Quiet Glide IDBC36RO Installation guide

Type
Installation guide
INSTRUCTION MANUAL
for Installing
INVISIDOOR HINGE KIT
ID.HINGEKIT
The Invisidoor Hinge Kit is designed and manufactured in the USA and offers:
Easy installation; comes complete with detailed Installation Instructions.
Universal design; can be used for inswing or outswing, left-hand or right-hand doors
Durable powder-coated ¼” thick steel hinge plates
Adjustable support foot
Quiet, smooth pivoting action
All fasteners included
(Bookcase not included)
Closed InswingOutswing
2
Instruction Manual for InvisiDoor Hinge Kit Installation
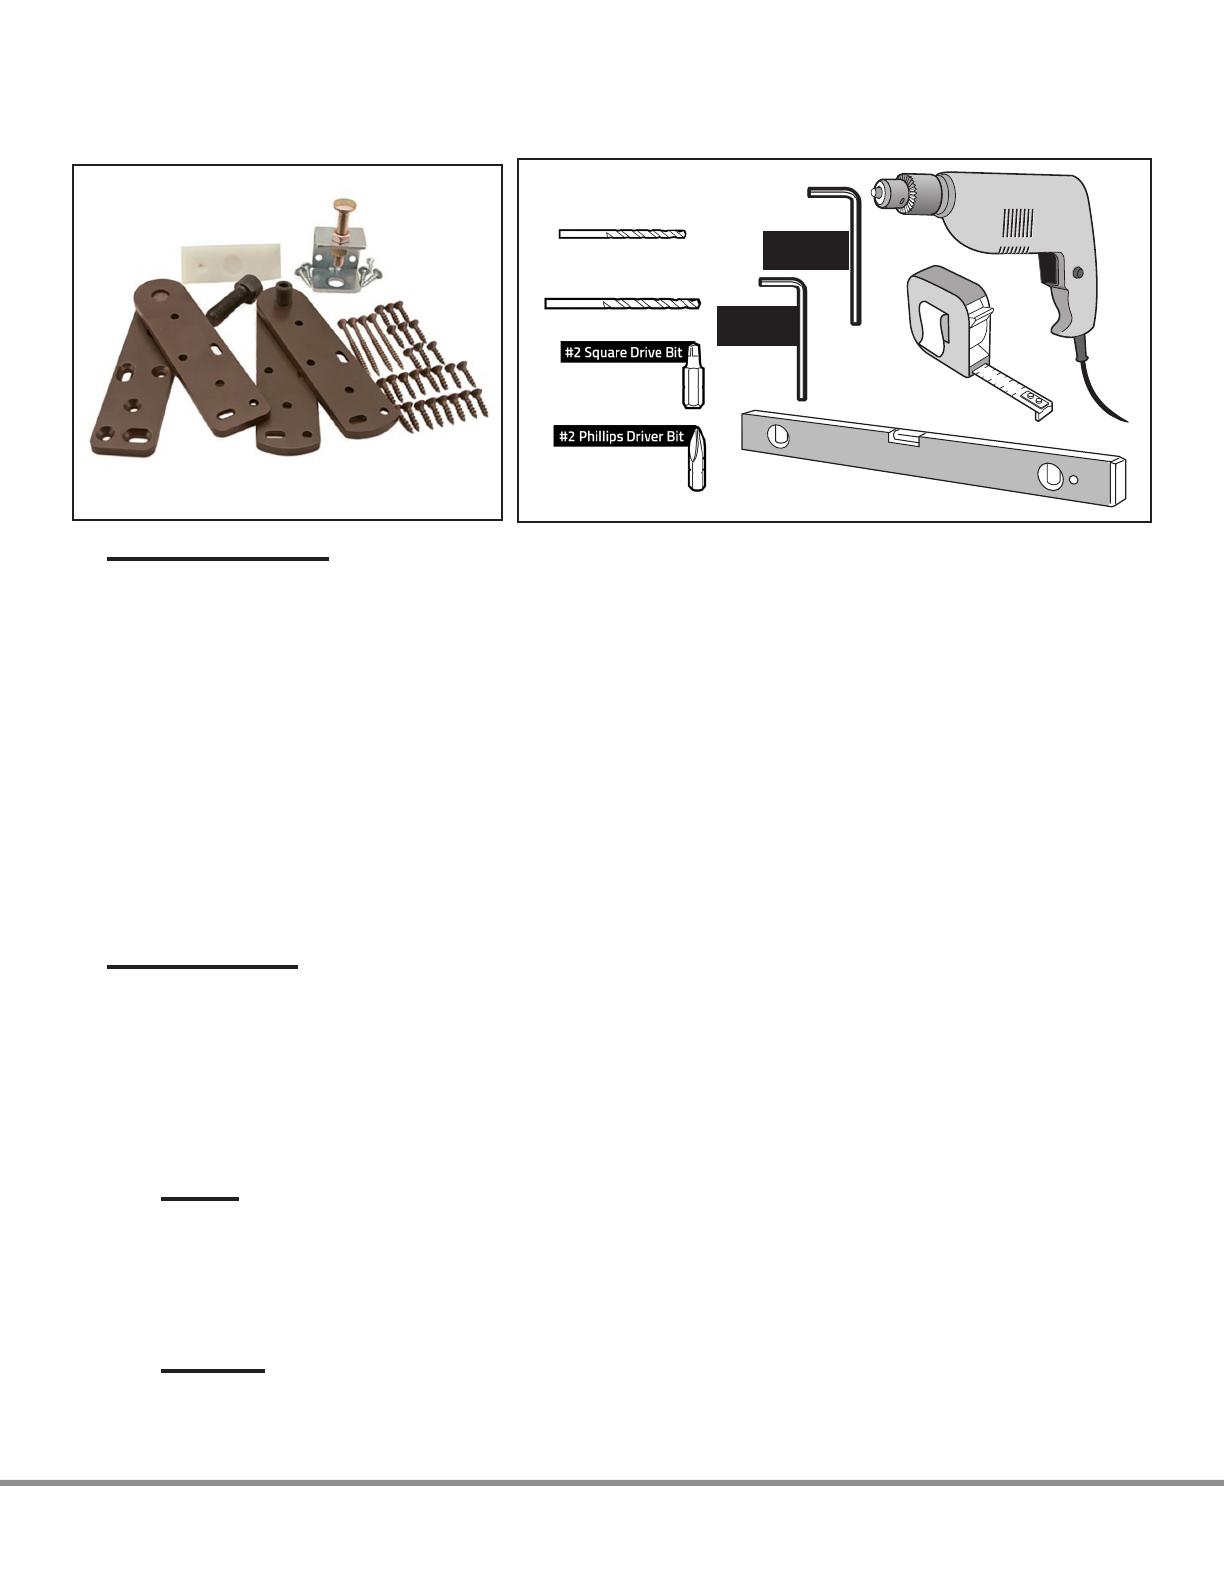
Installation Tools Needed:
3/8” Allen
(Outswing)
Wall Opening Preparation
1. Check the opening into which the Invisidoor will be installed to verify that it is plumb and level. Correct operation and
appearance of the Invisidoor requires that the opening be level and plumb or you need to make accommodations for it.
2. The Invisidoor pivot hinge is designed to be installed with the bottom hinge plate secured to stable, solid wood. Verify
that the floor of the opening has adequate support for weight of the unit and holding power for the screws.
3. It is recommended that you test mount the hardware and install the Invisidoor prior to applying stain and finish
coat. This will eliminate the chance of damaging the finished product during the process of mounting the hinges and
adjusting the unit.
Special note:
When the bookcase door is in the opened position there will be loss of space in the opening; 10” for the outswing
bookcase, 8” for the inswing.
Max wall thickness for inswing door is 6” (cannot use a 2x6 wall with drywall on both sides without modification). Can
add ¾” to the inside of the casing, this will push the InvisiDoor in ¾, then you can use the InvisiDoor in a 2x6 standard
wall construction.
Weight rating: Max 300lbs., including the weight of the bookcase (the CSH 36” wide InvisiDoor bookcase weighs approx.
70lbs).
Building the Bookcase
Dimensions given with these instructions are based on the size of the universal Invisidoor (for a standard 36” Wide x
80” High finished opening) to assist you in sizing your bookcase and finding the appropriate hinge locations.
Modifications to the width or depth of the bookcase will likely require you to change the spacing allowed for clearance
or the location of the hinge pivot point. In all cases, it is recommended that you create a template to mock-up the
dimensions of the opening and the bookcase to verify that you have the necessary clearance for your door to operate
properly.
Below are the design recommendations based on our universal bookcase (modify design as appropriate for custom
applications).
Materials:
¾” hardwood cabinet-grade plywood; sides, top and bottom, shelves
One (1) fixed shelf, three (3) adjustable shelves, 6 ” deep
Top, bottom, and fixed shelf are dadoed, glued, and brad nailed into sides for strength to prevent racking.
½” plywood glued and fastened to the back (sides, top, bottom and fixed shelf) for strength to prevent racking.
The face frame is ¾” thick x 2 ¼” wide with the edges rounded over with a ” radius router bit, and glued and nailed
to the bookcase carcass.
Construction:
Top of the bookcase is centered on the face frame ( ¾” difference between the top of the bookcase and the top of the
face frame. ½” plywood block and the ¼” hinge plate #2 makes the top of the hinge plate flush with the top of the
face frame).
(x4)
M8x90(x4)
(x2)
C
D
E
(x4)
F
G
(x2)
H
(x2)
(x2)
M5x26(x2)
ST4. 8X50(x8)
ST4. 2X32(x8)
Ø8X35(x8)
Ø8
Ø3
Ø10
Ø19
Ø10
ST6X25(x16)
(x4)
M5x6(x4)
(x2)
Ø12
(x2)
Ø10X48(x4)
I
(x4)
(x4)
M8x90(x4)
(x2)
C
D
E
(x4)
F
G
(x2)
H
(x2)
(x2)
M5x26(x2)
ST4. 8X50(x8)
ST4. 2X32(x8)
Ø8X35(x8)
Ø8
Ø3
Ø10
Ø19
Ø10
ST6X25(x16)
(x4)
M5x6(x4)
(x2)
Ø12
(x2)
Ø10X48(x4)
I
(x4)
3/32”
5/8”
OR
Hinge Kit Includes:
1/4” Allen
(Inswing)
3
Bottom shelf of the bookcase is
below the top edge of the bottom
face frame rail.
The pocket on the bottom of the Invisidoor is
approximately 1 ” deep.
(Bottom of the bookcase to the bottom edge of the face
frame.)
The thickness of Hinge Plate #3, plus the 3 washers,
plus Hinge Plate #1 = ⁄
That leaves ” space plus whatever desired
clearance gap between the bottom of the face frame
and the floor surface where the bottom hinge plate
is attached.
(The required gap height will depend on how level the
floor is within the swing of the bookcase.)
Example:
Using two ½” thick plywood blocks attached to the
bottom of the bookcase plus the two Hinge Plates
and three washers will total 1 ⁄, producing a gap of
approximately ⁄”.
Decrease or increase this gap by adjusting the thickness
of the blocks.
Sides and back run down past the bottom shelf, but not as far as the face frame (forms a pocket on
the bottom of bookcase. Sides and back extend ¾” below the bottom shelf. The face frame extends
approximately 1” below the bottom shelf)
Mounting blocks are screwed into this pocket. The thickness of the blocks may need to be adjusted based on
the clearance and spacing needed for door.
Top of Bookcase Top of Bookcase
¾” Overhang
Face Frame
Approx. ” Face Frame
centered on bookcase
½” Plywood
Back
¾” Plywood
Sides
¼” Rabbetted
Inside Bottom of Bookcase
⅛” Lip
1⅜” Face Frame Overhang
¾”
¾”
Bottom of Bookcase
4
Pivot Hinge Installation
Use the diagrams to identify locations
for the pivot hinge to be installed on the
left or right side of the unit as either an
outswing (which pulls out toward the
bookcase side) or an inswing (which
rotates away from the bookcase side). In
most cases, the bookcase face frame will
be flush with the drywall. The casing trim
will later be mounted over the drywall
and bookcase face frame, spanning
across the jamb.
Hinges to Door Opening Installation
1. To install hinge plate #3 to threshold/floor:
Place the two steel washers and the
bronze bearing onto the hinge pin as
shown.
Use the ” screws into the two slotted
holes at first to allow for adjustments.
When the door has been installed
and functioning properly, secure the
plate with the remaining screws to the
threshold/floor.
Hinge Plate #1
Hinge Plate #3
Hinge Plate #2
Hinge Plate #4
Inswing
Outswing
Bottom of the bookcase
Mounted to the upper door jam
Threaded hole, mounted to the top of the
bookcase
With attached pivot pin and washers,
mounted onto the threshold
Inswing
Outswing
5
2. To install hinge plate #4 to the upper jamb.
Shim the jamb as needed at location of pivot hinge for a solid mounting area between the upper
jamb and the door header. The longer 2 ¼” screws will be used to solidly secure this hinge plate
through the jamb and into the header once the bookcase is in its proper location.
Hinges to Bookcase Installation
1. Install mounting blocks to the hinged side of the bookcase unit (typically two ½” blocks measuring
6” x 8” on the bottom and a ½” block of same width and length on the top).
2. Use the mounting diagram to install hinge plate #1 to the bottom of the bookcase.
3. Mount hinge plate #2 to the top of the bookcase. Hinge plate #2 should be flush with the top edge of
the face frame.
Important Note: Prior to installing the upper hinge on an outswing door to the bookcase, an access hole
for the set screw must be drilled through the top of the bookcase. Use the diagrams for the location of this
hole. (Predrill a small hole from the top of the bookcase. Then drill a ” hole from the inside of the bookcase
through the top to avoid tear out inside the bookcase)
Inswing
Outswing
Bottom View Cross Section
Block
Block
Inswing
Outswing
Hinge Plate #1 on bottom of bookcase
Inswing Outswing
Drill ” through hole
Hinge Plate #2 on top of bookcase
6
Bookcase Installation
Lift the bookcase into the opening.
Inswing bookcase: mounts from the inside of the opening
Outswing bookcase: mounts from the outside of the opening
Set the hinge plate located on the bottom of the bookcase onto the pin of the hinge plate located on the
threshold/floor. Be sure the washers are in place.
Align the upper hinge plate located on the top of the bookcase (hinge plate #2) with the upper hinge
plate located on the header (hinge plate #4). Use Locktite on the set screw threads to prevent the screws
from twisting loose over time.
Inswing bookcase: screw the capscrew (with head) down through the hinge plate located on the header
and into the threaded hinge plate located on the top of the bookcase.
Outswing bookcase: Using a ” Allen drive, screw the set screw (no head) up through the access hole
that is located in the inside top of the bookcase, through the threaded hinge plate on the top of the
bookcase and into hinge plate located on the header.
Verify the fit of the casing trim against the installed Invisidoor. A slight gap between the face frame of
the bookcase and casing trim is necessary to allow clearance for the bookcase to swing.
Adjust hinges as needed by using slotted holes in hinge plates. Predrill holes for remaining screws for
each of the hinge plates. The provided 2¼” screws will be used to secure hinge plate #4 through the
upper jamb into the door header.
Casing Trim Installation
Inswing bookcase:
Trim on both sides and the top of the door are mounted to the
wall and serve as a stop for the door. Avoid using trim that has
a narrow inside edge as it will not hold up as a stop. A ¾” thick
molding is recommended.
It is also recommended that the trim overlay the face frame by
½”- ¾”.
A wide variety of trim styles will work for the inswing mounted
Invisidoor. Corner blocks, mitered corners, or built out crowns can
all be used without interfering with the function of the door.
OutswingInswing
Inswing
7
Outswing bookcase:
Trim on the hinge side of the bookcase and the top will be
attached to the wall, but the non-hinged side trim will be
attached to the bookcase to act as a stop.
It is recommended that the trim overlay the face frame by ¾” and
be mounted very securely to withstand the opening and closing
of the door.
The trim across the top of the door must be mounted to allow
clearance for the door to swing below it.
Allow clearance for the door-mounted trim to swing freely from
the upper piece of trim as well as clear the floor.
Support Foot Installation
Mount bracket to the side of
bookcase opposite from the
hinge side.
Bracket must be attached
near the face frame to allow
enough clearance to swing
past the jamb.
Align the tapered stop to the
location of the support bolt
when the door is in the closed
position, mark the location,
fasten it with the supplied
tape/and or screw.
Adjust the support bolt up or
down to desired tension.
Congrats on installing
your InvisiDoor!
Outswing
Outswing, support bolt bracket Outswing, tapered stop
Inswing, support bolt bracket Inswing, tapered stop
REV. 4.12.2021
  • Page 1 1
  • Page 2 2
  • Page 3 3
  • Page 4 4
  • Page 5 5
  • Page 6 6
  • Page 7 7
  • Page 8 8

Quiet Glide IDBC36RO Installation guide

Type
Installation guide

Ask a question and I''ll find the answer in the document

Finding information in a document is now easier with AI