Page is loading ...

Page 1
RTA INVISIDOOR
ASSEMBLY & INSTALLATION
INSTRUCTIONS
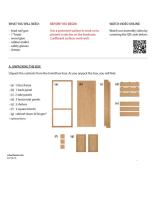
A. UNPACKING THE BOX
Unpack the contents from the InvisiDoor box. As you unpack the box, you will nd:
- (a) 1 face frame
- (b) 1 back panel
- (c) 2 side panels
- (d) 3 horizontal panels
- (e) 3 shelves
- (f) 3 square blocks
- (g) cabinet doors & hinges*
* optional items
(c)
(e)
(g)
Note: While the images in this manual shows a stained model, all RTA InvisiDoors come un nished.
(b)
(a)
(d)
(f)
WHAT YOU WILL NEED:
- brad nail gun
- 1” brads
- wood glue
- rubber mallet
- safety glasses
- clamps
BEFORE YOU BEGIN:
Use a protected surface to work on to
prevent scratches on the bookcase.
Cardboard surfaces work well.
WATCH VIDEO ONLINE:
Watch our assembly video by
scanning the QR code below:
cshardware.com
03/18/16

Page 2
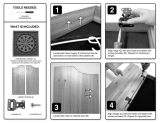
B. SLIDING IN THE SIDE PANELS
1. With the face frame lying face down on the at protected surface, run
a modest bead of glue in the two shoulders of the vertical groove.
2. Only the biscuit-style fasteners are pressed into the deepest recess, so
there is no need to put a full bead of glue in this recess.
3. Align the side panel onto the face frame. Make sure that the dadoed
grooves of the side panel line up properly with the dadoes of the face
frame.
4. Press the panel into the vertical slot. Use a rubber mallet to ensure a
tight t. Wipe o any excess glue with a damp rag.
5. Repeat steps 1 - 4 for the other side panel.
C. SLIDING IN THE HORIZONTAL PANELS
1. Apply glue to the horizontal groove on the face frame.
2. Apply glue to the grooves on both side panels.
3. Slide the horizontal panel into place. The dovetail shape of the end of each
panel needs to slide down into each side panel at the same time. Use a
mallet to ensure that the panel is seated completely into the groove.
4. Repeat steps 1 - 3 with each of the other panels. Wipe o any excess glue
with a damp rag.
(1)
(2)
Apply glue here
(3)
(4)
(5)
(1)
(3)
D. INSTALLING THE BACK PANEL
1. Working quickly before the glue dries, test t the back panel onto the
bookcase. Ensure that the board ts properly, including the grooves on the
back panel.
2. When satis ed, remove the back panel and apply glue into each of the
grooves that the back panel will t into.
(1)

Page 3
3. Put the back panel back in place, pressing down rmly.
4. Using a brad nailer, fasten the back panel to the rest of the InvisiDoor frame.
One-inch brads are recommended.
Be sure that the joints t tightly together and hold the nail gun at a slight angle
so the brad doesn’t come through the side panel.
5. Nail the back panel to the vertical side panels rst, spacing the fasteners 3”
to 4” apart.
6. Nail the back panel to the horizontal panels. Three scored lines are visible
across the back panel. This assists in nailing the back panel to the horizontal
panels. Apply pressure to the back panel to ensure a tight t.
While nailing into the horizontal panels, be sure that the nails are going straight into the wood without any angle.
F. INSTALLING SHELVES
1. Set the bookcase upright and insert the shelving pins as desired.
2. Set the shelves atop the shelving pins.
G. INSTALLING THE CABINET DOORS (OPTIONAL)
If you did not order cabinet doors, you may skip the rest of the instructions.
Optional cabinet doors can be easily installed onto your InvisiDoor. Door kits can be
ordered to t the upper or lower bookcase opening.
The cabinet doors give the bookcase a more complete built-in cabinet look, however,
it should be noted that installing cabinet doors on both the top and bottom will make
it less convenient to open and close the bookcase.
E. CLAMPING THE SIDE PANELS
It is suggested that you clamp each of the side panels to the face frame while
the glue dries to make sure that the face frames and all panels t tightly
together.
1. Clamp each side panel to the face frame. For best results, tighten the clamp
where the horizontal panels are positioned. Allow glue to dry completely per
manufacturer’s recommendations.
2. Wipe o any excess glue with a damp rag. Flip the bookcase over and allow
the glue to dry.

Page 4
For cabinet door installation, you will need the following tools: tape measure,
drill, drill bit, pencil, Phillips screwdriver, safety glasses and a speed
square (optional).
1. Insert the cup hinge into the large pre-drilled hole in the back of the
cabinet door.
2. Align the hinge to be square to the door. Drill two pilot holes by
inserting a self-centering drill bit into each screw hole.
3. Drive the provided hinge screws into each pilot hole, fastening the hinge
snugly to the cabinet door.
4. Repeat steps 1 - 3 for all the remaining hinges.
H. MOUNTING THE CABINET DOORS
1. Make a mark 2-1/2 inches from the corner of the face frame. Drill a pilot hole
at this mark, centered on the face frame.
2. Measure the distance between the center of the hinges on the cabinet door to
determine the distance to the next pilot hole on the face frame. Make a mark.
3. Drill a pilot hole at this mark, also centered.
4. Align the cabinet door with hinges over the pilot holes you just made.
5. Using a Phillips screwdriver, install the screws to attach the hinges to the face
frame.
6. When the door is installed, close it to check the alignment of the door. Use the
adjustment features of the hinge to adjust the door correctly.
7. Repeat steps 1 - 5 for the remaining cabinet doors.
Congratulations! Your RTA InvisiDoor assembly is now complete!
Read the next section to learn how to properly install your RTA InvisiDoor
(2)
(3)
(1)
(2)
(4)
(5)

Page 5
1”
6”
Watch our installation video
by scanning the QR code:
INVISIDOOR INSTALLATION INSTRUCTIONS
WHAT YOU WILL NEED:
- brad nail gun
- 1” brads
- drill
- drill bits
- tape measure
BEFORE YOU BEGIN:
This installation guide details the instructions of an inswing
door. Outswing diagrams will also be shown.
- speed square
- bubble level
- Phillips screwdriver
- 1/4” hex driver
- safety glasses
A. PRE-INSTALL PREPARATION
• Check the opening into which the InvisiDoor will be installed to verify that it is plumb and
level.
• Verify that your opening has the appropriate sized opening (height and width) that is
needed for the size of the InvisiDoor you will install.
• Determine which side your bookcase door will pivot from. This guide shows a right-
pivoting door.
• Remove any cabinet doors prior to installation.
B. INSTALLATION OF FRAME HINGE PLATES
This InvisiDoor kit comes with four hinge plates:
Hinge plate #2 - threaded hole
mounted on top of bookcase
Hinge plate #3 - with bearing
mounted on threshold
Hinge plate #1 - mounted
on bottom of bookcase
Hinge plate #4- non-thread-
ed hole mounted on upper
door jamb
1. Take hinge plate #3 and place the two steel washers and the
bronze bearing onto the hinge pin.
2. On the bottom threshold, make a mark 1” from the vertical
jamb to the center of the hinge. Make another mark 6” from
the front of the threshold which will mark the center of the
hinge pin.
3. Put the hinge plate into location and predrill pilot holes
for the slotted holes. Using the screws provided, fasten the
hinge plate to the bottom threshold.
4. Double check the measurements and adjust as needed. Drill
pilot holes and fasten screws into remaining holes.
(1)
(2)
(3)
(4)

Page 6
5. Take hinge plate #4 (non-threaded hole) and measure 6”
from the front of the top jamb header to the center of the
large pin hole. The center of the hinge plate also needs to be
1” from the vertical jamb. Make appropriate marks.
6. Pre-drill pilot holes through the slotted holes of the hinge
plate.
7. Drive 7/8” screws through the slotted holes, fastening
the hinge to the top jamb header. Double-check
measurements.
8. For the remaining round holes, use long, 2-1/4” screws to
further secure the hinge to the structural header.
Hinge plate #4- non-thread-
ed hole mounted on upper
door jamb
(5)
(8)
OUTSWING HINGE PLACEMENT
For the outswing InvisiDoor, the placement of the hinge plates on the jamb/threshold di er (as shown below).
BOTTOM THRESHOLD
UPPER JAMB HEADER
C. INSTALLING THE MOUNTING BLOCKS
The InvisiDoor is designed to have mounting blocks installed on the top and bottom of
the bookcase to build up the location of the hinges.
Usually, it is two 11/16” blocks on the bottom and one 1/2” block on the top of the
hinged side of the bookcase unit.
If needed, use blocks of a di erent thickness to create appropriate height and margin
for your application.
1. Use screws to fasten the necessary blocks to the bottom of the bookcase
(hinge side). Check the length of the screws to ensure that the screws will not
penetrate through the top/bottom of the bookcase.
2. Repeat this process for the top of the bookcase.
1”
6”

Page 7
D. INSTALLATION OF BOOKCASE HINGE PLATES
1. With the top of the bookcase still facing you, make a
mark 5-15/16” from the front edge of the bookcase face
frame. Place the center of hinge plate #2 at this mark.
2. While holding the hinge plate at the 5-15/16” line, align
Hinge plate #2 - threaded hole
mounted on top of bookcase
the center of the pin hole so that it sits 5/16” from the side of the bookcase.
3. Pre-drill pilot holes for the slotted holes.
4. Fasten the hinge plate to the top of the bookcase with two screws.
5. Double check the location of the pivot point to ensure proper
placement. Drive the rest of the screws securely into the hinge plate.
6. Take hinge plate #1 (non-threaded hole), and, using the same
measurements, fasten to the bottom of the bookcase.
Note: Both top and bottom hinges should point in the same direction.
(3)
(5)
TOP OF BOOKCASE BOTTOM OF BOOKCASE
OUTSWING HINGE PLACEMENT
For the outswing InvisiDoor, the placement of the hinge plates di er, as shown below:
TOP OF BOOKCASE BOTTOM OF BOOKCASE
5-15/16”
5/16”
1-11/16”
1-11/16”

Page 8
OUTSWING ACCESS HOLE CREATION
For the outswing InvisiDoor, an access hole needs to be made.
E. HANGING THE INVISIDOOR BOOKCASE
1. Stand the InvisiDoor bookcase upright and
bring it to the backside of the opening.
2. Carefully lift the bookcase into the opening
and set the bottom hinge of the door onto the
bottom hinge plate of the threshold.
3. Align the upper hinge plates and fasten them
together using the cap screw. Test the opening
and closing of the door.
(2)
(3)
(1)
1. With the top of the bookcase facing you, pre-drill a small pilot hole
through the center of the pivot hole.
2. Remove the top hinge plate.
3. From the inside of the bookcase, center a 5/8” drill bit on the pilot hole
and drill through.
4. Re-install the top hinge plate. Make sure the pivot hole aligns perfectly
with the new 5/8” hole you just made.
HANGING THE OUTSWING INVISIDOOR
Installation for the outswing InvisiDoor bookcase di ers slightly, as described below:
1. Stand the InvisiDoor bookcase upright and bring it to the front of the
opening.
2. Carefully lift the bookcase into the opening and set the bottom hinge of
the door onto the bottom hinge plate of the threshold.
3. Align the upper hinge plates and insert the set screw into the access hole.
4. Keep threading the set screw until it passes through the pivot holes of
both top hinges and presses tightly against the jamb above the opening.
Test the opening and closing of the door.

Page 9
F. INSTALLING THE TRIM
1. Take note of the mounting surface to make sure that the brad nails will go
into the wall or jamb rather than hitting the empty gap between the wall and
the InvisiDoor.
2. Install the top trim. It can overlay the face frame by any amount to give it the
nished look you desire.
3. Set the vertical frames to overlap the closed InvisiDoor by 3/4” inches. Nail
both frames to the wall.
G. INSTALLING THE SUPPORT FOOT
1. Fasten a nut about halfway down the carriage bolt. Thread the bolt into the bracket,
followed by a second nut, creating a door stop.
2. Hold the door in the closed position and hold the door stop in the desired location.
The head of the bolt will rest in the recessed area of the plastic wedge.
3. Mark the wedge’s location on the threshold so you can use the peel-and-stick
backing and the screw to install the wedge.
4. Close the bookcase door and mark the location of the bracket on the bookcase.
Fasten the support foot to the bookcase.
5. Test the closing mechanism by opening and closing the door. The tension of opening
and closing of the door can be adjusted with the height of the carriage bolt in the
bracket.
6. When satis ed, tighten both nuts against the bracket.
OUTSWING TRIM INSTALLATION
For the outswing InvisiDoor, the trim is implemented di erently:
1. Trim on the hinge side of the bookcase and the top will be attached to
the wall. Make sure that the top trim allows clearance for the door to
swing below it.
2. The non-hinged side trim will be attached to the bookcase to act as a
stop. It is recommended that the trim overlay the face frame by 3/4” and
be mounted securely to withstand the opening/closing of the InvisiDoor.

Page 10
H. ADDING SHELVES/CABINET DOORS
1. Insert the shelving pins into desired holes inside the bookcase.
2. Place each shelf onto the pins.
3. Fasten cabinet doors to the bookcase (optional).
Congratulations! Your RTA InvisiDoor installation is now complete!
* CSH stands behind the material and workmanship of the hinge kit,
but cannot be held liable for problems caused by poor construction
of the bookcase or faulty installation.
/