Page is loading ...

RETRACTABLE
Installing your new Coolaroo Exterior Blind is simple,
following our step-by-step instructions.
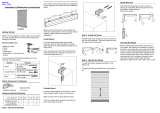
Parts list
Description Qty
a. Exterior blind 1
b. Le and right
headrail brackets 2
c. Base rail screws 2
d. Base rail arms 2
e. Screws 8
f. Anchors 8
You will also need:
• Power drill with 3mm bit
• Phillips head screwdriver
• Pencil or felt tip marker
• Pliers
EXTERIOR BLIND
ASSEMBLY GUIDE
The Exterior Blind can be installed:
• to the wall face
• to the side of a reveal or
• from the under side of the window eave
or structure.

STEP 1
Select the location for
your Exterior Blind by
holding the aluminium
headrail in place
where you would like it
installed. Fully unroll the
blind. Hold the headrail,
with the spring mechanism (at pin) on your le side,
ensure the fabric is going over the headrail and away
from you. The fabric should be positioned closest to
the window with the front of the fabric (smooth side)
facing you. Roll the headrail towards yourself until
the blind is wound up.
STEP 3
Facing the frame, the
bracket with the plastic
“bush” positioned in
the middle hole, must
be placed on your right
hand side. For Exterior
Blinds tted to the face
or side of the window,
the plastic “bush” should
be positioned in the top
hole. For installation
from the top (Internal)
the “bush” should be in
the centre space.
Bush
Right Bracket
Le Bracket
Face
Side
Top (Internal)
STEP 2
Examine the window
carefully and decide how
the mounting brackets
are to be installed.
STEP 4
Position the right hand side bracket where it is to be
tted, mark and drill. Install the bracket securely using
screws provided. You may need to drill a pilot hole.
PLEASE NOTE: Wall plugs (not supplied) may
be required for brick work. Use an appropriate
masonry drill bit.
Internal
(Bush – centre hole)
Face/side
(Bush – top hole)
STEP 5
Position the ROUND PIN end in the right hand tted
bracket and mark the position for the mounting of the LEFT
bracket. The at pin sits vertically in the le bracket. Mark,
drill and install ensuring the headrail is level horizontally.
Round pin
(positioned to RIGHT)
Flat pin
(positioned to LEFT)
Pin
IMPORTANT: DO NOT REMOVE THE PIN UNTIL BLIND IS ASSEMBLED
IN BRACKETS (STEP 7).
Your Exterior Blind comes pre-tensioned but can be re-tensioned if required (STEP 8).
*Please note for the longer blinds it is advisable to have two people to install.

STEP 9
Attach the base rail
arms to the base rail
using the large round
head screws. Apply light
tension to the Exterior
Blind and mark where
the base rail arms are to
be xed. Leave at least 1/2 turn of fabric around the
headrail, as this will make it easier to retract the blind
aer installation.
STEP 10
Drill into wall or frame
and x the base rail arm
into place using the
screws provided.
(Wall Plugs may be
needed)
STEP 7
Once the blind is
installed in the brackets,
remove the pin on the
spring mechanism on
the le side next to the
at pin. Your Exterior
Blind is ready to be used.
IF THE PIN IS REMOVED PRIOR TO INSTALLATION
OR THE BLIND NEEDS RE-TENSIONING FOLLOW
STEP 8.
STEP 8
TENSIONING THE RETRACTABLE BLIND
(IF REQUIRED)
Your Exterior Blind comes pre-tensioned. If your
shade does require re-tensioning please follow
the easy steps listed below.
STEP 6
Mount the Exterior Blind in the mounting brackets,
positioning the RIGHT end rst. The Flat Pin (Le)
must be installed vertically.
STEP 8-1
Begin with the blind
drawn halfway down.
Ensure the ratchet is
locked in place by rocking
the headrail back and
forth until the tension
is engaged. Take the
blind out of the brackets,
holding the headrail, with
the spring mechanism
(atpin) on your le side, ensure the fabric is going
over the headrail and away from you (so the fabric
is closest to the window). Roll the headrail towards
yourself until all the blind is woundup.
STEP 8-2
Place the wound up
blind in the pre-installed
brackets with the spring
mechanism (atpin) on
your le and the roller
pin on your right. Let
the blind unroll down by
itself. Ensure the ratchet
is locked by pulling down
on the base rail with a
short, sharp tug.
STEP 8-3
Take the blind out of
the brackets and repeat
steps 8-1 and 8-2 until
you have the desired
tension. To check the
tension pull down the
base rail with a short
sharp tug. Only pull the
blind down fully (to set
tension) a maximum of
3 times otherwise the spring may be damaged from
over tensioning. CAUTION DO NOT OVER-TENSION.
DAMAGE CAUSED TO THE HEADRAIL AS A RESULT
OF OVER-TENSIONING WILL NOT BE COVERED
UNDER THE WARRANTY.
STEP 8-4 (if required)
Reducing tension
Ensure ratchet is
locked in place before
removing the blind from
the bracket. To reduce
tension, ensure the
Exterior Blind is fully
up, remove it from the
brackets and partially
unroll it 2–3 times
turning the headrail by hand (top away from you).
Replace it in the mounting brackets and repeat
if required.

coolaroo.com
RETRACTING YOUR EXTERIOR BLIND
To retract the blind, remove the screws locating
the base rail to the brackets. In one smooth
movement, pull down the base rail a short
distance and then li upward, keeping the
Exterior Blind moving until it reaches the desired
height. Avoid letting the Exterior Blind spin
upwards without holding it (damage may occur to
the spring mechanism). This may happen if there
is too much spring tension. Too much tension
may cause the spring mechanism to rapidly grab
and lock. If this is a problem, try reducing the
tension slightly. Correct tension should have the
Exterior Blind retracting all the way to the top
and with enough tension le to snugly hold the
base rail against the top roll of fabric.
IMPORTANT:
For the Exterior Blind to operate correctly:
• Mounting brackets must be horizontally level.
• The at pin on the LEFT end of the headrail
must be installed vertically.
• The Exterior Blind should be installed so that
the fabric rolls down between the headrail
and the window.
• The Exterior Blind must be pulled from the
centre of the base rail – not from the side.
• Do not store shade wet. In areas of high
humidity, roll shade down frequently to air dry.
CARE INSTRUCTIONS:
Your Exterior Blind may be cleaned using a
solution of mild detergent and water. Apply the
solution with a sponge or a very so brush. Let
the solution stand on the fabric for 10 minutes
and then rinse thoroughly with water. Do not
put the fabric in your washing machine, clothes
drier, or scrub it with a sti brush, scouring pad
or abrasive cleaner.
Gale Pacic Limited 145 Woodlands Drive, Braeside, Victoria
3195 Australia
Gale Pacic Limited Suite A 45C Mt Wellington Highway,
Mt Wellington, Auckland 1060 New Zealand
For help with product assembly or for any other questions
you may have, contact our Customer Service Department.
Australia Toll Free: 1800 331 521
New Zealand Toll Free: 0800 555 171
United States Ph: +1 407 772 7900
Middle East Ph: +971 4 881 7114
China Ph: +86 574 5626 8888
® Coolaroo is a registered trademark of Gale Pacic Limited.
Made in China.
CAUTION: DO NOT OVER TENSION
YOUR EXTERIOR BLIND
Follow tensioning instructions carefully.
Contact Gale Pacic Limited prior to
installation if advice is required. When new,
the Exterior Blind may li unevenly, leaving
the base rail at an angle. This is due to the
hem on one side rolling up tighter than the
other side, and may occur if the base rail is
not lied from the centre. A slight increase in
spring tension may help overcome this, or try
pulling the shade down and liing the base
rail a little closer to the lowest side.
/