LIMITED LIFETIME WARRANTY
The enclosed product is warranted to the original residential retail purchaser as long as the
product remains in the original window.
I. Covered:
Lifetime: Entire product against manufacturing defects (i.e. a fl aw in the product
design, materials, or workmanship that causes the product to no longer function)
3 years: Cords including internal cords such as those found in cordless blinds.
5 years: All fabric
II. Not Covered:
Normal Wear and Tear
Any product that fails due to: • abuse • exposure to salt air • improper installation •
accident • extraordinary use • improper operation • alterations • improper cleaning •
misapplication • damage from pests/insects/pets • improper handling • misuse
III. Costs associated with: • product removal • transportation to and from the retailer •
brand label removal • product re-measure • incidental or consequential damages •
product re-installation • shipping
In the event there are multiple blinds/shades in the same room, only the defective
blind/shade will be replaced.
IV. To Report Shipping Damage: If damage occurred during shipping, call place of
purchase and report within 7 calendar days or else you may be denied credit for your
damaged product.
V. To Obtain Service: If you suspect this product has a manufacturing defect in
materials or workmanship: 1. Locate the sales receipt 2. Call place of purchase. Any
unauthorized returns will not be accepted.
VI. Warranty Remedy: THIS SHALL BE YOUR SOLE REMEDY UNDER THIS LIMITED
WARRANTY.
If this product is found to have a manufacturing defect in materials or workmanship,
we will (at our discretion) do one of the following:
• repair the product • replace the product • refund the cost of the product
Colors vary from lot to lot and may not exactly match sample swatch or previous
purchases.
Discontinued items or color selections will be replaced with the closest equivalent
current product.
VII. YOUR RIGHTS UNDER STATE LAW:
This lifetime limited warranty gives you specifi c legal rights, and you may have other
rights, which vary from state to state. Some states do not allow limitations on how
long a warranty lasts, so the above limitations may not apply to you. No agent,
representative, dealer, or unauthorized employee has the authority to increase or alter
the obligation of this warranty. This lifetime limited warranty supersedes any previous
versions.
PHASE II PRODUCTS, INC.
501 WEST BROADWAY, SUITE 1350
SAN DIEGO, CALIFORNIA 92101 • 1-800-264-1190
1” Cordless Lifestyle
Mini Blind
INSTALLATION INSTRUCTIONS
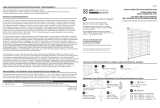
Step 1. Check Package Contents
Missing part? Call 800-264-1190
Mounting hardware kit includes the following:
Part Quantity
a Mounting Bracket 2 (blinds up to 40” wide)
3 (blinds 40⅛ ” to 54” wide)
4 (blinds 54⅛ ” to 72” wide)
b 1¼” Screws 4 (blinds up to 40” wide)
6 (blinds 40⅛ ” to 54” wide)
8 (blinds 54⅛ ” to 72” wide)
c Valance Clip 2 (blinds up to 30” wide)
3 (blinds 30⅛ ” to 60” wide)
4 (blinds 60⅛ ” to 72” wide)
d Hold-Down Bracket 2
e ⅝ ” Screws 4
Step 2. Tools Required
Screwdriver, tape measure, pencil, drill, drill
bits, step ladder.
Note: use #6 plastic anchors for dry wall or plaster mounting
(not included)
Step 3. Bracket Location and Installation
Your blind may be installed either inside the
window frame or outside the window frame.
A mounting bracket should be positioned
about 1” to 3” from each end of the head
rail. For wider shades that require 3 or more
brackets, these should be spaced evenly
between the two outermost brackets.
Always position the brackets such that there
is no interference with the mechanisms
inside the head rail. The front edge of each
bracket goes under the inner front edge of
the head rail - the fl exible tab at the bottom
of each bracket snaps onto the back of the
head rail.
The procedure outlined below will assure
proper bracket placement.
For Outside Mounting:
Clip the brackets onto the head rail as
described above. Hold the blind level at the
height desired and center it over the window
opening. Mark the exact location of each
bracket with a pencil. Remove the brackets
from the head rail and position the top of each
bracket at the marked location and screw
each bracket into the wall or window molding
using the 1¼” screws. Predrill the screw holes
using a 5/64” drill bit.
For Inside Mounting:
Clip the brackets onto the head rail as
described above. Hold the blind in place and
make a pencil mark at the rear of each bracket
where it contacts the inside of the window
frame. Remove the brackets from the head rail
and align them with the marks. Attach each
bracket using the 1¼” screws. Pre-drill the
screw holes using a 5/64” drill bit.
Step 4. Securing the Head Rail
Lift the head rail into position such that
the front edge of each bracket is under the
inner front edge of the head rail.
Push the head rail upward until the fl exible
tab at the bottom of each bracket snaps
onto the back of the head rail.
Check carefully to assure that each bracket
is properly secured.