
1. Make sure the motorcycle is completely cool before installation, and make sure it is secure on a stand or service
lift.
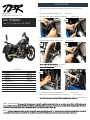
2. Remove black outer heat shield by removing the 4 screws. (Reference image 1)
3. Remove silver inner heat shield by removing the screws and band clamp. (Reference image 2)
4. Remove front and rear o2 sensors from the OEM header pipes. (Reference image 3)
5. Remove the band clamp from both the front and rear header. (Reference image 4)
6. (Reference image 5)
7. (Reference image 6)
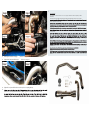
8. Loosely Install new headers to motorcycle with clamps left loose . (Reference image 7)
9. Install provided sensor kit to rear header and install front and rear o2 sensors. (Reference image 8)
10. (Reference image 9 &10)
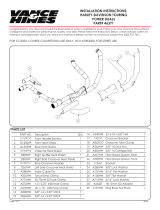
2022+ HD Nightster
Comp-S 2-1 System Part # 005-5440199
BILL OF MATERIALS
1 Front Header 005-54401-HF
1 Front Header - Part 2 005-54401-HF2
1 Rear Header 005-54401-HR
1 Hardware Kit 005-544-HK
1 61mm Barrel Clamp 005--27-61MSH
2 O2 Sensor Kit 005-92-22KIT
3 45mm Swivel Hook Springs 005-S45
1 Spring Puller 005-SP
1 TBR Sticker Kit 015-10212
IMPORTANT - PLEASE READ CAREFULLY:
WARRANTY:
INSTALLATION INSTRUCTIONS
WWW.TWOBROS.COM
3474 Niki Way, Riverside CA 92507 - (800) 211-2767

s
Care & Cleaning
Keep system free of dirt and moisture. Store in a cool, dry place. Make sure vehicle is completely cool before
maintenance.
Stainless Header System: Polished stainless steel pipes will turn a light golden hue after a few heat cycles, this is
cleaner or polish with a soft, clean cloth.
a soft, clean cloth.
it yourself.
it yourself.
canisters.
11. Install supplied swivel hook springs. (Reference image 11)
12. Tighten band clamps installed in step 8. (Reference image 12)
14. Tighten all loosely installed hardware now that you have everything lined up.
15.
and become somewhat permanent when the system gets hot. It is normal for some white smoke
-
 1
1
-
 2
2


Two Brothers Racing Harley Davidson Nightster Full System Operating instructions
- Type
- Operating instructions
Ask a question and I''ll find the answer in the document
Finding information in a document is now easier with AI
Related papers


Other documents
-
Ski-Doo MX Z TNT 600 HO E-TEC User manual
-
S&S Cycle T124 User manual
-
Chrysler Dodge Monaco 1966 User manual
-
BRP ski-doo MX Z 800 HO User manual
-
VANCE HINES 16332 User manual
-
-
Xerox workcentre 5335 series User manual
-
IBM 6400 Series Maintenance Manual
-
-
 VANCE HINES 46371 User manual
