Page is loading ...

www.mellanox.com
ConnectX®-3 Ethernet Single and Dual QSFP+
Port Adapter Card User Manual
P/N:
MCX313A-BCBT, MCX314A-BCBT
Rev 2.0

Mellanox Technologies
350 Oakmead Parkway Suite 100
Sunnyvale, CA 94085
U.S.A.
www.mellanox.com
Tel: (408) 970-3400
Fax: (408) 970-3403
Mellanox Technologies, Ltd.
Beit Mellanox
PO Box 586 Yokneam 20692
Israel
www.mellanox.com
Tel: +972 (0)74 723 7200
Fax: +972 (0)4 959 3245
© Copyright 2013. Mellanox Technologies. All Rights Reserved.
Mellanox®, Mellanox logo, BridgeX®, ConnectX®, CORE-Direct®, InfiniBridge®, InfiniHost®, InfiniScale®,
MLNX-OS®, PhyX®, SwitchX®, UFM®, Virtual Protocol Interconnect® and Voltaire® are registered trademarks of
Mellanox Technologies, Ltd.
Connect-IB™, FabricIT™, Mellanox Open Ethernet™, Mellanox Virtual Modular Switch™, MetroX™, MetroDX™,
ScalableHPC™, Unbreakable-Link™ are trademarks of Mellanox Technologies, Ltd.
All other trademarks are property of their respective owners.
NOTE:
THIS HARDWARE, SOFTWARE OR TEST SUITE PRODUCT (“PRODUCT(S)”) AND ITS RELATED
DOCUMENTATION ARE PROVIDED BY MELLANOX TECHNOLOGIES “AS-IS” WITH ALL FAULTS OF ANY
KIND AND SOLELY FOR THE PURPOSE OF AIDING THE CUSTOMER IN TESTING APPLICATIONS THAT USE
THE PRODUCTS IN DESIGNATED SOLUTIONS. THE CUSTOMER'S MANUFACTURING TEST ENVIRONMENT
HAS NOT MET THE STANDARDS SET BY MELLANOX TECHNOLOGIES TO FULLY QUALIFY THE
PRODUCTO(S) AND/OR THE SYSTEM USING IT. THEREFORE, MELLANOX TECHNOLOGIES CANNOT AND
DOES NOT GUARANTEE OR WARRANT THAT THE PRODUCTS WILL OPERATE WITH THE HIGHEST
QUALITY. ANY EXPRESS OR IMPLIED WARRANTIES, INCLUDING, BUT NOT LIMITED TO, THE IMPLIED
WARRANTIES OF MERCHANTABILITY, FITNESS FOR A PARTICULAR PURPOSE AND NONINFRINGEMENT
ARE DISCLAIMED. IN NO EVENT SHALL MELLANOX BE LIABLE TO CUSTOMER OR ANY THIRD PARTIES
FOR ANY DIRECT, INDIRECT, SPECIAL, EXEMPLARY, OR CONSEQUENTIAL DAMAGES OF ANY KIND
(INCLUDING, BUT NOT LIMITED TO, PAYMENT FOR PROCUREMENT OF SUBSTITUTE GOODS OR SERVICES;
LOSS OF USE, DATA, OR PROFITS; OR BUSINESS INTERRUPTION) HOWEVER CAUSED AND ON ANY
THEORY OF LIABILITY, WHETHER IN CONTRACT, STRICT LIABILITY, OR TORT (INCLUDING NEGLIGENCE
OR OTHERWISE) ARISING IN ANY WAY FROM THE USE OF THE PRODUCT(S) AND RELATED
DOCUMENTATION EVEN IF ADVISED OF THE POSSIBILITY OF SUCH DAMAGE.
Document Number: 3688
Rev 1.8
Mellanox Technologies
2

ConnectX®-3 Ethernet Single and Dual QSFP+ Port Adapter Card User Manual Rev 2.0
Mellanox Technologies
3
Table of Contents
Table of Contents . . . . . . . . . . . . . . . . . . . . . . . . . . . . . . . . . . . . . . . . . . . . . . . . . . . . . . . . . . 3
List of Tables . . . . . . . . . . . . . . . . . . . . . . . . . . . . . . . . . . . . . . . . . . . . . . . . . . . . . . . . . . . . . 5
List of Figures . . . . . . . . . . . . . . . . . . . . . . . . . . . . . . . . . . . . . . . . . . . . . . . . . . . . . . . . . . . . . 6
Revision History . . . . . . . . . . . . . . . . . . . . . . . . . . . . . . . . . . . . . . . . . . . . . . . . . . . . . . . . . . . 7
About this Manual . . . . . . . . . . . . . . . . . . . . . . . . . . . . . . . . . . . . . . . . . . . . . . . . . . . . . . . . . 8
Intended Audience . . . . . . . . . . . . . . . . . . . . . . . . . . . . . . . . . . . . . . . . . . . . . . . . . . . . . 8
Related Documentation. . . . . . . . . . . . . . . . . . . . . . . . . . . . . . . . . . . . . . . . . . . . . . . . . . 8
Document Conventions. . . .
. . . . . . . . . . . . . . . . . . . . . . . . . . . . . . . . . . . . . . . . . . . . . . 8
Technical Support. . . . . . . . . . . . . . . . . . . . . . . . . . . . . . . . . . . . . . . . . . . . . . . . . . . . . . 8
Firmware and Software Updates. . . . . . . . . . . . . . . . .
. . . . . . . . . . . . . . . . . . . . . . . . . . 9
Chapter 1 Introduction . . . . . . . . . . . . . . . . . . . . . . . . . . . . . . . . . . . . . . . . . . . . . . . . . . . 10
1.1 Product Overview . . . . . . . . . . . . . . . . . . . . . . . . . . . . . . . . . . . . . . . . . . . . . . . . .10
1.2 Features and Benefits . . . . . . . . . . . . . . . . . . . . . . . . . . . . . . . . . . . . . . . . . . . . . .11
1.3 Operating Systems/Distributions . . . . . . . . . . . . . . . . . . . . . . . . . . . . . . . . . . . . .11
1.4 Connectivity . . . . . . . . . . . . . . . . . . . . . . . . . . . . . . . . . . . . . . . . . . . . . . . . . . . . .12
Chapter 2 Interfaces . . . . . . . . . . . . . . . . . . . . . . . . . . . . . . . . . . . . . . . . . . . . . . . . . . . . . 13
2.1 Ethernet Interface . . . . . . . . . . . . . . . . . . . . . . . . . . . . . . . . . . . . . . . . . . . . . . . . .13
2.2 PCI Express Interface . . . . . . . . . . . . . . . . . . . . . . . . . . . . . . . . . . . . . . . . . . . . . .13
2.3 I2C-compatible Interface . . . . . . . . . . . . . . . . . . . . . . . . . . . . . . . . . . . . . . . . . . .14
2.4 LED Interface . . . . . . . . . . . . . . . . . . . . . . . . . . . . . . . . . . . . . . . . . . . . . . . . . . . .14
Chapter 3 Hardware Installation . . . . . . . . . . . . . . . . . . . . . . . . . . . . . . . . . . . . . . . . . . . 15
3.1 System Requirements . . . . . . . . . . . . . . . . . . . . . . . . . . . . . . . . . . . . . . . . . . . . . .15
3.1.1 Hardware. . . . . . . . . . . . . . . . . . . . . . . . . . . . . . . . . . . . . . . . . . . . . . . . . . . . . . . . 15
3.1.2 Operating Systems/Distributions . . . . . . . . . . . . .
. . . . . . . . . . . . . . . . . . . . . . . . 15
3.1.3 Software Stacks. . . . . . . . . . . . . . . . . . . . . . . . . . . . . . . . . . . . . . . . . . . . . . . . . . . 15
3.2 Safety Precautions . . . . . . . . . . . . . . . . . . . . . . . . . . . . . . . . . . . . . . . . . . . . . . . .15
3.3 Pre-installation Checklist . . . . . . . .
. . . . . . . . . . . . . . . . . . . . . . . . . . . . . . . . . . .15
3.4 Bracket Installation Instructions . . . . . . . . . . . . . . . . . . . . . . . . . . . . . . . . . . . . . .15
3.4.1 Removing the Existing Bracket . . . . . . . . . . . . . . . . . . . . . . . . . . . . . . . . . . . . . . 16
3.4.2 Installing the New Bracket . . . . . . . . . . . . . . . . . . . . . . . . . . . . . . . . . . . . . . . . . . 16
3.4.2.1 Gasket Installation. . . . . . . . . . . . . . . . . . . . . . . . . . . . . . . . . . . . . . . . . . . . . . . . . 16
3.4.2.2 Installing the Bracket. . . . . . . . . . . . . . . . . . . . . . . . . . . . . . . . . . . . . . . . . . . . . . . 17
3.5 Card Installation Instructions . . . . . . . . . . . . . . . . . . . . . . . . . . . . . . . . . . . . . . . .18
3.6 Cables and Modules . . . . . . . . . . . . . . . . . . . . . . . . . . . . . . . . . . . . . . . . . . . . . . .19
3.6.1 Cable Installation . . . . . . . . . . . . . . . . . . . . . . . . . . . . . . . . . . . . . . . . . . . . . . . . . 19
3.7 Identify the Card in Your System . . . . . . . . . . . . . . . . . . . . . . . . . . . . . . . . . . . . .20
3.7.1 On Windows . . . . . . . . . . . . . . . . . . . . . . . . . . . . . . . . . . . . . . . . . . . . . . . . . . . . . 20
3.7.2 On Linux . . . . . . . . . . . . . . . . . . . . . . . . . . . . . . . . . . . . . . . . . . . . . . . . . . . . . . . . 21
Chapter 4 Driver Installation . . . . . . . . . . . . . . . . . . . . . . . . . . . . . . . . . . . . . . . . . . . . . . 22
4.1 Linux Driver . . . . . . . . . . . . . . . . . . . . . . . . . . . . . . . . . . . . . . . . . . . . . . . . . . . . .22
4.1.1 Hardware and Software Requirements . . . . . . . . . . . . . . . . . . . . . . . . . . . . . . . . . 22

Rev 2.0
Mellanox Technologies
4
4.1.2 Installing the Driver . . . . . . . . . . . . . . . . . . . . . . . . . . . . . . . . . . . . . . . . . . . . . . . 22
4.1.3 Loading the Driver . . . . . . . . . . . . . . . . . . . . . . . . . . . . . . . . . . . . . . . . . . . . . . . . 23
4.1.4 Unloading the Driver. . . . . . . . . . . . . . . . . . . . . . . . . . . . . . . . . . . . . . . . . . . . . . . 23
4.1.5 Uninstalling the Driver . . .
. . . . . . . . . . . . . . . . . . . . . . . . . . . . . . . . . . . . . . . . . . 23
4.2 Windows Driver . . . . . . . . . . . . . . . . . . . . . . . . . . . . . . . . . . . . . . . . . . . . . . . . . .23
4.2.1 Hardware and Software Requirements . . . . . . . . . . . . . . . . . . . . . . . . . . . . . . . . . 24
4.2.2 Downloading MLNX_WinOF . . . . . . . . . . . . . . . . . . . . . . . . . . . . . . . . . . . . . . . 24
4.2.3 Extracting Files Without Running Installation . . . . .
. . . . . . . . . . . . . . . . . . . . . . 24
4.2.4 Installing MLNX_WinOF. . . . . . . . . . . . . . . . . . . . . . . . . . . . . . . . . . . . . . . . . . . 26
4.2.4.1 Attended Installation . . . . . . . . . . . . . . . . . . . . . . . . . . . . . . . . . . . . . . . . . . . . . . . 27
4.2.4.2 Unattended Installation . . . . . . . . . . . . . . . . . . . . . . . . . . . . . . . . . . . . . . . . . . . . . 32
4.2.5 Upgrading MLNX_WinOF. . . . . . . . . . . . . . . . . . . . . . . . . . . . . . . . . . . . . . . . . . 33
4.2.6 Installation Results . . . . . . . . . . . . . . . . . . . . . . . . . . . . . . . . . . . . . . . . . . . . . . . . 33
4.2.7 OpenSM Activation . . . . . . . . . . . . . . . . . . . . . . . . . . . . . . . . . . . . . . . . . . . . . . . 34
4.2.8 Uninstalling MLNX_WinOF . . . . . . . . . . . . . . . . . . . . . . . . . . . . . . . . . . . . . . . . 35
4.2.8.1 Attended Uninstall. . . . . . . . . . . . . . . . . . . . . . . . . . . . . . . . . . . . . . . . . . . . . . . . . 35
4.2.8.2 Unattended Uninstall. . . . . . . . . . . . . . . . . . . . . . . . . . . . . . . . . . . . . . . . . . . . . . . 35
4.2.9 Assigning Port IP After Installation . . . . . . . . . . . . . . . . . . . . . . . . . . . . . . . . . . . 35
4.2.10 Port Type Management on Windows . . . . . . . . . . . . . . . . . . . . . . . . . . . . . . . . . . 37
4.3 VMware Driver . . . . . . . . . . . . . . . . . . . . . . . . . . . . . . . . . . . . . . . . . . . . . . . . . . .39
4.3.1 Installing and Running the VBI Driver on ESXi-5.x . . . . . . . . . . . . . . . . . . . . . . 39
4.3.2 Installing and Running the offline_bundle Driver on ESXi-5.x . . . . . . . . . . . . . . 40
4.4 Removing the VIB/offline_bundle Driver . . . . . . . . . . . . . . . . . . . . . . . . . . . . . .40
4.5 FlexBoot . . . . . . . . . . . . . . . . . . . . . . . . . . . . . . . . . . . . . . . . . . . . . . . . . . . . . . . .40
Chapter 5 Updating Adapter Card Firmware . . . . . . . . . . . . . . . . . . . . . . . . . . . . . . . . 41
Chapter 6 Troubleshooting. . . . . . . . . . . . . . . . . . . . . . . . . . . . . . . . . . . . . . . . . . . . . . . . 43
6.1 General . . . . . . . . . . . . . . . . . . . . . . . . . . . . . . . . . . . . . . . . . . . . . . . . . . . . . . . . .43
6.2 Linux . . . . . . . . . . . . . . . . . . . . . . . . . . . . . . . . . . . . . . . . . . . . . . . . . . . . . . . . . . .44
6.3 Windows . . . . . . . . . . . . . . . . . . . . . . . . . . . . . . . . . . . . . . . . . . . . . . . . . . . . . . . .45
Chapter 7 Specifications . . . . . . . . . . . . . . . . . . . . . . . . . . . . . . . . . . . . . . . . . . . . . . . . . . 46
7.1 MCX313A-BCBT Specifications . . . . . . . . . . . . . . . . . . . . . . . . . . . . . . . . . . . . .46
7.2 MCX314A-BCBT Specifications . . . . . . . . . . . . . . . . . . . . . . . . . . . . . . . . . . . . .47
7.3 Adapter LED Operation . . . . . . . . . . . . . . . . . . . . . . . . . . . . . . . . . . . . . . . . . . . .48
7.4 Board Mechanical Drawing and Dimensions . . . . . . . . . . . . . . . . . . . . . . . . . . . .49
7.5 Bracket Mechanical Drawing . . . . . . . . . . . . . . . . . . . . . . . . . . . . . . . . . . . . . . . .51
7.6 Regulatory Statements . . . . . . . . . . . . . . . . . . . . . . . . . . . . . . . . . . . . . . . . . . . . .52
Appendix A Interface Connectors Pinout . . . . . . . . . . . . . . . . . . . . . . . . . . . . . . . . . . . . 53
A.1 QSFP+ Connector Pinout. . . . . . . . . . . . . . . . . . . . . . . . . . . . . . . . . . . . . . . . 53
A.2 PCI Express x8 Connector Pinout . . . . . . . . . . . . . . . . . . . . . . . . . . . . . . . . . 54
A.3 I2C-compatible Connector Pinout . . . . . . . . . . . . . . . . . . . . . . . . . . . . . . . . . 55
Appendix B Finding the MAC and Serial Number on the Adapter Card . . . . . . . . . . 57
Appendix C Safety Warnings . . . . . . . . . . . . . . . . . . . . . . . . . . . . . . . . . . . . . . . . . . . . . . 58
Appendix D Avertissements de sécurité d’installation (Warnings in French) . . . . . . 60
Appendix E Sicherheitshinweise (Warnings in German) . . . . . . . . . . . . . . . . . . . . . . . 62
Appendix F Advertencias de seguridad para la instalación (Warnings in Spanish) . 64

ConnectX®-3 Ethernet Single and Dual QSFP+ Port Adapter Card User Manual Rev 2.0
Mellanox Technologies
5
List of Tables
Table 1: Revision History Table . . . . . . . . . . . . . . . . . . . . . . . . . . . . . . . . . . . . . . . . . . . . . . . . . . . 7
Table 2: Documents List . . . . . . . . . . . . . . . . . . . . . . . . . . . . . . . . . . . . . . . . . . . . . . . . . . . . . . . . .
8
Table 3: Single and Dual-port 40 Gigabit Ethernet Adapter Cards
. . . . . . . . . . . . . . . . . . . . . . . . 10
Table 4: Features . . . . . . . . . . . . . . . . . . . . . . . . . . . . . . . . . . . . . . . . . . . . . . . . . . . . . . . . . . . . .
. 11
Table 5: Software and Hardware Requirements . . . . . . . . . . . . .
. . . . . . . . . . . . . . . . . . . . . . . . . 22
Table 6: Software and Hardware Requirements . . . . . . . . . . . . .
. . . . . . . . . . . . . . . . . . . . . . . . . 24
Table 7: MCX313A-BCBT Specifications Table . . . . . . . . . . . . . . . . . . . . . . . . . . . . . . . . . . . . . 46
Table 8: MCX314A-BCBT Specifications Table . . . . . . . . . . . . . . . . . . . . . . . . . . . . . . . . . . . . . 47
Table 9: Physical and Logical Link Indication . . . . . . . . . . . .
. . . . . . . . . . . . . . . . . . . . . . . . . . . 48

Rev 2.0
Mellanox Technologies
6
List of Figures
Figure 1: MCX314A-BCBT Card . . . . . . . . . . . . . . . . . . . . . . . . . . . . . . . . . . . . . . . . . . . . . . . . . .13
Figure 2: I2C-compatible Connector . . . . . . . . . . . . . . . . . . . . . . . . . . . . . . . . . . . . . . . . . . . . . . . .14
Figure 3: Bracket Screws . . . . . . . . . . . . . . . . . . . . . . . . . . . . . . . . . . . . . . . . . . . . . . . . . . . . . . . . .1
6
Figure 4: Gasket Location on Adapter Card . . . . . . . . . . . . . . . . . . . . . . . . . . . . . . . . . . . . . . . . . .17
Figure 5: Gasket Installation . . . . . . . . . . . . . . . . . . . . . . . . . . . . . . . . . . . . . . . . . . . . . . . . . . . . . .1
7
Figure 6: Placing the Bracket on the Card . . . . . . . . . . . . . . . . . . . . . . . . . . . . . . . . . . . . . . . . . . . .18
Figure 7: PCI Device . . . . . . . . . . . . . . . . . . . . . . . . . . . . . . . . . . . . . . . . . . . . . . . . . . . . . . . . . . . .
20
Figure 8: Support Download Assistant . . . . . . . . . . . . . . . . . . . . . . . . . . . . . . . . . . . . . . . . . . . . . .42
Figure 9: Mechanical Drawing of the Single-port MCX313A-BCBT Adapter Card
. . . . . . . . . . .49
Figure 10: Mechanical Drawing of the Dual-port MCX314A-BCBT Adapter Card
. . . . . . . . . . . .50
Figure 11: Dual-port Bracket . . . . . . . . . . . . . . . . . . . . . . . . . . . . . . . . . . . . . . . . . . . . . . . . . . . . . . .51
Figure 12: Single-port Bracket . . . . . . . . . . . . . . . . . . . . . . . . . . . . . . . . . . . . . . . . . . . . . . . . . . . . .51
Figure 13: Connector and Cage Views . . . . . . . . . . . . . . . . . . . . . . . . . . . . . . . . . . . . . . . . . . . . . . .53
Figure 14: PCIe Connector Pinout . . . . . . . . . . . . . . . . . . . . . . . . . . . . . . . . . . . . . . . . . . . . . . . . . . .55
Figure 15: Compatible Connector Plug and Pinout . . . . . . . . . . . .
. . . . . . . . . . . . . . . . . . . . . . . . . .55
Figure 16: Card Product Label (Example) . . . . . . . . . . . . . . . . . . . . . . . . . . . . . . . . . . . . . . . . . . . . .57

ConnectX®-3 Ethernet Single and Dual QSFP+ Port Adapter Card User Manual Rev 2.0
Mellanox Technologies
7
Revision History
This document was printed on June 27, 2013.
Table 1 - Revision History Table
Date Rev Comments/Changes
June 2013 2.0 Updated User Manual structure
February 2013 1.8
• Added Section 4.3, “VMware Driver,” on page 39
• Updated Figure 7, “PCI Device,” on page 20 and Figure 8,
“Device Manager,” on page 58
• Updated all Web links in the User Manua
- lFigure 10, “Mechanical Drawing of the Dual-
port MCX314A-BCBT Adapter Card,” on
page 50
November 2012 1.77
- Updated Web links in the following locations:
- Section 6.5.1, “Software Requirements,” on page 59
- Table 7, “MCX313A-BCBT Specifications Table,” on page 46
• Table 8, “MCX314A-BCBT Specification
s Table,” on page 47
October 2012 1.6
•Fixed Table 5, “Jumper Configuration,” on page 17
• Updated figures in Section 4.2, “Windows Driver,” on page 23
by providing ConnectX-3 examples
August 2012 1.5
• Added operational and non-operational temperature and humid-
ity level to the following tables:
- Table 7, “MCX313A-BCBT Specifications T
able,” on page 46
- Table 8, “MCX314A-BCBT Specifications Table,” on page 47
May 2012 1.4
• Removed “Blinking indicates a problem with the physical link”
from Table 9, “Physical and Logical Link Indication,” on
page 48
April 2012 1.3
• Updated power numbers in Table 7, “MCX313A-BCBT Specifi-
cations Table,” on page 46 and Table 8, “MCX314A-BCBT
Specifications Table,” on page 47
January 2012 1.2
• Minor edits
• Updated LED functions in Section 2.3, “I2C-compatible Inter-
face,” on page 14
• Formatted specification tables in Appendix 7, “Specifications,”
on page 46
October 2011 1.1 Added new OPNs based on ConnectX-3 Step A1 devices
July 2011 1.0 Minor edits
July 2011 0.10 First Release

Rev 2.0
Mellanox Technologies
8
About this Manual
This User Manual describes Mellanox Technologies ConnectX®-3 40 Gigabit Ethernet Single
and Dual QSFP+ port PCI Express x8 adapter cards. It provides details as to the interfaces of the
board, specifications, required software and firmware for operating the board, and relevant docu-
mentation.
Intended Audience
This manual is intended for the installer and user of these cards.
The manual assumes basic familiarity with Ethernet networks and architecture specifications.
Related Documentation
Table 2 - Documents List
Document Conventions
When discussing memory sizes, MB and MBytes are used in this document to mean size in mega
Bytes. The use of Mb or Mbits (small b) indicates size in mega bits. In this document PCIe is
used to mean PCI Express.
Technical Support
Customers who purchased Mellanox products directly from Mellanox are invited to contact us
through the following methods.
Mellanox Firmware Tools (MFT) User
Manual
Document no. 2204UG
User Manual describing the set of MFT firmware management
tools for a single node.
See http://www.mellanox.com
=> Products => Software => Firm-
ware Tools
MLNX_EN for Linux README Driver Kit
for Mellanox Adapter Cards with 1040GigE
Support
Document no. 2950
This document provides information on the MLNX_EN Linux
driver and instructions for installing the driver on Mellanox Con-
nectX adapter cards supporting 10/40Gb/s Ethernet.
WinOF VPI for Windows
User Manual
Document no. 3280
User Manual describing WinOF features, performance, InfiniBand
diagnostic, tools content and configuration. See http://www.mella-
nox.com => Products => Software => Windows SW/Drivers =>
Mellanox OFED for Windows (WinOF)
Mellanox MLX4_EN Driver for VMware
README
Document no. 3527
User Manual describing MLX4_EN driver for WMware features,
performance, diagnostic, tools content and configuration. See
http://www.mellanox.com
=> Products => Software => Ethernet
Drivers => VMware Drivers
IEEE Std 802.3 Specification This is the IEEE Ethernet specification
http://standards.ieee.org/getieee802
PCI Express 3.0 Specifications Industry Standard PCI Express 3.0 Base and Card Electromechan-
ical Specifications

ConnectX®-3 Ethernet Single and Dual QSFP+ Port Adapter Card User Manual Rev 2.0
Mellanox Technologies
9
•URL: http://www.mellanox.com => Support
• E-mail: [email protected]om
• Tel: +1.408.916.0055
Customers who purchased Mellanox M-1 Global Support Services, please see your contract for
details regarding Technical Support.
Customers who purchased Mellanox products through a Mellanox approved reseller should first
seek assistance through their reseller.
Firmware and Software Updates
The Mellanox support downloader contains software, firmware and knowledge database infor-
mation for Mellanox products. Access the database from the Mellanox Support web page,
http://www.mellanox.com
=> Support
or use the following link to go directly to the Mellanox Support Download Assistant page,
http://www.mellanox.com/supportdownloader/.

IntroductionRev 2.0
Mellanox Technologies
10
1 Introduction
This is the User Guide for Mellanox Technologies Ethernet adapter cards based on the Con-
nectX®-3 EN integrated circuit device. These adapters connectivity provide the highest perform-
ing and most flexible interconnect solution for PCI Express Gen3 servers used in Enterprise Data
Centers, High-Performance Computing, and Embedded environments
This chapter covers the following topics:
• Section 1.1, “Product Overview,” on page 10
• Section 1.2, “Features and Benefits,” on page 11
• Section 1.3, “Operating Systems/Distributions,” on page 11
• Section 1.4, “Connectivity,” on page 12
1.1 Product Overview
The following tables provide the ordering part number, port speed, number of ports, and PCI
Express speed. Each adapter comes with two bracket heights - short and tall.
Table 3 - Single and Dual-port 40 Gigabit Ethernet Adapter Cards
Ordering Part Number (OPN)
MCX31[4/3]A-BCBT
Data Transmission Rate
40GigE
Number of ports
MCX314A-BCBT: dual-port QSFP+
MCX313A-BCBT: single-port QSFP+
PCI Express SERDES Speed
PCIe 3.0 x8 8GT/s
RoHS
R6
Adapter IC Part Number
MT27518A1-FCCR-BE
Device ID (decimal)
4099 for Physical Function
4100 for Virtual Function

ConnectX®-3 Ethernet Single and Dual QSFP+ Port Adapter Card User Manual Rev 2.0
Mellanox Technologies
11
1.2 Features and Benefits
1.3 Operating Systems/Distributions
• Citrix XenServer 6.1
Table 4 - Features
PCI Express (PCIe)
Uses PCIe Gen 3.0 (1.1 and 2.0 compatible) through an x8 edge connector up to
8GT/s
10/40/56 Gigabit Ethernet
Mellanox adapters comply with the following IEEE 802.3* standards:
IEEE Std 802.3-2008 Ethernet
IEEE Std 802.3ae 10 Gigabit Ethernet
IEEE Std 802.3ba 40 Gigabit Ethernet
IEEE Std 802.3ad Link Aggregation and Failover
Memory
PCI Express - stores and accesses InfiniBand and/or Ethernet fabric connection
information and packet data
SPI - includes one 16MB SPI Flash device (M25PX16-VMN6P device by ST
Microelectronics)
EEPROM - accessible through the I
2
C-compatible interface. The EEPROM
capacity is 4Kb.
RDMA over Converged
Ethernet (RoCE)
Leveraging Data Center Bridging capabilities, RoCE provides efficient low
latency RDMA services over Layer 2 Ethernet.
CPU offload
Adapter functionality enabling reduced CPU overhead allowing more available
CPU
GPUDirect RDMA
Using GPUDirect RDMA, adapters can directly read and write CUDA host and
device memory, eliminating unnecessary system memory copies and CPU over-
head, resulting in significant performance improvements.
Sockets Acceleration
Applications utilizing TCP/UDP/IP transport can achieve industry leading
throughput over InfiniBand or 10 or 40GbE. The hardware-based stateless offload
engines in ConnectX-3 reduce the CPU overhead of IP packet transport. Sockets
acceleration software further increases performance for latency sensitive applica-
tions.
Quality of Service (QoS)
Support for port-based Quality of Service enabling various application require-
ments for latency and SLA
Hardware-based I/O
virtualization
ConnectX-3 provides dedicated adapter resourcesand guaranteed isolation and
protection for virtual machines within the server.
SR-IOV
ConnectX-3 Pro SR-IOV technology provides dedicated adapter resources and
guaranteed isolation and protection for virtual machines (VM) within the server.
I/O virtualization with ConnectX-3 Pro gives data center managers better server
utilization while reducing cost, power, and cable complexity.
Storage Acceleration
A consolidated compute and storage network achieves significant cost-perfor-
mance advantages over multi-fabric networks. Standard block and
file access protocols can leverage InfiniBand RDMA for high-performance stor-
age access.

IntroductionRev 2.0
Mellanox Technologies
12
• Novell SLES, Red Hat Enterprise Linux(RHEL), and other Linux distributions
• Microsoft Windows Server 2008/2012
• OpenFabrics Enterprise Distribution (OFED)
• OpenFabrics Windows Distribution (WinOF)
• Ubuntu 12.04
• VMware ESXi 4.x and 5.x
1.4 Connectivity
• Interoperable with InfiniBand or 10/40 Gb Ethernet switches. Interoperable with 56GbE
Mellanox Switches.
• Passive copper cable with ESD protection
• Powered connectors for optical and active cable support
• QSFP to SFP+ connectivity through QSA module

ConnectX®-3 Ethernet Single and Dual QSFP+ Port Adapter Card User Manual Rev 2.0
Mellanox Technologies
13
2 Interfaces
Each adapter card includes the following interfaces:
• “Ethernet Interface”
• “PCI Express Interface”
• “I2C-compatible Interface”
• “LED Interface”
Figure 1: MCX314A-BCBT Card
The adapter cards include special circuits to protect from ESD shocks to the card/server when
plugging copper cables.
2.1 Ethernet Interface
The network ports of the ConnectX®-3 adapter cards are compliant with the IEEE 802.3 Ether-
net standards listed in Table 4, “Features,” on page 11. Ethernet traffic is transmitted through the
cards' QSFP+ connectors.
2.2 PCI Express Interface
The ConnectX®-3 adapter cards support PCI Express 3.0 (1.1 and 2.0 compatible) through an x8
edge connector. The device can be either a master initiating the PCI Express bus operations or a
slave responding to PCI bus operations. The following lists the PCIe interface features:
• PCIe Base 3.0 compliant, 1.1 and 2.0 compatible
• 2.5, 5.0, or 8.0GT/s link rate x8
• Auto-negotiates to x8, x4, x2, or x1

InterfacesRev 2.0
Mellanox Technologies
14
• Support for MSI/MSI-X mechanisms
2.3 I
2
C-compatible Interface
A three-pin header on the adapter cards is provided as the I
2
C-compatible interface. See
Figure 10, “Mechanical Drawing of the Dual-port MCX314A-BCBT Adapter Card,” on page 50
for the location on the board.
Figure 2: I
2
C-compatible Connector
2.4 LED Interface
There are two I/O LEDs per port. For LED specifications please refer to Section 7.3, “Adapter
LED Operation,” on page 48

ConnectX®-3 Ethernet Single and Dual QSFP+ Port Adapter Card User Manual Rev 2.0
Mellanox Technologies
15
3 Hardware Installation
3.1 System Requirements
3.1.1 Hardware
A system with a PCI Express x8 slot is required for installing the card.
3.1.2 Operating Systems/Distributions
Please refer to Section 1.3, “Operating Systems/Distributions,” on page 11.
3.1.3 Software Stacks
Mellanox OpenFabric software package - MLNX_EN for Linux, WinOF for Windows and ESX
5.1 for VMware. See Chapter 4, “Driver Installation”.
3.2 Safety Precautions
1. Remove any metallic objects from your hands and wrists.
2. Make sure to use only insulated tools.
3. Verify that the system is p
owered off and is unplugged.
4. It is strongly recommended to use an
ESD strap or other antistatic devices.
3.3 Pre-installation Checklist
1. Verify that your system meets the hardware and software requirements stated above.
2. Shut down your system if active.
3. After shutting down the system, turn of
f power and unplug the cord.
4. Remove the card from its package. Please note that the ca
rd must be placed on an antistatic
surface.
5. Check the card for visible signs of damage. Do
not attempt to install the card if damaged.
3.4 Bracket Installation Instructions
The card is usually shipped with a tall bracket installed. If this form factor is suitable for your
requirements, you can skip the remainder of this section and move to Section 3.5, “Card Installa-
tion Instructions,” on page 18. If you need to replace it with the short bracket that is included in
the shipping box, please follow the instructions in this section.
To replace the bracket you will need the following parts:
• The new bracket of the proper height
• One new gasket
The adapter is being installed in a system that operates with voltages that can be lethal.
Before opening the case of the system, observe the following precautions to avoid
injury and prevent damage to system components.

Hardware InstallationRev 2.0
Mellanox Technologies
16
• The 2 screws saved from the removal of the bracket
• The 2 fiber washers saved from the removal of the bracket
3.4.1 Removing the Existing Bracket
Figure 3: Bracket Screws
1. Remove the two screws holding the bracket in place. The bracket comes loose from the card.
2. Save the two screws and the two fiber washers.
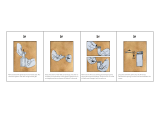
3.4.2 Installing the New Bracket
3.4.2.1 Gasket Installation
Note: The following instructions relate to t
he installation of the gasket for adapter cards that are
not shipped with a gasket already installed. Mellanox Technologies now provides all ConnectX-
3 adapter cards with the gasket already installed unto the bracket.
1. Remove the paper to expose the adhesive on the gasket.
2. Place the gasket onto the new bracket. Make sure to corre
ctly align the gasket with the hole in
the bracket.
3. If the old gaskets are still on the card, remove them before installing the
new bracket.
Be careful not to put stress on the LEDs.
Screws

ConnectX®-3 Ethernet Single and Dual QSFP+ Port Adapter Card User Manual Rev 2.0
Mellanox Technologies
17
Figure 4: Gasket Location on Adapter Card
Figure 5: Gasket Installation
3.4.2.2 Installing the Bracket
1. Place the bracket onto the card until the
screw holes line up. See Figure 6.
2. Screw on the bracket using the screws and washers saved from the bracket removal proce-
dure above.
Do not force the bracket onto the card. You may have to gently push the LEDs using a
small screwdriver to align the LEDs with the holes in the bracket.
Gasket

Hardware InstallationRev 2.0
Mellanox Technologies
18
Figure 6: Placing the Bracket on the Card
3. Make sure that the LEDs are aligned onto the bracket holes.
4. Use a torque driver to apply up to 2 lbs-in torque on the screws.
3.5 Card Installation Instructions
1. Before installing the card, make sure that the system is off and the power cord is not con-
nected to the server. Please follow prop
er electrical grounding procedures.
2. Open the system case.
3. Place the adapter in an available PCI Express slot.
4. Applying even pressure at both corners of the card, insert the adapter card into the slot until it
is firmly seated. When the adapter is properly seated, the adapter port connectors are aligned
with the slot opening, and the adapter faceplate is visible against the system chassis.
A lesser width adapter can be seated into a greater width slot (x4 in a x8), but a greater
width adapter cannot be seated into a lesser width slot (x8 in a x4). Align the adapter
connector edge with the PCI Express connector slot.

ConnectX®-3 Ethernet Single and Dual QSFP+ Port Adapter Card User Manual Rev 2.0
Mellanox Technologies
19
5. Secure the adapter with the adapter clip or screw.
6. Close the system case.
3.6 Cables and Modules
To obtain the list of supported cables for your adapter, please refer to “Mellanox Products
Approved Cable Lists” at:
www.mellanox.com/related-docs/user_manuals/Mellanox_approved_cables.pdf.
3.6.1 Cable Installation
1. All cables can be inserted or removed with the unit powered on.
2. To insert a cable, press the connector into the
port receptacle until the connector is firmly
seated.
3. After inserting a cable into a port, the Green L
ED indicator will light when the physical con-
nection is established (that is, when t
he unit is powered on and a cable is plugged into the port
with the other end of the connector plugged into a functioning port). See Section 7.3,
“Adapter LED Operation,” on page 48.
4. After plugging in a cable, lock the connector using the latching mechanism part
icular to the
cable vendor. When a logical connection is made the Yellow LED will light. When data is
being transferred the yellow led will blink. See Section 7.3, “Adapter LED Operation,” on
page 48.
5. Care should be taken as not to impede th
e air exhaust flow through the ventilation holes. Use
cable lengths which allow for routing horizontally around to the side of the chassis before
bending upward or downward in the rack.
6. To remove a cable, disengage the locks and sl
owly pull the connector away from the port
receptacle. Both LED indicators will turn off when the cable is unseated.
a.
Do not use excessive force when seating the card, as this may damage the system or
the adapter.
When installing cables make sure that the latches engage.
Always install and remove cables by pushing or pulling the cable and connector in a
straight line with the card.

Hardware InstallationRev 2.0
Mellanox Technologies
20
3.7 Identify the Card in Your System
3.7.1 On Windows
1. Open Device Manager on the server. Click start => Run, and then enter “devmgmt.msc”.
2. Expand System Devices and locate yo
ur Mellanox ConnectX-3 adapter card.
3. Right click the mouse on your adapter's row and se
lect properties to display the adapter card
properties window.
4. Click the Details tab and select Device
Instance Id (Windows 2003) or
5. Hardware Ids (Windows 2008/R2) from the Properties
pull-down menu.
Figure 7: PCI Device
6. In the Value display box, check the fields VEN and DEV (fields are separated by ‘&’). In the
display example above, notice the sub-string “PCI\VEN_15B3&DEV_1003”: VEN is equal
to 0x15B3 – this is the Vendor ID of Mellanox Technologies; and DEV is equal to 1003 – this
is a valid Mellanox Technologies PCI Device ID.
If the PCI device does not have a Mellanox adapter ID, return to Step 2 to check
another device.
The list of Mellanox Technologies PCI Device IDs can be found in the PCI ID reposi-
tory at http://pci-ids.ucw.cz/read/PC/15b3.
/