Page is loading ...

1
FrameSaver
®
DSL 9783 Router
Installation Instructions
Document Number 9783-A2-GN11-10
April 2001
Contents
FrameSaver DSL 9783 Router Overview ...................................................... 1
Upgrading a Basic Unit to SLV ...................................................................... 3
Product Documentation Online ..................................................................... 3
Package Checklist ......................................................................................... 3
Wiring and Cables You May Need ................................................................ 4
Prior to Installing the Router ......................................................................... 5
Installing the Router ...................................................................................... 6
Status LEDs .................................................................................................. 10
Troubleshooting ............................................................................................. 11
Configuration Setup ...................................................................................... 12
Verifying that Self-Test Passed ..................................................................... 15
Using the Easy Install Feature ...................................................................... 15
Completing Setup From the NOC ................................................................. 16
Setting Up for In-Band Management ............................................................ 17
Provisioning the Router Interface .................................................................. 20
Cables and Connectors ................................................................................ 21
DSL Router Technical Specifications ............................................................ 24
Important Safety Instructions ........................................................................ 25
Government Requirements ........................................................................... 27
Warranty, Sales, Service, and Training Information ...................................... 28
FrameSaver DSL 9783 Router Overview
The FrameSaver
®
DSL (Digital Subscriber Line) 9783 Router is a component in the
FrameSaver system. This system allows you to perform end-to-end service level
management (SLM) across a hybrid FrameSaver DSL/ATM/Frame Relay network.
Service providers can isolate and correct problems remotely from their NOC (Network
Operations Center).

2
The router has an SDSL front end and is a manageable frame relay aware endpoint. It
operates as a bridge or an IP router that connects a DSL link to an Ethernet network.
The FrameSaver DSL 9783 Router is used for data only and provides corporate LAN
access over traditional twisted-pair copper telephone wiring. Copper pairs run from the
central office (CO) to the customer premises (CP) to create the local loop. The local loop
terminates on the customer premises at the demarcation point in a punchdown block or
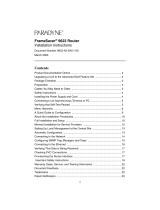
network interface device (NID). A typical example of using the FrameSaver DSL 9783
Router in a network configuration is shown below.
The FrameSaver DSL 9783 Router is available in two feature sets:
Basic Feature Set 1 provides basic frame relay and diagnostic capability.
Advanced SLV (Service Level Verification) Feature Set 2 provides basic features,
plus SLV management and reporting capability.
DSL
Access
Network
00-16915a
A
L
A
R
M
S
M
a
j
o
r
M
i
n
o
r
F
a
n
B
A
P
O
W
E
R
S
E
R
I
A
L
S
M
C
M
C
L
O
C
K
A
A
L
A
R
M
2
4
6
8
1
0
1
2
1
4
1
6
1
8
1
3
5
7
9
1
1
1
3
1
5
1
7
L
A
N
/
W
A
N
S
L
O
T
B
C
L
O
C
K
B
A
S
E
R
I
A
L
M
C
C
A
C
A
L
A
R
M
48V RTN
48V NEG
P
O
W
E
R
E
N
T
R
Y
M
O
D
U
L
E
L
E
F
T
U
N
I
T
:
L
I
N
E
A
R
I
G
H
T
U
N
I
T
:
L
I
N
E
B
W
A
R
N
I
N
G
!
P
O
W
E
R
M
U
S
T
B
E
D
I
S
C
O
N
N
E
C
T
E
D
A
T
T
H
E
S
O
U
R
C
E
B
E
F
O
R
E
R
E
M
O
V
I
N
G
O
R
I
N
S
T
A
L
L
I
N
G
T
H
I
S
P
W
R
E
N
T
R
Y
M
O
D
U
L
E
48V RTN
48V NEG
P
O
W
E
R
E
N
T
R
Y
M
O
D
U
L
E
L
E
F
T
U
N
I
T
:
L
I
N
E
A
R
I
G
H
T
U
N
I
T
:
L
I
N
E
B
W
A
R
N
I
N
G
!
P
O
W
E
R
M
U
S
T
B
E
D
I
S
C
O
N
N
E
C
T
E
D
A
T
T
H
E
S
O
U
R
C
E
B
E
F
O
R
E
R
E
M
O
V
I
N
G
O
R
I
N
S
T
A
L
L
I
N
G
T
H
I
S
P
W
R
E
N
T
R
Y
M
O
D
U
L
E
ATM
Switches
Hotwire
GranDSLAMs
A
L
A
R
M
S
M
a
j
o
r
M
i
n
o
r
F
a
n
B
A
P
O
W
E
R
S
E
R
I
A
L
S
M
C
M
C
L
O
C
K
A
A
L
A
R
M
2
4
6
8
1
0
1
2
1
4
1
6
1
8
1
3
5
7
9
1
1
1
3
1
5
1
7
L
A
N
/
W
A
N
S
L
O
T
B
C
L
O
C
K
B
A
S
E
R
I
A
L
M
C
C
A
C
A
L
A
R
M
48V RTN
48V NEG
P
O
W
E
R
E
N
T
R
Y
M
O
D
U
L
E
L
E
F
T
U
N
I
T
:
L
I
N
E
A
R
I
G
H
T
U
N
I
T
:
L
I
N
E
B
W
A
R
N
I
N
G
!
P
O
W
E
R
M
U
S
T
B
E
D
I
S
C
O
N
N
E
C
T
E
D
A
T
T
H
E
S
O
U
R
C
E
B
E
F
O
R
E
R
E
M
O
V
I
N
G
O
R
I
N
S
T
A
L
L
I
N
G
T
H
I
S
P
W
R
E
N
T
R
Y
M
O
D
U
L
E
48V RTN
48V NEG
P
O
W
E
R
E
N
T
R
Y
M
O
D
U
L
E
L
E
F
T
U
N
I
T
:
L
I
N
E
A
R
I
G
H
T
U
N
I
T
:
L
I
N
E
B
W
A
R
N
I
N
G
!
P
O
W
E
R
M
U
S
T
B
E
D
I
S
C
O
N
N
E
C
T
E
D
A
T
T
H
E
S
O
U
R
C
E
B
E
F
O
R
E
R
E
M
O
V
I
N
G
O
R
I
N
S
T
A
L
L
I
N
G
T
H
I
S
P
W
R
E
N
T
R
Y
M
O
D
U
L
E
TDM
Access
Network
LAN
FR Network
FR/ATM
IWF
ATM
Switches
FR
Switches
Frame Relay NSP's Network
ATM
NNI(s)
Aggregation
Switch
(Optional)
Copper
Loop
DSL
FrameSaver
DSL 9783
Bridge/Router
Endpoint
Customer
Premises–
Remote Site
Router
FrameSaver
Endpoint
Customer Premises–
HQ Site
Central Office
ATM
Services
LAN
ATM – Asynchronous Transfer Mode
DSL – Digital Subscriber Line
FR – Frame Relay
HQ – Headquarters
IWF – Interworking Function
LAN –Local Area Network
NSP – Network Service Provider
TDM – Time Division Multiplexer

3
Refer to
About FrameSaver DSL Devices
in the User’s Guide for a list of FrameSaver
DSL 9783 features, and the capabilities provided by each feature set.
Upgrading a Basic Unit to SLV
A basic FrameSaver DSL 9783 Router can be upgraded to full SLV capability at any time
by ordering a FrameSaver SLV Activation Certificate. A certificate can be ordered for a
single 9783 router, or for many 9783 routers. The OpenLane
®
SLM system, Release 5.3
or later, is required to schedule the activation of SLV features, and to manage the
certificate activations included in the certificate.
To upgrade a basic 9783 router to full SLV capability, order the FrameSaver SLV
Activation Certificate (Feature No. 9783-C1-220), providing the model to be activated
(i.e., 9783-Rtr), your OpenLane SLM system license key number, the number of 9783
router activations to be included on the certificate.
To learn more about activating SLV capability, refer to the
FrameSaver SLV Activation
Instructions
(Document No. 9000-A2-GK43), or contact your sales representative.
Product Documentation Online
Complete documentation for this product is available at
www.paradyne.com
.
Select
Library
→
Technical Manuals
→
FrameSaver Frame Relay Devices.
Select the following document:
9783-A2-GB20
FrameSaver DSL 9783
User’s Guide
To order a paper copy of a Paradyne document:
Within the U.S.A., call 1-800-PARADYNE (1-800-727-2396)
Outside the U.S.A., call 1-727-530-8623
Package Checklist
In addition to these instructions, verify that your package contains the following:
❑
FrameSaver DSL 9783 Router
❑
Power cord with power transformer
❑
Tie wrap for power cord strain relief
❑
DSL network access cable with 8-pin connectors – U.S. models only
❑
Ferrite choke – International models only
❑
FrameSaver DSL 9783 Router Quick Reference
(Document No. 9783-A2-GL11)
Be sure to register your warranty at
www.paradyne.com/warranty
.

4
Wiring and Cables You May Need
The following wiring and cables are used with this product, which uses standard
interface connectors:
❑
Standard connectors: An 8-pin modular (similar to RJ48C) or 6-pin modular
(similar to RJ11) wall jack for the DSL network connection.
❑
DSL wiring: Unshielded twisted-pair wiring (CAT3, or better). The CAT3 wiring must
meet EIA/TIA-568 specifications with 24 AWG (.5 mm) or 26 AWG (.4 mm).
❑
Ethernet wiring: Shielded twisted-pair wiring (CAT5, or better). The CAT5
wiring must meet EIA/TIA-568 specifications with 24 AWG (.5 mm) or
26 AWG (.4 mm).
For standard cables, refer to
Cables and Connectors
on page 21 for pin numbers.
For Paradyne cables, contact your sales representative to order them.
Interface
Connection Cables
Feature
Number
COM
port to a PC
or asynchronous
terminal
DB25-to-DB25:
Standard EIA-232 straight-through cable —
DB25-to-DB9:
DB25-to-8-pin modular adapter
8-pin modular-to-DB9 cable
(14 feet – 4.3 m)
3100-F1-920
3100-F2-550
ETHERNET
port
to a NIC on a PC
or an Ethernet hub
For connection to a PC NIC:
Standard Ethernet crossover cable —
For connection to an Ethernet Hub:
Standard Ethernet straight-through cable —
NET
work to the
DSL wall jack
Standard straight-through DSL network cable
with 8-pin modular connectors – similar to an
RJ48C-toRJ48C cable (20 feet – 6.1 m).
Cable supplied for use in the U.S.
3100-F1-500
Standard DSL network cable with
6-pin connectors – similar to an RJ11 cable
—

5
Prior to Installing the Router
These Installation Instructions assume that the virtual circuits at the DSLAM have
already been configured. Provisioning of these circuits can be simplified by using the
OpenLane SLM (Service Level Management) system, as indicated in
Provisioning Data
Circuits in OpenLane
.
Provisioning Data Circuits in OpenLane
Use the OpenLane SLM system’s Provision Circuit screen to add new circuits that start
at the FrameSaver DSL endpoint and traverse the SCM and ATM line card in the Hotwire
GranDSLAM, and the default VC sets (from 1 to 4). A group of 250 VCs can be allocated
to each line card, which can be assigned to any port on the card. These custom
connections carry the frame relay traffic.
Note that before the custom cross-connects are configured, the Maximum VCI
number for the uplink VP to be used by these custom connections must be
specified on the Max VCI per VPI screen, and the
apply changes
executed.
For ATM line cards, custom connections can be used to expand the number of VCs
connected to the card. Each of the 250 VCs can be cross-connected from any VC
on the uplink to any port on the line card.
The following information is collected by the Provision Circuit process:
Uplink VPI/VCI
Slot number and Port number of the DSL connection
Traffic Profile
DSL link VPI/VCI
Frame relay DLCI (provided by NSP)
Frame relay CIR, B
e
, B
c
(provided by NSP)
A Circuit ID is then applied to the newly defined circuit, and stored in both the router and
the OpenLane SLM system.

6
Installing the Router
Place the FrameSaver DSL 9783 Router on a flat surface, with clearance for the rear
connectors.
Procedure
1.
Use the supplied 8-pin DSL network cable (for use in the U.S.), or a 6-pin DSL
network cable (using connectors similar to RJ11), as applicable, for the DSL
connection. Insert one end of the cable into the jack labeled NET on the router.
Insert the other end into the wall jack for DSL data communications.
For domestic models, go to Step 3 on page 7.
2.
For certain international models, a ferrite
choke has been provided. Place the ferrite
choke on the network cable, as close as
possible to the rear panel.
Close the two halves around the cable
and snap the latch shut.
DSL
Network
00-16878
ETHERNET
COM
POWER
NET
NET
DSL 9783 Router
DSL
Network
01-16944
N
E
T
NET
Ferrite
Choke

7
3.
Use an 8-pin Ethernet cable for the Ethernet connection. Insert one end of the cable
into the jack labeled ETHERNET.
— Use a straight-through cable to connect the other end of the cable to an
Ethernet hub. Do not connect to the hub’s optional Uplink connection with a
straight-through cable; the Uplink connection requires an Ethernet crossover
cable.
– or –
— Use an Ethernet crossover cable to connect to a PC with an Ethernet Network
Interface Card (NIC) installed or a hub’s Uplink connection.
00-16879
ETHERNET
COM
POW
ER
NET
Ethernet
Straight-Through
Cable
ETHERNET
DSL 9783 Router
Hub

8
4.
Use a VT100-compatible asynchronous terminal or PC to set up management
access to the unit. Insert the DB25 end of the EIA-232 cable into the router’s COM
port. Tighten the screws on each side of the connector. Insert the other end into the
terminal or PC.
The terminal or PC’s configuration must be compatible with the router’s. Refer to the
procedure on page 13 of
Configuration Setup
. If connecting an external modem to
the COM port, refer to
Connecting an External Modem
on page 23.
COM
Port
00-16876
ETHERNET
COM
POW
ER
NET
VT100
Terminal
DSL 9783 Router

9
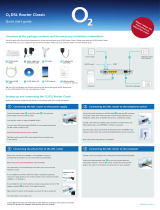
5.
Insert the supplied power cord’s round end into the jack labeled POWER. Plug the
transformer into an AC outlet.
Install the supplied tie wrap for strain relief, as shown.
Installation of the hardware is now complete. When the power cord is installed, the
router goes through a power-on self-test.
Power-On
When power is applied, the router performs self-diagnostics and the PWR LED is on.
The self-diagnostics include a power-on self-test where all of the LEDs are on.
Refer to
Status LEDs
on page 10 for information about the LEDs. Refer to
Troubleshooting
on page 11 for LED indications requiring action.
OK
OK
ALM
TEST
AT M
DSL
NetworkSystem
Port
9783-C
SLV
FrameSaver
®
DSL
SDSL
R
01-16877-01
ETHERNET
COM
POW
ER
NET
Grounded
Power
Outlet
Tie
Wrap
Power
Jack
OK
OK
ALM
TEST
AT M
DSL
NetworkSystem
Port
9783
ROUTER
FrameSaver
TM
SLV
FrameSaver
®
DSL
SDSL
R
01-16857-01
OK
OK
ALM
TEST
AT M
DSL
NetworkSystem
Port
9783
ROUTER
SLV
FrameSaver
®
DSL
SDSL
R
System OK – green
Alarm – red
Test – yellow
ATM – green/yellow
DSL – green
Ethernet Port – green

10
Status LEDs
After a successful self-test, the LEDs should appear as indicated in
BOLD
in the
Condition column below.
LED Condition Status
System LEDs
OK
ON
The router has power.
ALM ON
OFF
An alarm condition exists.
No alarms have been detected by the router.
TEST ON
OFF
The router is performing the power-on self-test, or a test
initiated by the service provider is currently active.
No tests are active.
Network LEDs
ATM
ON – Green
ON – Yellow
ATM mode is active and cell delineation is in sync.
ATM mode is active and there is loss of cell delineation.
DSL Blinking
ON
OFF
The router is in start-up or is retraining. The LED blinks on
and off about five times per second.
The DSL link is ready to transmit and receive data.
No DSL link has been established, or the link is down.
Port LED
OK
ON
OFF
The Ethernet port is transmitting and receiving data.
Self-diagnostics have not been completed successfully.

11
Troubleshooting
LED Symptom Action
All LEDs are on. If the LEDs remain on for more than ten minutes, the router is
not functional. Unplug the router and reapply power. If the
ALM LED is still on, contact the service provider.
ALM LED only
remains on.
The power-on self-test may have failed. Unplug the router
and reapply power. If the alarm LED is still on, contact the
service provider.
ALM and TEST LEDs
are blinking.
Firmware download may be in progress. If firmware
download is not in progress or the LEDs continue blinking for
more than ten minutes, contact the service provider.
Do not
unplug the unit, unless instructed to do so by the service
provider.
ATM Yellow LED
remains on.
There is loss of cell delineation (OCD) due to line
impairments. Contact the service provider.
DSL LED is off. Verify that the DSL cable is securely installed on both ends.
Unplug the unit and reapply power. If the problem continues,
contact the service provider.
DSL LED continues
blinking after the
power-on self-test
has completed.
The router is attempting to establish the DSL link, or adjusting
the DSL line rate due to line conditions. If the blinking
continues for more than ten minutes, contact the service
provider.
DSL LED is on, but
no data is being
transmitted.
The DSL link has been established, but there is no data
transmission. Verify the Ethernet connection. If the problem
persists, contact the service provider.
DSL and Port LEDs
are on, but no data is
being transmitted.
DSL and Ethernet links have been established, but there is
no data transmission. If the problem continues, contact the
service provider.
Port LED is off. Verify that the Ethernet cable is securely installed at both
ends, and at least one PC is connected and powered on.
Verify that the correct Ethernet straight-through or crossover
cable is installed. Refer to Step 3 on page 7.
System OK LED is off. Check that the power cord is securely installed on both ends.
If no LEDs are on, the power supply may be defective. Test
the outlet to verify power. If the outlet has power and the
problem persists, contact your service representative.
If other LEDs are on, the OK LED may be burned out. Unplug
the unit and reapply power, and watch all LEDs as the router
performs its power-on self-test. If the OK LED is functioning,
call your service representative.
TEST LED is on. A test initiated by the service provider may be active. Wait ten
minutes. If the LED does not go off, contact the service
provider.

12
Configuration Setup
Once the router is installed, it can be accessed locally through the menu-driven user
interface via an asynchronous terminal or PC connection, or remotely via a Telnet
session, and the router’s interfaces can be provisioned. The following provisioning can
be set up:
Frame relay, ATM, and physical layer provisioning
– Typically set up by the
CLEC (Competitive Local Exchange Carrier) using the menu-driven user interface
via an ASCII terminal or PC running a terminal emulation program, or a Telnet
session.
Router provisioning, using the CLI
– Typically accessed by the frame relay
service provider providing managed router service, or by the end user.
SLM provisioning
– Typically set up by the frame relay service provider or
the CLEC.
As soon as the router’s COM port is connected to a terminal or PC, the menu-driven
user interface can be accessed. The terminal or PC’s configuration must be compatible
with the router’s COM port settings.

13
Procedure
To access the menu-driven user interface:
1.
Verify the terminal or PC’s configuration:
— Data Rate is set to 19.2 kbps.
— Character Length is set to 8 data bits.
— Parity is set to None.
— Stop Bits is set to 1.
— Flow Control is set to None.
2.
Press Enter to display the Main Menu.
If the Main Menu does not appear, recheck the terminal or PC’s settings, or press
Enter again. Refer to
Troubleshooting
in the User’s Guide for other explanations.
main 9783-RtrSLV
Device Name: Node A 2/26/2001 00:02
MAIN MENU
Status
Test
Configuration
Control
Easy Install
-----------------------------------------------------------------------------
Ctrl-a to access these functions, Shift-r to access the Router's CLI. E
xit

14
Menu Navigation
The router should operate using the default (factory-set) configuration options. Refer to
the following table for help in navigating the menus.
As an example, follow these steps to go to the Configuration Edit/Display menu so you
can start setting up the unit.
Procedure
To load a configuration for editing:
1.
From the Main Menu, press the Tab key twice, or press the down (↓) arrow twice, so
the cursor is on Configuration.
2.
Press Enter to select Configuration. The Load Configuration From menu appears.
3.
Press Enter to select Current Configuration (the cursor is already on this selection).
The Configuration Edit/Display menu appears.
This sequence of steps would be shown as the menu selection sequence:
Main Menu
→
Configuration
Procedure
To save configuration changes:
1.
Press Ctrl-a to switch to the function keys area at the bottom of the screen.
2.
Type
s
(S
ave) and press Enter. The Save Configuration To menu appears.
3.
Press Enter again to save your changes to the Current Configuration (the cursor is
already on this selection).
To continue configuring the router, press Esc until the Configuration Edit/Display menu
reappears. To return to the Main Menu, press Ctrl-a, type
m
(M
ainMenu), and press
Enter.
Press the . . . To . . .
Esc key Go back one screen or menu level. For a visual display of
the menu hierarchy, see the Quick Reference.
Tab key, and
Up (↑), Down (↓),
Left (←), Right (→)
Arrow keys
Move the cursor from one menu item to the next.
Enter or Return key Complete the menu or option selection.
Spacebar Display the next available setting when changing a
configuration option. All the available settings for an option
appear at the bottom of the screen.

15
Verifying that Self-Test Passed
To verify that the unit passed its self-test, go to the System and Test Status screen.
Main Menu
→
Status
→
System and Test Status
The results of the self-test appear directly under the screen title.
If any failure messages appear, reset the unit by disconnecting, then reconnecting the
power cord. The unit will perform the self-test again. If the failure reappears, call your
service representative for assistance.
Using the Easy Install Feature
An Easy Install screen is provided for custom configurations, but you are not required to
use it for normal installation. You can configure the router by making selections from the
Configuration Edit/Display menu.
Procedure
1.
Select the Easy Install feature.
Main Menu
→
Easy Install
Easy Install Screen Example
main/easy_install 9783-RtrSLV
Device Name: Node A 2/26/2001 00:01
EASY INSTALL
DSLAM Type: Paradyne
Node IP Address: 000.000.000.000 Clear
Node Subnet Mask: 000.000.000.000 Clear
TS Access: VPI,VCI 0,35
Create a Dedicated Network Management Link
Ethernet Management Options Screen
Network 1 DSL Line Rate (Kbps) AutoRate
Network 1 FRF.8 Encapsulation Mod Transparent
-----------------------------------------------------------------------------
Ctrl-a to access these functions, ESC for previous menu MainMenu Exit
Save

16
2.
If the router will not be connected to a Paradyne DSLAM, change the DSLAM Type.
Other selections are Alcatel (NewBridge), PairGain, and Nokia.
3.
Enter the Node IP Address and Subnet Mask.
4.
Specify TS Access if a Troubleshooting (TS) DLCI or Virtual Circuit (VC) is being
set up for remote access by the service provider. The default is 0,35.
5.
Select Create a Dedicated Network Management Link to set up for permanent
remote access by the NOC. Enter a DLCI, VPI, and VCI at the resulting prompts.
6.
Select the Ethernet Management Options Screen to go directly to the Ethernet
Management Options screen. The interface (Status) is already enabled.
— Enter the IP Address (e.g., 10.101.51.253) and Subnet Mask
(e.g., 255.255.255.0) for the Ethernet interface.
— Enter the Default Gateway Address (the IP Address that will be used for
packets without a specified route).
— Press the Esc key to return to the Easy Install screen.
7.
Change Network 1 DSL Line Rate (Kbps), if desired. The default is AutoRate.
If a Paradyne DSLAM is used, the default setting is AutoRate. For non-Paradyne
DSLAMs, the AutoRate setting is not valid and the default rate is 784 kbps.
8.
Change Network 1 FRF.8 Encapsulation Mode, if desired. The default is
Transparent (data is forwarded without translation), which supports both frame relay
and ATM PVCs, and FrameSaver proprietary multiplexing.
9.
S
ave the configuration and return to the Configuration Edit/Display menu.
Completing Setup From the NOC
Procedure
1.
Access the router on the TS Management Link that was set up at the remote site in
Step 5 of
Using the Easy Install Feature
.
2.
Ping the router five times within five seconds. The router automatically provisions
the TS Access VC and accepts the destination IP address of the Ping as its
temporary IP address, which is used on the management VC interface.
3.
If necessary, open a Telnet session and configure any specific configuration options
that require input or changes from default settings. Create all customer VCs,
including internal DLCIs and VPI/VCIs on the DSL interface, and cross-connect the
DLCIs to the VCCs.

17
Configuring SNMP Trap Managers and Traps
Procedure
To enter SNMP managers and configure traps:
1.
Select SNMP Traps.
Main Menu
→
Configuration
→
Management and Communication
→
SNMP Traps
2.
Configure the following:
— Enable SNMP Traps.
— Identify the total Number of Trap Managers.
— Specify the IP address for each NMS Trap Manager to which traps will be sent.
— Specify the Initial Route Destination for each Trap Manager. The default is
AutoRoute.
— Select or disable trap categories, as needed.
3.
S
ave the configuration.
Setting Up for In-Band Management
If FRF.8 Encapsulation Mode is set to Translational, remote management of the router
can still be accomplished in-band, as indicated in the following procedure.
The following procedure assumes that the router’s Ethernet interface has already been
assigned an IP address that is in the same subnet as the management IP address
entered in Step 6 on page 16 of
Using the Easy Install Feature
, and that the router is not
configured for bridging only.
Refer to
Configuring the FrameSaver DSL Router
;
CLI Commands, Codes, and
Designations
, and
Command Line Summaries and Shortcuts
in the User’s Guide for
additional information.

18
Procedure
1.
Create a DLCI on the router virtual port.
Configuration
→
Virtual Router Ports
→
DLCI Records
Assign the DLCI number that will be used for management on Serial port 0
(Rtr-S0 – e.g., DLCI 900).
2.
Create a management PVC using the DLCI just configured on Serial port 0
to connect the management link to the router.
Configuration
→
Management and Communication
→
Management PVCs
Using the DLCI 900 example, make the following connection:
— Select Name: Mgmt900
— Intf IP Address: Special, and add the IP address for the Ethernet interface in
Step 6 on page 16 of
Using the Easy Install Feature
.
— Intf Subnet Mask: Special, and add the Subnet Mask for the Ethernet interface
in Step 6 on page 16 of
Using the Easy Install Feature
.
— Set DE: Leave at the default, Disable.
— Primary Link: Select Rtr-S0.
— Primary DLCI: Select 900.
3.
Return to the M
ain Menu and press Shift-r to access the router’s CLI.
4.
From the CLI, enable password and show the router’s configuration.
en
show config
A list of the router’s configuration is shown, most of the configuration already
completed using the default values.
interface serial 0.900
ip unnumbered
frame-relay interface-dlci 900
no bridge-group 1
exit
5.
Add the route to the routing table.
config t
ip route 10.101.51.253 255.255.255.255 Serial 0.900
save
exit
6.
Ping the Ethernet management interface to verify that the router can be reached.
ping 10.101.51.253
exit
The router is now set up for in-band management.

19
Verifying the End-to-End Management Path
After installation of a remote router, run an ATM Ping test from the Hotwire
®
GranDSLAM.
Procedure
To Ping the router:
1.
From the Hotwire ATM Line Card’s Main Menu, select the ATM Ping test.
Diagnostics
→
ATM Ping
(
D-C
)
2.
Enter a VPI of 0 and a VCI of 35.
3.
Select a Direction of Endpoint, then Start.
4.
If the test is successful, select a Direction of Network, then Start.
If both tests are successful, the VC has been tested from end to end.
Checking That Data is Being Received
Procedure
To verify that data is being received:
1.
From the router’s Main Menu
,
select
frame relay performance statistics.
Main Menu
→
Status
→
Performance Statistics
→
Frame Relay
2.
Repeatedly R
efresh the screen to:
— Verify that the counts for Frames Received and Characters Received under the
Frame Relay Link statistics are increasing.
— Verify that there are no errors under Frame Relay Errors.
If data is not being received or you are receiving errors, check your cable
connections and replace or repair a damaged cable.
3.
Return to the Status menu.

20
Checking PVC Connections
Check PVC connections to verify that all PVCs, including management PVCs, are
configured and active.
Procedure
To verify PVCs:
1.
Select PVC Connection Status from the Status menu.
The PVC Connection Status screen shows all PVC connections, the interface
source and DLCI number of the incoming data linked to the interface, and DLCI
number for the outgoing data. You can also see whether the PVC is active.
2.
Verify that each PVC is active.
— If active, the router should be passing data.
— If not active, no data traffic can be carried by the PVC. If the PVC is configured
correctly, the circuit may be down.
Provisioning the Router Interface
The FrameSaver DSL 9783 Router defaults to bridge mode. Routing without bridging,
and simultaneous routing and bridging, are also options.
Use the bridge command from the router’s CLI to configure the bridge and routing
attributes. Also, enter an Ethernet IP address and a DHCP IP address. Refer to the
Quick Reference for a summary of configuration options, CLI commands, and default
settings.
/