Page is loading ...

ID TECH
10721 Walker Street, Cypress, CA 90630-4720
Tel: (714) 761-6368 Fax (714) 761-8880
www.idtechproducts.com
VP3600 User Manual
IDMR-PBT93133TEB
Rev. R
14 August 2023

VP3600 User Manual
Page | 2
Copyright © 2023, ID TECH. All rights reserved.
This document, as well as the software and hardware described in it, is furnished under license
and may be used or copied online in accordance with the terms of such license. The content of
this document is furnished for information use only, is subject to change without notice, and
should not be construed as a commitment by ID TECH. While every effort has been made to
ensure the accuracy of the information provided, ID TECH assumes no responsibility or liability for
any unintentional errors or inaccuracies that may appear in this document. Except as permitted
by such license, no part of this publication may be reproduced or transmitted by electronic,
mechanical, recording, or otherwise, or translated into any language form without the express
written consent of ID TECH.
ID TECH and ViVOpay are trademarks or registered trademarks of ID TECH.
Warranty Disclaimer
The services and hardware are provided "as is" and "as-available" and the use of the services and
hardware are at its own risk. ID TECH does not make, and hereby disclaims, any and all other
express or implied warranties, including, but not limited to, warranties of merchantability, fitness
for a particular purpose, title, and any warranties arising from a course of dealing, usage, or trade
practice. ID TECH does not warrant that the services or hardware will be uninterrupted, error-
free, or completely secure.

VP3600 User Manual
Page | 3
Revision History
Date
Rev
Changes
By
08/25/2021
M
• Reimplemented revision history
•
Added VP3600 Device States diagram
CB
11/30/2021
N
•
Added VP3600 Power Timers section
CB
09/19/2022
P
• Added Bluetooth LED Status Indicators table
CB
08/14/2023
R
• Updated external links
CB

VP3600 User Manual
Page | 4
Table of Contents
1. INTRODUCTION .......................................................................................................................................................................... 5
2. MAJOR FEATURES OF THE VP3600 .................................................................................................................................... 5
2.1. Magnetic Stripe Features .............................................................................................................................................. 6
2.2. ICC Contact Card Features............................................................................................................................................. 6
2.3. Contactless NFC Features ............................................................................................................................................. 6
2.4. SAM Slot ............................................................................................................................................................................. 6
3. BEFORE YOU START USING THE VP3600 ......................................................................................................................... 7
3.1. Battery Charging Instructions ...................................................................................................................................... 7
3.1.1. Charging the VP3600 ......................................................................................................................................................................................... 7
3.1.2. 24-Hour Device Reboot ..................................................................................................................................................................................... 7
3.2. Battery Status When Charging the Battery ............................................................................................................. 8
3.3. LCD Display for Power Management ......................................................................................................................... 8
3.4. LCD Display During Transactions and Operation ................................................................................................... 8
3.5. Pairing a VP3600 and a Bluetooth Device ............................................................................................................... 8
3.5.1. Before You Begin .................................................................................................................................................................................................... 8
3.5.2. Pairing a VP3600 and an Android Device Using BLE (Bluetooth Low Energy) ............................................................ 9
3.5.3. Testing the Connection on Android ........................................................................................................................................................ 10
3.5.4. Pairing a VP3600 and an iOS device ................................................................................................................................................... 12
3.5.5. Testing the Connection on iOS .................................................................................................................................................................. 14
4. OPERATION AND STORAGE ENVIRONMENT ................................................................................................................ 16
5. TAMPER AND FAILED SELF-CHECK INDICATORS ........................................................................................................ 16
6. BLUETOOTH LED STATUS INDICATORS .......................................................................................................................... 17
7. VP3600 DEVICE STATES ...................................................................................................................................................... 18
7.1. VP3600 Power Timers ................................................................................................................................................. 19
8. OTHER AGENCY APPROVALS AND COMPLIANCES ..................................................................................................... 20
9. DECOMMISSIONING SRED DEVICES ................................................................................................................................ 20
10. FOR SOFTWARE DEVELOPERS: SOFTWARE DEVELOPMENT SUPPORT .......................................................... 21
10.1. Universal SDK Demo App .......................................................................................................................................... 21
10.1.1. Using the USDK Demo App ...................................................................................................................................................................... 21
11. FCC REGULATORY COMPLIANCE .................................................................................................................................... 23
11.1. Cautions and Warnings.............................................................................................................................................. 23

VP3600 User Manual
Page | 5
1. Introduction
The VP3600 is a compact mobile PIN Pad and card reader designed to allow magnetic stripe
reads (MSR), ICC (chip card) reads, and contactless transactions (via NFC technology).
The VP3600’s small form factor and Bluetooth interface make it ideal for mobile applications
requiring magnetic stripe or smart card reading. As a mobile reader, the VP3600 works with
Android and iOS phones and tablets.
The VP3600 is compatible with a wide range of third-party payment applications, and the
available ID TECH Universal SDK can be used for developing applications with VP3600. See the
VP3600 product page for information on how to obtain the SDK. Consult your gateway or POS
provider for information about service registration, set-up, and pairing of the VP3600 to a
compatible payment application and associated host devices.
2. Major Features of the VP3600
• Bluetooth BLE (Bluetooth Low Energy)
• Supports Apple iOS, Android and Windows platforms
• Rechargeable battery, no external power necessary
• MagStripe: ISO 7810/ISO 7811, Hi-Co+Lo-Co Magnetic, JIS1/JIS2
• ICC: EMV Level 1 and EMV L2 approval
• Front-facing contactless transaction support via Near Field Communication (NFC)
• SAM slot on back of device
• LED status indicator
• Audio feedback
• Micro USB (for battery charging and communication)
• Field upgradable firmware
• Bi-directional 3 track magnetic stripe reader

VP3600 User Manual
Page | 6
• Low power consumption when reader is in standby mode
• Compact and ergonomic design to integrate with a variety of mobile devices
• TDES and AES 128 encrypted MSR and ICC contact reader with DUKPT key management
• Visa Ready
• Supports most major digital wallet technologies (see listing below)
• Bluetooth range: 10 meters within line-of-sight
• LCD screen supports English and Japanese Text
2.1. Magnetic Stripe Features
• ISO 7810 / ISO 7811
• AAMVA format
• JIS I / II
• Single / Dual / Triple Track Support
• Bi-directional reading
• Samsung Pay MST
2.2. ICC Contact Card Features
• EMVCo Contact Level 1 & 2
2.3. Contactless NFC Features
• ISO 14443 Type A&B
• ISO 18092 (P2P)
• MasterCard® MCL (Formerly PayPass)
• Visa payWave/VCPS
• Visa IRWIN
• Discover® DPAS
• American Express® ExpressPay
• MIFARE
• Apple Pay
• Samsung Pay NFC
• Android Pay
• Google Wallet / Softcard SmartTap
• Sony FeliCa
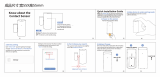
2.4. SAM Slot
The VP3600 has a SAM slot on the back of the device,
highlighted in the image to the right.

VP3600 User Manual
Page | 7
3. Before You Start Using the VP3600
The VP3600 is a mobile device for reading magnetic-stripe cards and ICC ("chip") cards. The
VP3600 is designed to operate in conjunction with certified third-party payment software and
compatible host devices such as Bluetooth- or USB-equipped tablets and smartphones. Before
connecting the VP3600 to the host device, install and activate the software application according
to the instructions provided by your payment application service and software provider, then
connect the VP3600 to the mobile device via Bluetooth or a micro-USB cable (included) and enjoy
the convenience of mobile payment processing offered by the VP3600.
3.1. Battery Charging Instructions
Your VP3600 is powered by a lithium ion polymer battery and delivered in a partially-charged
state. Make sure to fully charge the battery before using the device for the first time. Allow four
to six hours for the initial charge.
Warning: Do not use “fast chargers” with VP3600 readers. Only use the approved 5V ID TECH
power adapter
Note: The VP3600 also uses an internal coin battery for powering security mechanisms. This
battery has a lifespan longer than five years and cannot be replaced.
3.1.1. Charging the VP3600
Use a USB-to-micro-USB cable (included) to charge the VP3600.
3.1.2. 24-Hour Device Reboot
Per PCI Requirements, this device reboots every 24 hours. Please contact your device integrator if
you need to check the reboot time for your unit.

VP3600 User Manual
Page | 8
3.2. Battery Status When Charging the Battery
The VP3600 can be connected to a host via USB-to-micro-USB cable or Bluetooth. Connecting
with a cable allows the VP3600 to charge its internal battery via USB power. When connected to
a power source, a battery indicator appears on the LCD screen to display the current charging
status.
3.3. LCD Display for Power Management
• The LCD displays the battery status during operation.
• When the battery is low, a warning message appears on the LCD screen.
3.4. LCD Display During Transactions and Operation
• ICC processing: the LCD displays status during transaction. Do not remove card until the LCD
display shows the transaction has been completed.
• ICC process successful: the LCD display shows the transaction successful. At this point,
please remove card.
• Magnetic stripe read successful: the LCD display shows the transaction successful.
• Magnetic stripe read failed: the LCD display shows the transaction failed; please swipe card
again.
• Contactless read successful: the LCD display shows the transactions successful and all four
LEDs on top of the unit flash green simultaneously.
3.5. Pairing a VP3600 and a Bluetooth Device
The next two sections describe how to pair a VP3600 and an Android or iOS Bluetooth device.
Note: The pairing instructions below work for a VP3600 and ID TECH’s demo program; to pair
with a payment application, follow the instructions provided by your payment integrator.
3.5.1. Before You Begin
To set up a VP3600 and an Android or iOS device, you will need to download and install the NEO 2
Demo app for your device. Download the correct SDK .ZIP file from the VP3600 home page on the
ID TECH Knowledge Base and load the app onto your device.
Also, note that both platforms require you to set a new password using the Set Bluetooth
Parameters command:

VP3600 User Manual
Page | 9
3.5.1.1. Set Bluetooth Parameters (77-81)
The Set Bluetooth Parameters command sets a device’s Bluetooth name and password.
Command Frame
Byte 0-9
Byte 10
Byte 11
Byte 12
Byte 13
Byte 14
Byte 14+n
Byte 15+n
Header Tag &
Protocol
Version
Command Sub-
Command
Data
Length
(MSB)
Data
Length
(LSB)
Data CRC (LSB) CRC (MSB)
ViVOtech2\0
77h
81h
var
var
Command data field
Data field Length (bytes) Description
Name Var to 26 Ascii, must end with 0x00
Old password 6 Hex
New password 6 Hex
3.5.2. Pairing a VP3600 and an Android Device Using BLE (Bluetooth Low
Energy)
1. Download the NEO II Android SDK .ZIP file from the VP3600 product page and load the NEO 2
Demo app (NEO2_Demo.APK) onto your Android device.
2. Go to the Android device’s Bluetooth settings and forget the VP3600.
3. Power on the VP3600.
4. Enter a new password for the device using the Set Bluetooth Parameters (77-81) command
(the VP3600’s default password is 123456).
a. You can send this command using either ID TECH’s USDK Demo app (described below in
the Universal SDK Demo App section) or your preferred firmware command method.
5. Open your Android device’s settings.
6. Turn Bluetooth on.
7. Select the VP3600's Bluetooth name from the list of available devices (the default name is
IDTECH_BLE).
8. Enter the password you set in step 4, then tap OK to pair the device.

VP3600 User Manual
Page | 10
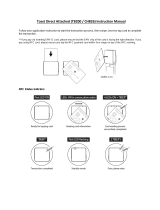
3.5.3. Testing the Connection on Android
If you have not already done so, install the NEO 2 Demo app before you continue.
1. Open the NEO 2 Demo app and select NEO 2 (Bluetooth):
2. Enter the VP3600's Bluetooth name (the default name is IDTECH_BLE) and tap Okay:

VP3600 User Manual
Page | 11
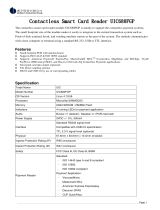
3. When the VP3600 is paired successfully, the Disconnected text changes to Connected and
the VP3600’s LED display shows the Bluetooth icon. You can now send commands and
receive responses.
4. Press Swipe/Tap in the lower-left corner.

VP3600 User Manual
Page | 12
5. When prompted, swipe or tap a card.
6. Card data appears in the app.
3.5.4. Pairing a VP3600 and an iOS device
Note: iOS devices do not require pairing with a VP3600; the iOS device’s Bluetooth list does not
display a VP3600’s Bluetooth name. The steps below describe connecting the two devices.
1. Download the iOS SDK for NEO 2 products .ZIP file from the VP3600 product page and load
the NEO 2 Demo app (NEO2.ipa) onto your iOS device.
2. Power on the VP3600.
3. Enter a new password for the device by using the Set Bluetooth Parameters (77-81)
command, described above. The VP3600’s default password is 123456.
4. Open your iOS device’s settings app.
5. Turn Bluetooth on.
6. Open the NEO 2 Demo app.

VP3600 User Manual
Page | 13
7. Enter the VP3600's Bluetooth name (the default name is IDTECH_BLE) in the upper-right
corner and tap Start BLE Scan in the upper-left corner.
8. Enter the VP3600’s password, then tap Pair to pair the device. When the VP3600 is
connected successfully, the Disconnected text changes to Connected and the VP3600’s LED
display shows the Bluetooth icon. You can now send commands and receive responses.

VP3600 User Manual
Page | 14
3.5.5. Testing the Connection on iOS
1. Tap Enable Transaction.
2. Tap Contactless in the transaction interface selection dialog.

VP3600 User Manual
Page | 15
3. When connected successfully, the NEO 2 Demo displays Enable CTLS: OK and the VP3600’s
LCD displays a CTLS transaction logo.
4. Tap a contactless card to the VP3600; the NEO 2 Demo displays the card data for the
transaction.

VP3600 User Manual
Page | 16
4. Operation and Storage Environment
Item
Specification
Note
Operating Temperature
0 °C to 55 °C
•
Non-condensing.
• Product operation temperature is limited to
the range for the reason of the constraint of
• Li-Battery specification.
Storage Temperature
-20 °C to 60 °C
•
Non-condensing.
• Product storage temperature is limited to the
range for the reason of the constraint of Li-
Battery specification.
Operating Humidity
5% to 95%
• Non-condensing
Storage Humidity
5% to 95%
• Non-condensing
• Changes or modifications to the VP3600 not expressly approved by ID TECH could void the
user's authority to operate the VP3600.
5. Tamper and Failed Self-Check Indicators
The VP3600 displays the following indicators when it has been tampered or has any of the other
following internal issues, such as an expired certificate, missing key, or similar fault discovered
during a self-check.
Indicator
Tampered Status
Other Issue Status
Front Four LEDs
All LEDs off
All LEDs off
LCD Screen
TAMPERED
None
Buzzer
Alarm tone
Alarm tone

VP3600 User Manual
Page | 17
6. Bluetooth LED Status Indicators
The rightmost LED at the top of a VP3600 reader provides Bluetooth status information.
The following table illustrates VP3600 Bluetooth device states.
Device State
LED1
LED2
LED3
LED4
BT LED
BT Icon
Buzzer
Bluetooth Paired ●
off
●
off
●
off
●
off
●
blinks once per
three seconds
off off
Bluetooth
connected
●
off
●
off
●
off
●
off
●
blinks twice per
three seconds
on one short
beep
Bluetooth
communicating
●
off
●
off
●
off
●
off
●
blinks twice per
three seconds
on off
Bluetooth
disconnected
●
off
●
off
●
off
●
off
●
blinks once per
three seconds
off two short
beeps
Bluetooth on
standby
●
off
●
off
●
off
●
off
●
slow blink
off off

VP3600 User Manual
Page | 18
7. VP3600 Device States
The diagram below illustrates VP3600 device states.

VP3600 User Manual
Page | 19
7.1. VP3600 Power Timers
The VP3600 allows product administrators to configure the wait times between certain state
transitions using the F0-04 NEO 2 command and the Timer IDs shown in the table below:
Original State
New State
Timer ID
Timer Name
Normal (without USB)
Idle
2
Standby0
Idle
Standby
3
Standby1
Standby
Sleep
4
Sleep
For more information on using the F0-04 command, see the NEO 2 Interface Developer’s Guide
(80139403-002) under “Set Low Power Consumption Configuration (F0-04).”
Note the following points:
• The VP3600 does not support Timer ID 1 (Low speed run)
• The maximum individual timer period supported is 3600 seconds (1 hour)

VP3600 User Manual
Page | 20
8. Other Agency Approvals and Compliances
• CE (EN55022/EN55024, Class- B)
• FCC (Part 15, Class-B)
• RoHS (DIRECTIVE 2011/65/EU)
• UL
• REACH
• PCI 5.x sRED
• EMV Contact L1&L2
• EMV Contactless L1
• TQM
9. Decommissioning SRED Devices
All PCI devices require proper decommissioning prior to device disposal in order to ensure the
protection of all sensitive financial card data. For instructions on decommissioning your device,
see Decommissioning of SRED Devices on the ID TECH Knowledge Base.
/