LX Series Free Programmable LX-PRGxxx-11 Controllers Installation Instructions 1
Applications
The LX Series Free Programmable LX-PRGxxx-11
Controllers are microprocessor-based controllers
designed for control various building automation
systems, such as multi-zone air handing units, lighting
control systems, central plant applications, and power
measurement applications.
The LX Free Programmable Controllers are built on a
similar platform, but have different numbers of inputs
and outputs. The LX PRG6x0-11 controllers are
compatible with the LX Input/Output (I/O) Extension
Module 400 Series models.
For more information on LX I/O Extension Modules,
refer to LX Series Input/Output (I/O) Extension
Modules Installation Instructions (LIT-12011858).
The LX Free Programmable Controllers use the
L
ONWORKS® communication protocol.
Follow these recommendations for proper installation
and subsequent operation of each controller:
• Inspect the controller for shipping damages. Do no
t
ins
tall damaged controllers.
• Keep the controller at room temperature for at leas
t
2
4 hours prior to installation to allow an
y
con
densation that may have accumulated during
shipping to evaporate.
• If the controller is used in a manner not specifie
d
by
Johnson Controls, the functionality and th
e
pr
otection provided by the controller may become
impaired.
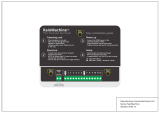
• Record the 12-digit Neuron® ID located on either
end of the device (shown on the sticker below th
e
b
arcode) for commissioning.
Note: The controller’s plastic enclosure has a
back plate that is separate from the front plate
allowing the back plates to be shipped directly
to
the ins
tallation site while all the engineering is done
elsewhere.
North American Emissions Compliance
Canada
United States
Installation
Observe these guidelines when installing an LX Free
Programmable Controller:
• Transport the controller in the original container to
minimize vibration and shock damage.
• Verify that all parts shipped with the controller.
• Do not drop the controller or subject it to ph
ysical
shock.
IMPO
RTANT: Prevent any static electric discharge
to the controller. Static discharge can damage the
controller and void the warranties.
Industry Canada Statement
The term IC before the certification/registration
number only signifies that the Industry Canada
technical specifications were met.
Le terme « IC » précédant le numéro d'accréditation/
inscription signifie simplement que le produit est
conforme aux spécifications techniques d'Industry
Canada.
This equipment has been tested and found to
comply with the limits for a Class A digital device
pursuant to Part 15 of the FCC Rules. These limits
are designed to provide reasonable protection
against harmful interference when this equipment is
operated in a commercial environment. This
equipment generates, uses, and can radiate radio
frequency energy and, if not installed and used in
accordance with the instruction manual, may cause
harmful interference to radio communications.
Operation of this equipment in a residential area
may cause harmful interference, in which case the
users will be required to correct the interference at
their own expense.
LX Series Free Programmable LX-PRGxxx-11 Controllers
Installation Instructions
LX-PRG203-11, LX-PRG300-11,
LX-PRG4x0-11, LX-PRG6x0-11
Code No. LIT-12011856
Issued July 17, 2014