Page is loading ...

1
AC1900 Enhanced Smart Dual-Band Gigabit WiFi Router
Model: AC18
User Guide

I
Copyright Statement
© 2016 Shenzhen Tenda Technology Co., Ltd. All rights reserved.
Tenda is a registered trademark legally held by Shenzhen Tenda Technology Co., Ltd. Other
brand and product names mentioned herein are trademarks or registered trademarks of their
respective holders. Copyright of the whole product as integration, including its accessories
and software, belongs to Shenzhen Tenda Technology Co., Ltd. No part of this publication can
be reproduced, transmitted, transcribed, stored in a retrieval system, or translated into any
language in any form or by any means without the prior written permission of Shenzhen
Tenda Technology Co., Ltd.
Disclaimer
Pictures, images and product specifications herein are for references only. To improve internal
design, operational function, and/or reliability, Tenda reserves the right to make changes to
the products without obligation to notify any person or organization of such revisions or
changes. Tenda does not assume any liability that may occur due to the use or application of
the product described herein. Every effort has been made in the preparation of this document
to ensure accuracy of the contents, but all statements, information and recommendations in
this document do not constitute a warranty of any kind, express or implied.

II
Preface
Thank you for choosing Tenda! Please read this user guide before you start with AC18.
Commonly Used Functions
Quickly accessing the internet
Setting a WiFi name & password
Turning off WiFi signals as scheduled
Extending WiFi coverage
Controlling bandwidth
Upgrading the router
Conventions
The typographical elements that may be found in this document are defined as follows.
Item
Presentation
Example
Cascading Menus
>
System > Live Users
Parameter and value
Bold
Set User Name to Tom.
Variable
Italic
Format: XX:XX:XX:XX:XX:XX
UI control
Bold
On the Policy page, click the OK button.
Message
“
The “Success” message appears.
The symbols that may be found in this document are defined as follows.
Symbol
Meaning
Note
This format is used to highlight information of importance or
special interest. Ignoring this type of note may result in
ineffective configurations, loss of data or damage to device.
Tip
This format is used to highlight a procedure that will save time or
resources.
Acronyms and Abbreviations
Acronym or
Abbreviation
Full Spelling
AP
Access Point
DDNS
Dynamic Domain Name System
DHCP
Dynamic Host Configuration Protocol
DLNA
Digital Living Network Alliance
DMZ
Demilitarized Zone
DNS
Domain Name System

III
Acronym or
Abbreviation
Full Spelling
IPTV
Internet Protocol Television
ISP
Internet Service Provider
L2TP
Layer 2 Tunneling Protocol
MPPE
Microsoft Point-to-Point Encryption
PPP
Point To Point Protocol
PPPoE
Point-to-Point Protocol over Ethernet
PPTP
Point to Point Tunneling Protocol
SSID
Service Set Identifier
STB
Set Top Box
URL
Uniform Resource Locator
VLAN
Virtual Local Area Network
VPN
Virtual Private Network
WISP
Wireless Internet Service Provider
WPS
WiFi Protected Setup
Additional Information
For more information, search this product model on our website at http://www.tendacn.com.

IV
Contents
Chapter 1 Get to Know Your Router .......................................................................................... - 1 -
1.1 Overview............................................................................................................................................................. - 1 -
1.2 Specifications ...................................................................................................................................................... - 1 -
1.3 Package List ........................................................................................................................................................ - 1 -
1.4 Appearance......................................................................................................................................................... - 2 -
Chapter 2 Quick Setup to Access the Internet ........................................................................... - 6 -
2.1 Connecting to Your Router ................................................................................................................................. - 6 -
2.2 Setting Up an Internet Connection ..................................................................................................................... - 7 -
Chapter 3 Other Functions ..................................................................................................... - 16 -
3.1 Internet Status .................................................................................................................................................. - 16 -
3.2 Internet Settings ............................................................................................................................................... - 20 -
3.3 Wireless Settings .............................................................................................................................................. - 22 -
3.4 Guest Network .................................................................................................................................................. - 32 -
3.5 Sleeping Mode .................................................................................................................................................. - 33 -
3.6 USB Application ................................................................................................................................................ - 34 -
3.7 VPN ................................................................................................................................................................... - 58 -
3.8 Advanced Settings ............................................................................................................................................ - 67 -
3.9 System Settings ................................................................................................................................................. - 91 -
I Appendixes ........................................................................................................................ - 107 -
I.1 Connecting a Computer to the WiFi Network of the Router ........................................................................... - 107 -
I.2 Configuring the Computer to Obtain an IP Address Automatically ................................................................. - 109 -
I.3 FAQ .................................................................................................................................................................. - 114 -
I.4 Technical Support ............................................................................................................................................ - 117 -
I.5 Safety and Emission Statement ....................................................................................................................... - 118 -

- 1 -
Chapter 1 Get to Know Your Router
1.1 Overview
AC18 is a 1,900 Mbps 802.11ac dual-band
wireless router dedicated to villas and large
apartments. It is powered by a dual-core CPU
and DDR3 memory, which ensure faster and
more stable system operation. It is also
equipped with the Beamforming+ technology,
built-in independent PA/LNA signal transmission
enhancement module, and three external
high-gain omnidirectional antennas, featuring a
robust wall penetration capability that truly
achieves full dual-band WiFi coverage in villas
and large houses. This router supports
additional functions such as wireless repeating,
LED indicator control, WiFi scheduling, USB
device sharing, cloud management, and VPN server, making it an optimal choice of users who
require wide network coverage, strong wall penetration performance, and resource sharing.
1.2 Specifications
Five 1,000 Mbps RJ45 ports and one USB3.0 port
1 GB built-in NAND flash memory and 2 GB built-in DDR3 memory
3 external high-gain dual-band antennas with a coverage area up to 450 m
2
Support for 2.4 GHz and 5 GHz frequency bands with a concurrent throughput of up to
1,900 Mbps
Support for WiFi and LED indicator schedules
Support for third-party firmware
Operating temperature: 0°C ~ 40°C
Operating humidity: 10%~90% (RH), no condensing
1.3 Packing List
1900 Mbps 802.11ac dual-band wireless router x 1
Power adapter x 1
CAT5E Ethernet cable x 1
Install guide x 1

- 2 -
1.4 Appearance
1.4.1 LED Indicators
States of LED indicators of the router that is powered on
LED Indicator
Name
LED Indicator
Description
State
State Description
PWR
Power indicator
Solid on
The router has been powered on properly.
Off
The router is not powered on or the power supply is
faulty.
WAN
Internet port
indicator
Solid on
The port is properly connected using an Ethernet cable.
Blinking
The port is transmitting of receiving data.
Off
The port is not connected or the connection is faulty.
LAN
LAN port indicator
Solid on
The port is properly connected using an Ethernet cable.
Blinking
A LAN port is connected.
Off
The port is not connected or the connection is faulty.
WPS
WPS indicator
Solid on
WPS pairing is successful.
Blinking
The router is performing WPS pairing with another
device.
Off
WPS pairing is disabled or fails, or it has been over 2
minutes since WPS pairing succeeded.
2.4G
2.4 GHz signal
indicator
Solid on
The 2.4 GHz WiFi function is enabled.
Blinking
The router is transmitting or receiving data over the 2.4
GHz WiFi network.
Off
The 2.4 GHz WiFi function is disabled.
5G
5 GHz signal
indicator
Solid on
The 5 GHz WiFi function is enabled.
Blinking
The router is transmitting or receiving data over the 5
GHz WiFi network.

- 3 -
LED Indicator
Name
LED Indicator
Description
State
State Description
Off
The 5 GHz WiFi function is disabled.
USB3.0
USB port indicator
Solid on
The port has been connected to a USB device.
Blinking
The port is transmitting of receiving data.
Off
The port is not connected to a USB device or a USB
device has been ejected.
SYS
System indicator
Blinking
The system is working properly.
1.4.2 Button& Ports
Description of buttons and ports
Button/Port
Description
DC-IN
It is the power port to be connected to the power adapter included
in the package.
Power
It is the button used to power on/off the router after the router is
connected to a power supply using the power adapter.
WiFi On/Off
It is the button used to enable or disable the WiFi function.
WPS
It is the button used to perform WPS pairing between the router
and another device.
Reset
It is the button used to restore the factory settings of the router.
Internet
It is used to connect to an Ethernet cable with Internet
connectivity.
1, 2, and 3
They are LAN ports that can be connected to devices using Ethernet
cables, such as computers, laptops, and switches.
4/IPTV
It is a LAN port by default. After the IPTV function of the router is

- 4 -
Button/Port
Description
enabled, it functions as an IPTV port for connecting to an STB or
smart TV.
USB
It is a USB3.0 port located on the front panel of the router for
connecting to USB devices. To disconnect a USB device from the
USB port, click Eject on the router web UI and remove the device,
instead of removing it directly. Do not connect two or more devices
to the USB port using a USB hub. Otherwise, the devices may be
damaged. You are not recommended to recharge the battery of
your phone using the USB port.
1.4.3 Label on the Bottom
(1) Default domain name and IP address of the router. You can use the domain name or
IP address to access the router web UI.
(2) Default 2.4 GHz WiFi name (SSID) of the router.
(3) Default WiFi password of the router. It is required when you connect to the WiFi
network of the router for the first time.
(4) PIN that may be required by a wireless client, such as a smart phone, when the client
connected to the router using the WPS function.
1.4.4 Label on the Top
(1) Default 2.4 GHz WiFi name (SSID) of the router. The default 5 GHz WiFi name (SSID) is
Tenda_XXXXXX_5G.
(1)
(2)
(3)
(4)
(1)
(2)

- 5 -
(2) Default WiFi password of the router. It is required when you connect to the WiFi
network of the router for the first time.

- 6 -
Chapter 2 Quick Setup to Access the Internet
To access the internet, you need at least two steps:
Step 1 Connect to your router.
Step 2 Set up an internet connection.
---End
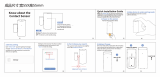
2.1 Connecting to Your Router
2.1.1 Connecting to Your Router Through WiFi
Perform the following procedure:
Step 1 Connect the Internet port using any of the methods shown in the following figure depending
on your internet connection means.
Step 2 Use the power adapter to connect the router to a power supply.
Step 3 Use a wireless device, such as a smart phone or tablet, to search for the WiFi network by the
WiFi name of the router and connect to the WiFi network. You can find the default WiFi name
and password on the label on the top of the router. For details about how to connect to the
WiFi network, refer to the appendix.
After the wireless device is connected to the router, log in to the router web UI on the wireless
device and configure an internet connection. For details, refer to Setting Up an Internet
Connection. After changing the WiFi name or password, you need to reconnect the wireless
device to the router.

- 7 -
---End
2.1.2 Connecting to Your Router Using an Ethernet Cable
Perform the following procedure:
Step 1 Connect the Internet port using any of the methods shown in the following figure depending
on your internet connection means.
Step 2 Use the power adapter to connect the router to a power supply.
Step 3 Connect your computer to the 1, 2, 3, or 4/IPTV port of the router using an Ethernet cable.
After the computer is connected to the router, log in to the router web UI on the computer
and configure an internet connection. For details, refer to Setting Up an Internet Connection.
---End
2.2 Setting Up an Internet Connection
Step 1 Start a web browser, type tendawifi.com or 192.168.0.1 in the address bar, and press Enter
on the keyboard.
Step 2 Click Start.
The router detects your connection type.

- 8 -
Step 3 According to the detection result, configure related settings. For details about the connection
type–specific configuration procedures, refer to Setting Up an Internet Connection with
PPPoE, Setting Up an Internet Connection with DHCP, and Setting Up an Internet Connection
with a Static IP Address.

- 9 -
---End
2.2.1 Setting Up an Internet Connection with PPPoE
Step 1 Select PPPoE, enter your PPPoE user name and password, and click Next.
Step 2 Set a WiFi name and password, set a login password, and click Next.
Note
The WiFi password indicates the password for connecting to the WiFi network of the router. The login
password indicates the password for logging in to the router web UI. To use the same password for both
purposes, select Set up the login password to the same as the WiFi password on the Wireless Settings
page of the quick setup wizard. Ensure that your password meets the complexity requirement.
Step 3 When the login page appears, use the password you set to log in.

- 10 -
Step 4 Go to the Internet Status page to view the current connection status.
If "Connected! You can surf the Internet." is displayed at Internet Settings, the internet is
accessible.
---End
2.2.2 Setting Up an Internet Connection with DHCP
Step 1 Select DHCP and click Next.

- 11 -
Step 2 Enter a WiFi name, WiFi password, and login password, and click Next.
Note
The WiFi password indicates the password for connecting to the WiFi network of the router. The login
password indicates the password for logging in to the router web UI. To use the same password for both
purposes, select Set up the login password to the same as the WiFi password on the Wireless Settings
page of the quick setup wizard. Ensure that your password meets the complexity requirement.
Step 3 When the login page appears, use the password you set to log in.

- 12 -
Step 4 Go to the Internet Status page to view the current connection status. If "Connected! You can
surf the Internet." is displayed at Internet Settings, the internet is accessible.
---End
2.2.3 Setting Up an Internet Connection with a Static IP Address
Step 1 Select Static IP, enter your static IP address and other related information, and click Next.

- 13 -
Step 2 Set a WiFi name and password, set a login password, and click Next.
Note
The WiFi password indicates the password for connecting to the WiFi network of the router. The login
password indicates the password for logging in to the router web UI. To use the same password for both
purposes, select Set up the login password to the same as the WiFi password on the Wireless Settings
page of the quick setup wizard. Ensure that your password meets the complexity requirement.
Step 3 When the login page appears, use the password you set to log in.

- 14 -
Step 4 Go to the Internet Status page to view the current connection status. If "Connected! You can
surf the Internet." is displayed at Internet Settings, the internet is accessible.
Note
If the internet is inaccessible after the preceding steps, refer to FAQ 5 in Appendix I.3.
For the detailed procedure for connecting to your router through WiFi, refer to Appendix 1.
If you change the WiFi password of the router when setting up an internet connection, all the
wireless connections of the router are disconnected. You can access the internet only after
reconnecting to the router using the new password.
---End
To enable the router to provide more stable WiFi signals and cover a wider area, position your
router as follows:
Put it on a high place at the center of your house.
Keep it close to your wireless devices, such as mobile phones and laptops.
Put it at a place with good ventilation. Unfold its antennas by 45°. Do not put it in an
enclosure, such as a wire distribution box, shoes cabinet, or metal box.

- 15 -
Keep it away from electrical devices, such as ceiling fans and microwave ovens.
Keep it away from metal surfaces, such as metal doors or aluminum nails.
Keep it away from other materials that may affect your wireless signals, such as glass,
mirrors, and fish tanks.
/