Hiwin HT-B User guide

Type
User guide

Hiwin HT-B is a high-performance linear axis designed for industrial applications. It features a rigid aluminum extrusion and a precision ball screw or belt drive system, ensuring accuracy and repeatability. The HT-B can be used for a variety of tasks, including material handling, assembly, and testing. It is also compatible with a wide range of robots, making it a versatile solution for automated applications.

Hiwin HT-B is a high-performance linear axis designed for industrial applications. It features a rigid aluminum extrusion and a precision ball screw or belt drive system, ensuring accuracy and repeatability. The HT-B can be used for a variety of tasks, including material handling, assembly, and testing. It is also compatible with a wide range of robots, making it a versatile solution for automated applications.

QUICK START GUIDE
HIWIN 7th Axis Kit for UR
www.
hiwin.de
2
This Quick Start Guide will get you started with your HIWIN 7th Axis Kit for UR.
We do advise to read the user-manuals before installation.
1.
What is supplied
HIWIN linear axis HT-B/-S
With belt or ballscrew drive
Limit switches
Possibly gearbox
Robot adapter
Cable chain
Cables
Instruction manuals for HIWIN Linear Axis HT-B/S
Instruction manual for HIWIN Adapters for Robot Axes
Linear Motion Kit
Control Box
SEW servo motor & Drive
USB with URCap software
Instruction manuals for Linear Motion Kit (LMK)
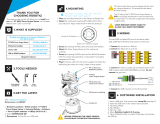
2.
LMK updates
To get the latest updates for the Linear Motion Kit:
Visit www.cobotracks.com/LMK
Download the latest LMK software and user manual.
3.
Assembly
3.1
Mechanical
Mount the HIWIN Linear Axis
Mount the HIWIN Adapter for Robot Axes on the HIWIN Linear Axis
Attach the motor to the gearbox at the HIWIN Linear Axis
Mount the UR robot on the carriage
3.2
Electrical
From the control cabinet, the following electrical connections have to be made:
Motor control: Orange and green cables from the cabinet to the SEW motor
connector
Data connection: Connect the Ethernet cable coming from the cabinet to the UR
controller box, either directly or through an Ethernet network/switch.
3
Sensor connection: Connect the limit switch cables coming from the HIWIN Linear
Axis to the cabinet.
Safety signals: Connect the bundle of wires coming from the cabinet to the safety
I/Os inside the UR Controller box.
Grounding wire: connect the grounding wire to the application grounding pin inside
the UR controller box.
4.
URCap Installation
Instert the USB fl ash drive into the teach pendant
Go to settings – Systems – URCaps and press the + button
CoboTrack.urcap will be added to the robot
Press restart to activate the URCap
5.
Safety setup
The required safety settings can be set in the Installation -> safety -> I/O menu.
For safe operation it is required that:
“confi g_in[0], confi g_in[1]” is set to “Safeguard Reset”
“confi g_out[0], confi g_out[1]” is set to “System Emergency Stopped”
“confi g_out[2], confi g_out[3]” is set to “Robot Moving”
4
6.
Network setup
When connecting the LMK to an existing network (supporting DHCP) the robot’s network
should be setup using the DHCP method shown in the following image:
The dip switches inside the LMK controller should be set as follows, and make sure DHCP is
enabled by checking, and/or adjusting parameter P785 of the LMK drive:
Def IP: .................................................................................................................... 0
AS: ......................................................................................................................... 1
When connecting the LMK directly to the UR controller box, the robot is to be setup with a
Static Address configuration. The Network detailed settings are to be set as follows:
5
The dip switches inside the LMK controller should be set as follows:
Def IP: .................................................................................................................... 1
AS: ......................................................................................................................... 0
7.
Configuring installation
The Linear Motion Kit installation can be configured from:
Installation -> URcaps -> Linear Motion Kit menu.
Setup the LMK IP-address by pushing the “Find IP”-button.
Setup Modbus starting register, change as required by other applications running on
the robot.
Adjust the track length to match the physical track available.
Adjust the collision threshold as required by the intended application.
Push the “Connect”-button to start the MODBUS connection to the track.
Reference the track by pushing and holding the reference button until the connection
status symbol turns green.
Linear Motion Kit is now ready for use.
  • Page 1 1
  • Page 2 2
  • Page 3 3
  • Page 4 4
  • Page 5 5

Hiwin HT-B User guide

Type
User guide

Hiwin HT-B is a high-performance linear axis designed for industrial applications. It features a rigid aluminum extrusion and a precision ball screw or belt drive system, ensuring accuracy and repeatability. The HT-B can be used for a variety of tasks, including material handling, assembly, and testing. It is also compatible with a wide range of robots, making it a versatile solution for automated applications.

Ask a question and I''ll find the answer in the document

Finding information in a document is now easier with AI