Princess auto 8603052 User manual

Category
Edgers
Type
User manual

Princess Auto 8603052 is a versatile and user-friendly metal detector designed to uncover hidden treasures such as coins, relics, jewelry, gold, and silver. With its four adjustable sensitivity levels, you can optimize its performance in various environments. The depth indicator, displayed on the LCD, helps you gauge the depth of detected items. This metal detector is water-resistant, allowing you to explore shallow waters for hidden valuables. It also features a headphone jack for private use and to conserve battery power.

Princess Auto 8603052 is a versatile and user-friendly metal detector designed to uncover hidden treasures such as coins, relics, jewelry, gold, and silver. With its four adjustable sensitivity levels, you can optimize its performance in various environments. The depth indicator, displayed on the LCD, helps you gauge the depth of detected items. This metal detector is water-resistant, allowing you to explore shallow waters for hidden valuables. It also features a headphone jack for private use and to conserve battery power.

V4.2 8603052
Visit www.princessauto.com for more information 1
User Manual
Metal Detector
8603052 Metal Detector V4.2
2 For technical questions call 1-800-665-8685
SPECIFICATIONS
Description Automatic metal detector used to detect
all sorts of metal objects.
Detection Depth 4 ft 11 in. (1.50 m)
Display LCD
Working Voltage 7.2 to 9.6V
Signal Frequency 7.5 KHz +/- 1 KHz
Working Environment -4 to 140 ºF (-20 to 60 ºC)
INTRODUCTION
With this powerful and versatile device, you can hunt for coins, relics, jewelry,
gold, and silver just about anywhere. The LCD display makes the metal detector
a versatile and easy to use device.
SAFETY
WARNING! Read and understand all instructions before using this tool. The
operator must follow basic precautions to reduce the risk of personal injury
and/or damage to the equipment.
Keep this manual for safety warnings, precautions, operating or inspection and
maintenance instructions.
HAZARD DEFINITIONS
Please familiarize yourself with the hazard notices found in this manual. A notice
is an alert that there is a possibility of property damage, injury or death if certain
instructions are not followed.
Metal Detector
V4.2 Metal Detector 8603052
Visit www.princessauto.com for more information 3
DANGER! This notice indicates an immediate and specific hazard that will
result in severe personal injury or death if the proper precautions
are not taken.
WARNING! This notice indicates a specific hazard or unsafe practice that
could result in severe personal injury or death if the proper
precautions are not taken.
CAUTION! This notice indicates a potentially hazardous situation that may result
in minor or moderate injury if proper practices are not taken.
NOTICE! This notice indicates that a specific hazard or unsafe practice will
result in equipment or property damage, but not personal injury.
PERSONAL SAFETY
WARNING! Wear personal protective equipment approved by the Canadian
Standards Association (CSA) or American National Standards Institute (ANSI).
PERSONAL PROTECTIVE EQUIPMENT
1. Always wear impact safety goggles that provide front and side protection
for the eyes. Eye protection equipment should comply with CSA Z94.3-07
or ANSI Z87.1 standards based on the type of work performed.
2. Wear gloves that provide protection based on the work materials or to
reduce the effects of tool vibration.
3. Wear protective clothing designed for the work environment and tool.
4. Non-skid footwear is recommended to maintain footing and balance in the
work environment.
5. Wear steel toe footwear or steel toe caps to prevent a foot injury from
falling objects.
PERSONAL PRECAUTIONS
Control the tool, personal movement and the work environment to avoid
personal injury or damage to tool.
1. Do not operate any tool when tired or under the influence of drugs, alcohol
or medications.
2. Avoid wearing clothes or jewelry that can become entangled with the
moving parts of a tool. Keep long hair covered or bound.
8603052 Metal Detector V4.2
4 For technical questions call 1-800-665-8685
3. Do not overreach when operating a tool. Proper footing and balance
enables better control in unexpected situations.
4. Use the correct tool for the job. This tool was designed for a
specific function. Do not modify or alter this tool or use it for
an unintended purpose.
UNPACKING
WARNING! Do not operate the tool if any part is missing. Replace the
missing part before operating. Failure to do so could result in a malfunction
and personal injury.
Remove the parts and accessories from the packaging and inspect for damage.
Make sure that all items in the parts list are included.
Contents:
Metal detector
Carrying bag
Sand scoop
Shovel
Earphone
Raincoat
PARTS IDENTIFICATION
V4.2 Metal Detector 8603052
Visit www.princessauto.com for more information 5
1 End Cap
2 Armrest
3 Armrest Stem
4 Adjustment Controls
5 LCD Display
6 Handle Assembly
7 Controller Unit
8 Knob Nut
9 Battery Compartment
10 Upper Stem
11 Stem-lock Nut
12 Lower Stem
13 Search Coil Adjustment Knobs
14 Search Coil Assembly
FEATURES OF YOUR DETECTOR
Position Targeting The signal on the screen will flash toward the middle
when approaching the object.
Panel Surface
Abrasion Resistance
The panel is made of a material with surface
abrasion resistance.
Mode
The speed of detection sweeping can be adjusted
between low speed and high speed.
Target Identity The detected objects are shown on the LCD display.
You can decide immediately if the object is
worth recovering.
Unwanted Target
Elimination
You can set the detector not to respond to
some objects.
Unique Tone for Target You don’t have to keep watching the LCD display.
When an object is being detected, a unique tone
corresponding to the target will be made. This allows
you to search when there is very little light available.
Speaker The unit comes with a water-proof speaker.
Headphone Jack Provided for the use of headphones with the
detector.
Volume Control For adjusting the output volume to the speaker
or headphones.
Battery Condition Indicator Shows the condition of the batteries in the
battery compartment.
Water-proof Search Coil Allows you to use the detector in shallow water.
Adjustable Stem Adjust the detector’s length for comfortable use. The
micro-plug that connects the search coil and the
8603052 Metal Detector V4.2
6 For technical questions call 1-800-665-8685
controller unit is made of metal which makes the
plug more reliable.
Armrest and Stem Extra thickened handle and the red and black colour
brings a direct visual effect. It is designed to
eliminate strain on the forearm. The armrest belt is
made of nylon to further support the comfortable use
of the detector.
Batteries The detector uses six 1.5V AA alkaline batteries.
ASSEMBLY & INSTALLATION
Numbered references in parenthesis (#1) refer to the included Parts List.
You do not need any special tools to assemble your metal detector. All you need
is a small Phillips-head screwdriver.
1. Rotate the stem lock nut (#11)
clockwise until it loosens.
2. Slide the lower stem (#12) towards
the search coil assembly (#14) as
indicated by an arrow until you can
see a micro-plug metal connector.
Pull out the plug so that you can
hold it in your hand.
3. Locate the micro-jack connector in the handle
assembly (#6). Connect the plug and the jack
together and take care to align the marks
showing on the surface of the jack and
the plug.
V4.2 Metal Detector 8603052
Visit www.princessauto.com for more information 7
4. Slide the upper stem (#10) towards the
controller unit (#7). Take care to note the
direction of the cut slot of the upper stem (#10)
which should be pulled underneath the support
of the controller unit (#7).
5. Secure by tightening the knob nut (#8) which is located
under the controller unit (#7).
6. Adjust the lower stem (#12) so that when you stand
upright with the detector in your hand that the search
coil (#14) is level with and about 1/2 to 2 in. above the
ground with your arm relaxed at your side.
7. Tighten the stem lock (#11) counterclockwise to lock the stem in place.
8. Loosen the search coil knobs (#13) at
the search coil assembly (#14), then
adjust the search coil to the desired
angle and then tighten the knobs just
enough to keep the search coil (#14)
from rotating or wobbling.
IMPORTANT! The search coil (#14) should be parallel with the ground.
9. To adjust the armrest (#2), loosen the one
screw at the bottom of the armrest. Adjust the
armrest so that it should be near the end of
your forearm. Tighten the screw to secure the
armrest in place.
8603052 Metal Detector V4.2
8 For technical questions call 1-800-665-8685
INSTALLING THE BATTERIES
The metal detector requires six 1.5V AA batteries.
1. Make sure that the detector is turned off before
changing the batteries.
2. Slide the battery cover away from the battery
compartment (#9).
3. Insert six new batteries into the
battery compartment (#9). Make sure
that the polarity symbols (+ and -),
which are marked on the connection
terminals of the detector and the
batteries, are lined up properly. The
polarities of the batteries must match
with the polarities of the terminals.
4. Replace the battery cover.
CAUTION! Use only fresh batteries and always replace the old batteries with
fresh batteries.
CAUTION! Do not mix old and new batteries, different types of batteries
(standard, alkaline, or rechargeable), or rechargeable batteries of
different capacities.
BATTERY CONDITION INDICATOR
The condition of the batteries is indicated by the battery icon on the LCD.
The icon starts with four segments which indicate the
batteries are new and in good condition.
When the icon has only one segment left and is flashing, it
is time to replace the batteries.
USING A HEADPHONE
Using headphones with the detector is always recommended. Headphones are
especially useful in noisy areas, such as the beach and in cities. It enhances the
V4.2 Metal Detector 8603052
Visit www.princessauto.com for more information 9
audio perception by bringing the sound directly to your ears while masking
outside noise interference. You will be amazed at how much better you can hear
the detector signals through headphones than you can with the speaker alone.
Using headphones with the detector also uses less battery power.
To connect headphones to the detector, insert the headphones 1/8
in. plug into the headphone jack.
IMPORTANT! The detector’s internal speaker will be
disconnected when you connect a headphone.
OPERATION
CONTROL PANEL
1 Mode
2 Set
3 Action Up
4 Target (P/P)
5 LCD
6 Photosensitive Device
7 Enter
8 Power
9 Action Down
10 Headphone Jack
8603052 Metal Detector V4.2
10 For technical questions call 1-800-665-8685
POWER Control the power On and Off
Toggle settings up
Toggle settings down
MODE Selects a target to ignore (eliminates a target)
SET Selects a function
LCD DISPLAY
Sensitivity
Four levels of sensitivity adjustment are
available to be selected.
Depth
Four levels are displayed to indicate the
detected item’s depth.
Highlight a Target
A rectangular box encircling a target icon
flashes when the target is selected or
being detected.
Target Elimination Indicator
Indicates the target that you don’t want
to detect.
Target Icons
To show each of the selected icons.
Tone Volume
Four levels of tone volume are available
to be selected from.
Target
Works together with the Target (P/P)
button to search for the target object.
Target Precision
A full target display appears when
approaching the target.
Battery Condition
Indicator
Indicates the condition of the battery life.
V4.2 Metal Detector 8603052
Visit www.princessauto.com for more information 11
Mode
The factory default is set up originally for
low speed sweep searching when you
switch on the detector. To speed up the
pace of detection, press the Mode button.
IMPORTANT! The fast setting mode
may reduce the detection accuracy.
NORMAL OPERATION STATE
1. Turn on the detector by pressing the Power button once (1 time).
2. The SENS and DEPTH icons (with other icons) should appear on the display.
3. The detector enters in the Normal Operation State.
4. Press the POWER button again to turn off the power supply to the detector.
BATTERIES CONDITION INDICATOR
1. Indicates the condition of the batteries in the battery box. There are four
levels (segments) that will indicate the condition of the batteries.
2. All four segments indicates the batteries are in good condition.
3. One segment is the minimum power at which the detector can be operated.
When the indicator reaches this level and is flashing, it is time to replace
the batteries.
SENSITIVITY ADJUSTMENT
1. In the Normal Operating State, press the SET button and the SENS icon
will flash.
2. Use the or buttons to increase or decrease the sensitivity.
3. Press the ENTER button to confirm the setting and return to the Normal
Operating State.
IMPORTANT! There are four levels of sensitivity adjustment. The more
segments displayed, the higher the sensitivity level. A high level of
sensitivity should always be used for searching since a high level of
sensitivity can detect the deepest and smallest targets, however, at a high
level of sensitivity you may face the problem of a false signal. A false signal
occurs when something shouldn’t sound like a good target but creates a
8603052 Metal Detector V4.2
12 For technical questions call 1-800-665-8685
reading on the detector. This is caused by highly mineralized ground or
interference from power lines, radio stations, etc. As a general rule, reduce
the sensitivity to prevent excessive false signals.
TARGET ELIMINATION SETTING
1. In the Normal Operating State, press the SET button twice (2 times) until
the highlight icon is flashing.
IMPORTANT! The iron nail encircled by the highlight icon means that it
is selected.
2. Press the MODE button. An “X” mark which means “eliminate” will be put
on the selected target.
3. Use the or buttons to select the targets that you do not want the
detector to respond to.
4. Press the MODE button again, the “X” mark will be removed and the target
is restored.
5. Repeat the above steps for setting the other targets.
6. Press the ENTER button to confirm the setting and return to the Normal
Operating State.
TARGET PRECISION
To find the exact location of the target, press and hold the target button, the audio
tone will raise loudly when approaching the target, and the screen will be flashing
segments in the Target Precision display when the exact location is reached.
TONE LOUDNESS SETTING
1. In the Normal Operating State, press the SET button three times (3 times)
until the Tone Volume Icon flashes.
2. Use the or buttons to increase or decrease the tone volume loudness.
IMPORTANT! There are four levels of volume adjustment. The more segments
displayed, the higher the volume level.
3. Press the ENTER button to confirm the setting and return to the Normal
Operating State.
V4.2 Metal Detector 8603052
Visit www.princessauto.com for more information 13
FACTORY SETTING
To restore the detector to the factory setting, press at the same time the ENTER
and the POWER buttons. The detector will return to the original factory settings.
SEARCH TESTING
To familiarize yourself and learn how the detector reacts to different metals by
placing different objects on the ground and passing the detector near and over
the objects. You can test the detector indoor or outdoor.
INDOOR TESTING
1. Turn on the detector and make sure that the detector is in the Normal
Operating State.
2. Place the detector on a table and remove any metal objects including
watches, rings or jewelry that you are wearing.
3. Adjust the search coil so that the searching face points towards the ceiling.
4. Slowly sweep a sample of the target that you want the detector to find at
about 2 to 3 in. above the face of the search coil. The detector produces a
tone for the target when it is detected.
5. Repeat with an eliminated target, such as the pull-tab from an aluminum can.
6. Seep the pull-tab above the face of the search coil. You should note that
the detector does not respond to the eliminated target.
OUTDOOR TESTING
1. Turn on the detector and make sure that the detector is in the Normal
Operating State.
2. Find an area on the ground outside where there are no metal objects.
3. Bury a few sample objects at a distance of 1 to 2 ft apart as targets for
the testing.
4. While holding the search coil level to the ground about 1 to 2 in. above the
surface, slowly move the search coil over the area where you have placed
the samples, sweeping the search coil in a side-to-side motion.
IMPORTANT! When a sample is being detected, a tone will be generated.
5. Slowly lift up the search coil, the depth indicator on the LCD display will
8603052 Metal Detector V4.2
14 For technical questions call 1-800-665-8685
increase. This means that the target is a real one. Return to the original
position to read the depth level of the target.
IMPORTANT! The indicator reading is for reference only. The exact depth of
a target depends on the projection area on the search coil.
OPERATION TIPS
OBJECTS NOT ON THE LIST
If the highlight indicator jumps from one target icon to another or vice versa
while an object is being detected, the detected object may be an object not in
the display list or the soil is highly mineralized. The highly mineralized can be
ruled out by decreasing the sensitivity level and search again.
FALSE SIGNAL
The detector is extremely sensitive and will find very deeply buried objects.
Because of this, trash produced signals and other sources of interference might
cause signals that seem confusing. The key to handling these types of signals is
to dig for only those targets that emit a strong, repeatable signal. As you sweep
the ground, learn to recognize the difference between signals that occur at
random and signals that are stable and repeatable.
To reduce false signals when searching in very trashy ground, scan only a small
area at a time using slow, short overlapping sweeps.
The false signal that the detector indicated might be caused by strong magnetic
or mineralized soil. To be certain with the target, we suggest to work on the
target position, search to prevent the signal disturbed by the magnetic or
mineralized soil.
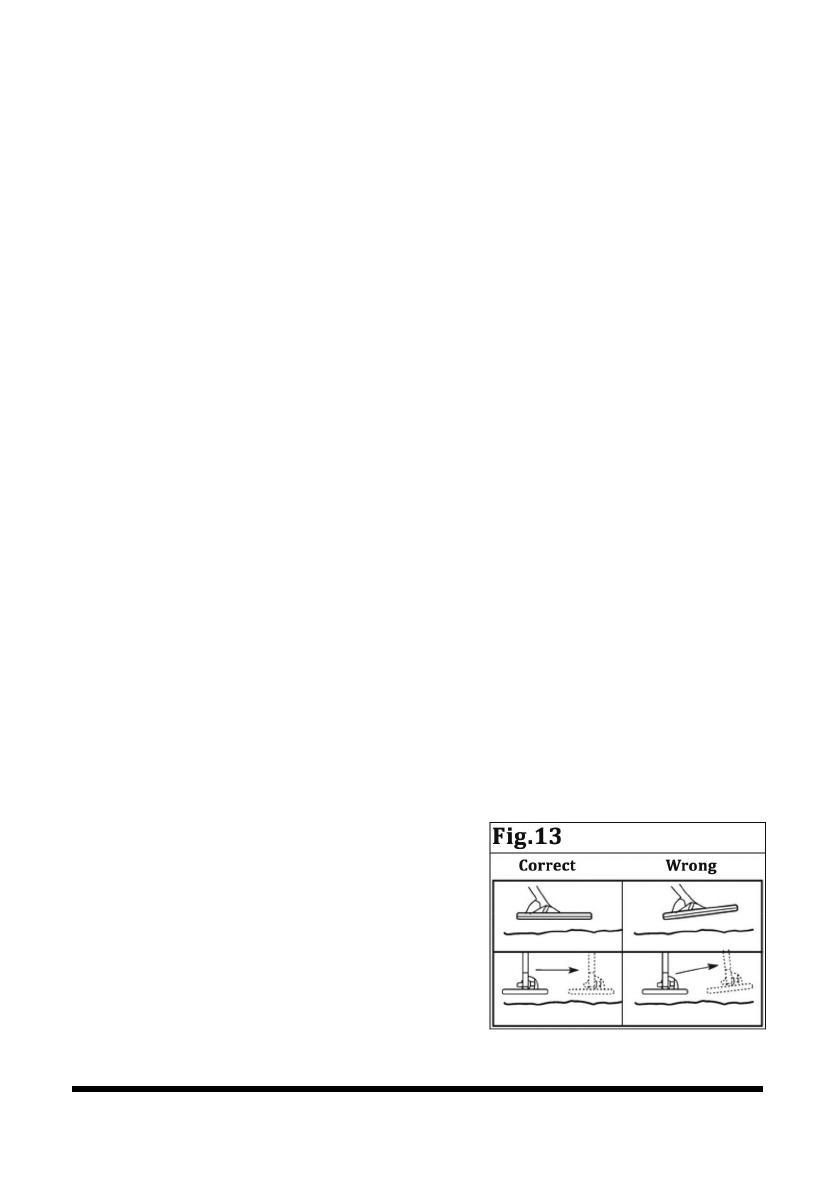
SEARCHING COIL SWEEPING
1. Keep the search coil moving at a
comfortable speed. Take your time. If
you walk too fast, you can’t overlap your
sweeps and you may miss a lot of
ground. Also, if you sweep too fast, you
will lose sensitivity and miss the target.
V4.2 Metal Detector 8603052
Visit www.princessauto.com for more information 15
Keep the search coil parallel and as close to the ground as practical. This is
important for maximum coverage and depth. If you are searching on a
lawn you can rub the coil right on the grass.
Overlap your sweeps by approximately 50%.
2. Search in a methodical manner
sweeping in a tight semicircle. Pay
close attention to where you are going
and where you have been.
METAL DETECTOR
OPERATOR ETHICS
Below are a few basic rules you should
follow while using your metal detector.
1. Always get permission to hunt on private property.
2. Always leave a site cleaner than you found it. Take at least some trash with
you or, if you can, take it all.
3. Always fill in your holes neatly whether you are in a city or remote
wilderness. Leave the land as it was before you disturbed it.
4. Always obey all laws relating to Treasure Hunting.
5. Always return valuable property if you can locate the original owner.
6. Always do whatever you can to give the hobby of Treasure Hunting a
good image.
PLACES WHERE YOU CAN USE YOUR
METAL DETECTOR
1. National Forests and Federal lands, Provincial parks and lands.
2. Corps of engineers, lakes, shorelines and lands.
3. Land Management lands.
4. City or country park lands and public school grounds.
8603052 Metal Detector V4.2
16 For technical questions call 1-800-665-8685
CARE & MAINTENANCE
Your detector does not require a lot of care, but there are a few things you
should do to keep it in operating condition.
1. If you are not going to use the detector for a while, take the batteries out.
2. Avoid extreme temperatures such as inside a closed car sitting in the sun
or extreme cold weather.
3. If you scrape the search coil on the ground, you will eventually wear off the
bottom. Coil replacements are expensive, instead, invest in a coil cover
(otherwise known as a skid plate).
4. Put a rain-resistant cover over the control housing if you are searching in
the rain, fog, or if it is dusty.
5. Keep your detector dry and clean. Wipe off the lower stem (#12) before
sliding it into the upper stem (#10) and keep the stem lock nut (#11)
threads free from sand and dirt.
6. Maintain the tool with care. A tool in good condition is efficient, easier to
control and will have fewer problems.
7. Inspect the tool components periodically. Repair or replace damaged or
worn components. Only use identical replacement parts when servicing.
8. Keep the tool handles clean, dry and free from oil/grease at all times.
9. Maintain the tool’s labels and name plates. These carry important information.
If unreadable or missing, contact Princess Auto Ltd. for replacements.
WARNING! Only qualified service personnel should repair the tool. An
improperly repaired tool may present a hazard to the user and/or others.
DISPOSAL
Recycle a tool damaged beyond repair at the appropriate facility.
Contact your local municipality for a list of disposal facilities or by-laws for
electronic devices, batteries, oil or other toxic liquids.
V4.2 Metal Detector 8603052
Visit www.princessauto.com for more information 17
8603052 Metal Detector V4.2
18 For technical questions call 1-800-665-8685
V4,2 8603052
Vous devez lire et comprendre toutes les instructions avant d'utiliser l'appareil.
Conservez ce manuel afin de pouvoir le consulter plus tard.
Manuel d'utilisateur
Détecteur de métal
8603052 Détecteur de métal V4,2
2 En cas de questions techniques, appelez le 1-800-665-8685
SPÉCIFICATIONS
Description Détecteur de métal automatique
utilisé pour détecter toutes sortes
d'objets métalliques.
Profondeur de détection 1,5 m (4 pi 11 po)
Affichage ACL
Tension de service 7,2 à 9,6 V
Fréquence signal 7,5 kHz +/- 1 kHz
Environnement d'utilisation -20 to 60 ºC (-4 to 140 ºF)
INTRODUCTION
Recherchez des pièces de monnaie, des reliques, des bijoux, de l'or et de
l'argent presque partout avec cet appareil puissant et polyvalent. L'écran ACL
fait de ce détecteur de métal un appareil polyvalent et facile à utiliser.
SÉCURITÉ
AVERTISSEMENT ! Veuillez lire et comprendre toutes les instructions avant
d'utiliser cet outil. L'utilisateur doit respecter les précautions de base
lorsqu'il utilise cet outil afin de réduire le risque de blessure ou de
dommage à l'équipement.
Conservez ce manuel qui contient les avertissements de sécurité, les
précautions, les instructions de fonctionnement ou d'inspection et d'entretien.
DÉFINITIONS DE DANGER
Veuillez-vous familiariser avec les avis de danger qui sont présentés dans ce
manuel. Un avis est une alerte indiquant qu'il existe un risque de dommage à la
propriété, de blessure ou de décès si on ne respecte pas certaines instructions.
Détecteur de métal
  • Page 1 1
  • Page 2 2
  • Page 3 3
  • Page 4 4
  • Page 5 5
  • Page 6 6
  • Page 7 7
  • Page 8 8
  • Page 9 9
  • Page 10 10
  • Page 11 11
  • Page 12 12
  • Page 13 13
  • Page 14 14
  • Page 15 15
  • Page 16 16
  • Page 17 17
  • Page 18 18
  • Page 19 19
  • Page 20 20
  • Page 21 21
  • Page 22 22
  • Page 23 23
  • Page 24 24
  • Page 25 25
  • Page 26 26
  • Page 27 27
  • Page 28 28
  • Page 29 29
  • Page 30 30
  • Page 31 31
  • Page 32 32
  • Page 33 33
  • Page 34 34
  • Page 35 35
  • Page 36 36

Princess auto 8603052 User manual

Category
Edgers
Type
User manual

Princess Auto 8603052 is a versatile and user-friendly metal detector designed to uncover hidden treasures such as coins, relics, jewelry, gold, and silver. With its four adjustable sensitivity levels, you can optimize its performance in various environments. The depth indicator, displayed on the LCD, helps you gauge the depth of detected items. This metal detector is water-resistant, allowing you to explore shallow waters for hidden valuables. It also features a headphone jack for private use and to conserve battery power.

Ask a question and I''ll find the answer in the document

Finding information in a document is now easier with AI

in other languages