Page is loading ...

SevenCompact™ Duo S213
pH/Conductivity Meter
Operating Instructions


Table of Contents
1 Introduction 3
2 Safety Instructions 4
2.1 Definition of signal warnings and symbols 4
2.2 Product specific safety notes 4
3 Design and Function 7
3.1 Overview 7
3.2 Rear panel connections 7
3.3 Display and icons 8
3.4 Key controls 9
3.5 Softkeys 9
3.6 Alphanumeric keypad 10
3.6.1 Entering alphanumeric characters 10
3.6.2 Editing values in tables 11
3.7 Navigating within a menu 11
3.8 Navigating between menus 11
3.9 Endpoint types 11
4 Putting into Operation 13
4.1 Scope of delivery 13
4.2 Mounting uPlace™ electrode arm 13
4.3 Installing power supply 14
4.4 Connecting sensors 15
4.5 Switching the instrument on and off 15
4.6 Connectivity 15
5 Configuring the Instrument 17
5.1 Sample ID 17
5.2 User ID 17
5.3 Stirrer 18
5.4 Data storage 18
5.5 System settings 19
5.5.1 Language 19
5.5.2 Time and Date 19
5.5.3 Access Control 19
5.5.4 Audio signal 20
5.5.5 Operator mode 20
5.5.6 Screen settings 20
5.6 Service 20
5.7 Instrument Self-test 21
6 Measuring pH 23
6.1 Measurement settings 23
6.1.1 Sensor ID / SN 23
6.1.2 Calibration Settings 24
6.1.3 Measurement Settings 24
6.1.4 Endpoint Type 25
6.1.5 Temperature Settings 25
6.1.6 Measurement Limits 26
6.2 Sensor Calibration 26
6.2.1 Running a one-point pH calibration 26
6.2.2 Running a multi-point pH calibration 27
6.3 Sample Measurement 27
Table of Contents 1SevenCompact™ Duo S213

7 Measuring Conductivity 29
7.1 Measurement settings 29
7.1.1 Sensor ID / SN 29
7.1.2 Calibration Settings 30
7.1.3 Measurement Settings 30
7.1.3.1 Reference temperature 30
7.1.3.2 Temperature correction/alpha-coefficient 31
7.1.3.3 TDS Factor 32
7.1.3.4 Conductivity Unit 32
7.1.3.5 Conductivity Ash 32
7.1.3.6 Salinity unit 33
7.1.4 Endpoint Type 33
7.1.5 Temperature Settings 33
7.1.6 Measurement Limits 33
7.2 Sensor Calibration 34
7.3 Sample Measurement 34
8 Dual Channel Operation 36
9 Managing data 37
9.1 Measurement data 37
9.2 Calibration data 38
9.3 ISM data 38
9.4 Transfer Interfaces 39
10 Troubleshooting 40
10.1 Instrument messages 40
10.2 Error limits 41
11 Sensors, Solutions and Accessories 43
12 Technical Data 45
13 Appendix 49
13.1 Buffers 49
13.2 Conductivity standards 51
13.3 Temperature correction factors 53
13.4 Temperature coefficients (alpha-values) 54
13.5 Practical salinity scale (UNESCO 1978) 54
13.6 Conductivity to TDS conversion factors 54
13.7 USP/EP tables 55
13.8 Conductivity ash methods 55
13.8.1 Refined sugar (28 g/100 g solution) ICUMSA GS2/3-17 55
13.8.2 Raw sugar or melasses (5 g / 100 mL solution) ICUMSA GS 1/3/4/7/8-13 55
Table of Contents2 SevenCompact™ Duo S213

Introduction 3SevenCompact™ Duo S213
1 Introduction
Thank you for purchasing this METTLER TOLEDO instrument. The SevenCompact Series is not only a new
generation of intuitive and easy-to-operate bench meters for reliable measurements, they also provide extra
security against mistakes and support your workflow in the laboratory.
Mistakes can be reduced to a minimum because of the following characteristics:
• ISM
®
(Intelligent Sensor Management) technology: the meter automatically recognizes the sensor and
transfers the latest set of calibration data from the sensor chip to the meter. The last five calibrations as
well as the initial calibration certificate are also stored on the sensor chip. These can be reviewed, trans-
ferred and printed. ISM
®
provides additional security and helps eliminate mistakes.
• Multi-language graphical user interface on a large 4.3 inch display with intuitive menu guidance,
making the operating instructions primarily a source of reference.
• Expert and Routine mode for the needs of any operator: in the routine mode, the deletion of data is
prevented and changing those settings that would potentially jeopardize the collection of reliable results,
such as measurement settings, are blocked. This provides extra security for routine daily work. Skilled
workers are advised to employ the GLP mode to enjoy the instruments’ powerful full functional range.
This instrument supports the workflow of a modern laboratory in all stages of the data collection and
archiving process:
• The uPlace™ electrode arm can be operated with one hand and moves perfectly straight up and down
to bring the electrode in the perfect position for the best measurement performance. This allows faster
measurements and poses less risk to tip over the sample vessel and/or damage the head of the sensor!
• Only one keypress required: Read starts a measurement and Cal a calibration. It’s so easy!
• Easy switching between the normal view and the uFocus™. The normal view has all the
measurement parameters and IDs on the display to provide you an instant complete overview. In the
uFocus™ only the most important information is shown in large digits, such as measurement value and
temperature. This enables you to focus completely on the measurement, without getting distracted by
information that is not relevant to you.
• Easy toggling with the soft key Mode. Toggle between the various measurement parameters either
before or during a measurement.
• Versatile data archiving options: print data, export data to a USB-stick, or send data to a PC with
EasyDirect pH software! EasyDirect pH allows to store the data electronically almost unlimited and
export them to Excel, or any other comma separated file for further use seamleassly and easy.
• Versatile data entry procedures: Enter sample / user and sensor IDs either directly on the instrument,
or use a barcode reader or USB-Keyboard to increase efficiency.
At METTLER TOLEDO we are committed to providing you instruments of highest quality and we do all we
can to support you in maximizing the lifetime of your instrument:
• IP54 rating – water and dust protection: we have designed our instrument in such way, that it
withstands spray of aqueous solutions on the housing and connections. This not only provides extra
protection, but also allows easy cleaning of the instrument with a damp cloth.
• Rubber plugs and protective cover provide extra security against dust and spills of aqueous solutions.
Just keep the plug attached to the connections and cover the instrument with the transparent protective
cover when not in use.
Have fun and many reliable measurements with our SevenCompact series of pH, Ion and conductivity
meters!

Safety Instructions4 SevenCompact™ Duo S213
2 Safety Instructions
2.1 Definition of signal warnings and symbols
Signal words
Safety notes are marked with signal words and warning symbols. These show safety issues and warnings.
Ignoring the safety notes may lead to personal injury, damage to the instrument, malfunctions and false
results.
WARNING
for a hazardous situation with medium risk, possibly resulting in death or severe
injury if not avoided.
CAUTION
for a hazardous situation with low risk, resulting in minor or moderate injury if not
avoided.
NOTICE
for a hazardous situation with low risk, resulting in damage to the instrument, other
material damage, malfunctions and erroneous results, or loss of data.
Attention
(no symbol)
for important information about the product.
Note
(no symbol)
for useful information about the product.
Warning symbols
General hazard Electrical shock
Toxic substance Inflammable or explosive substance
Acid / Corrosion
2.2 Product specific safety notes
The instrument has been tested for the experiments and intended purposes documented in the appropriate
manual. However, this does not absolve you from the responsibility of performing your own tests of the
products supplied by us regarding their suitability for the methods and purposes you intend to use them for.
Intended use
This instrument is designed to be used in analytical laboratories by qualified staff. The instrument is suitable
for the processing of reagents and solvents.
Site requirements
The instrument has been developed for indoor operation in a well-ventilated area. Avoid the following
environmental influences:
• Conditions outside of the ambient conditions specified in the technical data
• Powerful vibrations
• Direct sunlight
• Corrosive gas atmosphere
• Explosive atmosphere of gases, steam, fog, dust and flammable dust
• Powerful electric or magnetic fields

Safety Instructions 5SevenCompact™ Duo S213
Staff qualification
Incorrect use of the instrument or the chemicals used in the analysis can lead to death or injury. The
following qualifications are needed for operating the instrument.
• Knowledge and experience in working with toxic and caustic substances.
• Knowledge and experience in working with standard laboratory equipment.
• Knowledge and experience in working in accordance with general lab safety rules.
Responsibilities of the instrument owner
The instrument owner is the person that uses the instrument for commercial use or places the instrument at
the disposal of his staff. The instrument owner is responsible for product safety and the safety of staff, user
and third party.
The operator has the following responsibilities:
• Know the rules for safety at the workplace that are in effect and enforce them.
• Ensure that only qualified staff uses the instrument.
• Define the responsibilities for installation, operation, cleaning, troubleshooting and maintenance and
ensure that the tasks are done.
• Train the staff in regular intervals and inform them about dangers.
• Provide the necessary protective gear for the staff.
Shut down of the instrument in emergency situations
− Pull the plug from the electrical outlet.
Protective Clothing
Wear protective clothing in the laboratory when working with hazardous or toxic substances.
Wear suitable eye protection such as goggles.
Use appropriate gloves when handling chemicals or hazardous substances and check
their integrity before use.
Wear a lab coat.
Safety notes
WARNING
Danger of death or serious injury due to electric shock!
Contact with parts that contain a live current can lead to injury and death.
− Keep all electrical cables and connections away from liquids.

Safety Instructions6 SevenCompact™ Duo S213
WARNING
Danger of injuries and death due to harmful substances!
Chemicals can cause injuries if they come in contact with bare skin or are inhaled.
1 When using chemicals and solvents, comply with the instructions of the producer and
the general lab safety rules.
2 Set up the instrument in a well-ventilated location.
3 Clean any spills immediately.
4 If you measure substances which form toxic gases, place the instrument in a fume
hood.
WARNING
Danger of death and serious injuries due to flammable solvents!
Flammable solvents can ignite and lead to fire and explosions.
1 Keep flammable solvents away from naked flames.
2 When using chemicals and solvents, comply with the instructions of the producer and
the general lab safety rules.
Any other type of use and operation beyond the limits of technical specifications without written consent
from Mettler-Toledo GmbH, is considered as not intended.
FCC Rules
This device complies with Part 15 of the FCC Rules and Radio Interference Requirements of the Canadian
Department of Communications. Operation is subject to the following conditions: (1) this device may not
cause harmful interference, and (2) this device must accept any interference received, including interference
that may cause undesired operation.
This equipment has been tested and found to comply with the limits for a Class A digital device, pursuant to
Part 15 of the FCC rules. These limits are designed to provide reasonable protection against harmful inter-
ference when the equipment is operated in a commercial environment. This equipment generates, uses, and
can radiate radio frequency energy and, if not installed and used in accordance with the instruction manual,
may cause harmful interference to radio communications. Operation of this equipment in a residential area
is likely to cause harmful interference in which case the user will be required to correct the interference at his
own expense.

Design and Function 7SevenCompact™ Duo S213
3 Design and Function
3.1 Overview
1
2
3
4
5
1 On/Off key 2
Display
3
Softkeys
4 Read key
5 Cal key
3.2 Rear panel connections
1 2
3 4
5 6
7 8
9 10
1
BNC socket for mV/pH signal input
2
RCA (Cinch) socket for temperature signal
input
3
Socket for reference electrodes
4
Socket for digital sensor (pH or Conduc-
tivity)
5
Mini-DIN socket for conductivity signal input
6
Mini DIN socket for METTLER TOLEDO stirrer
7
RS232 interface (Printer)
8
DC power supply socket
9
USB-B interface (Computer)
10
USB-A interface (USB-Stick, printer, barcode
reader, keyboard)
PIN assignment for the RS-232 interface. METTLER TOLEDO printers such as RS-P25 can be connected to
this interface.

Design and Function8 SevenCompact™ Duo S213
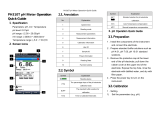
3.3 Display and icons
There are two modes available for the display representation: the full-information screen with all the infor-
mation displayed, and the measurement close-up screen uFocus™, where the measurement information is
shown in large font. To toggle between these views, press and hold Read during, after or before a
measurement.
Standard view
Data Channel Menu Mode
24-06-2016
10:34
InLab 742
uFocus™ view
Data Channel Menu Mode
24-06-2016
10:34
InLab 742
Data Channel Menu Mode
24-06-2016
10:34
InLab Pure Pro
InLab 742
1 2 5 63 4 9
12
11
13
14
26
8
19
2524
20
27
15
16
17
18
10
Icon Description
1 Interval Readings icon (timed interval reading)
2 Routine Mode icon (user access rights are restricted)
3
USB device connected
4 PC connected (for EasyDirect pH)
5 Stirrer icon (appears when stirring is active)
6 User ID
7
Calibration is running
8 7.000 pH
Measurement value and used measurement unit
9 Sample ID
10
◀ Channel selection if both channels are active
11 24-06-2016
10:34
Date and time
12 25°C
Measurement temperature
13 MTC Temperature Correction
ATC: Temperature sensor connected
MTC: no temperature sensor connected or detected
14 Stability Criterion (pH only)
Strict
Standard
Fast

Design and Function 9SevenCompact™ Duo S213
Icon Description
15 Endpoint Type
A: Auto measurement stops automatically when the signal is stable
M: Manual to manually stop the measurement
T: Timed the measurement stops after the preset time
Stability Signal appears if the signal is stable
16 M
Number of data sets in memory
17 ISM
®
sensor connected
18
pH electrode condition
Slope: 95-105% / Offset: ±(0-20)mV (Electrode is in good condition)
Slope: 94-90% / Offset: ±(20-35)mV (Electrode needs cleaning)
Slope: 89-85% / Offset: ±(>35)mV (Electrode is defective or too old)
19 Sensor ID
20 Ref.T. Reference Temperature
21 CC
The cell constant of the conductivity sensor
22
Buffer groups or standards
23
Warning messages
24
Softkeys are buttons whose function changes depending on the context.
See [Softkeys}9]
25
26
27
3.4 Key controls
Key Press and release Press and hold for 2 seconds
Switch meter on Switch meter off
• Start or end measurement
(measurement screen)
• Confirm input or start editing a table
• Exit menu and go back to
measurement screen
Switch between measurement close-up
screen and full-information screen
Start calibration Review the last calibration data
Softkeys
The function of the softkeys varies from
screen to screen
3.5 Softkeys
The meter has four softkeys. The functions assigned to them change during operation depending on the
application. The assignment is shown on the bottom line of the screen.
Data
Access data menu
Mode
Change measurement mode
Press and hold to change the channel
selection
Menu
Access meter settings
Channel
Select measuring channels
Move one position to the right Increase value

Design and Function10 SevenCompact™ Duo S213
Move one position to the left Decrease value
Scroll up in the menu Scroll to next page of results
Scroll down in the menu
Calculate
Calculate the calibration values
Edit
Edit table or value
Select
Select the highlighted function or setting
Delete
Delete selected data
Start
Start the measurement
Save
Save data, setting or value
Interface
Choose the transfer interface.
Yes
Confirm an entry
Transfer
Transfer selected data
No
Reject an entry
3.6 Alphanumeric keypad
3.6.1 Entering alphanumeric characters
The meter has a screen keypad for entering IDs, SNs and PINs. Both numbers and letters are allowed for
these entries. When entering a PIN, each character entered will be displayed as ( * ).
Enter Sample ID
Exit
Press 'Read' to confirm
1 Move the cursor position using the , or keys.
2 Press Read to confirm an entry.
ð The position of the next character that is entered is blinking.
3 Repeat these steps to enter additional characters.
- or -
To delete an entry, select the character. Navigate to Delete and press Read.
4 To confirm and save the entries, navigate to OK and press Read.
- or -
To reject the entries, press Exit.
Entering IDs / PIN
The four softkeys and the Read key are used for navigating on the keypad and entering the ID/PIN.
Example text: WATER
1 If 1 is highlighted, press once.
ð Q is highlighted.
2 Press once.
ð W is highlighted.
3 Press Read to enter W.
4 Reposition the selection to A, T, E and R, confirm each selection with Read.
5 Reposition the selection to OK, and press Read to save the ID.

Design and Function 11SevenCompact™ Duo S213
Note
• Instead of entering an ID with the alphanumeric keypad, you can also use a USB-keyboard or a USB-
barcode scanner. In case a character is entered or scanned that is not available on the instrument
keyboard, the entry will be displayed as an underscore (_).
3.6.2 Editing values in tables
The meter allows you to enter, edit or remove values in tables. (for example, temperature and buffer values
for a customized buffer group). This is accomplished by using the softkeys to navigate from cell to cell.
1 Press Read to start editing the cell in the table.
ð The softkeys on the display change.
2 Press and to enter the value and press Read to confirm.
ð The softkeys change back to and .
3 Navigate to a cell and press Delete to remove a value.
4 To finish editing the table, navigate with the and to highlight Save.
5 Press Read to confirm the action and exit the menu.
3.7 Navigating within a menu
1 Press Menu to enter the settings.
2 Move the selection to a menu item using the or keys and press Select to open the
selection.
3 Apply the required settings using the navigation keys.
- or -
If applicable, move the selection to the next menu item in the hierarchy using the or
keys.
4 Press Exit to return to the previous menu screen, or press Read to return to the measurement screen
directly.
3.8 Navigating between menus
The meter display consists of a measurement frame, softkeys, areas for status icons and underlying menu
areas. To access the menu areas and to navigate between them, use the softkeys.
1 Press Menu to enter the settings.
2 Move the selection to the top of the screen to select the tab using the or keys.
ð The navigation keys to navigate left and right are shown.
3 Move the selection to chose another tab using the or keys.
4 Press Exit to return to the measurement screen.
3.9 Endpoint types
A general setting that defines how the endpoint of the measurement is to be determined.

Design and Function12 SevenCompact™ Duo S213
A
M
T
M
T
A
M
T
M
T
Measurement stopped automatically,
reading was stable
Measurement stopped manually,
reading was stable
Measurement stopped manually,
reading was not stable
Measurement stopped after time,
reading was stable
Measurement stopped after time,
reading was not stable
Defined measurement time elapsed
User presses Read
Signal becomes stable

Putting into Operation 13SevenCompact™ Duo S213
4 Putting into Operation
4.1 Scope of delivery
Unpack the instrument and check the scope of delivery. Keep the calibration certificate in a safe place.
SevenCompact™ is delivered with:
• uPlace™ electrode arm
• Sensors (kit version or according to your order)
• Universal AC adapter
• Transparent protective cover
• CD-ROM with Operating instructions and User Manual (English, German, French, Italian, Spanish,
Portuguese, Polish, Russian, Chinese, Japanese Korean, Thai)
• User Manual (print version, English, German, French, Italian, Spanish, Portuguese, Polish)
• Declaration of conformity
• Calibration certificate
4.2 Mounting uPlace™ electrode arm
The electrode arm can be used as stand alone or it
can be attached to the instrument on the left or right
side, according to your preferences. The height of the
electrode arm can be varied by using the extension
shaft part. Use the wrench to attach the extension
part .
Assembly of the electrode arm
1 Use the wrench to attach the base to the electrode
arm by tightening the screws. The electrode arm
can now be used in the stand alone mode.

Putting into Operation14 SevenCompact™ Duo S213
2 Then insert the foot of the meter to the arm base
and shift the meter in the direction of the arrow to
make the foot fit.
3 Use the lock screw to attach the meter to the base
of the arm.
4.3 Installing power supply
WARNING
Danger of death or serious injury due to electric shock!
Contact with parts that contain a live current can lead to injury and death. If the
instrument cannot be shut down in an emergency situations, people can be injured or the
instrument can be damaged.
1 Check the cables and the plug for damage and replace damaged cables and plugs.
2 Ensure that the cables are arranged so that they cannot be damaged or interfere with
the operation.
3 Ensure that the power plug is accessible at all times.
NOTICE
Danger of damage to the AC adapter due to overheating!
If the AC adapter is covered or in a container, it is not sufficiently cooled and overheats.
1 Do not cover the AC adapter.
2 Do not put the AC adapter in a container.
The instrument is operated using an AC adapter. The AC adapter is suitable for all supply line voltages
ranging from 100...240 V AC ±10% and 50-60 Hz.
1 Insert the correct connector plug into the AC adapter until it is
completely inserted.
2 Connect the cable of the AC adapter with the DC socket of
the instrument.
3 Plug the AC adapter into the wall socket.
PUSH

Putting into Operation 15SevenCompact™ Duo S213
To remove the connector plug, push the release button and withdraw the connector plug.
4.4 Connecting sensors
When connecting a sensor, make sure that the plugs are properly inserted. If you are using a sensor with a
built-in temperature probe or a separate temperature probe, connect the second cable to the ATC socket.
Example
− Connect a pH sensor to the BNC plug and if a temperature probe is integrated, connect the RCA (chinch)
plug to the ATC input.
- or -
Connect a conductivity probe to the conductivity input, a temperature probe is always built in and does
not need to be connected seperatly. If you have a digital sensor connect it to the digital input.
ISM
®
sensor
When connecting an ISM
®
sensor to the meter, one of the following conditions have to be met for the
calibration data to be transferred automatically from the chip of the sensor into the meter and is used for
further measurements. After attaching the ISM
®
sensor ...
• The meter must be switched on.
• (If the meter is already switched on) the Read key is pressed.
• (If the meter is already switched on) the Cal key is pressed.
We strongly recommend you to switch off the meter when disconnecting an ISM sensor. In doing so, you
make sure that the sensor is not removed while the instrument is reading data from or writing data to the
ISM-chip of the sensor.
The ISM icon appears on the display and the sensor ID of the sensor chip is registered and appears on
the display.
The calibration history, the initial certificate and the maximum temperature can be reviewed and printed in
the data memory.
4.5 Switching the instrument on and off
Switching on
− Press and release On/Off to switch on the instrument.
ð The firmware version, the serial number and the current date are displayed for a few seconds. After
that the instrument is ready for use.
Switching off
− Press and hold the On/Off key until the instrument switches to standby mode.
Note
• In the standby mode, the control circuit for the On/Off switch is energized. The rest of the instrument is
no longer energized.
4.6 Connectivity
Thanks to the plug & play capability, USB-sticks, barcode reader and printers are detected automatically.
Connection Use
RS232 interface RS-Printers
USB B interface
EasyDirect pH PC Software
USB A interface USB-printer, USB barcode reader
USB-stick with file format FAT12/FAT16/FAT32

Putting into Operation16 SevenCompact™ Duo S213
The instrument adjusts the baud rate to the following settings in case no automatic baud rate synchro-
nization occurs (only with printer types RS-P25, RS-P26, RS-P28):
Printer Baud rate: 1200
Data bits: 8
Parity: none
Stop bits: 1
Handshake: none

Configuring the Instrument 17SevenCompact™ Duo S213
5 Configuring the Instrument
1.
Sample ID
5.
System Settings
1. Enter Sample ID 1. Language
2. Auto Sequential 2. Time and Date
3. Select Sample ID 3. Access Control
4. Delete Sample ID 4. Beep
2.
User ID 5. Routine/Expert Mode
1. Enter User ID 6. Screen Settings
2. Select User ID
6.
Service
3. Delete User ID 1. Software Update
3.
Stirrer 2. Export Settings to USB-stick
1. Stir Before Measurement 3. Factory Reset
2. Stir During Measurement
7.
Instrument Self-test
3. Stir Speed
4. Stirrer Voltage Settings
4.
Data Storage
1. Storage Mode
2. Storage Destination
3. Time Interval Readings
4. Printout Format
5.1 Sample ID
Navigation: Menu > > Sample ID
Parameter Description Value
Enter Sample
ID
Alphanumeric sample ID with up to 16 characters can be
entered.
A maximum of 10 sample IDs are stored in memory and listed
for selection. If the maximum number of IDs has been stored,
the meter will display the message Memory is full.
1…16 characters
Auto Sequential On: Using this setting will automatically increment the sample
ID by 1 for each reading. If the last character of the sample ID
is not a number, then the number 1 will be added to the
sample ID with the second sample. This requires the sample ID
to have less than 16 characters.
Off: The sample ID is not incremented automatically.
On | Off
Select Sample
ID
To select a sample ID out of a list of already entered sample
IDs.
List of available
sample IDs
Delete Sample
ID
To delete an existing sample ID out of the list, select the
sample ID you want to delete and press Read.
List of available
sample IDs
5.2 User ID
Navigation: Menu > > User ID
Parameter Description Value
Enter User ID
Alphanumeric user IDs with up to 16 characters can be
entered. A maximum of 10 user IDs are stored in memory and
listed for selection. If the maximum number of IDs has been
stored, the meter will display the message Memory is full.
1…16 characters
Select User ID
To select a user out of a list of existing users. List of available user
IDs

Configuring the Instrument18 SevenCompact™ Duo S213
Delete User ID
To delete an existing user ID out of the list, select the user ID
you want to delete and press Read.
List of available user
IDs
5.3 Stirrer
You can connect the METTLER TOLEDO external magnetic stirrer to the instrument. This stirrer is powered by
the instrument and will be automatically switched on/off according to the settings.
If a uMix or Compact stirrer is connected to the stirrer output, the option Stir During Measurement or Stir
Before Measurement can be selected. When the stirrer is active, the symbol is displayed.
Navigation: Menu > > Stirrer
Parameter Description Value
Stir Before
Measurement
On: Using this setting will include a stirring period before the
measurement starts (after pressing Read).
Off: No stirring before the measurement will take place.
On | Off
Enter Time Defines the stir duration [s] if Stir Before Measurement is
activated.
3…60
Stir During
Measurement
On: Using this setting will results in stirring during the
measurement. When the measurement is stopped, the stirrer is
automatically switched off.
Off: No stirring during the measurement will take place.
On | Off
Stir Speed
Defines the stir speed in steps, according to preferences and
the characteristics of the sample.
1…5
Stirrer Voltage
Settings
Defines the minimum and maximum voltages for the stirrer.
Stir Speed1: Defines the voltage for the lowest stirring speed.
Stir Speed5: Defines the voltage for the highest stirring speed.
0.5…8.0V
5.4 Data storage
Navigation: Menu > > Data Storage
The meter stores up to 2000 sets of measurement data in the memory. The number of data sets already
stored in the memory is indicated by MXXXX on the display. A message appears on the display when the
memory is full. To save further measurements if the memory is full, data has to be deleted first. You can
select between automatic and manual storage. Press Exit to discard the endpoint readings.
Parameter Description Value
Storage Mode Automatic Storage: Stores/transfers every found reading to the
memory/interface or both automatically.
Manual Storage: If selected, Save appears on the display as
soon as a measurement has found an endpoint. Press Save to
save or transfer the endpoint readings. The readings can only
be stored once. When the data is stored, Save disappears from
the measurement screen.
Automatic Storage |
Manual Storage
Storage Desti-
nation
Select to transfer the data to the memory, Printer or PC.
Memory: Data will be stored in the internal memory of the
instrument.
Printer: Data will be printed to the connected printer.
PC: Data will be transferred to the connected PC, running
EasyDirect pH.
Memory | Printer | PC
Interval
Readings
Activates the function to measure at intervals.
The measurement series stops according to the selected
endpoint format or manually by pressing Read.
On | Off
/