Page is loading ...

IMPORTANT SAFETY INSTRUCTIONS
LIGHTED BULB IS HOT!
WARNING- To reduce the risk of FIRE or INJURY TO PERSON:
• Turn off and allow to cool before replacing bulb.
• Bulb gets HOT QUICKLY! Contact switch only when turning off.
• DO NOT remain in light if skin feels warm. (Light is intense, may cause
"sunburn")
• DO NOT look directly at lighted bulb.
• Keep materials away from bulb that may burn.
• Use ONLY with wattage specified or lower.
• DO NOT touch bulb at any time, use a soft cloth. Oil from skin may
damage bulb.
• DO NOT operate fixture with missing or damaged glass.
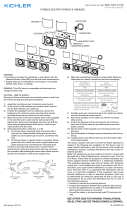
1) Turn off power.
2) At the center of the backpan are knockout slots. Remove the set that
matches your outlet box.
3) Pass mounting screws through holes in backpan and secure in place
with hexnuts.
4) Slip wire from sockets through hole near center of backpan.
5) Connect fixture ground wire to outlet box ground wire with wire connector.
(Not provided.) Never connect ground wire to black or white power supply
wire.
6) Make wire connections (connectors not provided.) Reference chart
below for correct connections and wire accordingly.
7) Screw the backpan to the outlet box. (Screws not provided)
8) Anchor the backpan to the wall using the set of slots at each end, with
wood screws, toggle bolts, plastic anchors etc. (Not provided)
9) Slip faceplate over mounting screws and backpan. NOTE: Be certain
wires do not get pinched between backpan and faceplate.
10) Secure faceplate to backpan using lockwashers and ball knobs.
11) Slip trim ring over socket cup and screw thumbscrews into holes in
socket cup.
12) Insert recommended bulb. CAUTION: DO NOT touch bulb with bare
hands. If this happens, clean bulb with denatured alcohol and a lint free
cloth.
13) Carefully slip glass over bulb and secure in place with thumbscrews.
(DO NOT over tighten)
Connect Black or
Red Supply Wire to:
Connect
White Supply Wire to:
Black White
*Parallel cord (round & smooth) *Parallel cord (square & ridged)
Clear, Brown, Gold or Black
without tracer
Clear, Brown, Gold or Black
with tracer
Insulated wire (other than green)
with copper conductor
Insulated wire (other than green)
with silver conductor
*Note: When parallel wires (SPT I & SPT II)
are used. The neutral wire is square shaped
or ridged and the other wire will be round in
shape or smooth (see illus.)
Neutral Wire
IMPORTANTES CONSIGNES DE SÉCURITÉ
UNE AMPOULE ALLUMÉE EST BRÛLANTE !
AVERTISSEMENT: Pour réduire les risques D’INCENDIE ou DE BLESSURE:
• Éteindre et laisser refroidir avant de remplacer l’ampoule.
• Les ampoules chauffent TRÈS RAPIDEMENT ! N’éteindre qu’à l’aide de
l’interrupteur.
• NE PAS rester dans la lumière si une sensation de chaleur est ressentie
sur la peau. (La lumière est intense et peut provoquer des coups de soleil).
• NE JAMAIS regarder directement une ampoule allumée.
• Tenir les matériaux à l’écart d’une ampoule pour éviter qu’ils ne brûlent.
• Utiliser UNIQUEMENT des ampoules à la puissance nominale indiquée
(watts) ou à une puissance inférieure.
• NE JAMAIS toucher l’ampoule à main nue, se servir d’un tissu doux.
L’huile de la peau peut endommager l’ampoule.
• NE PAS utiliser de luminaire sans verre ou avec verre endommagé.
1) Couper le courant.
2) Au centre du panneau arrière se trouvent des fentes amovibles. Enlever
l’ensemble correspondant à votre boîte à prises.
3) Passer les vis de montages par les trous du panneau arrière et fixer à
l’aide des écrous hexagonaux.
4) Passer le fil des douilles par le trou près du centre du panneau arrière.
5) Avec l’attache-fil (qui n’est pas fourni), connecter le fil de mise á la terre
au fil d’alimentation noir ou á celui qui est blanc.
6) Connecter les fils (connecteurs non fournis). Se reporter au tableau ci-
dessous pour faire les connexions.
7) Visser le panneau arrière sur la boîte à prises. (Vis non fournies).
8) Fixer le panneau arrière au mur avec l’ensemble des fentes sur chacune
des extrémités à l’aide des vis à bois, boulons à ailettes, brides d’an
crage en plastique etc. (non fournis)
9) Passer la plaque de contact sur les vis de montage et le panneau
arrière. REMARQUE: Veiller à ce que les fils ne se retrouvent pas
coincés entre le panneau arrière et la plaque de contact.
10) Fixer la plaque de contact au panneau arrière à l’aide des rondelles de
sécurité et des boules.
11) Passer la garniture circulaire sur le boîtier de douille et visser les vis à
serrage à main dans les trous du boîtier de douille.
12) Introduire l’ampoule recommandée. ATTENTION : NE PAS toucher l’am
poule à main nue. Si la peau entre en contact avec l’ampoule, nettoyer
l’ampoule avec de l’alcool dénaturé et un tissu non pelucheux.
13) Faire glisser soigneusement le verre sur l’ampoule et fixer à l’aide des
vis à serrage à main. (NE PAS serrer avec excès).
OUTLET
BOX
BOITE DE
JONCTION
MOUNTING SCREW
VIS DE MONTAGE
KNOCKOUT SLOT
FENTE AMOVIBLE
BACKPAN
PANNEAU
ARRIÈRE
HEXNUT
ECROU A
SIX PANS
FACEPLATE
PLAQUE DE CONTACT
BALL KNOB
BOULE
SOCKET CUP
BOÎTIER DE
DOUILLE
TRIM RING
ANNEAU DE
GARNITURE
THUMBSCREW
VIS À SERRAGE
À MAIN
GLASS
VERRE
INSTRUCTIONS
For Assembling and Installing Fixtures in Canada
Pour L’assemblage et L’installation Au Canada
Connecter le fil noir ou
rouge de la boite
Connecter le fil blanc de la boîte
A Noir A Blanc
*Au cordon parallèle (rond et lisse)
*Au cordon parallele (à angles droits el strié)
Au bransparent, doré, marron, ou
noir sans fil distinctif
Au transparent, doré, marron, ou
noir avec un til distinctif
Fil isolé (sauf fil vert) avec
conducteur en cuivre
Fil isolé (sauf fil vert) avec
conducteur en argent
*Remarque: Avec emploi d’un fil paralléle
(SPT I et SPT II). Le fil neutre est á angles
droits ou strié et l’autre fil doit étre rond ou
lisse (Voir le schéma).
Fil Neutre
LOCKWASHER
RONDELLE
D'ARRÊT
IS--6464-CBDate Issued: 8/17/01
/


