Whirlpool ADP 590 WH User guide
- Category
- Dishwashers
- Type
- User guide
This manual is also suitable for

Read this Manual
Dear Customer,
• Please carefully read this manual before using the
dishwasher, it will help you to use and maintain the
dishwasher properly.
• Keep it to refer to it at a later date.
• Pass it on to any subsequent owner of the appliance.
This manual contains sections on safety Instructions,
Operating Instructions, Installation Instructions and
Troubleshooting Tips, etc.
Before Calling for Service
• To review the section on troubleshooting Tips
will help you to solve some common problems by
yourself .
• If you can not solve the problems by yourself,
please ask for the help of professional technicians.
NOTE:
The manufacturer, following a policy of constant
development and updating of the product, may make
modifications without giving prior notice.
1) Safety Information.................................................... 29
2) Disposal .................................................................... 30
3) Operating Instructions............................................. 31
Control Panel ............................................................. 31
DishwasherFeatures .................................................. 31
4) Prior using for the first time.....................................32
A Water Softener ....................................................... 32
B Loadingthe Saltinto the Softener ............................ 33
C Fillthe Rinse Aid Dispenser .................................... 33
D Functionof Detergent.............................................. 34
Howtouse the 3 in 1 function...................................... 36
5) Loading the Dishwasher Basket............................. 37
Attention before or after loading the Dishwasher
Baskets ...................................................................... 37
Loading the upper Basket .......................................... 37
Loading the lowe Basket............................................ 37
Cutlery Basket............................................................ 39
6) Starting a washing programme .............................. 40
Wash Cycle Table...................................................... 40
Turning on the Appliance ........................................... 41
Change the Programme............................................. 41
Att he End of the Wash Cycle .................................... 41
7) Maintenance and cleaning ...................................... 42
Filtering System ......................................................... 42
Caring for the Dishwasher ......................................... 43
8) Installation instruction............................................. 44
Positioning the Appliance........................................... 44
About Power Connection ........................................... 44
Water Connection ...................................................... 45
Start of dishwasher .................................................... 46
9) Troubleshooting Tips............................................... 47
Before calling for service............................................ 47
Technical information................................................. 49
28

This appliance must be grounded. In the event of a
malfunction or breakdown, grounding will reduce
the risk of anelectric shock by providing a path of
least resistance of electric current. This appliance
is equipped with a cord having an equipment-
grounding conductor and a grounding plug.
The plug must be plugged into an appropriate outlet
that is installed and grounded in accordance with
all local codes and ordinances.
Improper connection of the equipment-grounding
conductor can result in the risk of an electric shock.
Check with a qualified electrician or service
representative if you are in doubt whether the
appliance is properly grounded. Do not modify the
plug provided with the appliance; If it does not fit
the outlet. Have a proper outlet installed by a
qualified electrician.
Keep children away from detergent and rinse aid, keep
child away fromthe open door of the dishwasher,
there could still be some detergent left inside.
ren
Do not abuse, sit on, or stand on the door or dish
rack of the dishwasher.
Do not wash plastic items unless they are marked
dishwasher safe or the equivalent. For plastic items
n
ot so marked, check the manufacturer's
recommendations.
Us eon ly deterge nt and rins ead ditiv es
design ed for an aut omatic d ishwasher.
Ne ver u ses oap,l aundr yde terg ent, or h and
wa shin gdeterg ent in your d ishwash er.K eep
these pr oducts out of th ere ach of child ren.
During installation, thepowersupply mustnot
beexcessively ordangerouslybent orflattened.
Do not tamper with controls.
Do not operate your dishwasher unless all
enclosure panels are properly in place. Open
the door very carefully if the dishwasher is
operating, there is a risk of water squirting out.
Do not place any heavy objects the
door when it is open. The appliance could tip
forward.
on or stand on
When load in g ite m s to be w ash ed:
1)Locatesharp itemssothat theyarenotlikely
todamagethedoorseal;
2 Warning: Kni ves and otheru te nsil swi th
sha rp p oin t s m u st be loa ded i n t h e bask et
w ith their pointsd own or p lace di n a
horizontalposition.
)
When us ing your di shwasher, yo ush ould
preve ntpl astic items from com in g int oco nt act
wit hthe he ating elem ent.(This i nstru ction is onl y
applica ble to machines wit ha vi sualh eating
ele ment.)
I fthe suppl y cord is d am aged, it must be rep laced
by the m an ufact urer or it sse rv ic eagent or a
si mi larly q uali fie d perso n in o rde r to avo id a
hazar d.
Pl ea se d is pose of pack ing mater ial s properl y.
U se the dishwasher only for its intended function.
Remove the door tothe washing compartment when
removing an old dishwasher from service or discardi ng it.
Dishwasherdetergentsare stronglyalkaline, they
can be ext re m e ly d anger ous i f s wa l lo w e d.Avoi d
contact with skin and eyes an dke ep children awa y
from th e dis hwasherw hen t he door is open.
Check thatthe detergentcomparmentisempty
aft er com pletio nof thew ashcycle.
Th e app lian ceis tob eco nn ected tot he water
mainsusing new hosesets and that oldhose-sets
should n o t b e reused .
The maximumnumberof place settingstobe
was hed i s9 .
The maximumpermissibleinletwaterpressureis
1Mp a .
The minimumpermissibleinlet waterpressureis
0.04Mpa.
Children should be supervised to ensure that they do
not play with the appliance.
T his appliance is not intended for use by persons
(including children with reduced physical, sensory or
mental capabilities, or lack of experience and
knowledge ,unless they have been given supervision
o r instruction concerning use of the appliance by a
person responsible for their safety.
)
When using your dishwashe r, fol low the p rec aut ions list ed below:
Th edoo rsh ould not be left o pen,
since th isco uld incr ease the risk of trippi ng.
29

D
ispo se o ft hedish wa sher pack ag ingm aterial c orrectl y.
All pa ckaging mate rials ca nbe r ec ycled .
Pl ast ic pa rt sa rem ark edw ith th estand ardi nternati onala bb reviat ion s:
PE fo r polyethylen e,e .g.s hee t wrappin gm ater ia l
PS for polystyrene,e.g.padding material
PO M polyox ymethylene, e.g. pla stic c lips
PP pol ypr opylene , e.g . Salt fill er
AB S Acr yl onitri leB utadiene St yrene, e. g. Contro lPa nel .
Packaging materialcouldbedangerous for children!
Fo rdi spos ing ofpa ckage a nd th ea ppli ance ple ase goto a re cy cling cen tre. Ther efor e cut
off the powersupplycableand mak ethe doorclosingdevice unusable.
Cardboard packaging ismanufactured fromrecycledpaper and shouldbedispos edin the
w ast e paper c ollecti on for re cy cling .
By en surin gth ispr oduct is dispo se d of corr ectl y, you wil lhel p pre ven tpo tentialn egat ive
con se quences for t heenvi ronm ent a nd hum anh eal th,w hich cou ldo ther wise be c aused
byinappropriatewaste handling of thisproduct.
Fo rm ored eta iled infor mat iona bou t rec ycli ngo f this prod uc t, please con tac t your loca l
ci tyoffice and your hou seh oldw aste dispos alse rvi ce.
DISPOSAL :Do not dis pose th is pr oduct as unsort ed municip alwa ste. Collect ionof such
waste sep arately for spec ial tr eatment i s n eces sary.
WARNING!
30

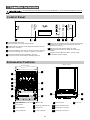
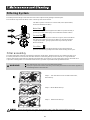
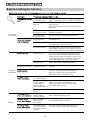
Ba ck Vie w
Front view
5
Pr ogr am i ndicat or l ights and but ton: To s el ect
one o f the seven a nd s how t he washing pr ogram.
2
3
4
3in1 indic ator l ight / 3in1
function but ton: To select an d show 3in1 .
Start and reset b u tton: To start the selected washing
progr am or re set t he washi ng p rogr am when the
machine is workin g.
Delay indicator lights: To show delay washing time 3 hours,
or 6 hours, or 9 hou rs.
6
Salt an d r inse a id warning light s:To sho w
when the salt cont ainer or disp enser ne ed to be
refilled
7
Power indicator light and switch:To turn on/off
and sho w the power su pply.
Delay startbutton:ToPress this button toset thedelayed
hours for wash ing up to 3 h ours, or 6 hours, o r 9 ho urs.
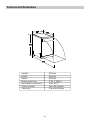
MainFilter
Deterg entD ispenser
CupShelf
Cutlery Basket
CoarseFilter
Ri nseAi d Disp ens e r
Inletpipe connector
Drainpipeconnector
Low er Bask e t
Sp ra yA rm s
Upp er B ask e t
1
Sa lt C ontainer
Dishwasher Features
Control Panel
beforeusingit forthe firsttime.
Togetthe best perform ance fromyourdi shwas her,read all operatinginstructions
5
6
7
8
9
10
12
11
3
2
4
11 12
1
2
3
4
5
6
7
8
9
10
on
Off
13
Tray ass
13
3
4 5
6
7
31

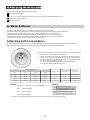
Be fore u sing you rdi shwas he r for the first ti me :
Th ewat erso ftener must bes etm anually, using the w ater hard ness di al.
The wat er so ftener is des igned to rem ove mineral san dsa lts fr omt hewat er, w hich w ouldh ave
a detrim enta lo r adverse eff ect on the op eration of the app liance .The h igh er the
content oft hese miner al san dsa lts, the har de r your wat er is. The softe ner s hould b e
adju st ed accordi ngt othe ha rdness o fthe water in you rarea. Your loca lWaterAuthor ity
can advise you onthehardnessofthewaterinyourarea.
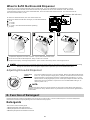
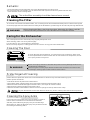
Adjusting Salt Consumption
Th edishwasher is de sig ned to al low for a dj ustment i n the amo untof sa lt co nsumed bas ed onthe ha rdness o f
thewaterused.Thisisintended tooptimiseandcustomisethelevelof salt consumption.
1. Unscrew thecap fromthesaltcontainer.
2. T herei s ar ingo nth e con tai nerw ith a na rr ow o ni t( se e fi gure
ontheside),ifnecessary, rotate thering intheanticlockwise
dire ctionfro mth e"-" Setting tow ardthe"+"sign, base don the
hardne sso fthe w at er being u sed.
It is rec ommende dthat a dju stme nts shou ldb e made i n
acco rd ance wit h t he f oll owin g sc h em e:
Contact your l ocalwater bo ardf ori nformation on the hardne ssof your w at ersu pply.
dH
mm ol /l
0~1 40~8 0~1.4
/
0
/
14~3 98~22 1.4~3.9 - 20 50
39~8022~45 3.9~8 Mid 40 25
+
60 16
fH
0~1 0
10~28
28~56
Clar ke
°
Clark: Britishdegree
°
fH: French degree
°
DH : Ger man degree
dH =1.25 Clarke=1.78 fH=0.178mmol/l
Note:1
°°
WATERHARDNESS
SelectorPosi tion
Salt consum ption
(gram/cycle)
Aut o no my
(cycles/1kgs)
Pl eas e fol lo w the s teps bel ow f or a djus tmen t in s alt cons um ptio n.
°
""/
"-"
"+ "
"Mid"
Note:2
Settingtowardthe"+"sign
Settingtowardthe"-"sign
Settingtowardbetween
the "-" sign and "+" sign
No sa lt n eed adde d
45~60 80~1 07 56~75 8~11
A. Water Softener
A. Set t he wate rsof tener
B. Pou r 1 2 li tre o fwa ter i nsi de thesa ltco ntainer a ndt hen f il l with d ish wash er sa lt
/
C. Fi ll the r inse ai d d i spens er
D. Fillindetergent
32

normal for a s mall a mount of water to c om e out o f th e sa l t co nta in er.Itis
1.The s alt contai ne r must onl y be ref illed when t he salt wa rn ing ligh tin t he control panel com es on.
Depend ing on how wel l the salt diss olves, th esa lt warni ng light may stil lbe on even t hough the
salt contai ner is filled .
If ther eis n osa ltw arning light i n the con trol p anel (fo rsome M odels),you c ane stim at e when to f ill
the salt i nto the so ftene rby the cycles t hatt he dishw asher has run.
2. If th erea re spi ll s of the salt, a soa kor a rapid pro gram s hould be run to re mo vet he excessive sa lt.
Always u se the sal ti ntended for u se wi th dishw asher.
The sa lt c ont ain er i sl ocated ben eath the l ower bas ket and sh ould b efill eda se xplaine di n the
foll ow ing:
Attention!
Only use salt spe cif ically designe dfor t he usei nd ishw ash ers! E very ot hertype of
salt no t speci f ically de sig ned fo r t heu se in ad ishwas her, espe cially tab le salt, wi ll
damage t hew ater sof tene r. I n case of d amages caused b y the use o fun suit able
salt t he ma nuf acture rdoe s notg ive any wa rranty nor is liabl e fora ny damage scau sed.
Only f il lwi ths alt justb efo re star ting one o fth eco mp lete washi ngp ro gr ams.
This will p reve ntany g rains of s alt or salt y water, w hi ch ma y have b een spill ed,
remain ing on the bottom o fth e machi nefor any p eriod of ti me , which m aycau se
c o rr osio n.
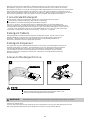
B. Loading the Salt Into the Softener
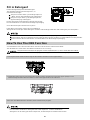
C. Fill the RinseAid Dispenser
Th er inse aid is rel eas edduri ngt he fi nal rin se to pr event wat er fro m f orming dr oplets o ny our dis he s, whic h can l eave
spots ands treaks. It al so improve sdryi ngby allow in g water to roll off thed ishes .Your di shwasheri s desi gned to
usel iquid rins eai ds.The r in se a iddi spen ser isl ocated inside t he d oor nex t tot he detergent d ispens er. To fill th e
dispenser,openthe capand pourthe rinse aidintothe dispenseruntilthelevelindicatorturnscompletelyblack.
Thevo lume o ft herins eaid contai neris abou t 110ml.
RinseAid Dispenser
Function of RinseAid
Rinse aid is aut om at ic ally added d uring t hel astr inse, ensur ing thor ough rinsi ng , and spo tan ds treak free dryi ng.
Attention!
Only use branded rinseaidfor dishwasher.Neverfilltherinseaid dispenserwithanyothersubstances
(e.g. Dishwasher cleani ng ag en t, liq uid dete rg e nt ).Th is wou ld damag e the a pp li ance.
A Remove the lower basket and then unscrewandremovethe cap fromthesaltcontainer.
B Before thefirstwash,fill 1lt. ofwater inthe saltcontainer of your machine.
C Pl ace the e nd of t hefun nel ( su ppli ed) into the ho le and introd uce abou t 1kg of sal t.
D Af te rf il ling th eco ntain er, scr ewth ec ap t ightly b ac k clo ckwise.
E Usu ally, the salt warni ng light wi ll stop bei ng il lumi nated with in 2 -6 days afte rth es altc o nt ainer ha sbe en fi lled wi t h
sal t.
F Imm ed iat el ya ft erf illing t hesalt into th esa ltc ontain er, a was hing pr ogram should be start ed (Wesuggest to use t he
soak orrapidprogram).Otherwisethe filter system, pump or otherimportantpartsofthe machinemay bedamaged
bysalty water.This isoutof warranty.
33

To op ent he d i spen ser, tur nt he ca p tothe " open" ( left) a rrow an dl ift i t o ut .
Po ur the ri nse ai d int o th e disp ens er, b eing car eful n ot to o ver fill .
Replace the cap b y inserting it aligned w ith "open " arrow and turnin git t ot he cl osed (righ t) arrow.
Adjusting RinseAid Dispenser
The ri nse aid dis penser ha s six or four s ett i ng s. Alw ays star twi th t hed ispens er
set o n"4". I fsp ot s and poor dr ying are a p roble m, i ncre ase t he amo unto fr inse
aid d ispensed by remov in gthed ispens erl idan dr ot atin gt he d ial to "5" .If the
dishes s til l are not dr yi ng prope rlyo r are s how sp ots,a dj ustth e di alto t he n ext
highe r lever un til your dishes a resp ot-free. The recom men ded set ting is "4".
(Fa ctory valueis "4".)
Increasethedose iftherearedrops of waterorlimespotsonthe dishes afterwashing.
Reduceitifthere aresticky whitis hstains on your dishes ora bluish filmonglassware or
knife blades.
1
2
3
As t he rinse aidd imin ishes,t he siz eo f th e black dot
ontherinse aidlevel indicator changes,asillustratedbelow.
Full
3/4full
1/2full
1/4 full- Should refilltoeliminatespotting
Em pty
Adjust lever
(Rinse)
When to Refill the RinseAid Dispenser
Ifth erei s no ri ns e-aid wa rning ligh t in t hec ont rol panel ,you can estimat ethe amount f ro m th e colo ur
ofth eop tical level ind icator C loca ted ne xtto t hec ap. When th erin se- aidc onta iner i sful l,th e whole
indicato rwil l bed ark . As the rinse -aid dimini sh es,t hes izeo f the dark dot de crea ses. You should n ev er let
t he r inse ai d lev el f a l l 1 / 4 full.
durin gth e next wa sh. Don 'tf orget t ore pla cet he cap be for e you clos edis hwa sher do or.
Clean u p a n y rinse aid spilled whi le du ri n g fi llingwi th a n ab so rbent cl oth t o av oi d ex ce ssi v e f oami n g
NOTE:
Deterge nts w ith its chem ical ingred ients a re necess ary t or emove dirt ,c rus hdirt an d trans po rt it o ut of the di shwashe r.
Mostofthecommerci al qualitydeterge ntsare suitableforthispurpose.
D. Function of Detergent
Detergents
The reare 3 sorts of det e rge nt s
1.Withphosphate andwithchlorine
2.With phos phate and without c hlorine
3.Wi thout phosph at e and with out chlo rine
""
C ( Ri nse - Ai d i n dic at o r)
6
34

Amount ofDetergent toUse
Prop erU se of De terg ent
Use o nly deterge nts pecifical lym ade for the u sei n dish wa shers. Ke ep your det ergentfr esh and dry.
Don'tput powdereddetergentinto the dispenseruntil you'reready towash dishes.
Dishwash erde tergent i sco rr osive! Takec are to kee pi tout of r each of c hildren.
WARNING!
Based ontheir chemicalcomposition,detergentscanbesplitintwo basictypes:
Theuse of normal washingprograms incombinationwithconcentrated detergents
redu ces poll ut iona nd is g ood for your dish es ; these wash p ro g ram sare spec ifically mat che d
to t he di rt- diss olvin g pro pe rti esof th ee nz yme sof the conce nt rated deterg ent . For this rea son
normal washprogramsin whichconcentrated detergentsareused canachievethe same
results thatcanotherwiseonlybe achievedusing intensive programs.
“”
“”
“”
Detergent tabletsof differentbrandsdissolve at differentspeeds. For thisreasonsome
dete rge nt ta blet sca nnot dissolve and dev el op the irfu ll cle anin gpo wer dur ing s ho rt
prog ra ms. There fore please u se l ong program swh enu sin gd eterg ent t ablet s, t o
ensure the com plet e re mova l of de t er g e n t r e si du als.
The dispens er m ust be re fill ed bef ore the s tar t of each wash cy cle f ollowing the i nst ructi ons
provided in t hew ash cyclet able . You r dis hwa sher uses le ssde ter gent an dri nse aid tha n
Conventionaldishwasher.Generally, onlyone tablespoon of detergent is neededfor
anormal washload. Moreheavily soileditemsneedmoredetergent.Alwaysaddthe
dete rgen tj us tb e fo re star ting the dishwas her, othe rwis e it coul dg e tda mp a nd w ill n ot
di s solv e prope rl y.
Concentrated Detergent
DetergentTablets
Detergent Dispenser
Always a ddth edete rg entjust b efo re start ingea chw ashcycl e.
Only use branded detergentaidfordishwasher.
If the l id is cl osed: press release butt on.T he li d will spring ope n.
conventional, alkaline detergentswithcausticcomponents
l ow a lkalinec onc ent r ated det ergents w ith natur a l e nzy mes
Normally new pul ver ised dete rge nt is with out phospha te.T hus the wate rsoften erfu nction of
phosph ate i s not gi ve n. I n th i s c a se w e r e com mend t o f i ll sa l t in th e sa lt co nta i ner e ven whe n
the hardness o fwater is o nl y 6 d H.I f dete rg entsw itho utph osphate are used in the caseof hard wat er
often whi tes pots appear on d ishesan dgl asses.I n this cas epl ease add mo re d eter gent to r each
better r esul ts . Dete rg en ts wit h o ut chlor ine d o on ly ble ach a lit tl e. Stro ngand col o u red s p o t s wi ll no t
ber emoved complete ly. I nth isc ase p leasechoos ea p rog ram wi th a hi gher tempera ture.
°
35

I fyou use 3i n1 ta ble ts in o ther pro gram s,t he appliance will not ac hieve a go od p erformance.
Only the 3in1 fun ction (for the prog ram :i nt ensi ve/N orm al /E co.) Can be used w it h 3in 1t ablet s.
Fillt he de ter gent dispens erw ithd etergen t.
Th e m ark ing i n d i c ates th e dosing l evels , as
i ll us tra ted o n t he r igh t:
Th eplace of m ain wash cyc ledete rg ent pl aced ,
M IN me ans appr oxim ate ly2 0go f det erge nt.
“”
Th eplace o fpr e-wash c ycle det erge ntp laced,
ap prox ima tely 5 go fdet ergen t
Pleaseo bser veth emanu facturer sdos ing and sto rage
Recommendationsasstatedonthedetergent packaging.
Close the lid and press untilit locks in place.
I f t h e d i shes are h eavily soi l ed, pl ac e an ad ditional
detergen tdo sei n the pre -wash det erg ent cha mber. This det er gent will take effe ctdurin g the pre- wa shp has e.
A
B
Fill in Detergent
Youf indi nformatio nab ou t the a mo unto f det erg en t forth esi ngle program me ont he last p age .
Pl ea sea ware, tha t acc ord ing t othe lev el so iling and the specific hardnes sof wa terd iff erence sa repo ssible.
Pleaseobservethemanufacturer'srecommendationsonthe detergentpackaging.
When us ing 3in1 com bination / co mpact D etergents ,pleas epa y attention to make s ure that
the size of the combi nation deterg ents fits t othe dispe nser so that combinat ion
deterge ntsc anb eea sily p ut into t hedi spe nser, and the d is penser wou ld no t be b ro ken.
,
Your dish wa sher has a 3i n1f unctio nw hich needs n osal ta ndri nse aid bu ta 3 In 1 tablet.
This dish was her c om esw ith a 3in 1 tabl et co nt ainer as an acce ssor y.
1.The figure below showshowto hangthe 3in1 tabletcontainer on theupper basket.
2. Rot atet he up per s pra yer an dchange the locat ion o f the conta ine r to en sure the upper sp rayer i sn ot
obstructedby the 3in 1 tabletcontainer.Refertothe figurebelow for reference.
3.Put the 3in1 tablet intothecontainer ,then start the 3in1pro gram .
How To Use The 3IN1 Function
6
36

Fo
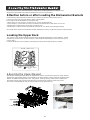
rb est pe rforma nce of t he d is hwashe r,f o llow the sel oading gu ide line s.F eatures and
appea rance of bask ets and cutl er y basket s may va ry from yo ur m odel.
Attention before or after Loading the Dishwasher Baskets
Scr ape off any la rge amou nts of le ftover fo od. Soft enr emnan ts of b urnt food in p ans .
It i sn ot ne cessary t o rinse the dishes un de r runni ng water.
Plac eo bjects in t he dishwash er in f ollowing way:
1.I te mss uch as cups , glass es , pot s/pans, et c. a ref aced dow nw ards .
2.C urved item s,or ones w ith r ecesses, sho uld bel oa ded asla ntso that wa te r can run off.
3.All utensilsare stackedsecurely andcan not tipover.
4.All uten sils ar e place di n t he wa yt ha t the spray a rms can r ota te fre ely d ur ingw ashi ng.
Ver ysma ll item s should no t be washe d in the d ishw ash er a st hey coul d easily fa ll ou t of th eb aske ts .
Bowl M Bowl L() ()
Glasse s
Dessert plate
Saucers
Cups
Front
(Eg g )
Gravy ladle
Loading the Upper Rack
The u p pe r r ac k is desig ned to hold m ore deli cat e and l igh t er d ishware suc h as gl as ses, c of fee
and tea c up and sauc ers, as well as pl at es, sm all b owls and sha ll ow pa ns( as lo ng a sthe yar e
not too d irty ).
Po sition the dish esa ndc ookware so t hat t hey do n ot g et m ove dby the spra yof wa te r.
Upper wheels
Lower wheels
Adjusting theUpperBasket
The height o fthe upper b ask et can b ea djuste din order to creat emo re spa ce for l arge ute nsils
both for theupper/lowerbasket.Theheightof the upperbasket canbe adjusted byplacingthe
wheels on di ff erent h ei ght of the r ai ls. Long items , ser vi ng cutl ery, sala dse rve r sa nd kn ives
should be pl aced o n the shel f so t hatt hey do not o bstruct t herot ati on o f the spr ay arms.
The she lfca nb e fold ed b ac k or be rem oved w he n not requ ired for us e.
37

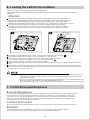
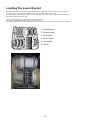
Loading the Lower Basket
Werecommendthatyoup lacelargeitems whicharemostdifficultto cleanintothelower basket:
pots, pans,lids,servingdishes andbowls, asshownin thefigureto theright.
I t isp referabl e to pl ac e serving dish es a nd lids ont hes ide of the ra c ksi n ord ert o avoid b locking
therotationofthetopsprayarm.
Pots, servingbowls, etc.must alwaysbeplaced top down.
D eep pots should bes lante dt o allow w ater tof low out.
Th eb ottom b aske t feature fold dow nti nero ws sot hatl arger orm ore pot s an dp ansc anb elo aded .
1. Cutlery basket
2. Dessert plates
3. Soup plates
4. Dinner plates
5. Oval platter
6. Saucer
38

Cutlery Basket
Fo r washi ng in th ed ishwashe r the f ol lowi ngcutler y/dishe s
Cutle rywith w ooden, h orn china or
mothe r-of-pe arlh andles
Plas tic items t hata re not h eat re sistant
Older c utlery with glued p arts that are not
temperatureresistant
Bond ed cutleryitemsordishes
Pewte r or coop er i tems
Crystalglass
Steel ite mssu bject to r usting
Woodenplatters
Items madefrom synth etic fibres
Do not p ut in it ems that are d irtyo f c igar ette ash, c andle w ax,l acq uer or pai nt.
If you b uy new d ishes pl ease make s uret hat they are su it able for d ishwashe rs.
Somet ypes of g las ses c an beco me
dullafte ra largenumbe rofwashes
Si lver and a l u mi nu m parts hav e a
tendenc yto discolou rdu ri ng was hin g
Glazed pa tter n s may f ad e i f ma c hin e
was he d fr equently
Pl ease do not ov er l o ad you r di s hwashe r. Th ere is on l y s pace f or 9 st an dar d d i s hes. D o not
us ed ish that is no tsu itable fo r dish wa shers .T hisi s im port ant f org ood resu lts and fo r
reasonableenergyconsume.
B efore lo adi ng th e dishes , you sho uld:
Removelargeleft-over
S ofte n re mnants of bu rnt f ood inp ans
Dishesandcutlery mustnotimpedetherotationof thesprayarms
Lo ad holl owi tems suc has cup s,g lass es,p ans etc . with the opening do wnwa rds s ot hat
w ater cannot colle ctin the contain ero r a deep b ase
NOT E:
NOT E:
Arenotsuitable
Are oflimited suitability
Loading cutlery a nd dishes
Whe nloadingthe dishes and cutlery, pleasenote:
Cutlery sh ould b eplace di n the cut lery ba ske t with th eh andles at the bottom .I f the rack has si deb askets ,the
spoons sh ould b elo aded sep arat el y in to the appr opriate slot s,es pecial lyl ong ute nsils should be pl aced in t he
horizont al posi tion at the fr on tof the u ppe rba sketa ss how nin the pi cture.
Alwa yslo ads harp u tensils wi th t hes harp
poin t dow n!
1 2 3456 7
3553
1551
3553
3553
1561
3213
3244
1244
2244
2214
1214
7274
1. Tea spoons
2. Dessert spoons
3. Soup spoons
4. Forks
5. Knives
6. Serving forks
7. Serving spoons
Do not l eave any item e x tend thro ugh bot tom .
Knivesandotherutensilswithsharp points
mustbe loaded in th eba sket with thei rpoi nt s
dow nor plac ed i n an hor izon t al p osit ion.
Itis dangerousto openthedoorwhenwashing, becausethe hotwatermaybescaldedtoyou.The doorshouldnot be
leftintheopenpositionsincethiscouldpresentatrippinghazard.
39

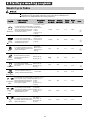
Wash Cycle Table
Meaning:needto fill rinse into theRinse-Aid Dispenser.
()
*En50242: This program isthe test cycle, therinse-aid dispenser
set ti ng i s r e comm e nde d to b e set to p os it io n 6 .
Daily
In ten s i ve
EN50242
5/22g
Fo rnor mally soiled lo ads,
such as , p lates, glasses
and lightlys oile dpans.
St andard daily cycle.
pots
Fortheheaviest soiledloads,
such as pots, pans, casserole
dishes and dishes that have
beensitting with driedfood
on the mfora w hil e.
Asho rter wash f or li ghtl y
soiled load s t hat do no t
needdrying.
Pre -wash
For lightl y soiled loa ds,
such as glas ses, cr ysta lan d
finechina.
Del icate
Pre-wa sh 50
-wash
Wash (60 )
Rinse
Rinse(70 )
Dryi ng
()
℃
℃
℃
Pre
Rinse
Pr e-w ash
Was h ( 4 0 )
Rinse (70 )
℃
℃
Drying
Pre-wash
Wash (50 )
Rinse (60 )
Drying
℃
℃
Was h ( 4 0 )
Rinse (45 )
℃
℃
171
0. 81
173
1.4
28
0.35
118
0.8
18.4
13. 0
Ec o.
22g
Fo rlightlysoiled loa ds,such
as plates,glasses,bowls and
ligh tly so ile d pa ns.
Pre-wash
Wash (45 )
Rins e(60 )
Drying
℃
℃
111
0.7
11.0
7.0
11.0
5/22g
To rinsedishes thatyou
pl an to w as h la ter th at da y.
Pre-wash
11
0.01
6.0
Express
15g
15g15g
Daily
Ec o.
In ten s i ve
3i n1
3i n1
Fornormally soiled l oads ,
such as ,plates, glasses
and lightly soiledpans.
standarddailycycle.
pots
For lightlysoiledlo ads,such
as pl at es ,glass es,bowl sand
lightlysoiled pans.
F o r t h e he aviest s o iled loads ,
suchaspots,pans,casserole
dishes anddishe sthat have
beensitting withdriedfood
onthem for a while.
Pre- wa sh 6 0
Wash (7 0 )
Rins e
Rins e
Rins e(70 )
Drying
(
℃)
℃
℃
Pre- wa sh
Wash (5 0 )
Rins e(70 )
Drying
℃
℃
Pre-w ash
Wash (45 )
Rinse (70 )
Drying
℃
℃
14 8
1.0
12 8
0.8
161
1.5
15. 1
12. 7
12. 7
3i n1
3in1
3in1
3in 1
+
+
+
+
+
+
40

WARNING!
It is d an gerou s to ope n th e do or w hen w ashi ng , be c a use the hot wate r ma y scal d you .
W h en the workin g c y cl e has fini s hed , the b u zzer of t he d i s hw a sh e r w ill s o u ndfor 8 seco n d s , th en s t op . Tu r n off
t he a ppl iance usi ng the O N/ OFF b utt on,sh ut offt he wa te rs upply and op en the door of th edi shwashe r.
Wait for a few m inutes bef ore unlo adi ng th edis hw ashe rto avoi dha ndlin gt hedi shes and ute nsils w hile th ey
are s ti ll h ot a ndm or e suscept ibl e tobr eakage. The yw ill als od rybe tter.
SwitchOfftheDishwasher
The p ro gram has en ded , only if th erea ppears a 0 i nthe digi tal displa y(r emaining prog ram time) .
1.S witch off the dishwa sher by p re ssing the ON/ OF F butto n.
2.Turnoff thewatertap!
Openthedoorcarefully.
Hot dis hes ar esensi tive to kn ocks.The di shes should t herefore be a ll owedt o cool down arou nd15 minutes
beforeremovingfromtheappliance.
Open t hed ishwasher's door, leave it aj ar and wai ta few mi nutes before r emoving t he dishes. In this way they
will be cooler an dt hedrying wi ll be i mproved .
Unloadingthe dishwasher
Iti s normal that the dishw as her is we tin side.
Empty the low erba sket first a ndthe nthe up pero ne.T his wil lavoi d water dr ipp ing from t he upper Bas ket onto
the dis hes in the low erone.
Turning On theAppliance
Change the Program...
Forgot toAdd a Dish?
will working after 10 seconds.continue
I fyou ope nthe doo r , the mach ine w il l pause. W hen you close the d oor, t he machineduring a wash cycl e
AttheEndoftheWashCycle
St arting a cycle w ash
1 Dr aw out the lowe ran dup perb asket, load the d ishe sa nd pu sht hem back.
It iscommendedtoloadthelowerbasketfirst,thentheupperone(seethe sectionentitled
Loadin g the Di s hw a sher ) .
2 Pou r in t hedete rg en t (se e th e sec ti on ent i t le d Sa lt, Dete r gent an d RinseA id ).
3 I nse rt the pl ug into t he soc ket. The pow er s uppl yi s2 20- 240 VAC /50 HZ, th es pec ificatio n of th e
s ocketis 10A 250 VAC . M ake sure thatt he water su pp ly is tu rn ed on tof ull pr essure.
4 Cl os e t h e door, press the O N /OF F bu tton , and the ON/ OFF l igh t wil l turn on . Pre ss t h e progr a m
b ut tont o select a desiredw ash cycle,A fter 3 secon ds, t he m ach inewill w ork.
“”
“”
Premi se:
1 Ac ycle th atis und erway can on ly be modi fied if it ha son ly been r unnin g fo r a short
time . Otherw ise, thed et er gent may ha ve a lrea dybeen relea sed, a nd the a pplianc emay
have al read y drai ned t hew ash water.If t hisis the case ,t he dete rgen t di sp enser mu st
be r efilled (s e ethe section enti tled " Loa ding th eD eter gent " ).
2 Wh en y ou pr ess the s tart/reset but ton mo re th an3 sec onds, you can cance l the runn ing
programmeandselectotherprogrammes(seethe sectionentitled"Startingawash cycle... ").
3 Wh en y ousele ct I ntensi ve /Normal /Eco.Pr ogramme s,y ou can sel ectt he3 in1fu nction .
Aforgotten dish can be added at any time before the detergent cup opens.
Loa d the forgotten dishes.
Close the door, the dishwasher will start running again
after 10 seconds.
After the spray arms stop working,you can open the door
comp letely.
2
Open the doo r a little to stop the washing.
1
3
4
41

The fil ter pre ventsl arger remn ant s of food or o ther objects f rom getting insi deth ep um.
Theresidues may blockthefilter, in this casethey mustbe removed.
The filter syst emc on sists of a coar se filter, aflat ( Mainf ilte r)
A n da mi c ro fi lt e r( F i ne f i lter) .
Food and soil particles trap ped inthisfilterarepulverizedby a
specia ljet ont hel owe r spr ay a rma ndw ashe dd own t od rain.
Larg er it ems, s uc h as pieces of bo ne s or glas s, t ha t could b lo ck
the drainaretrappedin the coarse filter.To removetheitems
caugh t by t he fil ter,ge nt ly s que eze the tap o nth et op of t his
filterandliftout.
Thisfilter holds soiland food residuesin the sumpareaand
preventsitfrombeingredepositonthedishes during washcycle.
Main filter
1
Coarse filter
2
Fine filter
3
2
3
1
Filtering System
Filter assembly
Thefilter efficiently
For b es t p erf orm ance and re sults ,t he f ilt er must be cle anedregula rly. t his r eason,i t i sa goo di dea to
r emo veth ela rger fo od pa rti clest rapp edin the f ilt er aft ere ach was hcyc leb yrin sing t he s emicirc ula r filte ran d
c up u nderr unnin gw at er. Tor emove th ef il ter d evic e, pull t hec up handle int he upwa rdd irect ion.
re mo vesf ood par ticles fro mt he wa sh w at er, all owi ng it t obe rec ycle dd ur ing the cycl e.
For
WARNING!
T he dish was her mus t n e ver be used wit hout t he f il ters.
Imp ro per repl ac ement of the f ilt er may red uce the performanc elev elo ft he applian ce
and damage dishesand utensils.
St ep 1 Turn the filt eri nant i-clockwis ed irectio n,
t hen li f t it up.
:
St ep 2 l ift the Ma in filter up:
Step 3 lifttheFinefilter up:
When following this procedure from step1 to step 3, the filter system will be removed;
when following it from Step 3 to Step 1, the filter system will be installed.
42

The cont ro lpane lcan be clea ned by using a l ightly dam pen edc lot h.
Af ter cle an ing, m ake sure to dr yit t horoug hly.
For the ex t e ri or, us e a g ood appliance po li s h wax .
Neveru ses harp object s,scouring pa ds o rh ar sh c lea ners ona ny part o ft hedi shwa sher.
ProtectAgainst Freezing
1.Cutofftheelectricalpowertothe dishwasher.
2.Turn off th ewat ers uppl y an dd is connec tth ewat eri nlet pipe from the w ater val ve.
3.Drainthe water fromthe inletpipe an dwatervalve. (Use apantocatchthewater)
4.Reconnect t he water inlet pipe to the wa ter valve.
5.Remove the f ilter at the bott omo f the tub and use a spong eto soak up wate rin t he sump.
pl ease take fros t protection m easures o nt he dishw asher in winter.Ev ery fter washing c ycle s,
pl ease operat eas follow s
time a
:
Caring for the Dishwasher
- Inspec tt he filt ers for blo ckin ga ftere very tim eth edi shwa sher ha sbe enu sed.
- By uns crew ing t he c oar se fi lter, you can remove t he filter system .Re mov ea ny foo dre mna nts and
cleanthefilters underrunningwater.
Remarks:
Cleaning the Filter
CleaningThe Door
To c lean th e c o a rse fil t er and t he fin e fil t e r, use a cl eanin g brush . Reas sem ble thef il t er par t s as sho wn in th e f igur es
on th e las t pa ge a nd r eins ert t he e nti re ass emb ly in the dis hwa sher, pos itio ning i ti n i tss ea t and pres sing dow nwa rds .
Theentirefilterassemblyshouldbe cleaned oncea week.
Whencleaning the filters, don't knock onthem. Otherwise, thefilters could be
contortedandtheperformance ofthe dishwashercouldbe decreased.
WARNING!
To cle an thee dge ar ound t he door, you sho uldu seo nly a sof twa rm, d am pcloth.
To avoi dpene trati ono f wate ri nto the d oorlock and el ectrical com po nents, do not
usea spray c leaner of any kind.
WARNING!
Never u se a spr ay c lean er t ocle an t he d oor panel as it m ay dam age the door loc k
and electricalcomponents.
Ab rasive ag entso r some paper towels shou ldnot be u sed becau se o ft heri sko f
sc r a t c hing o r l eav ing s pot s on the st ainless steel s ur fa ce.
Cleaning the SprayArms
It is nece ssary to cl ean thespray a rms regularly in orde rto
remove the accum ulat ion of s calef rom the hard water
and thus preve nt blocki ng of spray ar mj ets and bear ings.
We Sug ges tto poke the blo cked spray ar mj ets wit ha nee dle
to ensur egood washi ngeffect.
I f y ou r dishwasher cann ot w ork be ca u s e of the ic e, ple a se c ont a ct pr ofe ss ional s erv ice p er so ns.
Unscrew
43

Itis recommendthatyouruna washcyclewith the
dish washer empt yan dthe nr emove th eplu gf rom the
socket, t urn o ff t he wa te r supp ly and le ave the door of
t he app lian c e s l i ghtly open. This wil l help t h e doo r
sealstolastlonger andpreventodoursfromforming
withinth eappliance.
If the app liance m ustbe move d, tr yto keep it in the
verticalposition.Ifabsolutely necessary, itcanbe
positi oned on its back .
Oneofthefactorsthatcauseodourstoforminthe
dishwasher i sfoo dth atr emains tr app edi n the seals .
Periodic cleaning with a damp sponge will p rev e nt t his
f r o m oc curr i ng.
Ensu reth ev olt age and frequ en cyo f thep owe rbe ing cor respondst o
t hose on the rating plate. Only in ser t the plug into an elec trica l socke t wh ich is ear the d
pr op erly. I ft he el ectr ical sock et t owh ich thea ppl ianc em ustb ec onn ected is not
appropriate fortheplug, replacethe socket, ratherthan usingaadaptors orthelike as
they couldcause ove rheating andburns.
Plea sel ook at th er ating labe l to know the rat ing v olt age and c on nect t he dishw asher to the appropr iat e pow er s upply.
Use the r equ ired fu se 10 amp ,tim ed elay f use orc ircui tbre ak er rec omm ended and prov idesepa rate circ uits erving
only th is appl ia nce.
This appliance must be earthed. In the event of a malfunction or breakdown, earthing will reduce the risk of
electric shock by providing a path of least resistance for the electric cu rrent. This a ppliance is equipped with a
cord having an equipment-earthing conductor and an earthing plug. The plug must be plugged into an
ap propriate outlet that is installed and earthed in accordance with all local standards and requirements.
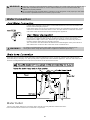
Posi tion the ap pli anc ei n the d esired l ocation. The back sho uld r est ag ainst t hew al l behin dit, and the sides,
along t he adj acen t cabine tso r wal ls.T he dishw asheri s equippe dwi thwat er supply and d rain hos es th atcan
be pos itioned ei th er to the righ tor the l eft s ide st o facil it atep rop er i nstallati on.
O nce th e applian ceis pos iti onedfor leve lling, the height of the di shwashe r
m ay be a lteredv ia adjust mento f the screwing level of the fe et. In any cas e,
th eapplia nce sho uld not b ei nclin ed mo re than 2 .
Positioning theAppliance
About Power Connection
WARNING!
for p ersonal safety:
DO NOT USEAN EXTENSION CORD OR AN ADAPTER PLUG WI TH THIS APPLIANCE.
DO NOT, UNDERANY CIRCUMSTANCES, CUTOR REMOVE THE EARTHING
CONNECTION FROM THE POWER CORD.
Af ter ever y wash, t urn off t he wa ter supp ly t o the
applia nce and l ea vet he doo rs li ght lyop en soth at
m oistu rean dodou rs ar en ott rapped in side.
Befo re cleani ng or per fo rming ma inten ance, always
remove the p lug fr om the socket.
Tocleanthe exteriorandrubberparts ofthedishwasher,
donot usesolventsor abrasivecleaningproducts.
O nly u se a clothw ith w arm so apy wate r.
To re m ov e sp ots o r st ains f rom the sur f ac e of t he
interior, use a cloth damp ened withwater a na little
v ineg ar, o ra c lean ing pro duct mad es pecifical lyfo r
dishwashers.
After EveryWash
Remove the Plug
No Solvents orAbrasiveCleaning
Mov ing t heAppli ance
Seals
WhennotinUse for aLongTime
44

for personal safety:
DO NOT USE AN EXTENSION CORD OR AN ADAPTER PLUG WITH THIS APPLIANCE.
DO NOT, UNDER ANY CIRCUMSTANCES, CUT OR REMOVE THE
FROM THE POWER CORD .
EAR THING
CONNECTION
C onn ect th ec old w ate r supply hose t oa t hre aded 3/4 (inch ) connect or an dmake su re
t hati t isf astened t ight ly in place.
I fthew at er pipe sare new o r ha ven ot been use dfor an e xtended period of ti me , let the
w ater run to m ake sure that t hewat eri s clear. This p re caution is need ed to avoid th e
r isk of t he w ater in let t o be blocked an dd amage thea pplian ce .
Th ew ater supp lyto the app lianc eca na lso be co nn ected to th eho use hold hot water
line ( such as, cent ra l sy st em, heatin gsy stem),as l ong as i tdoes no te xce eda
temper ature of 60 C. In this case ,th ewa shc ycle ti mew ill bes hortene db y abo ut 1 5
minutesandthewashefficiency slightly reduced.
Th eco nnection mu st be ma de to the hot wate rl inef ollowi ng the s ame procedu res as
des cribedinthe sec tion for thec onnection tothe coldwaterline.
Insert the drai nh ose into a dra inpi pew itha minimum di amet ero f 4c m,o r let it run i nt o the sink ,ma king sure to
avoidbendingor crimping.Use the special plasticsupportthat comes withthe appliance. The freeend ofthehose
must be a ta h eig h tbe tween 40 and 100cm and mus tnot be im me rsed inw ater.
WARNING!
Improper connection of the equipment earthing conductor can result in the risk of an electric shock.
Check with a qualified electrician or service representative if you are in doubt whether the
appliance is properly earthed.
Do not modify the plug provided with the appliance. If the plug does not fit properly to the outlet,
please have a qualified electrician to install a proper outlet.
In or der to avoid th attherei smo re waterstaying in the inlet hose, pleaseclose
thehydrant afterusing.(Notapplicable to appliances without aqua-stop.)
WARNING!
Wa t e r O ut l et
Connect t he wat erd rain h os e.Th edr ain hose must be corr ect lyf ittedt oav oidw ate r lea ks.
En sure tha tth ewat eri nlet hose i sn otki nked or squas hed.
Water Connection
45

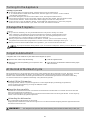
Thefollowingthingsshouldbe checked before starting the dishwasher.
Syphon Connection
Th ew as te conne ction must be at a he ight of be twe en5 0 cm ( minimum) and 1 00 cm ( max imu m)
from t he botto mof the di sh.T hew ater dra inho ses houl db e fixed b ya ho se c lip .
StartofDishwasher
The content of this manualis very helpful to the users.
Afterin stallation, please make sure to keep t his manual.
ExtensionHose
Ifyo une eda dra inhose ext ension, make sure to use a sim ilar drain hose .
Itm ustb eno lon ger t han 4m etr es;ot he rwise the cleani ng effect of the dishwas he r coul dbe re duced .
1
Thedishwasheris levelandfixed properly
2
T he i nle t va lv ei s o pen
3
There is a leakageat theconnections oftheconducts
4
The wires are tightly connected
5
The poweris switchedon
6
The i nlet an d drain hoses are k nott ed
7
Allpackingmaterials and printingsshouldbe taken outfromthe dishwasher
46

Fuse blown, or the
circuit breaker acted
Replace fuse or reset circuit breaker. Remove any other
appliances sharing the same circuit with the dishwa sher
Spil led rinse-aid
Always wipe up rinse-aid spills immediately.
Hard wat er mi nerals
The affec ted items are
notcorrosion resistant.
The lid of the softer
is lo ose
Aspayarmis
knocking against
an item in a basket
r
Item s of crockery
are loose in the
wash cabinet
This m ay becaused
by on-site installation
or the c ross-section of
the piping.
A programme was not
run after dishwasher
salt was added.
Traces of salt have
gotten into the wash cycle.
To clean the int erior, use a damp sponge with
dishwasher deterg ent an d wear rubb er gloves.
Never use any other cleaner than dishwasher
detergent for the risk of foaming or suds.
Always run the quick wash programme .
with out any crockery in the dishwasher and
without s electing the Tur bo function (if pr esent),
after adding dishwasher salt.
Check the lip .Ensure the fix is fine.
Interrupt the programme, and rearra nge the items
which ar e obstructing the sp ay arm.r
Interrupt the programme,
and rearrange the items of crockery .
This has no influence on the dishwasher function.
if in doubt, contact a suitably qualified plumbe r.
Detergent with
colourant was used
Make sure that the detergent is the one w ithout
colourant.
Improper det ergent
Make sure the dishwasher is turned on and the door is
closed securely.
Check that the water supply is connected properly and
the water is turned on.
Make sure to close the door properly and latch it.
Make sure the power cord is properly plugged into the
wall socket.
Power supply is not
turned on
Error code:E1;
Water pressure is low
Door of dishwasher
not properly closed.
Kink in drain hose
Filt er clogged
Kitchen sink clogged
Check drain hose.
Check coarse the filter
(see section titled )" Cleaning The Filter "
Check the kitchen sink to make sure it is draining well.
If the problem is the kitchen sink not draining ,you may
nee d a plumber rather than a serviceman for dishwashers.
Use only the special dis hwasher detergent to avoid
suds. If this occurs, open the dish washer and let suds
evaporate.Add 1 gallon of cold water to the tub. Close
and latch the dishwasher, then Start the "soak" wash
cycle to drain out the water . Repeat if necessary.
Before Calling for Service
Technical
problem s
Gen eral
problem s
Noise
47
Page is loading ...
Page is loading ...
-
 1
1
-
 2
2
-
 3
3
-
 4
4
-
 5
5
-
 6
6
-
 7
7
-
 8
8
-
 9
9
-
 10
10
-
 11
11
-
 12
12
-
 13
13
-
 14
14
-
 15
15
-
 16
16
-
 17
17
-
 18
18
-
 19
19
-
 20
20
-
 21
21
-
 22
22


Whirlpool ADP 590 WH User guide
- Category
- Dishwashers
- Type
- User guide
- This manual is also suitable for
Ask a question and I''ll find the answer in the document
Finding information in a document is now easier with AI
Related papers
Other documents
-
BOMANN GSP 848 IX Owner's manual
-
Groupe Brandt LFI-047X Owner's manual
-
-
Brandt VH1472J User manual
-
Teka DW1 455 FI User manual
-
White-Westinghouse WDFC12JGCWD Owner's manual
-
-
-
White Knight DW1260IA Full Size Dishwasher Owner's manual
-
White Knight DW0945WA User manual