Page is loading ...

INSTRUCTION MANUAL
COMPLETE SYSTEM
Web Ready 8CH DVR System
w/ 8 Outdoor Night Vision CCD Cameras and 8" LCD Monitor
SVAT ELECTRONICS
now you can see
Model#
CLEARVU3
www.svat.com
Version 1.0

SVAT ELECTRONICS
now you can see
CLEARVU3 www.svat.com
SPARTAN4 2
!IMPORTANT! PLEASE READ!
NEED
HELP?
DO NOT RETURN THIS
PRODUCT TO THE STORE
Please contact a SVAT customer support representative rst regarding any
additional information on product features, specications or help with set-up.
Please contact us via one of the methods below:
Toll free telephone:
1.866.946.7828
For more product information visit www.svat.com
Email:
support@svat.com
Online live web chat:
Visit www.svat.com
Toll free fax:
1.888.771.1701
Note: This is manual version 1.0 for this product, you may nd updated versions by visiting
our website.

PRODUCT WARRANTY & REGISTRATION
Please keep a copy of your Receipt/Order
Conrmation to verify your 1-Year Warranty
We take quality very seriously. This is why all of our products come with a one year
warranty from the original purchase date against defects in workmanship and materials.
If you have warranty or support issues please contact us using any of the following methods:
SVAT Electronics USA SVAT Electronics Canada Phone: 866.946.7828
2315 Whirlpool St., Unit 333 4080 Montrose Road Fax: 888.771.1701
USA 14305 Canada L2H 1J9 Website: www.svat.com
Warranty Terms
1. SVAT products are guaranteed for a period of one year from the date of purchase against defects in
workmanship and materials. This warranty is limited to the repair, replacement or refund of the purchase price
at SVAT’s option.
2. This warranty becomes void if the product shows evidence of having been misused, mishandled or tampered
with contrary to the applicable instruction manual.
3. Routine cleaning, normal cosmetic and mechanical wear and tear are not covered under the terms of
this warranty.
4. The warranty expressly provided for herein is the sole warranty provided in connection with the product itself
and no other warranty, expressed or implied is provided. SVAT assumes no responsibilities for any other
claims not specically mentioned in this warranty.
5. This warranty does not cover the shipping cost, insurance or any other incidental charges.
6. You MUST call SVAT before sending any product back for repair. You will be given a Return Authorization
number. When returning the product for warranty service, please pack it carefully in the original box with all
supplied accessories, and enclose your original receipt or copy, and a brief explanation of the problem
(include RA #).
7. This warranty is valid only in Canada and the continental U.S.A.
8. This warranty cannot be re-issued.
Graphic Symbol Explanation
The lightning ash with arrowhead symbol, within an equilateral triangle, is intended to alert the
user to the presence of insinuated “dangerous voltage” within the product’s enclosure that may be
of sufcient magnitude to constitute a risk of electric shock to persons.
The exclamation point within an equilateral triangle is intended to alert the user to the presence
of important operating maintenance (servicing) instructions in the literature accompanying the
appliance.
TO REDUCE THE RISK OF ELECTRIC SHOCK, DO NOT REMOVE THE COVER (BACK).
NO USER SERVICEABLE PARTS INSIDE. REFER SERVICING TO QUALIFIED SERVICE PERSONNEL.
CAUTION
RISK OF ELECTRIC SHOCK, DO NOT OPEN
SVAT ELECTRONICS
now you can see
CLEARVU3
www.svat.com

SVAT ELECTRONICS
now you can see
CLEARVU3
TABLE OF CONTENTS
1. WHAT IS INCLUDED ..................................................................................... 1
2. DVR BUTTON AND FUNCTIONS .....................................................................................1
3. INSTALLATION TO DVR ............................................................................... 2
3.1 Camera Installation ............................................................................... 3
3.2 Monitor Installation ................................................................................ 3
3.3 Audio Installation ................................................................................... 3
4. POWER TO DVR ........................................................................................... 4
5. DVR OPERATION .......................................................................................... 5
5.1 Live Mode .............................................................................................. 5
5.2 Record Mode ......................................................................................... 7
5.3 Playback Mode ...................................................................................... 8
5.4 Search ................................................................................................... 9
6. MENU SETUP DESCRIPTION .................................................................... 10
6.1 Date/ Time Setup..................................................................................11
6.2 Camera Setup ......................................................................................11
6.2.1 Edit Camera Title 1-8 ................................................................. 12
6.2.2 Video Adjust ............................................................................... 12
6.2.3 Motion Detection ........................................................................ 13
6.3 Record Setup ...................................................................................... 14
6.4 Schedule Setup ................................................................................... 15
6.5 Hard Disk Setup .................................................................................. 16
6.6 CF Card Setup .................................................................................... 16
6.7 Others.................................................................................................. 18
6.7.1 Password ................................................................................... 19
6.7.2 Buzzer ........................................................................................ 19
6.7.3 Relay Output (Advanced users) ................................................. 20
6.7.4 Alarm Input (Advanced users).................................................... 21
6.7.5 Sequence Dwell Time ................................................................ 22
6.8 Factory Default .................................................................................... 22
7.DVR NETWORKING GUIDE ......................................................................... 23
7.1 Introduction.......................................................................................... 23
7.2 Prepare Your Computer....................................................................... 24
7.3 Prepare Your DVR ............................................................................... 25
7.4 Connect To The Internet ...................................................................... 16
7.5 Find Your External Ip ........................................................................... 28
7.6 Forwarding Outside Your Network....................................................... 29
7.7 Finalizing The Set-Up .......................................................................... 32
7.8 Additional Troubleshooting .................................................................. 33
www.svat.com

SVAT ELECTRONICS
now you can see
CLEARVU3
8. FUNCTION SETUP ...................................................................................... 34
8.1 Main Display .........................................................................................34
8.1.1 View ............................................................................................35
8.1.2 Image Recording.........................................................................35
8.1.2.1 Save As JPEG.................................................................36
8.1.2.2 Save As AVI .....................................................................36
8.1.2.3 DVR Control ....................................................................36
8.2 Advanced Network Setup .....................................................................38
8.2.1 Advanced Network Setting ...................................................38
8.2.2 User Setup ...............................................................................39
9. DVR TROUBLESHOOTING ........................................................................ 40
10. SYSTEM CONFIGURATION ...................................................................... 41
11. HARD DISK INFORMATION ...................................................................... 41
12. APPENDIX ................................................................................................. 41
13. MONITOR GUIDE ...................................................................................... 42
13.1 Button Functions And Connections ....................................................42
13.1.1 Monitor .....................................................................................42
13.1.2 Remote Control ........................................................................43
13.2 Installation ..........................................................................................43
13.2.1 OPTION 1: Connecting To Security Cameras ...........................43
13.2.2 OPTION 2: Connecting To A DVR .............................................44
13.2.3 Powering On .............................................................................45
13.2.4 Basic Operation ........................................................................45
13.2.5 Adjusting Settings .....................................................................45
13.2.6 Picture .......................................................................................45
13.2.7 Option .......................................................................................45
13.2.8 Clock .........................................................................................46
13.2.9 System ......................................................................................46
13.2. Troubleshooting ..........................................................................47
14. CAMERA GUIDE ....................................................................................... 47
14.1 Features Of The CV67 (Camera) .......................................................47
14.2 Camera Installation Tips .....................................................................48
14.2.1 Mounting ...................................................................................48
14.2.2 Troubleshooting ........................................................................49
15. SPECIFICATIONS ...................................................................................... 50
www.svat.com

SVAT ELECTRONICS
now you can see
CLEARVU3 1
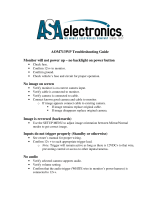
1. WHAT IS INCLUDED
2. DVR BUTTON AND FUNCTIONS
2.1 Front Panel
1. LED Indicators (Alarm/Play/HDD/Record)
2. Removable/Lockable HDD Casing: 3.5” IDE HDD
3. Camera Channel Select (1-8)
4. Record Button
5. Stop Button
6. Play Button
7. Pause Button
8. Split Button – Switch between Full Screen/ Quad Screen/ 9-Split Screen
9. Auto Sequencing Button – Automatically cycle through all the camera channels
10. Search Button – Quickly search your recorded footage by date and event.
11. Menu Button
12. Exit/Info Button – Return to the previous menu/view system information
13. Enter/Display Button – Conrm selection/show or hide onscreen display
14. CF Card Slot
15. Left Button – Change values in the menu screen/rewind
16. Right Button – Changes values in the menu screen/fast forward
17. Up Button – Navigate the onscreen menu/change camera channels
18. Down Button – Navigate the onscreen menu/change camera channels
Software CD10 RCA to BNC
Connectors
1 Remote Control for
LCD Monitor
10ft RJ45
Ethernet Cable
8” Ultra Slim LCD
Monitor
8 Camera Mounts w/
Hardware
8 Indoor/Outdoor Night
Vision CCD Cameras
1 DVR (160GB HDD)
•1 Power Adapter for
LCD Monitor
•1 Power Adapter for DVR
1 10ft RCA to RCA
(male) A/V Wire
1 RCA Female to
3.5mm (male)
A/V Wire
8 x 60ft 4 PIN DIN to
RCA (male)Video/
Power Wires
•Online/ Toll Free Support
•Instruction Manual
•Quick Start Guide
•1 Year Warranty
•8 Power Adapters for Cameras

SVAT ELECTRONICS
now you can see
CLEARVU3 2
2.2 Rear Panel
1. BNC Video Inputs – Connects the cameras to the DVR
2. Power Input – DC power input (12V)
3. Alarm Input/Output Port
4. RCA Audio Input – For connecting a microphone/audio supported camera (not included)
5. RCA Audio Output – For connection to your TV/monitor
6. BNC Video Output – For connection to your TV/monitor
7. Ethernet Port – For connection to your local area network and Internet
8. BNC SPOT Video Output – Additional connection to your TV/monitor, only displays
video when motion recording is activated
9. Cooling Fan
3. INSTALLATION TO DVR

SVAT ELECTRONICS
now you can see
CLEARVU3 3
3.1 Camera Installation
1. Plug the 4 pin DIN female connection on the camera into the 4 PIN DIN male
connection on the 60ft video/power wire.
2. Match the two arrows on top of both connecting cables.
3. Plug the camera’s power supply into the power jack located on the 60ft video/
power wire.
4. Plug the camera’s power adapter into an AC outlet.
5. Connect the 60ft video/power wire’s male RCA plug to the VIDEO IN port of
your TV/ monitor/VCR/DVR.
6. If your VIDEO IN port is a BNC connection (common with DVR units), you will
need to attach the BNC to RCA adapter before connecting the camera.
3.2 Monitor Installation
1. Plug the “3.5mm to RCA (female) wire” into the AV1/IN port on the monitor.
2. Plug one end of an RCA wire into the DVR’s VIDEO OUT port. Plug the other
end into the female end of the 3.5mm to RCA (female) wire.
3. Ensure that the DVR is plugged in and powered on.
3.3 Audio Installation
1. If you have an audio supported camera or microphone with an RCA Audio Out
connection, you may connect it to the Audio In port on the DVR.
2. Connect an RCA audio wire (not included) to one of the Audio Out ports on the DVR.
3. Connect the other end to the Audio In port of your TV/monitor/speaker.

SVAT ELECTRONICS
now you can see
CLEARVU3 4
4. POWER TO DVR
1. Insert the power supply wire into the rear DC 12V Port on the DVR.
2. Insert the power cord into the power supply.
3. Plug the power cord into a power outlet. We recommend using a surge protected
power bar and/or Uninterrupted Power Supply (UPS) backup. To turn the DVR
on and off, use the power switch on your UPS or power bar. This DVR does not
have a power switch. This is for your security and helps to prevent users from
accidentally turning the DVR off.
The DVR will power on and you will see a boot screen. After the DVR initializes your
cameras should be displayed and recording will begin immediately.
Important notes before operation
1. To power off the DVR, make sure the DVR is not recording to prevent le
corruption. If on manual record, press STOP to stop recording and wait for the
REC light to turn off before you power off the DVR. If in schedule record, press
MENU and enter the password to enter the menu screen. When the record light
turns off, you can power off the DVR.
2. The default password is 12345678.
3. This DVR does not support HDD hot swap. To prevent damage, please enter the
main menu to stop all HDD activities, then power-off the device before replacing
the hard disk.
4. After power-on, the DVR auto detects the video system (NTSC/PAL) of the rst
camera connected. When no camera has been connected, the video system
will be the same as the previous setup.
5. After power-on the system auto enters 9-split screen mode, and continues with
the previously setup recording schedule (auto resume recording)

SVAT ELECTRONICS
now you can see
CLEARVU3 5
5. DVR OPERATION
5.1 Live Mode
1. Press the “DISP” button to turn the onscreen display ON or OFF. The
onscreen display shows the channel, date, and time.
2. Press the “INFO” button to display system information and conguration.
3. When the hard disk information icon turns to red, this indicates that the hard drive
is full. To avoid this situation, set the DVR recording mode to OVERWRITE.
4. Press the channel buttons to switch between full screen camera views.
(CH1 – CH8).
5. Press the “SPLIT” button to switch between “Full Screen/Quad Screen/
9-Split Screen”.
6. Press the “SEQ” button to turn Sequence Mode on or off. Full screen channel
auto sequence will skip the channels that show video loss (i.e. the cameras that
are unplugged or not powered on).
7. When video loss occurs, a video loss message will be shown on the screen.
8. During an alarm triggered event the corresponding channel name will be
changed to the color red.
9. During a motion triggered event the corresponding channel name will be
changed to the color red and display “M”.
10. When an alarm event occurs, the SPOT monitor (when plugged into the SPOT
Out port) will immediately switch to the full screen view of the channel that has
been triggered by an alarm event, and will then return to previous channel
switching status.
11. Live monitoring operations have no effect on recording functions.

SVAT ELECTRONICS
now you can see
CLEARVU3 6
System Information: Screen shot

SVAT ELECTRONICS
now you can see
CLEARVU3 7
5.2 Record Mode
Quick Glossary of Recording Terms:
Manual Record: This is the simplest of recording modes. Just press record to record
video from your cameras. The system will continue recording until you press stop.
Continuous Record: This is a schedule record mode that allows you to specify what
hours of the day you would like to record. The system will continue to record for those
specied hours. During this time, you cannot press stop to halt recording. You must press
menu.
Motion Record: This is a schedule record mode that allows you to specify which hours of
the day you would like to record when movement is detected. After motion is detected, the
system will record for a duration that you specify. During this time, you cannot press stop
to halt recording. You must press menu.
Alarm Record: This is a special recording method that requires you to have alarm sensors
wired in to the DVR. You must buy these alarm sensors separately from a 3rd party, and
SVAT does not offer support on motion sensors. This feature is for advanced users only. If
you have alarm sensors wired correctly, the alarm record function will allow you to specify
which hours of the day you want to record when your alarm sensor is triggered. After your
alarm is triggered, the system will record for a duration that you specify. {During this time, you
cannot press stop to halt recording. You must press menu.)
1. Manual Record: Under monitoring mode, press the “REC” button to enable all (CH1
– CH 8) camera recordings, and the “STOP” button to stop manual recording.
2. When schedule recording (ALARM/ MOTION DETECTION/ CONTINUOUS
RECORD) has been activated, recording can not be stopped by pressing the
“STOP” button. You must enter the menu screen to disable recording.
3. After entering playback mode or menu setup, when the correct password has been
entered, all recording activities will stop. When exiting playback mode or menu setup,
and schedule recording has been switched on, schedule recording will auto resume.
4. At power on after a power loss, the system auto returns to the recording mode
scheduled before power-loss.

SVAT ELECTRONICS
now you can see
CLEARVU3 8
5.3 Playback Mode
1. When pressing the PLAY button and when the playback password is set to “ON”,
the system will request to enter a password. When the correct password has
been entered, all recording activities will stop and playback mode will begin.
2. Press the “PLAY” button to play back starting from the previous playback end
time (continues from where you left off).
3. Press the “DISP” button to switch on/off the channel, date, and time message display.
4. Press the “INFO” button to switch on/off the system information display.
5. Press the channel buttons to play back a camera channel in full screen (CH1 – CH8).
6. Press the “SPLIT” button to switch to “Full Screen/ Quad Screen/ 9-Split Screen”.
7. The SEQ button does not function during playback.
8. Press the “PAUSE” button under normal playback to pause.
9. During pause status, hold the “LEFT” button to step rewind playback, and the
“RIGHT” button to step forward playback.
10. During normal playback, press the “LEFT” button to adjust the rewind playback
speed (x1/ x2/ x4/ x8/ x16/ x32/ x64 ), and the “RIGHT” button to adjust the
forward playback speed (x1/ x2/ x4/ x8/ x16/ x32/ x64). Press the “PLAY” button
to return to normal speed and the “PAUSE” button to pause.
11. Connect the audio output to your TV/monitor/speaker input (using an RCA wire)
to enable audio playback.
12. Press the “STOP” button to stop playback and return to live monitoring mode or
schedule rec ord mode.

SVAT ELECTRONICS
now you can see
CLEARVU3 9
5.4 Search
1. When you press the SEARCH button and the playback password is set to “ON”,
the system will request password entry. When the correct password has been
entered, all recording activities will stop.
2. Press the SEARCH button for quick search by date and time. Press the ENTER
or PLAY button to enter 9-split screen display.
3. YEAR/ MONTH/ DAY/ HOUR:
• White Index Bar: No recorded data available under this date period.
• Green Index Bar: Recorded data available under this date period.
4. MINUTE:
• White Color Bar: No recorded available under this time period.
• Red Color Bar: Manual recorded data, motion detection recorded data,
and alarm recorded data is available under this time period.
• Blue Color Bar: Schedule recorded data is available under this time period.
5. Use the “UP/ DOWN” buttons to move the cursor to the desired item (YEAR/
MONTH/DAY/HOUR/MINUTE), use the “LEFT/ RIGHT” buttons or drag the
index bar to make changes to the setup.
6. After setup has been completed, press the “ENTER” button to enter play mode,
or the “EXIT” button to return to live monitoring mode.

SVAT ELECTRONICS
now you can see
CLEARVU3 10
6. MENU SETUP DESCRIPTION
The password is requested after the “MENU” button is pressed.
1. In order to enter the main menu, the password entered must be correct. After
entering the main menu all recording activities will stop.
2. Default Password: 12345678 (CH1~CH8 represents number 1~8).

SVAT ELECTRONICS
now you can see
CLEARVU3 11
6.1 Date/ Time Setup
DATE FORMAT (Three Types of Date Format Setup) :
1. Y/M/D: Year/ Month/ Day
2. M/D/Y: Month/ Day/ Year
3. D/M/Y: Day/ Month/ Year
6.2 Camera Setup

SVAT ELECTRONICS
now you can see
CLEARVU3 12
6.2.1 Edit Camera Title 1-8
1. Maximum 8 character titles.
2. Move the cursor to the desired camera number by using the “UP/DOWN” buttons.
3. Move between the characters of the camera title by using the “LEFT/ RIGHT”
buttons and use “UP/ DOWN” buttons to edit the camera title (letters A-Z,
numbers 0-9 or blank spaces).
6.2.2 Video Adjust
Adjustable brightness, contrast, saturation, and hue for 1 –8 CH videos.

SVAT ELECTRONICS
now you can see
CLEARVU3 13
6.2.3 Motion Detection
You can use these settings to adjust the area and sensitivity of motion detection on each
camera channel. These settings are important if you are using motion activated recording,
because if adjusted correctly, they can help prevent false triggering of
motion recording.
1. Channel – Select the camera channel in which you would like to make changes
2. Set Detection Area – Select this setting to enter a grid screen for the selected
camera channel. In this screen you can set the areas in the camera’s view that
you want to enable or block motion detection in. For example, if there are cars
constantly driving by in an area on your camera, you can block that area from
detecting motion. Use the directions below to set up motion detection areas:
Area Block Color:
• Grey: Detection Block. These areas will be detected
• Transparent: Non-Detection Block.
• Green: Flashes when motion on the camera is being detected.
Use the green ashes to determine where motion is consistently being detected, and then
make sure to set the motion detection area to exclude these areas from motion detection.
Follow the directions below:
• Press “SEARCH” button to enable whole detection area.
• Press “MENU” button to disable whole detection area.
• You can set up a maximum of 3 separate detection areas (Detection areas
may overlap):
• Press the” UP/ DOWN/ LEFT/ RIGHT” buttons to setup the starting point of the
detection area.
• Press the “ENTER” button to conrm the starting point of the detection area.
• Press the “UP/ DOWN/ LEFT/ RIGHT” buttons to drag the window and set the
ending point of the detection area.
• Press the “ENTER” button to conrm the ending point of the detection area.

SVAT ELECTRONICS
now you can see
CLEARVU3 14
3. Sensitivity: The blue bar shown on the Motion Detection screen indicates the motion
variation of the detection window. When the amount of motion detected exceeds the preset
sensitivity threshold, it triggers motion detection recording. For example, if there is slight
movement in your camera’s view (e.g. curtains blowing, shadows) you can decrease the
sensitivity of that camera channel to avoid false triggering of motion record.
6.3 Record Setup
1. QUALITY: LOW/ MEDIUM/ HIGH
2. AUDIO:
• ON: Audio recording enabled.
• OFF: Audio recording disabled.
3. DISK FULL:
• Overwrite: When the hard disk is full the system overwrites your oldest
recorded footage (recommended).
• Stop: When the hard disk is full the system stops recording (message will
be displayed).
4. POST ALARM: Recording time after an event (Alarm/ Motion Detection) has
been triggered.
5. MANUAL: Set frames per second (FPS) for manual recording.
6. CONTINUOUS: Set FPS for schedule continuous recording.
7. MOTION DETECT: Set FPS for schedule motion detection recording.
8. ALARM: Set FPS for schedule alarm recording (if you have alarm sensors wired
into the DVR).
9. DEFAULT: Reload the factory default setting.

SVAT ELECTRONICS
now you can see
CLEARVU3 15
6.4 Schedule Setup
Use this menu to set up a 24 hour recording schedule. Specify which hours to record when
motion is detected, and when to record continuously or not at all.
The recording schedule is based on a 24 hour clock that goes from 0~24. Using the
directional arrows, move the cursor to the hour of the day you would like to change,
and adjust the letter to the one that represents the type of recording you would like. For
example, if you want to record only when motion is detected at 12:00 PM, move the cursor
to the 12, and use the arrows to change the letter to “M”. All types of recording are listed
below along with their corresponding letter:
1. C: Continuous Recording
2. M: Motion Detect Record
3. A: Alarm Recording (advanced users only)
4. - : None (no recording will occur)
5. * : All (all types of recording are activated)
Record Mode Priority:
Manual Record>Alarm Record>Motion Detection Record>Continuous Record
/