Polycom V500 User manual
- Category
- Car media receivers
- Type
- User manual
This manual is also suitable for

VideoVoiceDataWeb
Connect. Any Way You Want.
Administrator’s Guide
for the V500 System
July 2004 Edition
3725-21743-003/A
V500 Version 7.0

Trademark Information
Polycom® and the Polycom logo design are registered trademarks of Polycom, Inc. V500™, Global
Management System™. Pro-Motion™, and Siren™ 14 are trademarks of Polycom, Inc. in the United
States and various other countries. All other trademarks are the property of their respective owners.
Patent Information
The accompanying product is protected by one or more U.S. and foreign patents and patents pending
held by Polycom, Inc. Polycom Siren™ 14 Stereo (patent pending).
© 2004 Polycom, Inc. All rights reserved.
Polycom Inc.
4750 Willow Road
Pleasanton, CA 94588-2708
USA
No part of this document may be reproduced or transmitted in any form or by any means, electronic or
mechanical, for any purpose, without the express written permission of Polycom, Inc. Under the law,
reproducing includes translating into another language or format.
As between the parties, Polycom, Inc. retains title to, and ownership of, all proprietary rights with respect to the
software contained within its products. The software is protected by United States copyright laws and
international treaty provision. Therefore, you must treat the software like any other copyrighted material (e.g.
a book or sound recording).
Every effort has been made to ensure that the information in this manual is accurate. Polycom, Inc. is not
responsible for printing or clerical errors. Information in this document is subject to change without notice.

© Polycom, Inc. iii
About this Guide
The Administrator’s Guide for the V500 System is for administrators of the
V500 system who need to:
❑ Learn about and set up the system hardware
❑ Configure the system
❑ Customize the behavior and appearance of the system for easy and efficient
use
❑ Obtain information about calls made by the system, and gather usage and
performance data
❑ Troubleshoot any issues that occur with the system
Other documents available for the V500 system include:
❑ Setting Up the System, which describes how to install the hardware
❑ The Getting Started Guide, which describes how to place calls and perform other
video calling tasks
❑ Setup Sheets, which describe how to install optional hardware
❑ Release Notes
For support or service, please contact your Polycom distributor or go to Polycom
Support at www.polycom.com/support.
Polycom recommends that you record the serial number of your V500 system here
for future reference. The serial number for the system is printed on the unit.
System Serial Number: ____________________________________________

Administrator’s Guide for the V500 System
iv www.polycom.com/videodocumentation

© Polycom, Inc. v
Contents
Chapter 1 - Introducing the V500 System
Key Features ..........................................................................................................................................1 - 2
Rich Conference Experience .........................................................................................................1 - 2
Enhanced User Experience ...........................................................................................................1 - 2
Easy Installation .............................................................................................................................1 - 3
Security and Network Management ...........................................................................................1 - 3
Standard System Components ............................................................................................................1 - 5
Optional System Components ............................................................................................................1 - 6
Chapter 2 - Setting Up Your System Hardware
Standard System Set-up .......................................................................................................................2 - 2
Positioning the System ..................................................................................................................2 - 2
Connecting the Monitor ................................................................................................................2 - 3
Connecting the System to the LAN ............................................................................................2 - 3
Connecting Power .........................................................................................................................2 - 4
Installing Batteries in the Remote Control .................................................................................2 - 5
Powering on the System ...............................................................................................................2 - 5
Optional Equipment Set-up ................................................................................................................2 - 6
Connecting to a BRI Network Interface .....................................................................................2 - 6
Connecting Headphones ..............................................................................................................2 - 6
Chapter 3 - Configuring Network Use
Getting the Network Ready ................................................................................................................3 - 2
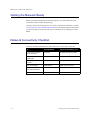
Network Connectivity Checklist ........................................................................................................3 - 2
Configuring with the Setup Wizard ..................................................................................................3 - 3
Configuring LAN Properties ..............................................................................................................3 - 4
Configuring IP Network Support ......................................................................................................3 - 6
Specifying H.323 Settings .............................................................................................................3 - 6
Configuring the System to Use a Gatekeeper ....................................................................3 - 7
Configuring the System to Use a Gateway .........................................................................3 - 8
Specifying SIP Settings ..................................................................................................................3 - 9
Specifying Quality of Service .....................................................................................................3 - 10
Configuring the System for Use with a Firewall or NAT ......................................................3 - 11
Configuring ISDN Support ...............................................................................................................3 - 13
Configuring the BRI Network Interface ...................................................................................3 - 13
Configuring Call Preferences ............................................................................................................3 - 14
Configuring the Global Directory ....................................................................................................3 - 16
Configuring the Directory Server Settings ...............................................................................3 - 16
Setting the Dialing Rules ............................................................................................................3 - 17
Placing a Test Call ...............................................................................................................................3 - 17
Checking System Status .....................................................................................................................3 - 18
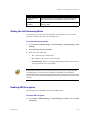
Keeping your Software Current .......................................................................................................3 - 19

Administrator’s Guide for the V500 System
vi www.polycom.com/videodocumentation
Chapter 4 - Designing the User Experience
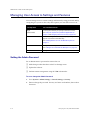
Managing User Access to Settings and Features ............................................................................. 4 - 2
Setting the Admin Password ....................................................................................................... 4 - 2
Screens that Require the Admin Password for Access ............................................................ 4 - 3
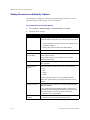
Letting Users Customize the Workspace ................................................................................... 4 - 4
Limiting What Users Can Do With the System ........................................................................ 4 - 5
Using the System for Specialized Applications ........................................................................ 4 - 5
Designing Video Behaviors ................................................................................................................. 4 - 6
Configuring Camera Settings ...................................................................................................... 4 - 6
Configuring the TV Monitor ........................................................................................................ 4 - 7
Using Dual Monitor Emulation ...................................................................................................4 - 8
Adjusting the Monitor’s Color Balance ...................................................................................... 4 - 9
Designing Audio Behaviors ................................................................................................................ 4 - 9
Configuring General Audio Settings ........................................................................................ 4 - 10
Setting the Volume on an External Audio System ................................................................. 4 - 10
Designing General System Behaviors .............................................................................................. 4 - 11
Configuring Call Settings ........................................................................................................... 4 - 11
Configuring Remote Control Behavior .................................................................................... 4 - 12
Configuring Directory Settings .................................................................................................4 - 12
Setting the Call Answering Mode ............................................................................................. 4 - 13
Enabling AES Encryption ........................................................................................................... 4 - 13
Setting Passwords and Security Options ................................................................................. 4 - 14
Setting Date, Time, and Location .............................................................................................. 4 - 15
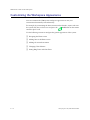
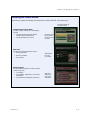
Customizing the Workspace Appearance ...................................................................................... 4 - 16
Designing the Home Screen ....................................................................................................... 4 - 17
Adding Sites to the Home Screen ............................................................................................. 4 - 19
Adding On-screen Instructions ................................................................................................. 4 - 20
Using Marquee Text ............................................................................................................ 4 - 20
Using Screen Saver Text ...................................................................................................... 4 - 20
Changing System Appearance .................................................................................................. 4 - 21
Setting Ring Tones and Alert Tones ......................................................................................... 4 - 21
Configuring Closed Captioning ....................................................................................................... 4 - 22
Audio Options for Closed Captioners ..................................................................................... 4 - 22
Options for Supplying Closed Captions to Conferences ....................................................... 4 - 22
Providing Captions Via the V500 Web Interface ............................................................. 4 - 23
Providing Captions Via a Telnet Session .......................................................................... 4 - 24
Getting Started with Calling ............................................................................................................. 4 - 25
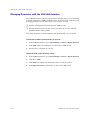
Chapter 5 - Managing the System Remotely
Using the V500 Web Interface ............................................................................................................ 5 - 2
Accessing the V500 Web Interface .............................................................................................. 5 - 2
Managing System Profiles with the V500 Web Interface ........................................................ 5 - 3
Managing Directories with the V500 Web Interface ................................................................ 5 - 4
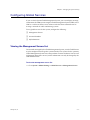
Configuring Global Services ............................................................................................................... 5 - 5
Viewing the Management Servers List ...................................................................................... 5 - 5
Requiring an Account Number for Calls ................................................................................... 5 - 6
Adding My Information ............................................................................................................... 5 - 6
Requesting Technical Support from the GM S Administrator ............................................... 5 - 7

© Polycom, Inc. vii
Setting Up SNMP ..................................................................................................................................5 - 8
Downloading MIBs .......................................................................................................................5 - 8
Configuring for SNMP Management .........................................................................................5 - 9
Chapter 6 - System Usage and Statistics
Call Summary ........................................................................................................................................6 - 2
Call Statistics ..........................................................................................................................................6 - 3
Call Status ..............................................................................................................................................6 - 4
Recent Calls ............................................................................................................................................6 - 5
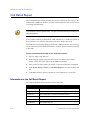
Call Detail Report .................................................................................................................................6 - 6
Information in the Call Detail Report .........................................................................................6 - 6
Call Detail Report Archives .........................................................................................................6 - 9
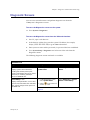
Chapter 7 - Diagnostics and General Troubleshooting
Sending a Message ................................................................................................................................7 - 2
System Screens Quick Reference ........................................................................................................7 - 2
Diagnostic Screens ................................................................................................................................7 - 3
Indicators ...............................................................................................................................................7 - 7
System Lights .................................................................................................................................7 - 7
Network Interface Lights ..............................................................................................................7 - 7
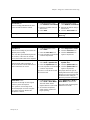
General Troubleshooting .....................................................................................................................7 - 8
Critical Problems ...........................................................................................................................7 - 8
Severe Problems .............................................................................................................................7 - 9
Moderate Issues ...........................................................................................................................7 - 11
Minor Issues .................................................................................................................................7 - 13
Normal System Behaviors ..........................................................................................................7 - 16
How to Contact Technical Support ..................................................................................................7 - 17
By Telephone ................................................................................................................................7 - 17
By Internet ....................................................................................................................................7 - 17
Appendix
Cable Descriptions................................................................................................................. Appendix - 1
Cable Drawings ..................................................................................................................... Appendix - 2
LAN Cable ......................................................................................................................Appendix - 2
Composite Video Cable ................................................................................................ Appendix - 3
Q.850 Cause Codes ............................................................................................................... Appendix - 4
Safety and Legal Notices
Index

Administrator’s Guide for the V500 System
viii www.polycom.com/videodocumentation

© Polycom, Inc. 1 - 1
1
Introducing the V500 System
Your V500 video conferencing system is a state-of-the-art visual collaboration tool.
With crisp, clean video and crystal-clear sound, your V500 system provides the
essential tools your home or small business needs for video conferencing over
broadband networks.
What’s in this Chapter? Page
Key Features 1-2
Standard System Components 1-5
Optional System Components 1-6

Administrator’s Guide for the V500 System
1 - 2 www.polycom.com/videodocumentation
Key Features
Rich Conference Experience
❑ Best-in-class video algorithms — The H.264 video algorithm provides
smooth, natural TV-like video.
❑ State-of-the-art audio quality — The V500 system offers Polycom Siren™ 14,
a 14 kHz frequency response that delivers CD-quality sound.
❑ See more with single-monitor systems — Use Dual Monitor Emulation
(split-screen viewing) to see more even when you only have room for one
monitor.
❑ Language support — Use the V500 system user interface, remote control, and
web interface in any of twelve languages.
Enhanced User Experience
❑ Customizable home screen — Customize the home screen to support
different types of users:
• Novice users — Offer just a few options, so users need little or no training.
• Advanced users — Provide a wide range of video conferencing features.
❑ Customizable look and feel — Set up the workspace to suit your
environment.
❑ Easy-to-use remote control — Navigate through the configuration screens and
place calls easily using the remote control.
• Enter text — Press the number buttons to enter text using the method
commonly used with cell phones.
• Color-coded buttons — Find buttons for related features quickly since
they are color coded.
• Separate buttons for calling and hanging up — Call and hang up without
confusion even if you have never made a video call before.

Chapter 1 - Introducing the V500 System
© Polycom, Inc. 1 - 3
❑ Many ways to use the directory — Find information in the directory using the
method you find most convenient.
• Assign entries to categories — Sort your directory by department or
category.
• Search by name — Quickly find people by entering the first, middle, or
last name.
• Find others and let them find you — Register with the Global Directory
Server and make it easy to call other registered systems and just as easy for
the other registered systems to call you. The system automatically copies
the global directory to your system periodically, so entries are always
available.
Easy Installation
❑ Firewall (UPnP™) support — The V500 system offers support for routers that
support UPnP (Universal Plug and Play) NAT traversal, making video
conferencing setup easier for users in homes and small offices.
❑ IP or ISDN calling — The V500 system has a built-in 10/100 Mb Ethernet port
for IP calls. Add the optional single BRI network interface to make calls over
your ISDN telephone lines.
❑ Easy configuration wizard — The system setup wizard detects your network
connections and guides you through configuring the system to work on an IP
network or ISDN.
❑ Fully broadband capable — The standards-compliant V500 system works
with any other H.323 system.
❑ Auto-sensing power supply — The system automatically adjusts for line
voltages from 90 to 260 V and line frequencies from 47 to 63 Hz.
Security and Network Management
❑ Use AES encryption — Enable the integrated AES encryption to automatically
encrypt calls to other AES-capable systems, without external encryption
equipment.
❑ Remote access — Configure, manage, and monitor the system from a remote
computer using the V500 web interface (the system’s web interface), the
Polycom Global Management
™
System, or SNMP. Alternatively, you can
choose not to allow remote management.
❑ Secure system management — The local administrator’s password on the
system prevents others from changing system configuration while allowing
you to manage the system.

Administrator’s Guide for the V500 System
1 - 4 www.polycom.com/videodocumentation
❑ Call Detail Reports — Access the system’s call history from the V500 web
interface. You can download the data to a spreadsheet application for sorting
and formatting.
❑ Remote diagnostics — Tools in the V500 web interface allow you to identify
and correct issues that affect the video conferencing experience.
❑ SNMP reporting — The V500 system sends SNMP reports to indicate a total
of 31 conditions.

Chapter 1 - Introducing the V500 System
© Polycom, Inc. 1 - 5
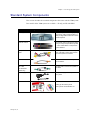
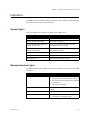
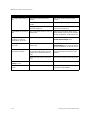
Standard System Components
This section describes the standard components that come with the V500 system.
Two models of the V500 system are available — IP only, and IP with ISDN.
Name Component Description
V500 System The V500 system delivers high-quality,
face-to-face video communication in a
sleek package that includes the camera
and microphone.
Remote Control The remote control is designed to make
it easy to set up and operate the system
— color-coded buttons correspond to
system features.
Composite video
cable
The composite video cable is a triple
RCA cable with S-video that connects
the V500 system to a monitor.
LAN cable The LAN cable connects the system to
the IP network.
BRI cable
(IP with ISDN
model only)
The BRI cable connects the system to
the ISDN.
Power supply The power supply connects power to
the system.
Documentation Read Me First
Setting Up the V500 System
V500 system documentation CD

Administrator’s Guide for the V500 System
1 - 6 www.polycom.com/videodocumentation
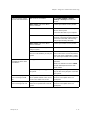
Optional System Components
To extend what you do with your V500 system, the following additional options
are available. For information about ordering these options, please see your
Polycom distributor.
❑ Single BRI network interface — Connect the system to use ISDN.
❑ Headphone — Listen privately by adding your own headphone using the
3.5 mm stereo mini jack.

© Polycom, Inc. 2 - 1
2
Setting Up Your System Hardware
This chapter describes how to set up your system with the required components
and optional equipment. If you need additional installation information, refer to
the system setup document that was provided with your system.
For optional components, you can also refer to the setup sheet that was shipped
with the component.
To obtain additional copies of any of these documents, refer to the documentation
CD that came with the system or go to the Polycom web site,
www.polycom.com/videodocumentation.
What’s in this Chapter? Page
Standard System Set-up 2-2
Optional Equipment Set-up 2-6

Administrator’s Guide for the V500 System
2 - 2 www.polycom.com/videodocumentation
Standard System Set-up
This section describes how to connect the components that are required for the
basic system set-up. Procedures for connecting additional equipment are in the
next section, Optional Equipment Set-up on page 2-6.
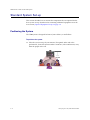
Positioning the System
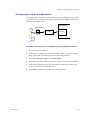
The V500 system is designed for homes, home offices, or small offices.
To position the system:
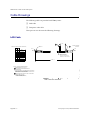
>> Place the system on top of your monitor. For optimal audio and video
performance, locate the monitor within 5 to 10 feet (1.52 to 3.05 meters) away
from the people in the call.
5'-10'
1.

Chapter 2 - Setting Up Your System Hardware
© Polycom, Inc. 2 - 3
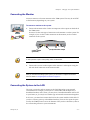
Connecting the Monitor
You must connect a television monitor to the V500 system. This may be an NTSC
or PAL monitor, depending on your system.
To connect a monitor to the system:
1. Connect the monitor to the S-video or composite video outputs on the back of
the V500 system.
You must use the same type of connector on the monitor as on the system. For
example, if you use the S-video connector on the monitor, use the S-video
connector on the system.
S-video provides superior video quality, and is recommended.
2. Connect the system’s audio outputs to the monitor’s audio inputs using the
red and white connectors on the monitor cable.
After you have finished setting up the system, you will need to configure the monitor’s
behavior. Refer to Configuring the TV Monitor on page 4-7.
Connecting the System to the LAN
The steps you need to take to connect to the LAN depend on your network
environment. For example, you may have a small office with multiple PCs, a
broadband modem, and a router; you may have a broadband modem and one PC
in your home; or, you may have another type of network environment altogether.
In all cases, you must first connect the LAN to the system with the LAN cable. If
you have a router, gateway, or broadband modem, you must also open the ports
used by the V500 system to access the Internet. Once you have done these, refer to
the section that pertains to your environment.
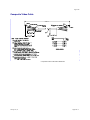
DC IN 12V
LAN
BRI
S-video output
Composite video output
(preferred)

Administrator’s Guide for the V500 System
2 - 4 www.polycom.com/videodocumentation
To connect the system to the LAN:
1. Connect the LAN cable to the LAN connector on the back of the system.
2. Connect the other end of the LAN cable to the LAN.
After you have finished setting up the system, you will need to configure it to work properly
in your network. Refer to Configuring Network Use on page 3-1.
Connecting Power
The V500 system has an external power supply.
Do not use a power supply other than the one supplied with your V500 system. Using the
wrong power supply will void the warranty and may damage your system.
To connect power to the system:
1. Connect the power supply to the power connector on the back of the system.
2. Connect the power cord to the power supply.
Do not connect the V500 system power cord to a wall outlet until you have connected all
equipment to the system.
DC IN 12V
LAN
BRI
LAN connector
DC IN 12V
LAN
BRI
Power connector

Chapter 2 - Setting Up Your System Hardware
© Polycom, Inc. 2 - 5
Installing Batteries in the Remote Control
The remote control uses three AAA batteries, which are included with the system.
To install batteries in the remote control:
1. Remove the battery cover from the back of the remote control.
2. Refer to the diagram inside the remote control, and install the batteries in the
orientation shown.
3. Reinstall the battery cover on the remote control.
Powering on the System
After you have connected all your standard and optional equipment, plug the
power cord into a wall outlet.
To power on the system:
>> Press the power switch located at the back of the system.
DC IN 12V
LAN
BRI
Power switch

Administrator’s Guide for the V500 System
2 - 6 www.polycom.com/videodocumentation
Optional Equipment Set-up
This section describes how to connect optional components to the V500 system.
Connecting to a BRI Network Interface
The V500 system is available with the optional BRI network interface, which
allows you to make ISDN calls.
You may need an NT-1 device if your site does not use an internal telephone
system (PBX). A PBX or an NT-1 device provides the S/T interface that the
system’s BRI network interface requires.
To install the BRI network interface:
1. Make sure the system is powered off.
2. Connect the BRI cable from the BRI connector on the back of the system to
ISDN or to your NT-1 device, as appropriate.
3. If you are using an NT-1 device, connect it to the ISDN.
Connecting Headphones
You can connect headphones to the V500 system to listen to your calls privately.
To connect headphones to the system:
>> Connect the headphone cable to the headphone jack on the back of the system.
DC IN 12V
LAN
BRI
BRI connector
DC IN 12V
LAN
BRI
Headphone jack
Page is loading ...
Page is loading ...
Page is loading ...
Page is loading ...
Page is loading ...
Page is loading ...
Page is loading ...
Page is loading ...
Page is loading ...
Page is loading ...
Page is loading ...
Page is loading ...
Page is loading ...
Page is loading ...
Page is loading ...
Page is loading ...
Page is loading ...
Page is loading ...
Page is loading ...
Page is loading ...
Page is loading ...
Page is loading ...
Page is loading ...
Page is loading ...
Page is loading ...
Page is loading ...
Page is loading ...
Page is loading ...
Page is loading ...
Page is loading ...
Page is loading ...
Page is loading ...
Page is loading ...
Page is loading ...
Page is loading ...
Page is loading ...
Page is loading ...
Page is loading ...
Page is loading ...
Page is loading ...
Page is loading ...
Page is loading ...
Page is loading ...
Page is loading ...
Page is loading ...
Page is loading ...
Page is loading ...
Page is loading ...
Page is loading ...
Page is loading ...
Page is loading ...
Page is loading ...
Page is loading ...
Page is loading ...
Page is loading ...
Page is loading ...
Page is loading ...
Page is loading ...
Page is loading ...
Page is loading ...
Page is loading ...
Page is loading ...
Page is loading ...
Page is loading ...
Page is loading ...
Page is loading ...
Page is loading ...
Page is loading ...
Page is loading ...
Page is loading ...
Page is loading ...
Page is loading ...
Page is loading ...
Page is loading ...
Page is loading ...
Page is loading ...
Page is loading ...
Page is loading ...
Page is loading ...
Page is loading ...
Page is loading ...
Page is loading ...
Page is loading ...
Page is loading ...
Page is loading ...
Page is loading ...
Page is loading ...
Page is loading ...
Page is loading ...
Page is loading ...
Page is loading ...
Page is loading ...
Page is loading ...
Page is loading ...
Page is loading ...
Page is loading ...
Page is loading ...
Page is loading ...
Page is loading ...
Page is loading ...
Page is loading ...
Page is loading ...
Page is loading ...
Page is loading ...
Page is loading ...
Page is loading ...
-
 1
1
-
 2
2
-
 3
3
-
 4
4
-
 5
5
-
 6
6
-
 7
7
-
 8
8
-
 9
9
-
 10
10
-
 11
11
-
 12
12
-
 13
13
-
 14
14
-
 15
15
-
 16
16
-
 17
17
-
 18
18
-
 19
19
-
 20
20
-
 21
21
-
 22
22
-
 23
23
-
 24
24
-
 25
25
-
 26
26
-
 27
27
-
 28
28
-
 29
29
-
 30
30
-
 31
31
-
 32
32
-
 33
33
-
 34
34
-
 35
35
-
 36
36
-
 37
37
-
 38
38
-
 39
39
-
 40
40
-
 41
41
-
 42
42
-
 43
43
-
 44
44
-
 45
45
-
 46
46
-
 47
47
-
 48
48
-
 49
49
-
 50
50
-
 51
51
-
 52
52
-
 53
53
-
 54
54
-
 55
55
-
 56
56
-
 57
57
-
 58
58
-
 59
59
-
 60
60
-
 61
61
-
 62
62
-
 63
63
-
 64
64
-
 65
65
-
 66
66
-
 67
67
-
 68
68
-
 69
69
-
 70
70
-
 71
71
-
 72
72
-
 73
73
-
 74
74
-
 75
75
-
 76
76
-
 77
77
-
 78
78
-
 79
79
-
 80
80
-
 81
81
-
 82
82
-
 83
83
-
 84
84
-
 85
85
-
 86
86
-
 87
87
-
 88
88
-
 89
89
-
 90
90
-
 91
91
-
 92
92
-
 93
93
-
 94
94
-
 95
95
-
 96
96
-
 97
97
-
 98
98
-
 99
99
-
 100
100
-
 101
101
-
 102
102
-
 103
103
-
 104
104
-
 105
105
-
 106
106
-
 107
107
-
 108
108
-
 109
109
-
 110
110
-
 111
111
-
 112
112
-
 113
113
-
 114
114
-
 115
115
-
 116
116
-
 117
117
-
 118
118
-
 119
119
-
 120
120
-
 121
121
-
 122
122
-
 123
123
-
 124
124
-
 125
125
-
 126
126


Polycom V500 User manual
- Category
- Car media receivers
- Type
- User manual
- This manual is also suitable for
Ask a question and I''ll find the answer in the document
Finding information in a document is now easier with AI
Related papers
-
Polycom V500 Administrator's Manual
-
-
-
-
-
-
-
Polycom VSX 8000 Series Integrator's Reference Manual
-
Polycom QDX 6000 System Administrator's Manual
-
Other documents
-
Poly ISDN Gateway User guide
-
UGREEN 30849 User manual
-
-
Avaya Webcam 16-601423 User manual
-
-
-
ZyXEL V500-T1 User manual
-
-
-
 ZyXEL Communications V500 Series User manual
