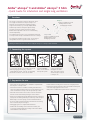
Ambu aScope 3 Slim is a single-use sterile flexible videoscope with a 1.2 mm working channel and a 3.8 mm insertion cord diameter. It has a bending angle of 130°/130° and is compatible with ET tubes size 5 and up, as well as DLT's of FR 37 or greater or BB of sizes 5-9. The aScope 3 Slim is ready to use whenever you need it, making it the perfect choice for all types of intubation. Its instantly accessible single-use and ready-to-go concept simplifies flexible intubation procedures and improves patient safety.
Ambu aScope 3 Slim is a single-use sterile flexible videoscope with a 1.2 mm working channel and a 3.8 mm insertion cord diameter. It has a bending angle of 130°/130° and is compatible with ET tubes size 5 and up, as well as DLT's of FR 37 or greater or BB of sizes 5-9. The aScope 3 Slim is ready to use whenever you need it, making it the perfect choice for all types of intubation. Its instantly accessible single-use and ready-to-go concept simplifies flexible intubation procedures and improves patient safety.


-
 1
1
-
 2
2


Ambu aScope 3 Slim Quick Manual
- Type
- Quick Manual
- This manual is also suitable for
Ambu aScope 3 Slim is a single-use sterile flexible videoscope with a 1.2 mm working channel and a 3.8 mm insertion cord diameter. It has a bending angle of 130°/130° and is compatible with ET tubes size 5 and up, as well as DLT's of FR 37 or greater or BB of sizes 5-9. The aScope 3 Slim is ready to use whenever you need it, making it the perfect choice for all types of intubation. Its instantly accessible single-use and ready-to-go concept simplifies flexible intubation procedures and improves patient safety.
Ask a question and I''ll find the answer in the document
Finding information in a document is now easier with AI
Related papers
-
Ambu aScope 3 Quick Manual
-
-
-
-
-
Ambu aScope Gastro User guide
-
-
Ambu 492413031 User manual
-
-
Other documents
-
3M Jacketed, Flat Cable, .050", 3603 Series Important information
-
Garmin Pack para pesca en hielo STRIKER Plus 5 Owner's manual
-
Navman 6500 User manual
-
Atmos S 201 Thorax Operating Instructions Manual
-
Raymarine DSM250 Owner's Handbook Manual
-
insize ISV-3000D Operation Manuals
-
Extech Instruments HDV5-6CAM-1AFM User manual
-
Furuno FCV-600L User manual
-
-
Olympus InstaClear Quick Reference Manual