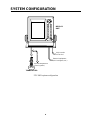
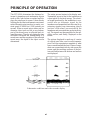
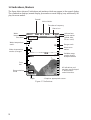
Furuno FCV-600L is a compact color LCD sounder featuring 16-color, high-resolution images on a bright 5.6-inch display. With its dual-frequency (50/200 kHz) operation, it excels in a wide range of applications, from shallow water to deep sea fishing, effectively marking fish echoes and bottom contours.
Furuno FCV-600L is a compact color LCD sounder featuring 16-color, high-resolution images on a bright 5.6-inch display. With its dual-frequency (50/200 kHz) operation, it excels in a wide range of applications, from shallow water to deep sea fishing, effectively marking fish echoes and bottom contours.


-
 1
1
-
 2
2
-
 3
3
-
 4
4
-
 5
5
-
 6
6
-
 7
7
-
 8
8
-
 9
9
-
 10
10
-
 11
11
-
 12
12
-
 13
13
-
 14
14
-
 15
15
-
 16
16
-
 17
17
-
 18
18
-
 19
19
-
 20
20
-
 21
21
-
 22
22
-
 23
23
-
 24
24
-
 25
25
-
 26
26
-
 27
27
-
 28
28
-
 29
29
-
 30
30
-
 31
31
-
 32
32
-
 33
33
-
 34
34


Furuno FCV-600L is a compact color LCD sounder featuring 16-color, high-resolution images on a bright 5.6-inch display. With its dual-frequency (50/200 kHz) operation, it excels in a wide range of applications, from shallow water to deep sea fishing, effectively marking fish echoes and bottom contours.
Ask a question and I''ll find the answer in the document
Finding information in a document is now easier with AI
Related papers
Other documents
-
 Onwa KF-667 User manual
-
Samyung SDF-315 Owner's manual
-
Koden CVS-FX2 Reference guide
-
-
Standard Horizon DS-1 Owner's manual
-
-
Konica Minolta RANGE7 User manual
-
Si-tex CVS-126 User manual
-
-
NORTHSTAR 491 User manual
