Page is loading ...

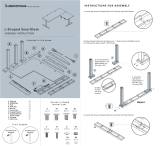
L- Shaped Desk
work smarter
5mm Allen wrench
(included)
4mm Allen wrench
(included)
Y
(22+1)
V1
(2+1)
V
(8+1)
Y1
(2+1)
W
(18+1)
Z
(16+1)
Z1
(4+1)
A. Side Leg
B. Middle leg
C. Foot
D. Desk Top
E. Bracket
F. Control Box
G. Support Beam1
H. Support Beam2
I. Power Cable
K. Key pad
x2
x1
x2
x1
x3
x1
x1
x1
x1
x1
1. Loosen the screws of Support Beam 1 (G) using 4MM Allen
wrench, adjust Beam to proper position to fit the Desk Top (D),
and then retighten the screws to lock.
2. Attach legs to the Support
Beam 1 using 8 (W).
c. Assemble
right side of
Support Beam
1 with Side Leg
(A) using 4 (W)
F
D
I
G
E
H
K
C
B
A
W
Beam1
Loosen the 8 screws of Support Beam 2 (H) and adjust it to
the desired position to fit your Desk Top (D), then lock Beam
by retightening its screws.
3.
A
B
a. On the left side
of Support Beam 1
(G), attach Middle
Leg (B) using 4
(W).
b. Make
sure the
bar faces
outward.
(H)
X4

4.
5. Attach Support Beam 2 (H) to Support Beam 1 (G) using 2 (V1).
7. Flip the frame right side up and attach Brackets (E) to the ends of
the Support Beams using 6 (W).
. Attach remaining Side Leg (A) to right side of
Support Beam 2 using 4 (W).
Beam2
W
W
A
Beam2
Beam2
Beam1
Beam1
V1
6. Attach Feet (C) to the Side Legs (A) using 8 (V), and insert the 4
Levelling Feet Pads (Z1) to the bottom of the feet.
Z1
V
Z
Z
a. then place 16 Rubber Cushions (Z) to the
top of the Brackets and Beams.
Z
A
A
X4
C
X2
X4
X4
X2
X4
X2

8. With a partner, lay the Desk Top (D) upside down on the ground and attach the
Beams using 20 (Y).
Y
Y
Y
Y1
F
Y
Y1
Y1
F
Y
10. Attach Control Switch (K)
into its corresponding holes
near the edge of the bottom of
the desk using 2 (Y1).
9. Attach the
Control Box (F)
to the bottom
of the table
using 2 (Y).
K
YOUR DESK IS READY TO USE.
Designed by Autonomous
X4
X4
X2
X2
Press up and down
buttons at the same
time until it beeps and
goes down to the
lowest level
Release both buttons
and press down button
until exact height
appears on display.
IMPORTANT! You must RESET the desk prior to use.
12. Plug the Power Cable (K) into Control Box (F)
and then into a power outlet. Repeat process with
the Desk on other side.
K
L
F
A2
I
F
11. Connect the Control Box (F) to corresponding
Control Switch (K), and Legs cable (L). Repeat process
with the Desk on other side.
13. Before use, reset each Control Box following these instructions on both sides.
!
NOTE: Make sure no obstacles are in the desk’s path. Make sure cords are a length that
will accommodate the change in height.

Autonomous - Smart oce
www.autonomous.ai
9469-5 Opal Ave - Mentone, CA 92359
+1 844-208-6205
8am - 5pm PT
1. Adjust SmartDesk’s height
Press “Up” or “Down” button to adjust the height of the desk.
2. Program pre-set buttons
To use the presets on the SmartDesk, please follow the steps:
Set the desk to the height you like.
Press the M button until the LED flashes.
Press the number you want the desk set to.
3. Reset the desk
Unplug the power cord to the control box.
Unplug the cable from the keypad to the control box.
Plug all the cables again.
Do the reset: Press up and down buttons at the same time until it beeps and goes down to the
Lowest level: Release both buttons, then press only down until it shows the exact height.
Your desk is ready to use.
Before use make sure that:
The legs are level and start at the lowest position.
All the screws are tightened or else the desk will make noise/ wobble.
When moving the desk, DO NOT lift the desk by the desktop alone. Support both the frame
and the desk top equally. Favoring one over the other can stress the fasteners connecting
the desk frame to the desktop. Lower the desk completely before moving it.
Choose a placement for the desk that’s a safe distance from window frames, radiators,
furniture, etc., so that people do not get stuck or trapped by the desk, and nothing obstructs
the desk from rising or lowering.
Ensure adequate cord clearance before using the desk. Connect desk’s power cord to the
110V - 240V outlet to make the desk ready for use.
Do not place any objects underneath the desk that are taller than 25’’.
DESK PLACEMENT
Autonomous-Smart office
+1 844-208-6205
Smart Office
9469-5 Opal Ave - Mentone, CA 92359
www.autonomous.ai
ABOUT
Autonomous is a global network of innovators. We’re engineers who
take apart your day, examine the pieces, and then reassemble your
routine to help you #worksmarter. Our sole focus is towards realizing
the gold standard of the smart oce industry.
visit autonomous.ai/warranty.
/