MONO
L
R
MONO
SUB WOOFER BUS AUDIO
OUT IN
Sony Corporation © 2001 Printed in Japan
WX-4500X
Equipment used in illustrations (not supplied)
그림에 사용하는 장치(별매품)
Cautions
•This unit is designed for negative ground 12 V
DC operation only.
•Do not get the wires under a screw, or caught
in moving parts (e.g. seat railing).
•Before making connections, turn the car
ignition off to avoid short circuits.
•Connect the yellow and red power input leads
only after all other leads have been connected.
•Run all ground wires to a common ground
point.
•Be sure to insulate any loose unconnected
wires with electrical tape for safety.
•The use of optical instruments with this
product will increase eye hazard.
Notes on the power supply cord (yellow)
•When connecting this unit in combination with
other stereo components, the connected car
circuit’s rating must be higher than the sum of
each component’s fuse.
•When no car circuits are rated high enough,
connect the unit directly to the battery.
Parts Iist (1)
The numbers in the list are keyed to those in the
instructions.
Connection example (2)
Tip (2-B-
)
For connecting two or more changers, the source
selector XA-C30 (optional) is necessary.
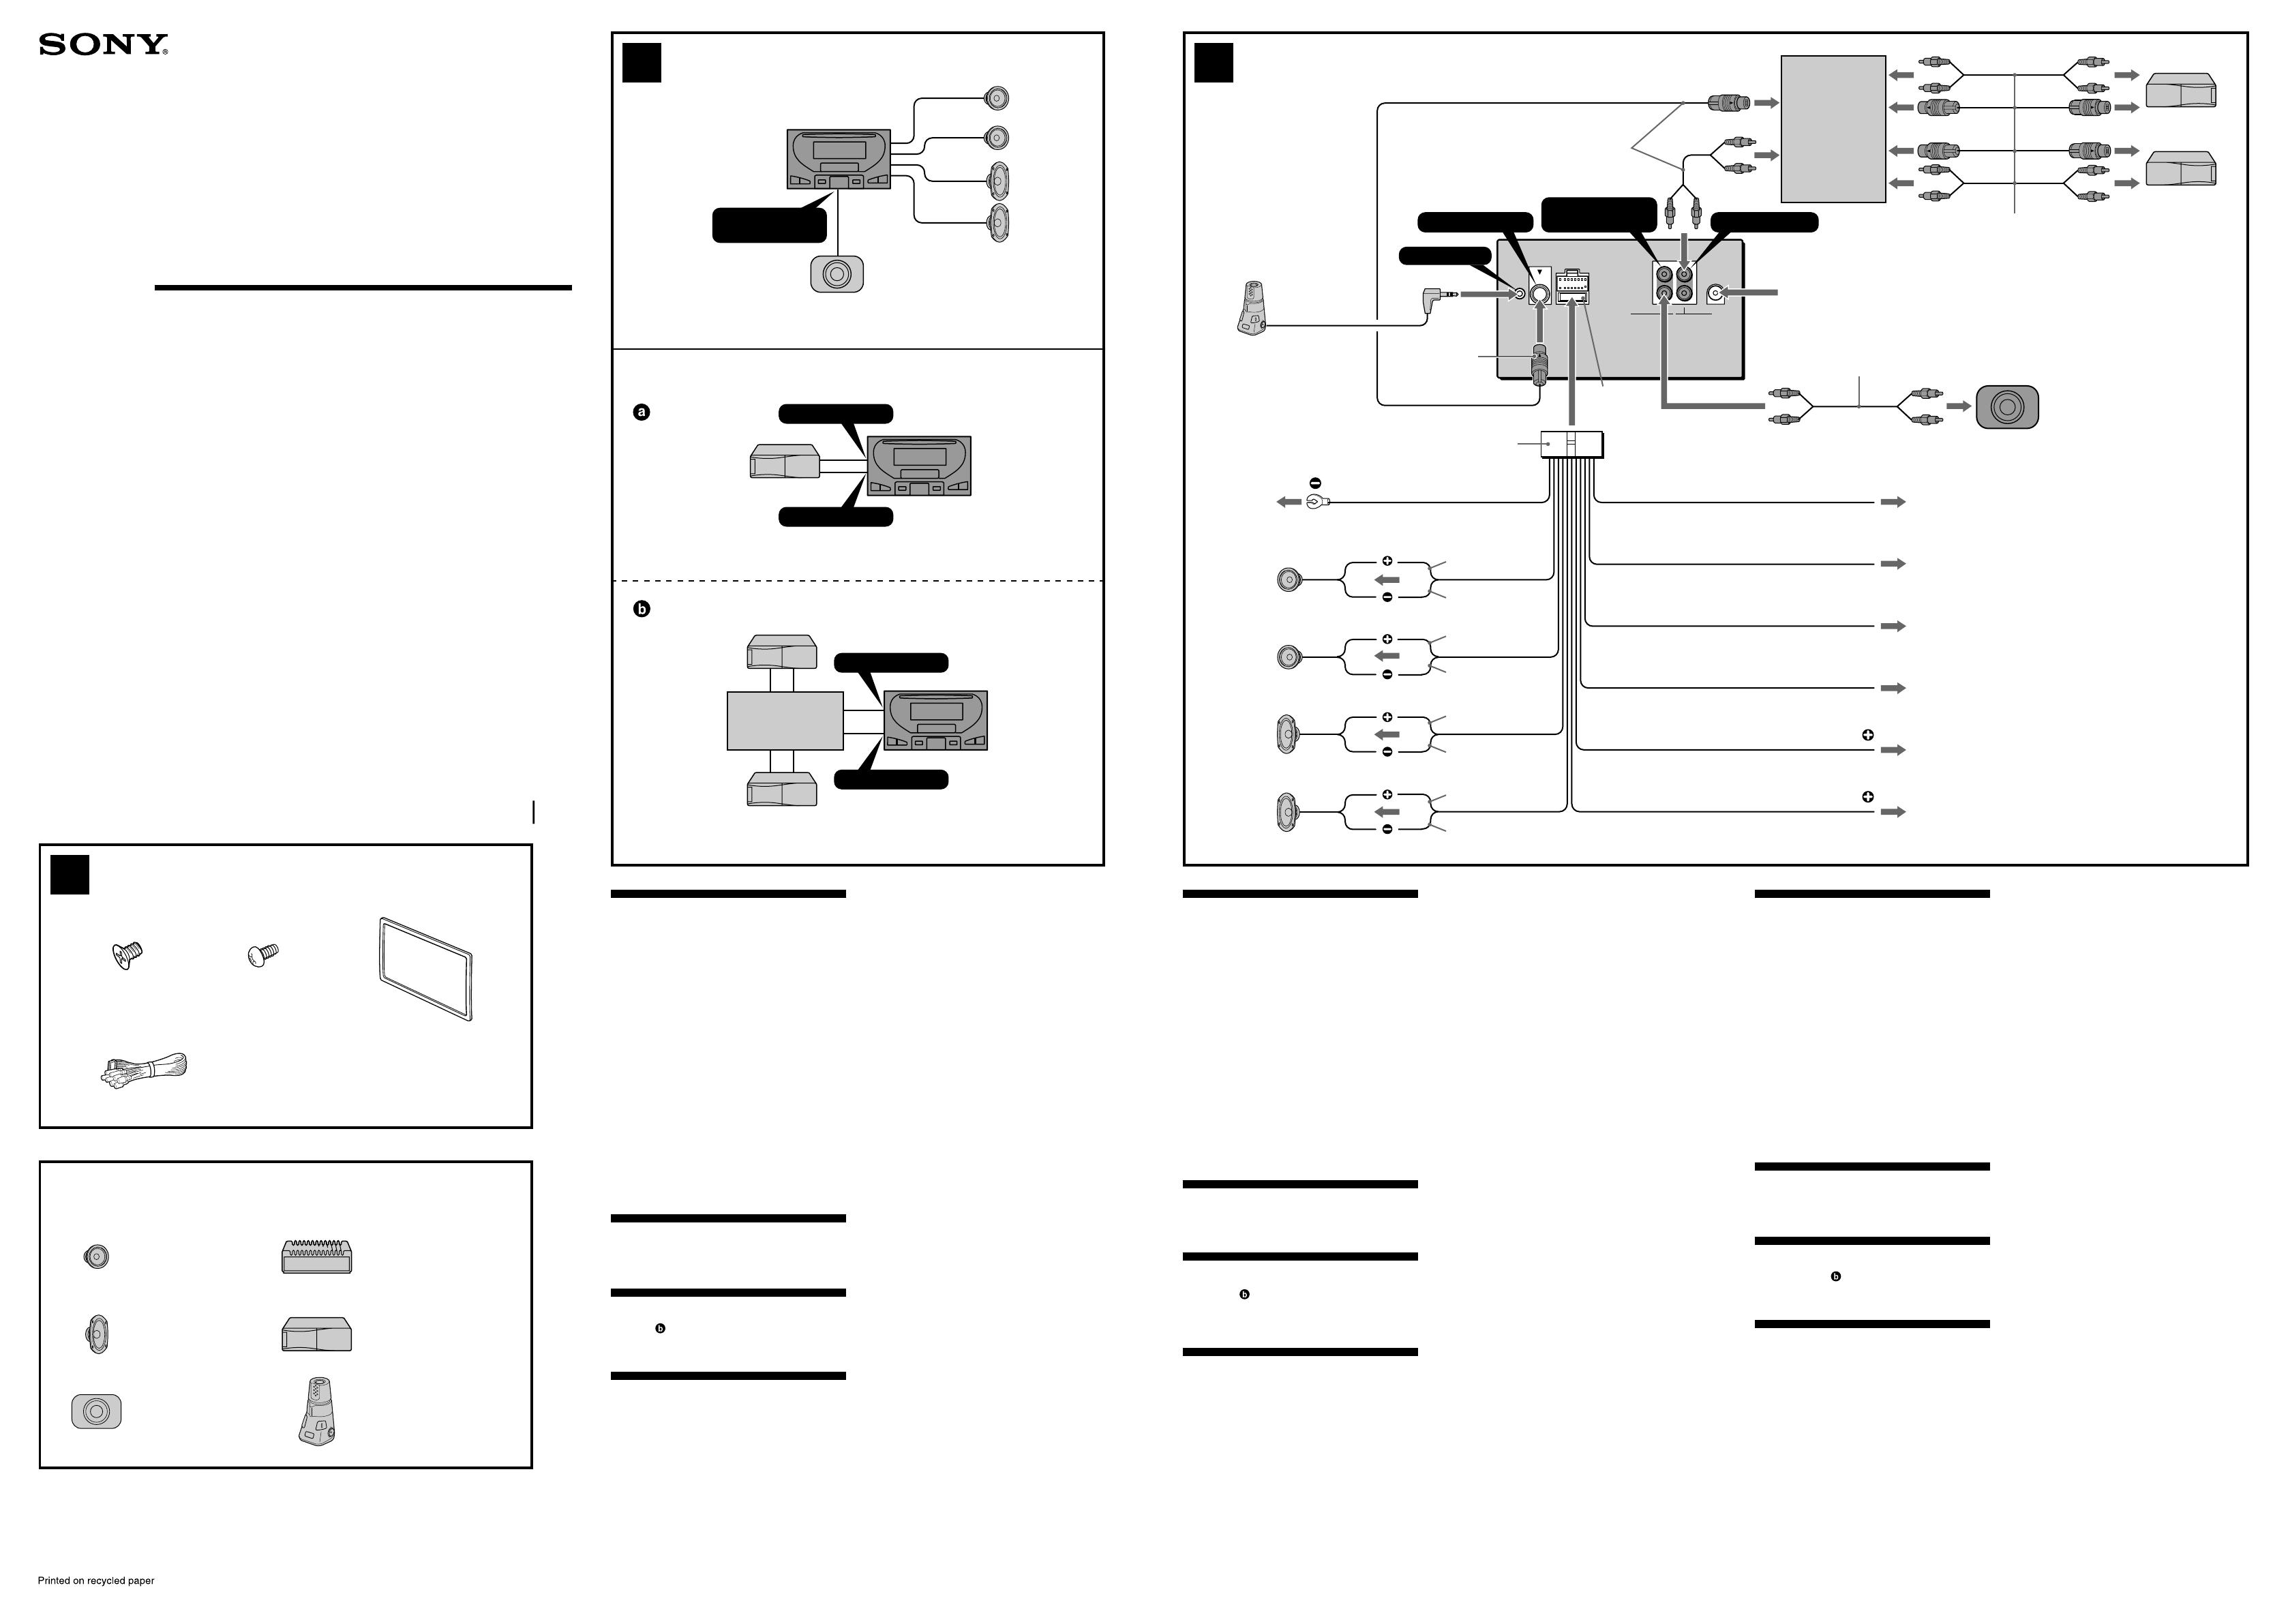
Connection diagram (3)
When inserting each connector, be sure to insert
securely, as vibration through driving may
cause a poor connection.
1 To a metal surface of the car
First connect the black ground lead, then
connect the yellow and red power input leads.
2 To the power antenna control lead or power
supply lead of antenna booster amplifier
Notes
• It is not necessary to connect this lead if there
is no power antenna or antenna booster, or
with a manually-operated telescopic antenna.
• When your car has a built-in FM/AM antenna in
the rear/side glass, see “Notes on the control
and power supply leads.”
1
32
B
12
× 6
3
4
× 6
Power amplifier
파워 앰프
CD/MD changer
CD/MD 체인저
Front speaker
프론트 스피커
Rear speaker
리어 스피커
Source selector*
*
소스 셀렉터*
BUS CONTROL IN
A
Installation/Connections
설치/접속
1
4
5
6
Blue
청색
Red
적색
Yellow
노란색
4
Black
검정색
Max. supply current 0.1 A
최고 공급 전류 0.1 A
Fuse (10 A)
퓨즈(10 A)
BUS AUDIO IN
AMP REM
ANT REM
BUS CONTROL IN
Light blue
하늘색
Max. supply current 0.3 A
최고 공급 전류 0.3 A
White
흰색
Gray
회색
Green
녹색
Purple
보라색
White/black striped
흰색/검정색 줄무늬
Gray/black striped
회색/검정색 줄무늬
Green/black striped
녹색/검정색 줄무늬
Purple/black striped
보라색/검정색 줄무늬
Changer Control
Audio Master
3 To AMP REMOTE IN of an optional power
amplifier
This connection is only for amplifiers. Connecting
any other system may damage the unit.
4 To the interface cable of a car telephone
5 To a car’s illumination feed
Be sure to connect the black ground lead to it
first.
6 To the +12 V power terminal which is energized
in the accessory position of the ignition key
switch
Notes
• If there is no accessory position, connect to the
+12 V power (battery) terminal which is
energized at all times.
Be sure to connect the black ground lead to it
first.
• When your car has a built-in FM/AM antenna in
the rear/side glass, see “Notes on the control
and power supply leads.”
7 To the +12 V power terminal which is energized
at all times
Be sure to connect the black ground lead to it
first.
Notes on the control and power supply leads
• The power antenna control lead (blue) supplies
+12 V DC when you turn on the tuner.
• When your car has built-in FM/AM antenna in the
rear/side glass, connect the power antenna control
lead (blue) or the accessory power input lead (red)
to the power terminal of the existing antenna
booster. For details, consult your dealer.
•A power antenna without relay box cannot be
used with this unit.
Memory hold connection
When the yellow power input lead is connected,
power will always be supplied to the memory circuit
even when the ignition key is turned off.
Notes on speaker connection
• Before connecting the speakers, turn the unit off.
• Use speakers with an impedance of 4 to 8 ohms,
and with adequate power handling capacities to
avoid its damage.
• Do not connect the speaker terminals to the car
chassis, or connect the terminals of the right
speakers with those of the left speaker.
• Do not connect the ground lead of this unit to the
negative (–) terminal of the speaker.
•Do not attempt to connect the speakers in parallel.
• Connect only passive speakers. Connecting active
speakers (with built-in amplifiers) to the speaker
terminals may damage the unit.
• To avoid a malfunction, do not use the built-in
speaker wires installed in your car if the unit shares
a common negative (–) lead for the right and left
speakers.
• Do not connect the unit’s speaker cords to each
other.
Source selector
*
1
*
소스 셀렉터*
1
Left
왼쪽
Right
오른쪽
Left
왼쪽
Right
오른쪽
3
Blue/white striped
청색/흰색 줄무늬
2
REMOTE IN
ATT
Active subwoofer
액티브 서브우퍼
Rotary commander RM-X4S
회전 커맨더 RM-X4S
SUBWOOFER OUT
(MONO)
*I-3-229-007-12*(1)
For NISSAN cars only
닛산 제품 자동차 전용
* not supplied
*
*
별매품
BUS AUDIO IN
BUS CONTROL IN
BUS AUDIO IN
Supplied with the CD/MD changer
CD/MD 체인저에 부속
Supplied with XA-C30
XA-C30에 부속
SUBWOOFER OUT
(MONO)
RCA pin cord*
1
*
1
RCA 핀 코드*
1
Orange/white striped
주황색/흰색 줄무늬
7
ILLUMINATION
*
1
not supplied
*
2
Connect the Bus cable to its
terminal with the unit’s V mark
and the Bus cable’s v mark
aligned.
*
1
*
2
v
V
*
별매품
*
2
장치의
V
마크와 버스 케이블의
v
마크
를 맞추어서 버스 케이블을 그 단자에 접
속합니다.
*
2
from car antenna
자동차 안테나에서
RM-X4S
주의
• 본기는 부접지 12V DC 전용입니다.
• 와이어가 나사 아래로 들어가거나 가동 부품(시트의
레일 등)에 끼지 않도록 주의하십시오.
• 단락을 방지하기 위해서 접속하기 전에 자동차 시동
키를 꺼 주십시오.
• 노란색과 적색 전원 입력 리드는 다른 모든 리드를
접속한 후에 접속하여 주십시오.
• 노란색 코드는 본기의 퓨즈 정격치보다 높은 정격치
의 자동차 빈 회로에 접속하여 주십시오.
• 접속 부분에 배선이 늘어져 있을 때에는 안전을 위
해서 절연 테이프로 감아 주십시오.
전원 코드(노란색)에 관한 주의
• 본 장치를 다른 스테레오 컴포넌트와 조합해서 접속
할 때에는 접속한 자동차의 회로 정격치는 컴포넌트
의 퓨즈 정격치보다 커야 합니다.
• 자동차 회로에 적절한 회로가 없을 때에는 배터리에
장치를 직접 접속하여 주십시오.
부품 리스트(1)
리스트 번호는 사용설명서의 번호에 대응하고 있습니
다.
접속예(2)
잠깐 한마디
(2-B-
)
2대 이상 체인저를 접속하면 소스 셀렉터 XA
-
C30(옵션)가
필요합니다.
접속도(3)
운전 중의 진동에 의해서 접속이 느슨해지는 경우가
있으므로 각 커넥터를 삽입할 때에는 반드시 단단히
접속하여 주십시오.
1 자동차의 금속 면에
우선 검정색 접지 리드선을 접속한 후에 노란색과 적색 전
원 입력 리드선을 접속합니다.
2 파워 안테나 컨트롤 리드 또는 안테나 부스터 앰프의 전원
리드로
주의점
•
파워 안테나 또는 안테나 부스터가 없을 경우나 수동 신
축식 안테나에서는 이 리드를 접속할 필요가 없습니다.
•
자동차 뒷면/옆면 유리에 내장 FM/AM 안테나가 있을
때에는
“
컨트롤과 전원 리드에 관한 주의
”
를 참조하여 주
십시오.
3 옵션 파워 앰프의 AMP REMOTE IN으로
앰프에 한해서만 이 접속을 할 수 있습니다. 그 밖의 시스
템을 접속하면 본기가 손상될 염려가 있습니다.
4 자동차 전화의 인터페이스 케이블로
5 자동차 조명용 전원으로
반드시 처음에 검정색 접지선을 접속하여 주십시오.
6 시동 키 스위치의 액세서리 위치에서 통전하는 +12 V 전
원 단자로
주의점
•
액세서리 위치가 없을 때에는 항상 통전하고 있는
+12 V 전원(배터리) 단자로 접속하여 주십시오.
반드시 처음에 검정색 접지선을 접속하여 주십시오.
•
자동차 뒷면/옆면 유리에 내장 FM/AM 안테나가 있을
때에는
“
컨트롤과 전원 리드에 관한 주의
”
를 참조하여
주십시오.
7 항상 통전되고 있는 +12 V 전원 단자로
반드시 처음에 검정색 접지선을 접속하여 주십시오.
컨트롤과 전원 리드에 관한 주의
•
튜너의 전원을 넣으면 파워 안테나 컨트롤 리드선(청색)에
서 +12 V DC가 공급됩니다.
•
자동차의 뒷면/옆면 유리에 내장 FM/AM 안테나가 탑재되
어 있을 때에는 파워 안테나 컨트롤 리드선(청색) 또는 액세
서리 전원 입력 리드선(적색)을 기존의 안테나 부스터의 전
원 단자에 접속하여 주십시오. 자세한 것은 판매점으로 문의
하여 주십시오.
•
본기에서는 릴레이 박스가 없는 파워 안테나는 사용할 수 없
습니다.
메모리 홀드 접속
노란색 전원 입력 리드를 접속하면 시동 키를 꺼도 전원은 항
상 메모리 회로에 공급됩니다.
스피커 접속에 관한 주의
•
스피커를 접속하기 전에 본기 스위치를 꺼 주십시오.
•
손상을 방지하기 위해서는 임피던스가 4〜8 Ω에서 적절한
대응 전원을 갖춘 스피커를 사용하여 주십시오.
•
스피커 단자를 자동차 섀시에 접속하거나 오른쪽 스피커 단
자를 왼쪽 스피커용 단자에 접속하거나 하지 마십시오.
•
본 장치의 접지 리드선은 스피커의 마이너스(-) 단자에 접
속하지 마십시오.
•
스피커를 병렬로 접속하지 마십시오.
•
퍼시픽 스피커만 접속하여 주십시오. 액티브 스피커(앰프
내장 제품)를 스피커 단자에 접속하면 장치가 손상될 염려
가 있습니다.
•
장치에 좌우 스피커에 마이너스(-) 리드선을 공용하는 경우
에는 고장을 방지하기 위하여 사용 중인 자동차에 탑재된 내
장 스피커의 와이어는 사용하지 마십시오.
•
본기 스피커 코드를 서로 접속하지 마십시오.
•
•
•
•
•
•
•
•
1
2
2
3
1
2
•
•
3
4
5
6
•
•
7
•
•
•
•
•
•
•
•
•
•
•

