Page is loading ...

305-018201 9/12
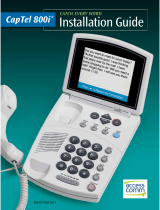
CapTel 840i
®
Setup Guide

Your new CapTel 840i is like any other telephone in many ways: it
connects to a telephone line, you talk and listen to your callers, and
you place/answer calls the same way you use any other telephone.
Your new CapTel 840i is also different than a traditional telephone
in some important ways.
In order to show captions, your CapTel 840i connects to the Internet
the same way you connect a computer to the Internet. The Internet
connection links to a free Captioning Service, where a specially-trained
operator transcribes everything your caller says into captions. The
captions are sent back over the Internet to your CapTel 840i phone, for
you to read in the display.
Because the CapTel 840i relies on the Internet to provide captions,
setting up the phone takes a few extra steps to make sure it is
connected to the Internet properly.
About Your New
CapTel 840i
®
CapTel is the latest innovation from
Ultratec, Inc.
450 Science Drive
Madison, WI 53711
(888) 269-7477 V/TTY
(866) 670-9134 (Spanish CapTel Customer Service)
Email: CapTel@CapTel.com
Fax: (608) 204-6167
Web: www.CapTel.com
©2012 Ultratec, Inc. All rights reserved.
Ultratec and CapTel are registered trademarks of Ultratec, Inc.

Installation Help: 888-269-7477 WHERE TO GET HELP • 1
Help is available 24 hours a day, 7 days a week. Please contact:
Toll-Free Installation Help Line: 888-269-7477
Email: CapTel@CapTel.com
• Fax: (608) 204-6167
Online Help: www.captel.com/customer-service.php
If someone else installed your home computer or your Internet connection,
you may want to consult with that person as you set up the CapTel 840i. You
can also try the Troubleshooting suggestions at the end of this guide to help
with any problems.
Important Information when Calling for Help
The following information may help CapTel Customer Service troubleshoot your
problem. If possible, please have this information handy when you call for help:
Where To Get Help
My Telephone Number
My CapTel 840i Electronic Serial Number (ESN)
(located underneath your CapTel phone)
My Internet Service Provider
My Telephone Service Provider
If using WiFi: Name of WiFi Network (SSID)
WiFi Password (also sometimes called “Pass Phrase” or “Network Key”)

Step 1 Requirements ................................................3
Step 2 Choosing a Location.......................................4
Step 3 Connect the Telephone Line ..........................5
Step 4 Connect to a Power Outlet.............................6
Step 5 Connect to your Internet Service...................7
Step 6 Setting the Time and Date ...........................18
Step 7
Record Personal Greeting Message (Optional)
...19
Troubleshooting .....................................................21
2 • TABLE OF CONTENTS Installation Help: 888-269-7477
T A B L E O F C O N T E N T S
How CapTel 840i Works
Captions of the call
are provided over the
Internet Connection.
You talk back and
forth with callers over the
Telephone Connection.

Installation Help: 888-269-7477 REQUIREMENTS • 3
STEP 1
Requirements
Before you set up your phone, make sure you already have:
Telephone Service
Connects to the CapTel 840i via a telephone cord using a standard RJ11
connection. Your telephone service can be any of the following:
NOTE: Your CapTel 840i does NOT work with digital Private Branch Exchange
(PBX) phone systems found in some business settings, residential facilities,
and hotels, unless an analog port is available.
Access to High-speed Internet Service
Connects to the CapTel 840i via an Ethernet cable or via a Wireless
(WiFi) network. Your Internet service must be working properly in order for
the CapTel 840i to display captions. A high-speed Internet connection is
required. Dial-up Internet service will not work. In home settings that do not
have a wireless network, you may need a router or switch to connect more
than one device to your Internet service. Your Internet modem and/or router
should support DHCP. You should also check if a firewall is active on either
the modem or the router, as it might interfere with connecting the CapTel
840i to your network (see Troubleshooting on page 23 for tips).
Standard Electrical Power
The CapTel 840i plugs into a standard electrical wall outlet. You must
use the power adapter that came with the CapTel 840i. Using any other
adapter may damage the CapTel and will void the warranty.
• Standard analog service
• DSL (Digital Subscriber Line)
– filter recommended
• Digital Cable phone service
• VOIP (Voice Over Internet Protocol)
phone service
• FIOS (Fiber Optic Service) phone
service

4 • CHOOSING A LOCATION Installation Help: 888-269-7477
If possible, make sure that the outlets for your telephone service and your
electrical power are located close to your Internet service outlet (for wired
installations) or within range of your wireless router (for WiFi installations).
For settings where the outlets are not located close to one another, see
page 9 for more installation tips.
Choose a location where:
• There is a telephone jack, an electrical outlet, and an Internet
jack (Ethernet) all located nearby.*
• The surface it will be set on or mounted to is stable and secure.
• The area is protected from excessive heat or humidity.
* In WiFi settings, it is not necessary for your CapTel phone to be in the same room/area as the
wireless router. However, your wireless signal strength may be stronger the closer your CapTel
phone is positioned to the wireless router.
STEP 2
Choosing a
Location
• CapTel 840i Phone
• Telephone Cord
• Power Adapter –
to plug into a
wall outlet
Important! Use only the power adapter that
came in the box with your CapTel 840i
• Ethernet Cable – to connect
to Internet service
(not necessary for
WiFi installations)
• CapTel Setup
Guide and CapTel
How-to Guide
• Warranty
Card
What is in the box?
Your CapTel 840i includes the following parts:

Installation Help: 888-269-7477 CONNECT THE TELEPHONE LINE • 5
STEP 3
Connect the
Telephone Line
Plug one end of the telephone cord into the
telephone jack labeled “Line 1”
Located on the back (top) edge of the CapTel 840i. Be sure to use the
telephone cord that came with your new CapTel 840i phone.
Plug the other end of the telephone cord into a
telephone wall outlet

6 • CONNECT TO A POWER OUTLET Installation Help: 888-269-7477
STEP 4
Connect to a
Power Outlet
Plug the power adapter cord into the power socket
labeled “Power”
Located on the back (top) edge of the CapTel 840i. Be sure to use the power
adapter that came with your new CapTel 840i.
Plug the power adapter into a wall outlet or power strip
The CapTel display screen will light up to let you know power is connected.
Once you plug in the power, your CapTel phone will automatically check
that everything is connected and working properly. You can follow along
on the CapTel display screen, which will tell you what is happening during
the set up process.
TIP: Plug your power adapter into an electrical power surge protector to
protect your CapTel 840i from damage caused by unspecified electrical voltage
or damage caused by lightning. Do not use an electrical outlet controlled by a
"dimmer" or wall switch.
WARNING: Be sure to use only
the power adapter that came
with your CapTel 840i. Using
any other power adapter may
damage your phone.

Installation Help: 888-269-7477 CONNECT TO YOUR INTERNET SERVICE • 7
STEP 5
Connect to Your
Internet Service
There are two ways to connect to your Internet service:
Option 1: Wired – using an Ethernet cable to connect to the Internet.
Please follow instructions for "Wired Installations" below.
Option 2: Wireless – using your home/office WiFi network to reach the
Internet. Please follow instructions for "Wireless/WiFi Installations"
on page 13.
For Wired Installations
1. Plug one end of the Ethernet cable into the jack labeled “Ethernet”,
located on the back (top) edge of the CapTel 840i. Be sure to use the
Ethernet cable that came with your new CapTel 840i phone.
2. Connect the other end of the Ethernet cable into the jack you use to access
your Internet service. Depending on how your Internet service is set up for
your home/office, you could be plugging into any of the following:
• An available Ethernet jack on a digital cable modem
• An available Ethernet jack on a DSL modem
• An available Ethernet jack on a router in your home
• An available Ethernet jack in a wall outlet
NOTE: When connected properly, the LNK/ACT
indicator light will glow. The LNK/ACT indicator
light is located next to the Ethernet jack on
the back (top) edge of the CapTel 840i.

8 • CONNECT TO YOUR INTERNET SERVICE Installation Help: 888-269-7477
Example 2: If there is not an available Ethernet jack in your DSL or Cable
Modem, you will need a router or switch that lets you connect more than one
device to the Internet. Contact your Internet Service Provider for information
about what router or switch will work with your modem. The router should
support DHCP. Connect the router to your DSL/Cable Modem. Then connect the
CapTel 840i to the router or switch using the Ethernet cable as shown below.
Use the examples on the following pages to match your setting with the
correct installation method.
Case 1: All Outlets Located Together
Example 1: All of the connection outlets (telephone, Internet, and power) are
available in the same room that you are planning to use the CapTel 840i.

Installation Help: 888-269-7477 CONNECT TO YOUR INTERNET SERVICE • 9
Case 2: Outlets Located in Separate Rooms
If your Internet connection is located in a different room from where you
plan to use your CapTel phone, choose one of the following examples that
best matches your setting.
Example 1: Use a wireless "WiFi" router (See page 13 for set up instructions).

10 • CONNECT TO YOUR INTERNET SERVICE Installation Help: 888-269-7477
IMPORTANT: The Powerline Network Adapters cannot be plugged into a
power strip, surge protector, extension cord or GFI-type outlet. They must be
connected directly into the electrical wall outlet.
Example 2: Use Powerline Network Adapters
* Powerline Network Adapters (sold separately) are
available from a computer electronics store or online
from WCI (www.weitbrecht.com) at an additional cost.
Outlet should not have other devices plugged in.

Installation Help: 888-269-7477 CONNECT TO YOUR INTERNET SERVICE • 11
Example 3: Install an Ethernet Wall Jack
Some newly-constructed homes are wired for Internet connectivity by having
Ethernet cable jacks built right into a wall outlet (similar to how an electrical
outlet or a telephone outlet would work).
For approximately the same cost as buying Powerline Network Adapters,
your telephone company or Internet Service Provider can install Ethernet
jacks/wiring in your home or office directly in the room that you plan to use
your new CapTel telephone.
To learn more about this option, please contact your Internet Service Provider.

12 • CONNECT TO YOUR INTERNET SERVICE Installation Help: 888-269-7477
Example 4: Extra Long Ethernet Cable
You can use an extra long Ethernet cable (longer than the standard Ethernet
cable that came with your CapTel telephone) to bridge the distance between
your phone location and your Ethernet jack. Extra long Ethernet cables
(sold separately) are available from a computer electronics store or online
from WCI (www.weitbrecht.com) at an additional cost.

Installation Help: 888-269-7477 CONNECT TO YOUR INTERNET SERVICE • 13
For Wireless/WiFi Installations
If you have a wireless (“WiFi”) network in your home or office, your CapTel
phone can connect to the Internet using the WiFi network. You do not need
to plug in an Ethernet cable.
To set up your CapTel for WiFi use, you will need to know the name of your
wireless network (also called the SSID) as well as any passwords that may be
necessary to access the network. The way you access your WiFi network with
CapTel will be very similar to the way you access the network from a
computer or mobile device.

NOTE: If someone helped install the wireless network in your home or office,
it may be helpful to consult with them as you set up your CapTel phone.
1. The display asks, Press
YES for WiFi Setup.
Press the YES button.
2. Your CapTel checks if any wireless
networks have been used previously and
are already saved in memory. If no
previous networks are detected, CapTel
scans for available networks in your
location.
3. CapTel lists any WiFi networks
detected, in order of the
strongest signal strength to the
weakest signal strength.
Use the UP/DOWN arrows to
highlight the wireless network
you want to use. Press the YES
button to select.
NOTE:
CapTel may detect wireless networks in your location that you do not
recognize – such as a wireless network from a neighbor or nearby office. Be
sure to select the SSID that matches your WiFi network.
If you do not see the network you want listed, try moving your CapTel phone
to an area closer to your wireless router and selecting Refresh Network List.
CapTel will re-scan for available networks. See Troublehshooting for WiFi
Networks on page 25 for additional directions.
14 • CONNECT TO YOUR INTERNET SERVICE Installation Help: 888-269-7477
SETUP - CONNECT TO INTERNET
Please plug in Ethernet Cable.
Or
Press YES for WiFi Setup
Press YES for WiFi Setup
SSID Security Ch. Signal
2WIRE269 WPA 08
OfficeNet WPA 06
ACBRDBAND WPA 06
NETWORK1 WPA 04
Refresh Network List
Enter Network Manually
Press YES to Select a Wireless Network
Press NO To Refresh Network List

Installation Help: 888-269-7477 CONNECT TO YOUR INTERNET SERVICE • 15
4. If required, CapTel asks for the password to access your WiFi network.
NOTE:
Where to find your WiFi password? This is the same password you
need to access the WiFi network from any computer or mobile device. The
password (sometimes called a “pass phrase” or “network key”) is assigned by
your Internet Service Provider or by whomever set up your wireless network.
In some cases, the password may be listed directly on your wireless router.
Use the dialing pad to enter the letters
or numbers of your password. Look for
the letters listed on the number keys to
know which number key to press. For
some letters/numbers, you will need to
press the number key several times until
the correct letter/number appears on
the display screen. For special characters
(i.e., #, &, %) press the 1 key repeatedly.
NOTE:
Depending on the type of security on your wireless network, you may
not be asked to enter a password.
5. After you have entered the password, press the YES button to
accept. CapTel will save your network settings, and connect to
your wireless network.
TIP: After you have typed your password, double-check that you have all the
letters and numbers listed correctly, and that any capital/lower case letters are
entered properly. If the password is not correct, CapTel will not be able to
connect to your WiFi network.
Please Enter WPA Password:
7547534933_
Press YES to Accept
for Shift, for Backspace, # for Space
TIP: Some passwords are case-sensitive. Press the UP button to shift lock for
capital letters. Press the UP button again to return to lower case.
Example: To enter the letter “R”, press the UP arrow key to set shift-lock to
capital letters, then press the number 7 key three times until you see “R” on
the display screen.

16 • CONNECT TO YOUR INTERNET SERVICE Installation Help: 888-269-7477
Entering a Network Manually
If you do not see your network name in the list of available WiFi networks,
you can manually enter the name of the network you want to use.
1. Use the DOWN arrows to
highlight Enter Network
Manually. Press the YES
button to select.
2. Use the dialing pad to enter the name of
the wireless network you want to use
(also called the “SSID”). Look for the
letters listed on the number keys to
know which number key to press. For
some letters/numbers, you will need
to press the number key several times
until the correct letter/number appears on
the display screen. For special characters
(i.e., &, #. %) press the 1 key repeatedly.
Example: To enter the letter “R”, press
the UP arrow key to set shift-lock to
capital letters, then press the number
7 key three times until you see “R” on
the display screen.
3. Use the UP/DOWN buttons to
highlight the type of Network
Security on your WiFi network.
Press the YES button to select.
NOTE: If you don't know which Network
Security to use, please check with the
person who set up your WiFi network.
No Security
WPA Security
WEP Security
Press YES to Select
Please Enter the SSID:
RayNETWORK2
_
Press YES to Accept
for Shift, for Backspace, # for Space
TIP: Some network (SSID) names are case-sensitive. Press the UP button to shift
lock for capital letters. Press the UP button again to return to lower case. Use
the DOWN button to backspace.
SSID Security Ch. Signal
2WIRE269 WPA 08
OfficeNet WPA 06
ACBRDBAND WPA 06
NETWORK1 WPA 04
Refresh Network List
Enter Network Manually
Press YES to Select a Wireless Network
Press NO To Refresh Network List

4. If required, CapTel asks for the password
to access your WiFi network. Use the
dialing pad to enter the letters or
numbers of your password. Look for the
letters listed on the number keys to
know which number key to press. For
some letters/numbers, you will need to
press the number key several times until
the correct letter/number appears on the
display screen. For special characters
(i.e., #, &, $) press the 1 key repeatedly.
5. Confirm that your password
is listed correctly, then press
the YES button to accept.
6. CapTel saves your wireless settings, and
then connects to the wireless network
that you specified.
If you have any problems accessing your
wireless network with CapTel, please see
Troubleshooting on page 25 or contact
CapTel Customer Service for help.
NOTE:
Once your CapTel phone connects to the Internet, it automatically
checks to make sure that you have the most current software version. If
needed, your phone will automatically update its software over the Internet
connection. Watch the display screen to follow the progress. Your CapTel
phone may reboot as part of the update process. Once the entire update
process is completed, you will be able to continue with the installation.
Installation Help: 888-269-7477 CONNECT TO YOUR INTERNET SERVICE • 17
Please Enter WPA Password:
7547534933_
Press YES to Accept
for Shift, for Backspace, # for Space
Initializing Wireless Setup
Checking Saved Configuration
RayNETWORK2
Connecting to WiFi Network...OK
Getting DHCP Information...OK
Resolving Caption via DNS...OK
Wireless Setup Complete
TIP: Some passwords are case-sensitive. Press the UP button to shift lock for
capital letters. Press the UP button again to return to lower case.
Example: To enter the letter “R”, press the UP arrow key to set shift-lock to
capital letters, then press the number 7 key three times until you see “R” on
the display screen.

18 • SETTING THE DATE AND TIME Installation Help: 888-269-7477
STEP 6
Setting the
Date and Time
To Set the Date and Time
1. CapTel shows you the current
time and date setting. Use the
UP/DOWN buttons to move the
blue highlight over the number
that you want to change.
2. On the dialing pad, press the key that
lists the number you want to use.
Example: To set the time for 11:30, press the “1” key twice, then press the
“3” key followed by the “0” key.
Note: When you enter the date setting, only the last two numbers in the year
can be changed.
3. When you have set the time and date, press the YES key to save.
Set the Time and Date
12:13 AM
01/01/2012
Use 2 for AM
Use 7 for PM
Use the keypad to enter the Time and Date
Press YES to accept or NO to exit
TIP: To change the time from AM to PM, make sure the AM/PM section is
highlighted, then press the 2 key for “AM” and the 7 key for “PM”.
You are now ready to make/receive calls. Make a test call
to check that your CapTel 840i is working properly.
/