A&D AD-4212A/AD-4212B Series User manual

Category
Measuring, testing & control
Type
User manual
AD-4212A/B
AD-4212A-100/200/600/1000
A
D-4212B-23/101/102/201/301
Production Weighing Unit
INSTRUCTION MANUAL
1WMPD4001448F
© 2016 A&D Company, Limited. All rights reserved.
No part of this publication may be reproduced, transmitted, transcribed, or translated
into any language in any form by any means without the written permission of A&D
Company, Limited.
The contents of this manual and the specifications of the instrument covered by this
manual are subject to change for improvement without notice.
Windows and Excel are registered trademarks of Microsoft Corporation.
.
1
CONTENTS
1. INTRODUCTION ................................................................................................................................. 4
1-1 Features ............................................................................................................................................... 4
1-2 Compliance .......................................................................................................................................... 5
2. UNPACKING THE BALANCE ............................................................................................................ 8
2-1 Unpacking ............................................................................................................................................ 8
2-2 Installing the Balance ......................................................................................................................... 10
3. PRECAUTIONS ................................................................................................................................ 12
3-1 Before Use ......................................................................................................................................... 12
3-2 When Building into a System ............................................................................................................. 13
3-3 During Use ......................................................................................................................................... 15
3-4 After Use ............................................................................................................................................. 15
3-5 Power Supply ..................................................................................................................................... 15
4. DISPLAY SYMBOLS AND KEY OPERATION ................................................................................ 16
5. WEIGHING UNITS ............................................................................................................................ 17
5-1 Units ................................................................................................................................................... 17
5-2 Changing the Unit............................................................................................................................... 19
6. WEIGHING ........................................................................................................................................ 20
6-1 Basic Operation (Gram Mode) ........................................................................................................... 20
6-2 Smart Range Function ....................................................................................................................... 21
7. CHANGING THE WEIGHING SPEED ............................................................................................. 22
8. CALIBRATION .................................................................................................................................. 23
8-1 Calibration .......................................................................................................................................... 24
8-2 Calibration Test ................................................................................................................................... 26
9. FUNCTION SWITCH AND INITIALIZATION ................................................................................... 28
9-1 Permit or Inhibit .................................................................................................................................. 28
9-2 Initializing the Balance ....................................................................................................................... 29
2
10. FUNCTION TABLE ......................................................................................................................... 30
10-1 Structure and Sequence of the Function Table ................................................................................ 30
10-2 Display and Keys .............................................................................................................................. 30
10-3 Details of the Function Table ............................................................................................................ 31
10-4 Description of the Class “Environment, Display” .............................................................................. 35
10-5 Description of the Item “Data output mode”...................................................................................... 37
10-6 Description of the Item “Data format” ............................................................................................... 38
10-7 Description of the Data Format Added to the Weighing Data
....................................................................... 40
10-8 Data Format Examples ..................................................................................................................... 41
10-9 Clock and Calendar Function ........................................................................................................... 42
10-10 Comparator Function ...................................................................................................................... 44
11. ID NUMBER AND GLP REPORT ................................................................................................... 48
11-1 Setting the ID Number ...................................................................................................................... 48
11-2 GLP Report ....................................................................................................................................... 49
12. COUNTING MODE (PC) ................................................................................................................. 52
13. PERCENT MODE (Pct) .................................................................................................................. 54
14. DATA MEMORY .............................................................................................................................. 55
14-1 Notes on Using Data Memory .......................................................................................................... 55
14-2 Memory for Weighing Data ............................................................................................................... 56
14-3 Memory for Calibration and Calibration Test Data ............................................................................ 59
14-4 Memory for Unit Mass in the Counting Mode ................................................................................... 60
14-5 Memory for Upper/lower limit values ................................................................................................ 61
15. PROGRAMMABLE-UNIT (AD-4212A only) .................................................................................. 64
16. I/O UNIT SPECIFICATIONS (Standard interface) ........................................................................ 65
16-1 RS-232C/Comparator Contact Output/External Contact Input .......................................................... 65
17. CONNECTION TO PERIPHERAL EQUIPMENT ........................................................................... 67
17-1 Connection to the AD-8121B Printer ................................................................................................ 67
17-2 Connection to a Computer ................................................................................................................ 68
17-3 Using Windows Communication Tools (WinCT) ............................................................................... 6 8
3
18. COMMANDS ................................................................................................................................... 70
18-1 Command List .................................................................................................................................. 70
18-2 Acknowledge Code and Error Codes ............................................................................................... 71
18-3 Control Using CTS and RTS ............................................................................................................ 72
18-4 Settings Related to RS-232C ........................................................................................................... 72
19. BCD OUTPUT (OP-01) ................................................................................................................... 73
19-1 Connector Pin Nos. and Specifications ............................................................................................ 73
20. EXTENDED FUNCTIONS (AD-4212A only) ................................................................................. 76
20-1 Description of "Averaging range" and "Averaging time"................................................................... 78
21. MAINTENANCE .............................................................................................................................. 79
22. TROUBLESHOOTING ................................................................................................................... 79
22-1 Checking the Balance Performance and Environment .................................................................... 79
22-2 Error Codes ...................................................................................................................................... 81
22-3 Asking For Repair ............................................................................................................................. 83
23. SPECIFICATIONS .......................................................................................................................... 84
24. DESIGNING A SPECIAL WEIGHING PAN .................................................................................... 86
25. INSTALLING THE DISPLAY UNIT ................................................................................................. 92
26. ATTACHING THE MOUNTING FIXTURES.................................................................................... 93
27. EXTERNAL DIMENSIONS ............................................................................................................. 94
28. OPTIONS ........................................................................................................................................ 96
29. TERMS/INDEX ................................................................................................................................ 98
4
1. INTRODUCTION
This manual describes how the AD-4212A/B series balance works and how to get the most out of it in
terms of performance.
Read this manual thoroughly before using the balance and keep it at hand for future reference.
1-1 Features
Separate Weighing Unit and Display (standard connection cable length 2 m), suitable for
building into a production line system. The weighing unit is compact, with a width of 80 mm.
High Resolution and High Response Speed
Model Weighing capacity Minimum weighing value Stabilization time *1
AD-4212A-100 110 g 0.1 mg 1.1 to 1.3 seconds
AD-4212A-200 210 g
1 mg
0.8 to 1.0 second
AD-4212A-600 610 g
0.9 to 1.1 seconds
AD-4212A-1000 1100 g
AD-4212B-23 21g 0.001mg 12 seconds
AD-4212B-101 110 g / 31 g 0.1 mg / 0.01 mg 2.5 / 4.0 seconds *2
AD-4212B-102 110 g 0.01 mg 4.0 seconds *3
AD-4212B-201 210 g
0.1 mg 2.5 seconds
AD-4212B-301 310 g
*1 With FAST selected under good environment
*2 The AD-4212B-101 is equipped with a smart range function. When the minimum
weighing value is set to 0.01 mg and the weight value exceeds 31 g, the minimum
weighing value will switch to 0.1 mg automatically. Even under this circumstance,
pressing the RE-ZERO key tares the value and weighing with the minimum weighing
value of 0.01 mg is available up to 31 g.
*3 2.5 seconds when the minimum weighing value is 0.1 mg.
Standard RS-232C Serial Interface / Standard Comparator Contact Output (*4)
Using the RS-232C serial interface, weighing data can be output to external devices and the
balance can be controlled by external devices.
Using comparator contact output, the weight value is compared to the preset upper/lower limit
values and the results are displayed as HI, OK or LO. The buzzer is also available in response
to the results.
The RE-ZERO operation is possible using a signal from an external contact input, which allows
easy system construction. (This function is only available when the external contact input is
installed on the standard interface or OP-01.)
*4 AD-4212A series balance: 3-level output.
AD-4212B series balance: 3-level or 5-level output, switched by the function table setting.
Data Memory Function, storing weighing data, calibration data, unit mass in the counting mode
or upper/lower limit values. Once stored, selection of the upper or lower limit value is easy.
Dust-protected and Protected Against Splashing Water (Complying with IP54)
5
Clock and Calendar Function, adding the time and date to the output data.
GLP/GMP Output, using the RS-232C serial interface.
Reference Sheet, provided for a quick reference to the balance operation.
Windows Communication Tools (WinCT), allows easy communication with a Windows-based
personal computer.
Windows is a registered trademark of Microsoft Corporation.
Multiple Weighing Units, with most of the common units used around the world.
Auto display-ON Function, that displays the weighing mode without any key operation when the
AC adapter is plugged in, is available.
Stainless Steel Casing with high chemical resistance for the AD-4212B weighing unit
Stainless Steel Breeze Break, provided for the AD-4212B series balance and the
AD-4212A-100, for more accurate weighing. For the other models, it is available as an option
(OP-19).
BCD Output (OP-01) and Ethernet Interface (OP-08) are available as options
1-2 Compliance
Compliance with FCC Rules
Please note that this equipment generates, uses and can radiate radio frequency energy. This
equipment has been tested and has been found to comply with the limits of a Class A
computing device pursuant to Subpart J of Part 15 of FCC rules. These rules are designed to
provide reasonable protection against interference when the equipment is operated in a
commercial environment. If this unit is operated in a residential area, it may cause some
interference and under these circumstances the user would be required to take, at his own
expense, whatever measures are necessary to eliminate the interference.
(FCC = Federal Communications Commission in the U.S.A.)
Compliance With Directives of CE mark
This device features radio interference suppression, safety regulation and restriction of
Hazardous Substances in compliance with the following Council Directives
Council directive 2004/108/EC EN61326 EMC directive
Council directive 2006/95/EC EN60950 Safety of Information Technology Equipment
Council directive 2011/65/EU EN50581 Restriction of the use of certain Hazardous Substances
The CE mark is an official mandatory European marking.
Please note that any electronic product must comply with local laws and regulations when
sold or used anywhere outside Europe.
6
7
8
2. UNPACKING THE BALANCE
2-1 Unpacking
The balance is a precision instrument. Unpack the balance carefully. Keep the packing material
to be used for transporting the balance in the future.
See the illustrations to confirm that everything is included.
Provided for the AD-4212B series balance and the
AD-4212-100. For the other models, available as
an option (OP-19).
Stainless steel breeze break
Grounding terminal
I/O unit
RS-232C/comparator
External input terminal
AC adapter
jack
Rear of the display unit
AC adapter
plug
Keys
Reference sheet
Weighing
unit
Bubble spirit
level
Leveling foot
Weighing unit
connection jack
Connection cable (2 m)
Display unit
A
D
4
2
1
2
B
-
2
3
O
N
:
O
F
F
C
A
L
S
A
M
P
L
E
P
R
I
N
T
M
O
D
E
R
E
-
Z
E
R
O
M
a
x
2
1
g
d
=
0
.
0
0
1
m
g
P
R
O
D
U
C
T
I
O
N
W
E
I
G
H
I
N
G
U
N
I
T
AD-4212B-23/101/102
AD-4212A-100/200
AD-4212B-201/301
AD-4212A-600/1000
(Example: AD-4212B-23)
Weighing
pan
Pan
support
Dust
guard
Breeze
ring
Dust
guard
Weighing
pan
Pan support and
pan support plate
(Can be separated)
Grounding
terminal
Angle
adjustment
knob
Stand
From
weighing unit
Arrow mark
face up
9
Notes
About how to attach the mounting fixtures, refer to “26. ATTACHING THE
MOUNTING FIXTURES” on page 93.
Please confirm that the AC adapter type is correct for your local voltage and
receptacle type.
10
2-2 Installing the Balance
Caution
The weighing unit and the display unit were adjusted as a unit. Therefore, make sure that
the weighing unit and the display unit have the same serial number. The serial number is
printed on the rear of the weighing unit and the display unit. The connection cable also
carries the serial number.
If the serial numbers of both units are different, the balance may not function properly.
When a repair is necessary, submit both the weighing unit and the display unit for repair.
There is no compatibility between The AD-4212A and the AD-4212B or AD-4212, for both the
weighing unit and the display unit.
Install the balance as follows:
1. Refer to “3. PRECAUTIONS” for installing the balance.
2. Refer to "2-1 Unpacking" on the previous page to attach the dust guard, the breeze ring
(AD-4212B-23/101/102 only), the pan support and the weighing pan on the weighing unit.
The stainless steel breeze break is provided for the AD-4121B series balance and the
AD-4212A-100 as a standard accessory, and for the other models as an option. Use it as
necessary when performing calibration or checking accuracy.
How to install the breeze break
AD-4212A-100/200 and the AD-4212B series balance
Place the breeze break on the weighing pan so that it fits over the dust guard.
AD-4212A-600/1000
Follow the procedure below to install the breeze break.
1 Remove the weighing pan and the pan support.
2 Place the breeze break on the weighing pan so
that it fits over the dust guard.
3 Replace the pan support.
4 Replace the weighing pan.
3. Connect the weighing unit and the display unit, firmly inserting one end of the connection cable
into the jack located on the rear of the weighing unit and the other end into the jack located on
the rear of the display unit.
If the extension cable (OP-07: 3 m) is used, connect it between the connection cable and the
display unit.
Pan support
2
2
3
4
Weighing
pan
Breeze
break
Dust guard
11
How to disconnect the cable from the weighing unit
Slide the connector sleeve in the direction of the arrow to unlock and gently pull the connector
out.
4. Adjust the leveling feet to level the weighing unit. Confirm it using the bubble spirit level.
5. Confirm that the adapter type is correct for the local voltage and power receptacle type.
6. Plug the AC adapter plug into the AC adapter jack located on the rear of the display unit and
plug the AC adapter into the electrical outlet. Warm up the balance for the appropriate duration
with nothing on the weighing pan.
AD-4212A series balance: 30 minutes or more
AD-4212B series balance: one hour or more
7. Set the pan unit and I/O unit to adapt to the peripheral system. Set the following for the I/O unit.
RS-232C (Refer to page 65)
Comparator contact output (Refer to page 66)
RE-ZERO operation using external contact input (Refer to page 66)
Auto-display ON function (Refer to pages 31 and 36)
Set the weighing speed to adapt to the ambient conditions.
8. After the balance has been installed, calibrate the balance using the calibration weight provided
with the balance. For details, refer to “8. CALIBRATION”.
9. A special weighing pan designed appropriately for the sample to be weighed or the peripheral
system can be attached to the balance. About how to design a weighing pan, refer to “24
DESIGNING A SPECIAL WEIGHING PAN”.
Rear of the display unit
Rear of the weighing unit
Connection cable
Serial number
Make sure the weighing unit, display unit
and connection cable have the same
serial number.
Arrow mark
face up
Slide the connector sleeve
in the direction of the arrow
Unlocked
12
3. PRECAUTIONS
To get the optimum performance from the balance and acquire accurate weighing data, note the
following:
3-1 Before Use
Install the balance in an environment where the temperature and humidity are not excessive.
The best operating temperature is about 20°C / 68°F at about 50% relative humidity.
Install the balance where it is not exposed to direct sunlight and it is not affected by heaters
or air conditioners.
Install the balance where it is free of dust.
Install the balance away from equipment which produces magnetic fields.
Install the balance in a stable place avoiding vibration and shock. Corners of rooms on the
first floor are best, as they are less prone to vibration.
The AD-4212A/B series balance responds even to very subtle
airflow. To avoid the influence of ambient airflow or airflow
caused by balance operation, make sure to use the dust
guard and the breeze ring (AD-4212B-101/102 only).
Level the weighing unit by adjusting the leveling feet
and confirm it using the bubble spirit level.
If the leveling adjustment is difficult to perform due to
the installation conditions, perform calibration using a
calibration weight or controlled actual sample before
weighing.
Ensure a stable power source when using the AC
adapter
Warm up the balance for the appropriate duration. Plug
in the AC adapter as usual.
AD-4212A series balance: 30 minutes or more
AD-4212B series balance: one hour or more
In the case of the AD-4212B-23 high-precision model (minimum
display: 0.001 mg), warm up the balance usually (if possible, keep
connected the AC adapter connected to power at all times).
Calibrate the balance before use or after having moved
it to another location.
In addition, calibrate it periodically to maintain the accuracy.
Caution
Do not install the balance where flammable or corrosive gas is present.
13
3-2 When Building into a System
The AD-4212A/B is a precision balance. When it is built into a system and used, errors such as
unstable weight values may occur due to static electricity, vibration and materials used for the
devices near the balance.
When using the balance that is built into a system, take the following precautions.
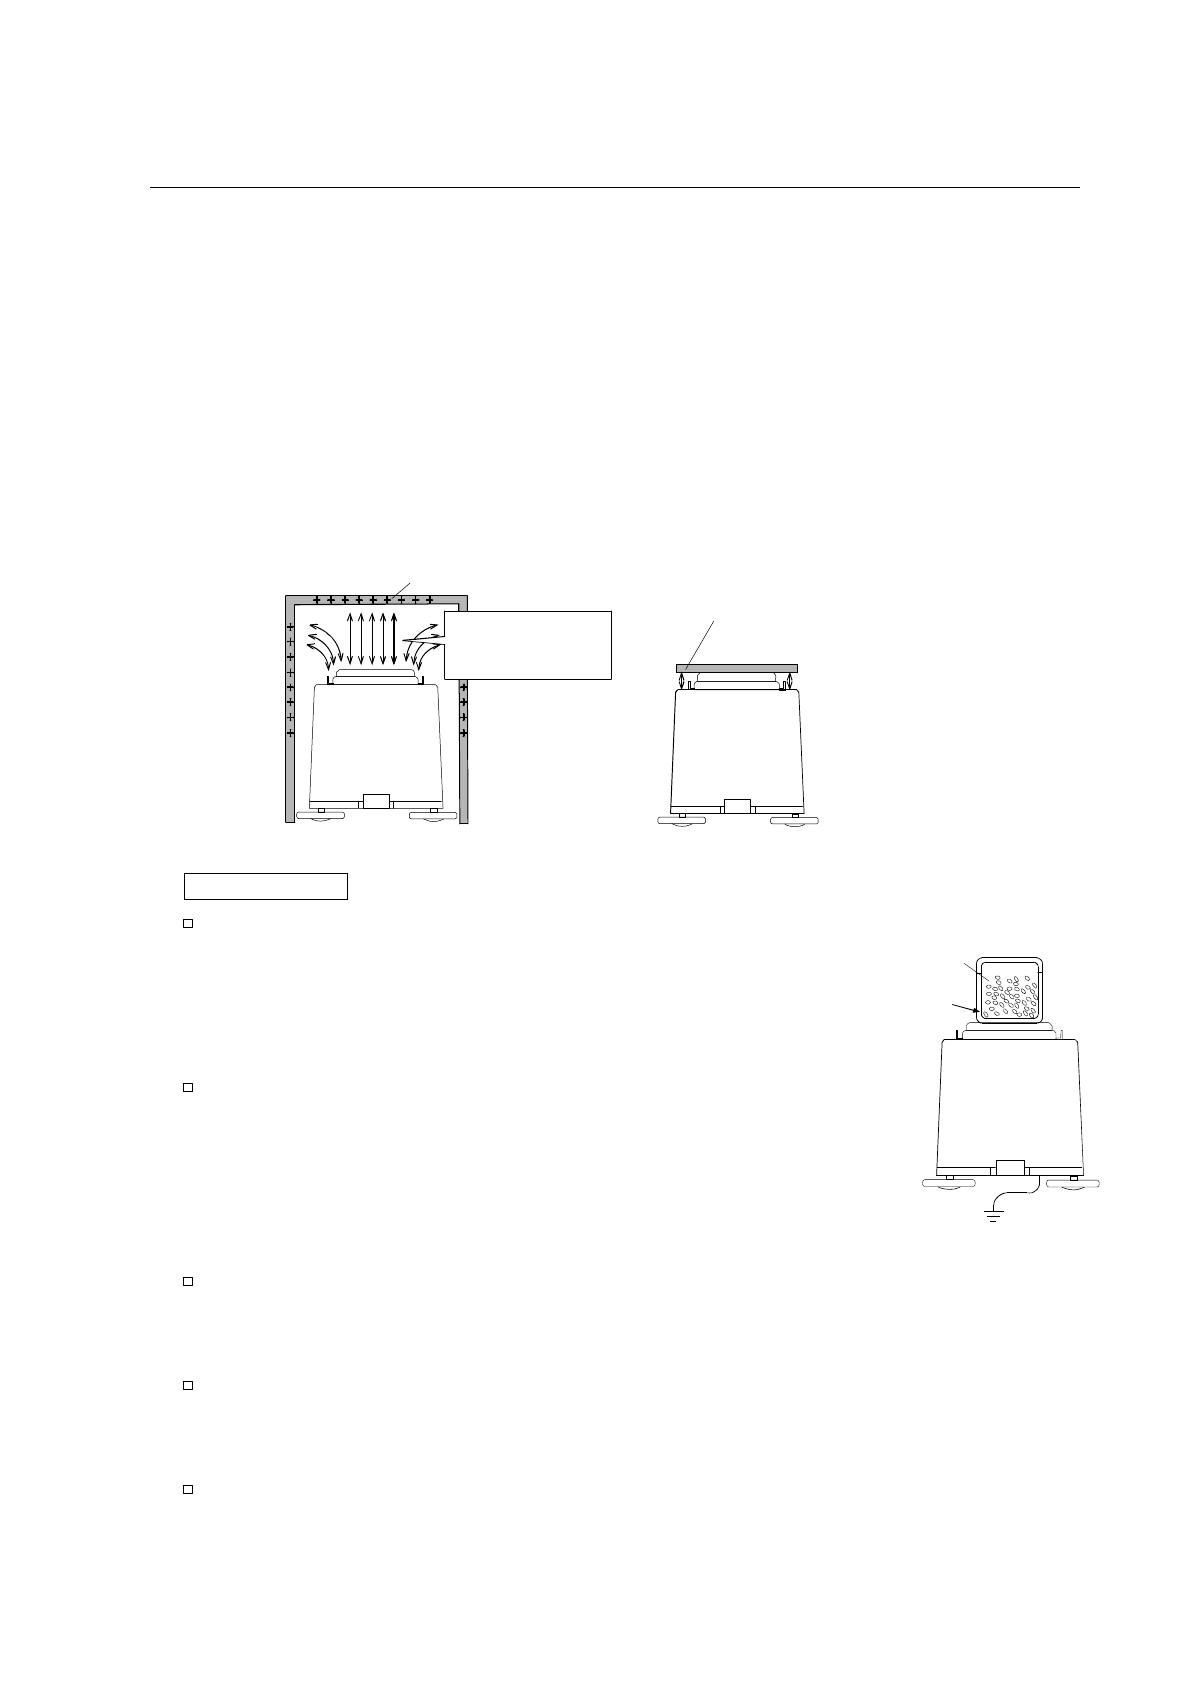
Errors due to a static charge
When the ambient humidity is less than 45% RH, insulators such as plastic or glass are prone to
static electricity. When charged material comes close to the balance, a pulling force is generated
between the charged material and the weighing pan. This causes an unstable weight value.
To protect the balance against a discharge generated by charged material when it comes
close to the balance, make sure to earth ground the weighing unit and the display unit.
(Static electricity generated by static induction will not be canceled by earth-grounding.)
Measures to take (Plastic is used in the measures below. They can be applied to glass, too.)
When the sample or devices are plastic
Use a static eliminator that generates no air blow such as the
AD-1683, DC static eliminator, to remove static electricity.
Place the sample in a container that is made of a conductive
material such as metal and that can be sealed and weigh it.
When the sample is powdery
When the balance is used in combination with a feeder for
batch weighing of powdery samples, samples may be
charged by rubbing sample particles against each other.
Use a static eliminator and perform weighing while removing
static electricity.
When the sample container is made of material that is prone to static electricity such as plastic
Cover the outside of the container with a metal such as aluminum foil.
Apply an anti-static agent onto the container.
When making a breeze break using plastic
Apply an anti-static agent onto the breeze break.
Use a conductive acrylic fiber.
When plastic exists in the balance installation site
Cover the plastic with a grounded metal.
Apply an anti-static agent onto plastic.
Metal case
Charged
material
Grounding
A pulling force generated between
the charged sample and the balance
causes an unstable weight value.
Charged plastic breeze break
The pulling force
makes the weight
value unstable
14
When an operator is static charged
If an operator’s clothes are static charged, especially in winter, it may be a cause for
unstable weight values.
Wear an anti-static wrist strap.
Errors due to airflow
Where the influence of ambient airflow is great
such as: close to an air conditioner, door or
passage way. Even very subtle airflow that is
hard to be detected may influence the weighing
operation.
Avoid those areas as a weighing site.
If weighing is to be performed in such an
area, use a breeze break or take other
appropriate measures.
Where the influence of heat or drafts is great
Eliminate temperature differences between
a sample and the environment.
When a sample is warmer (cooler) than the
ambient temperature, the sample will be
lighter (heavier) than the true weight. This
error is due to a rising (falling) draft around
the sample.
Do not touch the sample directly with your
hand. Use tweezers or other tools.
If you touch the sample, the same type
error described above will occur.
Do not perform weighing where it is exposed to direct sunlight. Weighing errors may
occur due to sudden temperature change or drafts.
Where the influence of vibration is great, such as:
(1) Soft ground (2) Second or higher floor (3) Near center of a floor far from pillars (4) Seismic
isolated structures (5) Near tall buildings.
In the areas listed above, the scale may yield unstable weight values on windy days or after an
earthquake. Especially in case of (4) and (5), weight values may be unstable during and for a
long period of time after strong winds or an earthquake.
Errors due to other causes
Change in temperature or humidity
A sudden change in temperature or humidity can generate a draft and cause the balance to
absorb or exude moisture, which leads to weighing errors.
Avoid sudden change in temperature or humidity.
Use an air conditioner to control the temperature or humidity.
40 C
20 C
Draft
Influence of the air flow
makes the weight
value unstable
15
Magnetic material
The balance uses a strong magnet as part of the balance assembly, so use much care when
weighing magnetic materials.
Place a non-magnetic object such as aluminum or brass between the sample and the
balance, also keep an appropriate distance between them while weighing.
3-3 During Use
To minimize the affect by electrical noises, earth ground
the weighing unit and the display unit.
Make each weighing gently and quickly to avoid errors
due to changes in the environmental conditions.
Do not drop things upon the weighing pan, or place a
sample on the pan that is beyond the balance weighing
capacity. Place a sample in the center of the weighing
pan.
Do not use a sharp instrument such as a pencil to press
the keys. Use your finger only.
Press the RE-ZERO key before each weighing to
prevent possible errors. In addition, a RE-ZERO signal
can be sent using external contact input/RS-232C
command.
Take into consideration the affect of air buoyancy on a sample when more accuracy is required.
Keep the balance interior free of dust and foreign materials.
3-4 After Use
Avoid mechanical shock to the balance.
Calibrate the balance, using a calibration weight, periodically.
Do not disassemble the balance. Contact the local A&D dealer if the balance needs service or
repair.
Do not use organic solvents to clean the balance. Clean the balance with a lint free cloth that is
moistened with warm water and a mild detergent.
Avoid dust and water so that the balance weighs correctly. Protect the internal parts from liquid
spills and excessive dust.
3-5 Power Supply
When the AC adapter is connected, the balance is in the standby mode if the standby indicator
is on (refer to 4 DISPLAY SYMBOLS AND KEY OPERATION”). This is a normal state and
does not harm the balance. For accurate weighing, plug in the AC adapter and warm up the
balance for the appropriate duration before use.
16
4. DISPLAY SYMBOLS AND KEY OPERATION
Key operation
Key operation affects how the balance functions. The basic key operations are:
“Press and release the key immediately” or “Press the key”
= normal key operation during measurement
“Press and hold the key
Display symbols
Each key, when pressed or when pressed and held, functions as follows:
Key When pressed When pressed and held
Turns the display ON and OFF. The standby indicator is displayed when the display is
turned off. The weighing mode is enabled when the display is turned on.
This key is available anytime. Pressing the key during operation will interrupt the
operation and turn the display OFF.
In the weighing mode, switches the
minimum weighing value. *
In the counting or percent mode, enters
the sample storing mode.
Enters the function table mode. Refer to
“10. FUNCTION TABLE”.
Displays the upper/lower limit values
currently set.
Switches between the upper and lower limit
values when they are stored in memory.
Performs weighing speed adjustment.
No function. Enters the calibration mode.
Stores the weighing data in memory or
outputs to a printer or personal computer
depending on the function table settings.
(Factory setting = output)
Not available when OP-01 is installed.
No function at the factory setting
By changing the function table setting:
Outputs “Title block” and “End block for
GLP report.
Displays the data memory menu.
Sets the display to zero.
* The factory setting of the minimum weighing value for the AD-4212B-101/102 is 0.1 mg.
Stabilization indicator
Processing indicator
Weighing speed indicators
Comparator indicators
Standby indicator
Processing indicator
(Capacity indicator)
Blinking indicators
Displays memory data information
Displays the weighing data relative to the
weighing capacity, in percentage, in the
weighing mode
Units
Interval memory
standby indicator
(AD-4212B)
Interval memory
active indicator
(AD-4212B)
Data number of the
data currently displayed
Weighing data
or stored data
Interval memory
active indicator
(AD-4212A)
Interval memory
standby indicator
(AD-4212A)
17
5. WEIGHING UNITS
5-1 Units
With the AD-4212A/B series balance, the following weighing units and weighing modes are available:
A unit or mode can be selected and stored in the function table as described in “5-2 Changing the Unit”.
If a weighing mode (or unit of weight) has been turned off, that mode or unit will be missing in the
sequence. Tael has four varieties, one of which can be selected and installed at the factory.
For details about the units and modes, see the table below:
Name (unit, mode) Display Function table
(Storing mode)
Conversion factor
Gram
1 g
Milligram
0.001 g
Counting mode
Percent mode
Ounce (Avoir)
28.349523125 g
Troy Ounce
31.1034768 g
Metric Carat
0.2 g
Momme
3.75 g
Pennyweight
1.55517384 g
Grain (UK)
0.06479891 g
Tael (HK general, Singapore)
37.7994 g
Tael (HK jewelry) 37.429 g
Tael (Taiwan) 37.5 g
Tael (China) 31.25 g
Tola (India)
11.6638038 g
Messghal
4.6875 g
Programmable-unit (Multi-unit)
(AD-4212A only)
g
Percent mode
Counting mode
PC
Pct
OZ
OZt
ct
mm
dwt
GN
TL
t
MS
mg
Programmable-unit
(AD-4212A only)
18
The table below indicates the weighing capacity and the minimum display for each unit, depending on
the balance model.
Unit
AD-4212A-100 AD-4212A-200 AD-4212A-600 AD-4212A-1000
Capacity Minimum
display
Capacity Minimum
display
Capacity
Minimum
display
Capacity
Minimum
display
Gram
110 0.0001 210 0.001 610 0.001 1100 0.001
Milligram
110000 0.1 210000 1 610000 1 1100000 1
Ounce (Avoir)
3.88 0.000005 7.40 0.00005 21.51 0.00005 38.80 0.00005
Troy Ounce
3.53 0.000005 6.75 0.00005 19.61 0.00005 35.36 0.00005
Metric Carat
550 0.0005 1050 0.005 3050 0.005 5500 0.005
Momme
29.3 0.00005 56.0 0.0005 162.6 0.0005 293.3 0.0005
Pennyweight
70.7 0.0001 135.0 0.001 392.2 0.001 707.3 0.001
Grain (UK)
1697 0.002 3240 0.02 9413 0.02 16975 0.02
Tael
(HK
general, Singapore)
2.91 0.000005 5.55 0.00005 16.13 0.00005 29.10 0.00005
Tael (HK jewelry)
2.93 0.000005 5.61 0.00005 16.29 0.00005 29.38 0.00005
Tael (Taiwan)
2.93 0.000005 5.60 0.00005 16.26 0.00005 29.33 0.00005
Tael (China)
3.52 0.000005 6.72 0.00005 19.52 0.00005 35.20 0.00005
Tola (India)
9.43 0.00001 18.00 0.0001 52.29 0.0001 94.30 0.0001
Messghal
23.4 0.00005 44.8 0.0005 130.1 0.0005 234.6 0.0005
Unit
AD-4212B-23
AD-4212B-101
Standard range Precision range
Capacity Minimum
display
Capacity Minimum
display
Capacity Minimum
display
Gram 21 0.000001 110 0.0001 31 0.00001
Milligram 21000 0.001 110000 0.1 31000 0.01
Ounce (Avoir) 0.741 0.0000001 3.88 0.00001 1.09 0.000001
Troy Ounce 0.675 0.0000001 3.53 0.00001 0.99 0.000001
Metric Carat 105 0.00001 550 0.001 155 0.0001
Momme 5.60 0.000001 29.3 0.0001 8.2 0.00001
Pennyweight 13.50 0.000001 70.7 0.0001 19.9 0.00001
Grain (UK) 324.1 0.00002 1697 0.002 478 0.0002
Tael
(HK general, Singapore)
0.556 0.0000001 2.91 0.00001 0.82 0.000001
Tael (HK jewelry) 0.561 0.0000001 2.93 0.00001 0.82 0.000001
Tael (Taiwan) 0.560 0.0000001 2.93 0.00001 0.82 0.000001
Tael (China) 0.672 0.0000001 3.52 0.00001 0.99 0.000001
Tola (India) 1.800 0.0000001 9.43 0.00001 2.65 0.000001
Messghal 4.48 0.000001 23.4 0.0001 6.6 0.00001
  • Page 1 1
  • Page 2 2
  • Page 3 3
  • Page 4 4
  • Page 5 5
  • Page 6 6
  • Page 7 7
  • Page 8 8
  • Page 9 9
  • Page 10 10
  • Page 11 11
  • Page 12 12
  • Page 13 13
  • Page 14 14
  • Page 15 15
  • Page 16 16
  • Page 17 17
  • Page 18 18
  • Page 19 19
  • Page 20 20
  • Page 21 21
  • Page 22 22
  • Page 23 23
  • Page 24 24
  • Page 25 25
  • Page 26 26
  • Page 27 27
  • Page 28 28
  • Page 29 29
  • Page 30 30
  • Page 31 31
  • Page 32 32
  • Page 33 33
  • Page 34 34
  • Page 35 35
  • Page 36 36
  • Page 37 37
  • Page 38 38
  • Page 39 39
  • Page 40 40
  • Page 41 41
  • Page 42 42
  • Page 43 43
  • Page 44 44
  • Page 45 45
  • Page 46 46
  • Page 47 47
  • Page 48 48
  • Page 49 49
  • Page 50 50
  • Page 51 51
  • Page 52 52
  • Page 53 53
  • Page 54 54
  • Page 55 55
  • Page 56 56
  • Page 57 57
  • Page 58 58
  • Page 59 59
  • Page 60 60
  • Page 61 61
  • Page 62 62
  • Page 63 63
  • Page 64 64
  • Page 65 65
  • Page 66 66
  • Page 67 67
  • Page 68 68
  • Page 69 69
  • Page 70 70
  • Page 71 71
  • Page 72 72
  • Page 73 73
  • Page 74 74
  • Page 75 75
  • Page 76 76
  • Page 77 77
  • Page 78 78
  • Page 79 79
  • Page 80 80
  • Page 81 81
  • Page 82 82
  • Page 83 83
  • Page 84 84
  • Page 85 85
  • Page 86 86
  • Page 87 87
  • Page 88 88
  • Page 89 89
  • Page 90 90
  • Page 91 91
  • Page 92 92
  • Page 93 93
  • Page 94 94
  • Page 95 95
  • Page 96 96
  • Page 97 97
  • Page 98 98
  • Page 99 99
  • Page 100 100
  • Page 101 101
  • Page 102 102
  • Page 103 103
  • Page 104 104
  • Page 105 105
  • Page 106 106
  • Page 107 107
  • Page 108 108

A&D AD-4212A/AD-4212B Series User manual

Category
Measuring, testing & control
Type
User manual

Ask a question and I''ll find the answer in the document

Finding information in a document is now easier with AI