Page is loading ...

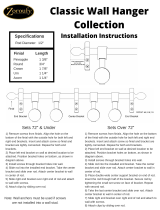
BRACKET INSTALLATION
STEP 1.
Place brackets against wall or ceiling at desired locations
and mark screw holes. Use tape measure and level to make
sure marked screw holes are horizontal to each other.
Pre-drill two pilot holes for each bracket (1/4” drill bit) and
insert anchors into wall/ceiling and insert screws into wall
anchors.
STEP 2B.
If mounting directly into wood or studs, pre-drill two pilot
holes for each bracket (1/4” drill bit) and install bracket on
the wall with screws provided.
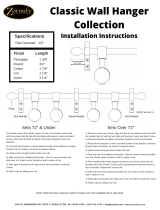
ROD INSTALLATION
STEP 4.
Detach finial from inner rod.
STEP 5.
Assemble rod and shirr drapery treatment onto rod.
STEP 6.
Screw finials onto inner rod. Rotate finial on rod for proper
alignment if required.
STEP 7.
Extend rod to desired width and place it into the brackets.
Adjust draperies to desired position.
STEP 3.
Determine projection of brackets. Loosen projection screw,
slide bracket to desired position and tighten projection
screw. Repeat for each bracket.
FINAL ADJUSTMENT
STEP 8.
Secure each rod by tightening screws provided.
STEP 2A.
(FOR MOUNTING TO DRYWALL OR PANELING)
(FOR MOUNTING TO WOOD OR STUDS)
projection
screw
WOOD
or
STUDS
DRY WALLCEILING MOUNT
Note:
Finial shown is for illustration purposes only.
It may not represent the style of finial purchased.
For larger width windows, two persons may be
required for easier leveling.
Tape Measure, Pencil, Drill & Bit Set, Philipshead
Screwdriver, Level
Tools needed:
Tape Measure
Philipshead
Screwdriver
Drill & Bit SetPencil Level
DRAPERY ROD SET INSTALLATION GUIDE
/