
Facsimile Guide
Facsimile Guide
Please read this guide before operating this equipment.
After you finish reading this guide, store it in a safe
place for future reference.

Manuals for the Machine
The manuals for this machine are divided as follows. Please refer to them for detailed information.
Depending on the system configuration and product purchased, some manuals may not be needed.
Only for the MF5750/MF5770 models.
Only for the MF5770 model.
Only for the MF5770 model.
Guides with this symbol are printed manuals.
CD-ROM
Guides with this symbol are PDF manuals included on the
accompanying CD-ROM.
• Setting Up the Machine
• Software Installation
• Network Setting (Only for the MF5770 model.)
Set-Up Sheet
• Introduction on Machine Use
Quick Reference Guide
• Copying and Printing Instructions
• Troubleshooting
User’s Guide
CD-ROM
• Fax Instructions
• Troubleshooting
Facsimile Guide
(This Manual)
• Software Installation and Instructions
• Printing, Scanning and PC Faxing Instructions
• Troubleshooting
Software Guide
CD-ROM
• Remote User Interface Instructions
Remote UI Guide
CD-ROM
• Network Connectivity and Setup Instructions
Network Guide
CD-ROM
• To view the manual in PDF format, Adobe Reader/Acrobat Reader/Acrobat is required. If Adobe Reader/Acrobat Reader/Acrobat is not installed on your
system, please download it from the Adobe Systems Incorporated website .

Copyright
Copyright © 2005 by Canon, Inc. All rights reserved. No part of this publication
may be reproduced, transmitted, transcribed, stored in a retrieval system, or
translated into any language or computer language in any form or by any
means, electronic, mechanical, magnetic, optical, chemical, manual, or
otherwise, without the prior written permission of Canon, Inc.
This equipment conforms to the essential requirements of EC
Directive 1999/5/EC.
We declare that this product conforms to the EMC
requirements of EC Directive 1999/5/EC at nominal mains
input 230 V, 50Hz although the rated input of the product is
200–240 V, 50/60Hz. This equipment has been tested in a
typical system to comply with the technical requirements of
EMC Directive. Use of shielded cable is required to comply
with the technical requirements of EMC Directive.
If you move to another EU country and are experiencing
trouble please call the Canon Help Desk.
(For Europe Only)
F146502 (LaserBase MF5750)
F146502 (LaserBase MF5770)
Model Name

Trademarks
Canon
®
is a registered trademark, and UHQ
™
is a trademark of Canon Inc.
IBM
®
is a registered trademark.
Microsoft
®
and Windows
®
are registered trademarks of Microsoft Corporation.
Other brand and product names may be trademarks or registered trademarks
of their respective companies.
As an ENERGY STAR
®
Partner, Canon has determined
that the machine meets the Energy Star guidelines for
energy efficiency.
Super G3 is a phrase used to describe the new
generation of fax machines that use ITU-T V.34
standard 33.6Kbps* modems. Super G3 High Speed
Fax machines allow transmission time of approx. 3
seconds* per page which results in reduced telephone
line charges.
* Approx. 3 seconds per page fax data transmission time based on Canon FAX
Standard Chart No.1, (Standard Mode) at 33.6Kbps modem speed. The Public
Switched Telephone Network (PSTN) currently supports 28.8Kbps modem speeds or
lower, depending on telephone line conditions.

iii
Contents
Preface . . . . . . . . . . . . . . . . . . . . . . . . . . . . . . . . . . . . . . . . . . . . . . . . . . . . . . . . . . . . . . . . . . . . . . . . . . . v
How to Use This Manual . . . . . . . . . . . . . . . . . . . . . . . . . . . . . . . . . . . . . . . . . . . . . . . . . . . . . . . . . .v
Symbols Used in This Manual . . . . . . . . . . . . . . . . . . . . . . . . . . . . . . . . . . . . . . . . . . . . . . . . . .v
Keys Used in This Manual . . . . . . . . . . . . . . . . . . . . . . . . . . . . . . . . . . . . . . . . . . . . . . . . . . . . .v
Messages Displayed in the LCD . . . . . . . . . . . . . . . . . . . . . . . . . . . . . . . . . . . . . . . . . . . . . . . .v
Chapter 1 Introduction
Customer Support . . . . . . . . . . . . . . . . . . . . . . . . . . . . . . . . . . . . . . . . . . . . . . . . . . . . . . . . . . . . . 1-1
Operation Panel . . . . . . . . . . . . . . . . . . . . . . . . . . . . . . . . . . . . . . . . . . . . . . . . . . . . . . . . . . . . . . . 1-1
Standby Display . . . . . . . . . . . . . . . . . . . . . . . . . . . . . . . . . . . . . . . . . . . . . . . . . . . . . . . . . . . . . . . 1-3
Chapter 2 Registering Information in Your Machine
Registering Sender Information . . . . . . . . . . . . . . . . . . . . . . . . . . . . . . . . . . . . . . . . . . . . . . . . . . . 2-1
Entering the Date and Time . . . . . . . . . . . . . . . . . . . . . . . . . . . . . . . . . . . . . . . . . . . . . . . . . . 2-2
Registering Your Fax/Telephone Number and Name. . . . . . . . . . . . . . . . . . . . . . . . . . . . . . . 2-2
Setting the Telephone Line Type . . . . . . . . . . . . . . . . . . . . . . . . . . . . . . . . . . . . . . . . . . . . . . . . . . 2-3
Dialing Through a Switchboard . . . . . . . . . . . . . . . . . . . . . . . . . . . . . . . . . . . . . . . . . . . . . . . . . . . 2-3
Chapter 3 Speed Dialing
Speed Dialing Methods . . . . . . . . . . . . . . . . . . . . . . . . . . . . . . . . . . . . . . . . . . . . . . . . . . . . . . . . . 3-1
Registering One-Touch Speed Dialing . . . . . . . . . . . . . . . . . . . . . . . . . . . . . . . . . . . . . . . . . . . . . . 3-1
Changing or Deleting an Entry. . . . . . . . . . . . . . . . . . . . . . . . . . . . . . . . . . . . . . . . . . . . . . . . 3-2
Registering Coded Speed Dialing . . . . . . . . . . . . . . . . . . . . . . . . . . . . . . . . . . . . . . . . . . . . . . . . .3-3
Changing or Deleting an Entry. . . . . . . . . . . . . . . . . . . . . . . . . . . . . . . . . . . . . . . . . . . . . . . . 3-4
Registering Group Dialing . . . . . . . . . . . . . . . . . . . . . . . . . . . . . . . . . . . . . . . . . . . . . . . . . . . . . . . 3-4
Changing or Deleting an Entry. . . . . . . . . . . . . . . . . . . . . . . . . . . . . . . . . . . . . . . . . . . . . . . . 3-5
Printing Speed Dialing Lists . . . . . . . . . . . . . . . . . . . . . . . . . . . . . . . . . . . . . . . . . . . . . . . . . . . . . . 3-6
Chapter 4 Sending Faxes
Sending Methods . . . . . . . . . . . . . . . . . . . . . . . . . . . . . . . . . . . . . . . . . . . . . . . . . . . . . . . . . . . . . . 4-1
Memory Sending . . . . . . . . . . . . . . . . . . . . . . . . . . . . . . . . . . . . . . . . . . . . . . . . . . . . . . . . . . 4-1
Manual Sending . . . . . . . . . . . . . . . . . . . . . . . . . . . . . . . . . . . . . . . . . . . . . . . . . . . . . . . . . . . 4-2
Improving Faxed Images . . . . . . . . . . . . . . . . . . . . . . . . . . . . . . . . . . . . . . . . . . . . . . . . . . . . . . . . 4-3
Adjusting the Image Quality (Fax Resolution) . . . . . . . . . . . . . . . . . . . . . . . . . . . . . . . . . . . . 4-3
Adjusting the Exposure (Scan Density) . . . . . . . . . . . . . . . . . . . . . . . . . . . . . . . . . . . . . . . . . 4-3
Dialing Methods . . . . . . . . . . . . . . . . . . . . . . . . . . . . . . . . . . . . . . . . . . . . . . . . . . . . . . . . . . . . . . . 4-4
Regular Dialing . . . . . . . . . . . . . . . . . . . . . . . . . . . . . . . . . . . . . . . . . . . . . . . . . . . . . . . . . . . 4-4
One-Touch Speed Dialing . . . . . . . . . . . . . . . . . . . . . . . . . . . . . . . . . . . . . . . . . . . . . . . . . . . 4-4
Coded Speed Dialing . . . . . . . . . . . . . . . . . . . . . . . . . . . . . . . . . . . . . . . . . . . . . . . . . . . . . . .4-5
Group Dialing . . . . . . . . . . . . . . . . . . . . . . . . . . . . . . . . . . . . . . . . . . . . . . . . . . . . . . . . . . . . . 4-5
Directory Dialing. . . . . . . . . . . . . . . . . . . . . . . . . . . . . . . . . . . . . . . . . . . . . . . . . . . . . . . . . . . 4-5
Redialing a Busy Number. . . . . . . . . . . . . . . . . . . . . . . . . . . . . . . . . . . . . . . . . . . . . . . . . . . . . . . . 4-6
Manual Redialing . . . . . . . . . . . . . . . . . . . . . . . . . . . . . . . . . . . . . . . . . . . . . . . . . . . . . . . . . . 4-6
Automatic Redialing . . . . . . . . . . . . . . . . . . . . . . . . . . . . . . . . . . . . . . . . . . . . . . . . . . . . . . . . 4-6
Sending the Same Document to Several Recipients (Sequential Broadcasting) . . . . . . . . . . . . . . 4-7
Special Dialing . . . . . . . . . . . . . . . . . . . . . . . . . . . . . . . . . . . . . . . . . . . . . . . . . . . . . . . . . . . . . . . . 4-8
Dialing an Overseas Number (With Pauses) . . . . . . . . . . . . . . . . . . . . . . . . . . . . . . . . . . . . . 4-8
Switching Temporarily to Tone Dialing . . . . . . . . . . . . . . . . . . . . . . . . . . . . . . . . . . . . . . . . . . 4-9

iv
Chapter 5 Receiving Faxes
Setting the Receive Mode . . . . . . . . . . . . . . . . . . . . . . . . . . . . . . . . . . . . . . . . . . . . . . . . . . . . . . . 5-1
Receiving Faxes Automatically: FaxOnly Mode. . . . . . . . . . . . . . . . . . . . . . . . . . . . . . . . . . . 5-1
Receiving Both Faxes and Voice Calls Automatically: FaxTel Mode . . . . . . . . . . . . . . . . . . . 5-2
Receiving When an Answering Machine Is Connected: AnsMode . . . . . . . . . . . . . . . . . . . . 5-3
Receiving Faxes Manually: Manual Mode . . . . . . . . . . . . . . . . . . . . . . . . . . . . . . . . . . . . . . . 5-4
Receiving Faxes While Performing Other Tasks . . . . . . . . . . . . . . . . . . . . . . . . . . . . . . . . . . . . . . 5-5
Receiving Faxes in the Memory When a Problem Occurs. . . . . . . . . . . . . . . . . . . . . . . . . . . . . . . 5-5
Canceling Receiving . . . . . . . . . . . . . . . . . . . . . . . . . . . . . . . . . . . . . . . . . . . . . . . . . . . . . . . . . . . 5-5
Chapter 6 Reports and Lists
Summary of Reports and Lists . . . . . . . . . . . . . . . . . . . . . . . . . . . . . . . . . . . . . . . . . . . . . . . . . . . 6-1
ACTIVITY REPORT . . . . . . . . . . . . . . . . . . . . . . . . . . . . . . . . . . . . . . . . . . . . . . . . . . . . . . . . . . . . 6-2
Printing the ACTIVITY REPORT . . . . . . . . . . . . . . . . . . . . . . . . . . . . . . . . . . . . . . . . . . . . . . 6-2
Adjusting the ACTIVITY REPORT Setting. . . . . . . . . . . . . . . . . . . . . . . . . . . . . . . . . . . . . . . 6-3
Adjusting the TX REPORT Setting. . . . . . . . . . . . . . . . . . . . . . . . . . . . . . . . . . . . . . . . . . . . . . . . . 6-3
Adjusting the RX REPORT Setting . . . . . . . . . . . . . . . . . . . . . . . . . . . . . . . . . . . . . . . . . . . . . . . . 6-5
Printing the USER DATA LIST . . . . . . . . . . . . . . . . . . . . . . . . . . . . . . . . . . . . . . . . . . . . . . . . . . . . 6-6
Chapter 7 Troubleshooting
LCD Messages . . . . . . . . . . . . . . . . . . . . . . . . . . . . . . . . . . . . . . . . . . . . . . . . . . . . . . . . . . . . . . . 7-1
Error Codes . . . . . . . . . . . . . . . . . . . . . . . . . . . . . . . . . . . . . . . . . . . . . . . . . . . . . . . . . . . . . . . . . . 7-3
Faxing Problems . . . . . . . . . . . . . . . . . . . . . . . . . . . . . . . . . . . . . . . . . . . . . . . . . . . . . . . . . . . . . . 7-5
Sending Problems . . . . . . . . . . . . . . . . . . . . . . . . . . . . . . . . . . . . . . . . . . . . . . . . . . . . . . . . . 7-5
Receiving Problems. . . . . . . . . . . . . . . . . . . . . . . . . . . . . . . . . . . . . . . . . . . . . . . . . . . . . . . . 7-8
Telephone Problems . . . . . . . . . . . . . . . . . . . . . . . . . . . . . . . . . . . . . . . . . . . . . . . . . . . . . . . . . . 7-11
If a Power Cut Occurs . . . . . . . . . . . . . . . . . . . . . . . . . . . . . . . . . . . . . . . . . . . . . . . . . . . . . . . . . 7-12
If You Cannot Solve the Problem . . . . . . . . . . . . . . . . . . . . . . . . . . . . . . . . . . . . . . . . . . . . . . . . . 7-12
Chapter 8 Machine Settings
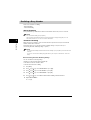
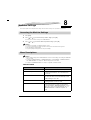
Accessing the Machine Settings . . . . . . . . . . . . . . . . . . . . . . . . . . . . . . . . . . . . . . . . . . . . . . . . . . 8-1
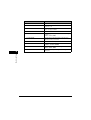
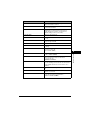
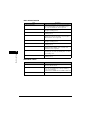
Menu Descriptions . . . . . . . . . . . . . . . . . . . . . . . . . . . . . . . . . . . . . . . . . . . . . . . . . . . . . . . . . . . . . 8-1
FAX SETTINGS. . . . . . . . . . . . . . . . . . . . . . . . . . . . . . . . . . . . . . . . . . . . . . . . . . . . . . . . . . . 8-1
ADD. REGISTRATION. . . . . . . . . . . . . . . . . . . . . . . . . . . . . . . . . . . . . . . . . . . . . . . . . . . . . . 8-8
REPORTS / LISTS . . . . . . . . . . . . . . . . . . . . . . . . . . . . . . . . . . . . . . . . . . . . . . . . . . . . . . . . 8-8
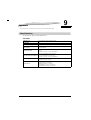
Chapter 9 Appendix
Specifications. . . . . . . . . . . . . . . . . . . . . . . . . . . . . . . . . . . . . . . . . . . . . . . . . . . . . . . . . . . . . . . . . 9-1
Facsimile . . . . . . . . . . . . . . . . . . . . . . . . . . . . . . . . . . . . . . . . . . . . . . . . . . . . . . . . . . . . . . . . 9-1
Telephone . . . . . . . . . . . . . . . . . . . . . . . . . . . . . . . . . . . . . . . . . . . . . . . . . . . . . . . . . . . . . . . 9-2
Index . . . . . . . . . . . . . . . . . . . . . . . . . . . . . . . . . . . . . . . . . . . . . . . . . . . . . . . . . . . . . . . . . . . . . . . 9-3

v
Preface
Thank you for purchasing the Canon LaserBase MF5750/MF5770. Please read this manual thoroughly before
operating the machine in order to familiarize yourself with its capabilities, and to make the most of its many
functions. After reading this manual, store it in a safe place for future reference.
How to Use This Manual
Symbols Used in This Manual
The following symbols are used in this manual to explain procedures, restrictions, handling
precautions, and instructions that should be observed for safety.
Keys Used in This Manual
The following symbols and key names are a few examples of how keys to be pressed are expressed in
this manual. The operation panel keys on the machine are indicated within brackets.
Press [Start].
Press [Image Quality].
Messages Displayed in the LCD
The following are a few examples of how messages in the LCD are expressed in this manual. The
messages are indicated within angle brackets.
• If <MEMORY FULL> is displayed, the machine cannot scan the documents.
• <NOT REGISTERED> appears if there are no numbers registered.
WARNING
Indicates a warning concerning operations that may lead to death or injury to persons
if not performed correctly. In order to use the machine safely, always pay attention to
these warnings.
CAUTION
Indicates a caution concerning operations that may lead to injury to persons, or
damage to property if not performed correctly. In order to use the machine safely,
always pay attention to these cautions.
IMPORTANT
Indicates operational requirements and restrictions. Be sure to read these items
carefully in order to operate the machine correctly, and to avoid damage to the
machine.
NOTE
Indicates a clarification of an operation, or contains additional explanations for a
procedure. Reading these notes is highly recommended.

1-1
CHAPTER
1
Introduction
This chapter describes the operation panel and the standby display used for the fax function of the machine.
Customer Support
The machine is designed with the latest technology to provide trouble-free operation. If you encounter
a problem with the machine's operation, try to solve it by using the information in Chapter 7,
"Troubleshooting." If you cannot solve the problem or if you think the machine needs servicing, contact
your local authorized Canon dealer or the Canon help line.
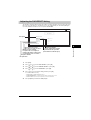
Operation Panel
This section describes keys used when sending and receiving faxes, and setting the Menu.
For keys not described here, see Chapter 1, "Introduction," in the User’s Guide.
■ MF5770
a One-Touch Speed Dialing keys
Dial fax/telephone numbers registered under one-touch speed
dialing keys.
b Coded Dial key
Press [Coded Dial], followed by a two-digit code to dial fax/telephone
number registered for coded speed dialing.
c Redial/Pause key
Redials the previous number dialed manually with the numeric
keys, and enters pauses when dialing or registering the
numbers.
d In Use/Memory indicator
Flashes green when a fax is being received or sent, or the
extension phone is off the hook.
Lights green when there are waiting fax jobs, or a fax is
received into the memory.
COPY
FAX
SCAN
Menu
OK
Coded
Dial
Directory
Hook
R
Redial /
Pause
01 02 03
04
05
06
07
08
09
10
1
23
4
5
6
7
8
9
0
ABC
DEF
GHI
JKL
MNO
PQRS
T
TUV
WXYZ
11 12
/
C
bc de f gh i ja
mlknopqrst
u

1-2
Introduction
1
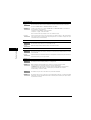
■ MF5750
e Alarm indicator
Flashes red when the machine has a problem such as a paper jam.
(The error message is displayed in the LCD.)
f FAX key
Switches the standby display to the Fax mode.
g Menu key
Customizes the way the machine operates.
h [ (-)] or [ (+)] keys
Scroll through the selections so you can see other settings.
i Exposure key
Adjusts the fax exposure.
j Energy Saver key
Sets or cancels the energy saver mode manually. The key lights
green when the energy saver mode is set, and goes off when the
mode is canceled.
k R key
Dials an outside line access number when the machine is connected
through a switchboard (PBX).
l Directory key
Enables you to search for fax/telephone numbers by the name under
which they are registered for speed dialing, and then use the number
for dialing.
m Hook key
Enables you to dial without picking up the handset.
n Status Monitor key
Checks the status of copy, fax, print and report jobs.
o Clear key
Clears an entry in the LCD.
p LCD
Displays messages and prompts during operation. Also
displays selections, text, and numbers when specifying
settings.
q Start key
Starts sending or receiving faxes.
r Stop/Reset key
Cancels sending or receiving faxes and other operations, and
turns to the standby display in the LCD.
s OK key
Determines the contents you set or register.
t Image Quality key
Adjusts the quality of fax image.
u Numeric keys
Enter numbers when dialing or registering fax/telephone
numbers, etc. Also, enter characters when registering names.
Coded
Dial
Directory
Hook
Redial /
Pause
R
01 02 03
04
05
06
07
08
09
10 11 12
Menu
ABC
DEF
GHI
JKL MNO
PQRS
TUV
WXYZ
T
1
23
4
5
6
7
8
9
0
OK
COPY
FAX
SCAN
bc de f gh i ja
mlknopqrst
u

1-3
Introduction
1
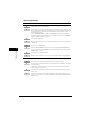
Standby Display
The standby display differs depending on which mode is selected.
The standby display in the Fax mode is as follows:
■ Fax Mode
NOTE
For the standby display in the Copy mode and the Scan mode, see Chapter 1, "Introduction," in the User’s Guide.
Receive mode Image quality
Date & time

2-1
CHAPTER
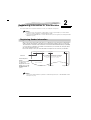
2
Registering Information in Your Machine
This chapter explains how to register the information necessary for sending and receiving faxes.
NOTE
•
For details on how to enter characters or symbols when you come to step that requires you to enter a name or
number, see Chapter 2, "Operation," in the Quick Reference Guide.
•
You can print the USER DATA LIST to check the sender information you have registered. (See "Printing the USER
DATA LIST," on p. 6-6.)
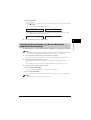
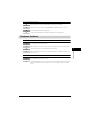
Registering Sender Information
When you receive a fax, the name of the person or company who sent you the fax, their fax/telephone
number, and the date and time of transmission may be printed in small type at the top of each page.
This information is called the Sender information or the Transmit Terminal Identification (TTI). Similarly,
you can register your details in your machine so that whenever you send a fax, the other party knows
who sent it, and when it was sent.
Below is an example of how your sender information would print on a fax sent from your machine:
NOTE
You can set the sender information to print inside or outside the image area. (See <1. TTI POSITION> of "Menu
Descriptions," on p. 8-2.)
01/02 2005 15:33 FAX 123 4567 YOUR NAME 001/001
THE SLEREXE COMPANY LIMITED
SAPORS LANE•BOOLE•DORSET•BH25 8ER
TELEPHONE BOOLE (945 13) 51617 – FAX 1234567
Our Ref. 350/PJC/EAC
Date and time of
transmission
Your fax/telephone
number.
You can select <FAX>
or <TEL> to be
displayed in front of the
number. (See <2. TEL
NUMBER MARK> on
p. 8-3.)
Your name
Page number

2-2
Registering Information in Your Machine
2
Entering the Date and Time
NOTE
You can print the USER DATA LIST to check the current setting. (See "Printing the USER DATA LIST," on p. 6-6.)
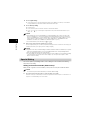
1
Press [Menu].
2
Press [ (-)] or [ (+)] to select <TIMER SETTINGS> ➞ press [OK].
3
Press [ (-)] or [ (+)] to select <DATE/TIME SETTING> ➞ press [OK].
4
Use the numeric keys to enter the date (day/month/year) and time (in 24-hour format) ➞ press [OK].
Enter only the last two digits of the year.
5
Press [Stop/Reset] to return to the standby display.
Registering Your Fax/Telephone Number and Name
1
Press [Menu].
2
Press [ ] or [ ] to select <FAX SETTINGS> ➞ press [OK].
3
Press [ (-)] or [ (+)] to select <USER SETTINGS> ➞ press [OK].
4
Press [ (-)] or [ (+)] to select <TEL LINE SETTINGS> ➞ press [OK].
5
Press [ (-)] or [ (+)] to select <UNIT TEL NUMBER> ➞ press [OK].
6
Use the numeric keys to enter your fax/telephone number (max. 20 digits, including spaces) ➞ press
[OK].
To enter a plus sign (+) before the number, press [#].
To delete a previous number, press [ (-)] or [Clear]. To delete the entire entry, press and hold [Clear].
7
Press [Menu].
8
Press [ (-)] or [ (+)] to select <UNIT NAME> ➞ press [OK].
DATE/TIME SETTING
01/02 '05 11:01
➞
TIMER SETTINGS
2.DATE SETUP
UNIT TEL NUMBER
123xxxxxxx
TEL LINE SETTINGS
2.TEL LINE TYPE
➞

2-3
Registering Information in Your Machine
2
9
Use the numeric keys to enter your name (max. 24 characters, including spaces) ➞ press [OK].
For details on how to enter characters or symbols, see "2.3 Enter Characters," in the Quick Reference Guide.
10
Press [Stop/Reset] to return to the standby display.
Setting the Telephone Line Type
Before using the machine, make sure you have set the correct telephone line type for your telephone
line. If you are unsure of your telephone line type, contact your telephone company.
NOTE
You can print the USER DATA LIST to check the current setting. (See "Printing the USER DATA LIST," on p. 6-6.)
1
Press [Menu].
2
Press [ (-)] or [ (+)] to select <FAX SETTINGS> ➞ press [OK].
3
Press [ (-)] or [ (+)] to select <USER SETTINGS> ➞ press [OK].
4
Press [ (-)] or [ (+)] to select <TEL LINE SETTINGS> ➞ press [OK].
5
Press [ (-)] or [ (+)] to select <TEL LINE TYPE> ➞ press [OK].
6
Press [ (-)] or [ (+)] to select the telephone line type ➞ press [OK].
You can select from the following:
- <TOUCH TONE> for tone dialing
- <ROTARY PULSE> for pulse dialing
7
Press [Stop/Reset] to return to the standby display.
Dialing Through a Switchboard
A PBX (Private Branch Exchange) is an on-site telephone switchboard. If your machine is connected
through a PBX or other telephone switching system, you have to dial the outside line access number
first, and then the number of the party you are calling.
To facilitate this procedure, you can register the PBX access type and the outside line access number
under [R] so that you only need to press this key before dialing the fax/telephone number you want to
reach.
NOTE
You can print the USER DATA LIST to check the current setting. (See "Printing the USER DATA LIST," on p. 6-6.)
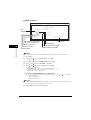
UNIT NAME :A
CANON
➞
USER SETTINGS
3.TX TERMINAL ID

2-4
Registering Information in Your Machine
2
1
Press [Menu].
2
Press [ (-)] or [ (+)] to select <FAX SETTINGS> ➞ press [OK].
3
Press [ (-)] or [ (+)] to select <USER SETTINGS> ➞ press [OK].
4
Press [ (-)] or [ (+)] to select <R-KEY SETTING> ➞ press [OK].
5
Press [ (-)] or [ (+)] to select <PBX> ➞ press [OK].
6
Press [ (-)] or [ (+)] to select the access type of your switching system.
● If you selected <HOOKING>:
❑
Press [OK].
● If you selected <PREFIX>:
❑
Press [OK].
❑ Use the numeric keys to enter the outside line access number (max. 19 digits) ➞ [Redial/Pause] to enter a
pause ➞ [OK].
NOTE
If you do not press [Redial/Pause] before pressing [OK], you cannot complete the registration.
7
Press [Stop/Reset] to return to the standby display.

3-1
CHAPTER
3
Speed Dialing
This chapter explains how to simplify the dialing process by assigning the recipient names and their fax/telephone
numbers to only one or two keys.
Speed Dialing Methods
Speed dialing allows you to dial fax/telephone numbers by simply pressing one or a few keys.
The following speed dialing methods are available:
■ One-Touch Speed Dialing
Register a fax/telephone number for one-touch speed dialing (see "Registering One-Touch Speed Dialing," on p.
3-1), then to dial the number, simply press the one-touch speed dialing key assigned to that number.
■ Coded Speed Dialing
Register a fax/telephone number for coded speed dialing (see "Registering Coded Speed Dialing," on p. 3-3), then
to dial the number, simply press [Coded Dial] ➞ enter the two-digit code assigned to that number.
■ Group Dialing
Register a group of fax/telephone numbers for group dialing (see "Registering Group Dialing," on p. 3-4), then to send
a document to all numbers in that group, simply press the one-touch speed dialing key, or press [Coded Dial] ➞ enter
the two-digit code assigned to that group.
NOTE
After you set up your speed dialing keys, we recommend that you occasionally print a list of all fax/telephone
numbers registered in the machine, and store it for reference. (See "Printing Speed Dialing Lists," on p. 3-6.)
Registering One-Touch Speed Dialing
Before you can use one-touch speed dialing (see "One-Touch Speed Dialing," on p. 4-4), you need to
register the recipients' fax/telephone numbers. You can register up to 11 one-touch speed dialing keys,
which can include group dialing numbers.
NOTE
You can also register multiple fax/telephone numbers in each one-touch speed dialing key. (See "Registering
Group Dialing," on p. 3-4.)

3-2
Speed Dialing
3
1
Press [Menu].
2
Press [ (-)] or [ (+)] to select <ADD. REGISTRATION> ➞ press [OK].
3
Press [ (-)] or [ (+)] to select <1-TOUCH SPD DIAL> ➞ press [OK].
4
Press [ (-)] or [ (+)] to select a one-touch speed dialing key (01 to 11) ➞ press [OK] twice.
You can also select a key by pressing the one-touch speed dialing key.
5
Use the numeric keys to enter the fax/telephone number you want to register (max. 120 digits, including
spaces and pauses) ➞ press [OK] twice.
6
Use the numeric keys to enter a name for the one-touch speed dialing key (max. 16 characters, including
spaces) ➞ press [OK].
To continue registering one-touch speed dialing keys, repeat the procedure from step 4.
7
Press [Stop/Reset] to return to the standby display.
NOTE
Use the destination labels provided with the machine to label the one-touch speed dialing keys with the recipients'
names.
Changing or Deleting an Entry
■ Changing a Fax/Telephone Number You Registered
Follow steps 1 to 4 of "Registering One-Touch Speed Dialing" (see p. 3-1). In step 5, press and hold [Clear] to
delete an entire fax/telephone number ➞ use the numeric keys to enter a new number ➞ press [OK] ➞ [Stop/Reset].
NOTE
You can also press
[ (-)]
or [Clear] repeatedly to delete the registered number.
■ Changing a Name You Registered
Follow steps 1 to 5 of "Registering One-Touch Speed Dialing" (see p. 3-1). In step 6, press and hold [Clear] to
delete an entire name ➞ use the numeric keys to enter a new name ➞ press [OK] ➞ [Stop/Reset].
NOTE
You can also press [Clear] repeatedly to delete the registered name.
TEL NUMBER ENTRY
905xxxxxxx
➞
NAME :A
NAME :A
Canon FRANCE
➞
1-TOUCH SPD DIAL
[01]Canon FRANCE

3-3
Speed Dialing
3
■ Deleting an Entire Entry
Follow steps 1 to 4 of "Registering One-Touch Speed Dialing" (see p. 3-1). In step 5, press and hold [Clear] to
delete the registered number ➞ press [OK] ➞ [Stop/Reset].
NOTE
•
When deleting the registered number, the registered name is cleared automatically.
•
You can also press
[ (-)]
or [Clear] repeatedly to delete the registered number.
Registering Coded Speed Dialing
Before you can use coded speed dialing (see "Coded Speed Dialing," on p. 4-5), you need to register
the recipients' fax/telephone numbers. You can register up to 100 fax/telephone numbers.
1
Press [Menu].
2
Press [ (-)] or [ (+)] to select <ADD. REGISTRATION> ➞ press [OK].
3
Press [ (-)] or [ (+)] to select <CODED SPD DIAL> ➞ press [OK].
4
Press [ (-)] or [ (+)] to select a coded speed dialing code (00 to 99) ➞ press [OK] twice.
You can also select a code by pressing [Coded Dial] ➞ entering the two-digit code with the numeric keys.
5
Use the numeric keys to enter the fax/telephone number you want to register (max. 120 digits, including
spaces and pauses) ➞ press [OK] twice.
6
Use the numeric keys to enter a name for the coded speed dialing code (max. 16 characters, including
spaces) ➞ press [OK].
To continue registering coded speed dialing codes, repeat the procedure from step 4.
7
Press [Stop/Reset] to return to the standby display.
TEL NUMBER ENTRY
149xxxxxxx
➞
NAME :A
NAME :A
Canon ITALIA
CODED SPD DIAL
[ ∗ 00]Canon ITALIA
➞

3-4
Speed Dialing
3
Changing or Deleting an Entry
■ Changing a Fax/Telephone Number You Registered
Follow steps 1 to 4 of "Registering Coded Speed Dialing" (see p. 3-3). In step 5, press and hold [Clear] to delete an
entire fax/telephone number ➞ use the numeric keys to enter a new number ➞ press [OK] ➞ [Stop/Reset].
NOTE
You can also press
[ (-)]
or [Clear] repeatedly to delete the registered number.
■ Changing a Name You Registered
Follow steps 1 to 5 of "Registering Coded Speed Dialing" (see p. 3-3). In step 6, press and hold [Clear] to delete an
entire name ➞ use the numeric keys to enter a new name ➞ press [OK] ➞ [Stop/Reset].
NOTE
You can also press
[ (-)]
or [Clear] repeatedly to delete the registered name.
■ Deleting an Entire Entry
Follow steps 1 to 4 of "Registering Coded Speed Dialing" (see p. 3-3). In step 5, press and hold [Clear] to delete the
registered number ➞ press [OK] ➞ [Stop/Reset].
NOTE
•
When deleting the registered number, the registered name is cleared automatically.
•
You can also press
[ (-)]
or [Clear] repeatedly to delete the registered number.
Registering Group Dialing
Before you can use group dialing (see "Group Dialing," on p. 4-5), you need to register the recipients'
fax/telephone numbers. You can register up to 110 groups, which can include one-touch speed dialing
keys and/or coded speed dialing codes.
Each time you program a one-touch speed dialing key or coded speed dialing code, the amount of
group dials available is reduced by one.
NOTE
•
You can only enter the fax/telephone numbers that have already been registered for one-touch or coded speed
dialing. See the following titles:
- "Registering One-Touch Speed Dialing," on p. 3-1
- "Registering Coded Speed Dialing," on p. 3-3
•
You cannot enter numbers with the numeric keys.
1
Press [Menu].
2
Press [ (-)] or [ (+)] to select <ADD. REGISTRATION> ➞ press [OK].
3
Press [ (-)] or [ (+)] to select <GROUP DIAL> ➞ press [OK].

3-5
Speed Dialing
3
4
Specify an empty one-touch speed dialing key or coded speed dialing code that you want to set as the
group dial.
● To register a group under a one-touch speed dialing key:
❑
Press [ (-)] or [ (+)] to select a one-touch speed dialing key (01 to 11) ➞ press [OK] twice.
You can also select a key by pressing the one-touch speed dialing key.
● To register a group under a coded speed dialing code:
❑
Press [Coded Dial] ➞ use the numeric keys to enter the two-digit code (00 to 99) ➞ press [OK] twice.
5
Select the speed dialing numbers you want to register in the group ➞ press [OK] twice.
The speed dialing number refers to the one-touch dialing number or coded speed dialing number under which the
fax/telephone number is programmed.
To enter in the group a number stored under a one-touch speed dialing key, press the desired one-touch speed
dialing key(s).
To enter a number stored under a coded speed dialing code, press [Coded Dial] ➞ enter the two-digit code for the
number using the numeric keys. For multiple entries, press [Coded Dial] between each entry.
NOTE
To review the numbers you have entered, press [ (-)] or [ (+)].
6
Use the numeric keys to enter a name for the group (max. 16 characters, including spaces) ➞ press [OK].
To continue registering other groups, repeat the procedure from step 4.
The name you enter here will appear in speed dialing lists.
7
Press [Stop/Reset] to return to the standby display.
Changing or Deleting an Entry
■ Deleting a Fax/Telephone Number from the Group
Follow steps 1 to 4 of "Registering Group Dialing" (see p. 3-4). In step 5, press [ (-)] or [ (+)] to display the
number you want to delete ➞ press and hold [Clear] ➞ press [OK] ➞ [Stop/Reset].
■ Adding a Fax/Telephone Number to the Group
Follow steps 1 to 4 of "Registering Group Dialing" (see p. 3-4). In step 5, simply enter the additional number as
explained.
■ Deleting an Entire Group
Follow steps 1 to 4 of "Registering Group Dialing" (see p. 3-4). In step 5, press [Clear] repeatedly until all numbers
are deleted ➞ press [OK] ➞ [Stop/Reset].
NOTE
When deleting all numbers, the registered group name is cleared automatically.
NAME :1
Canon group 2
GROUP DIAL
[02] GROUP DIAL
➞

3-6
Speed Dialing
3
Printing Speed Dialing Lists
You can print lists of the recipients registered for speed dialing. You may want to keep these lists near
the machine to refer to them when dialing.
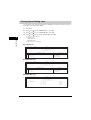
1
Press [Menu].
2
Press [ (-)] or [ (+)] to select <REPORTS/LISTS> ➞ press [OK].
3
Press [ (-)] or [ (+)] to select <SPEED DIAL LIST> ➞ press [OK].
4
Press [ (-)] or [ (+)] to select the list you want to print ➞ press [OK].
You can select from the following:
- <1-TOUCH LIST>
- <CODED DIAL LIST>
- <GROUP DIAL LIST>
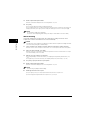
Samples of the lists are shown below.
■ 1-TOUCH LIST
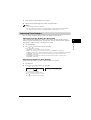
■ CODED DIAL LIST
■ GROUP DIAL LIST
************************
***
1-TOUCH LIST
***
************************
01/02 2005 10:32 FAX 1234567 CANON 001
NO. RECIPIENT ADDRESS DESTINATION ID
[ 01] 732 2233 ADAM BOOKS,CPA
[ 02] 761 1298 JOHN BARRISTER
[ 04] 1 516 911 4411 NATALIE SMITH
[ 03] 1 914 438 3619 SEYMOUR GREEN
*****************************
***
CODED DIAL LIST
***
*****************************
01/02 2005 10:47 FAX 1234567 CANON 001
NO. RECIPIENT ADDRESS DESTINATION ID
[
*
00] 555 1234 BILL
[
*
01] 14043333499 PEACHTREE,INC.
[
*
02] 16172223322 HUNT INVESTMENTS
[
*
03] 1 312 538 4005 LAKESIDE INC.
01/02 2005 10:07 FAX 1234567 CANON 001
***************************
***
GROUP DIAL LIST
***
***************************
[ 05 ] CANON GROUP [
01] 225 7823 CANON NY
[
02] 233 7766 CANON CA
[
*
00] 876 2398 CANON TX
[
*
01] 613 9076 CANON OH
Page is loading ...
Page is loading ...
Page is loading ...
Page is loading ...
Page is loading ...
Page is loading ...
Page is loading ...
Page is loading ...
Page is loading ...
Page is loading ...
Page is loading ...
Page is loading ...
Page is loading ...
Page is loading ...
Page is loading ...
Page is loading ...
Page is loading ...
Page is loading ...
Page is loading ...
Page is loading ...
Page is loading ...
Page is loading ...
Page is loading ...
Page is loading ...
Page is loading ...
Page is loading ...
Page is loading ...
Page is loading ...
Page is loading ...
Page is loading ...
Page is loading ...
Page is loading ...
Page is loading ...
Page is loading ...
Page is loading ...
Page is loading ...
Page is loading ...
Page is loading ...
Page is loading ...
Page is loading ...
Page is loading ...
Page is loading ...
Page is loading ...
Page is loading ...
Page is loading ...
Page is loading ...
Page is loading ...
Page is loading ...
-
 1
1
-
 2
2
-
 3
3
-
 4
4
-
 5
5
-
 6
6
-
 7
7
-
 8
8
-
 9
9
-
 10
10
-
 11
11
-
 12
12
-
 13
13
-
 14
14
-
 15
15
-
 16
16
-
 17
17
-
 18
18
-
 19
19
-
 20
20
-
 21
21
-
 22
22
-
 23
23
-
 24
24
-
 25
25
-
 26
26
-
 27
27
-
 28
28
-
 29
29
-
 30
30
-
 31
31
-
 32
32
-
 33
33
-
 34
34
-
 35
35
-
 36
36
-
 37
37
-
 38
38
-
 39
39
-
 40
40
-
 41
41
-
 42
42
-
 43
43
-
 44
44
-
 45
45
-
 46
46
-
 47
47
-
 48
48
-
 49
49
-
 50
50
-
 51
51
-
 52
52
-
 53
53
-
 54
54
-
 55
55
-
 56
56
-
 57
57
-
 58
58
-
 59
59
-
 60
60
-
 61
61
-
 62
62
-
 63
63
-
 64
64
-
 65
65
-
 66
66
-
 67
67
-
 68
68


Canon ImageCLASS MF5750 User manual
- Category
- Multifunctionals
- Type
- User manual
Ask a question and I''ll find the answer in the document
Finding information in a document is now easier with AI
Related papers
-
Canon imageCLASS MF5770 Owner's manual
-
Canon imageCLASS MF5880dn Owner's manual
-
-
-
Canon FaxPhone L90 User guide
-
Canon i-SENSYS MF3228 User manual
-
-
-
Canon imageCLASS MF5550 User manual
-
