Page is loading ...

INTERCHANGE HALF-MOON ACTIVITY TABLE
04128 Interchange Activity Table - Half-Moon
INTERCHANGE TRAPEZOID ACTIVITY TABLE
04127 Interchange Activity Table - Trapezoid
INTERCHANGE KIDNEY ACTIVITY TABLE
04130 Interchange Activity Table - Trapezoid
ASSEMBLY
INSTRUCTIONS
For assistance in assembling product, missing or damaged parts,
or to place an order, please contact Customer Service at 800-328-1061.
Form# 179746 www.smithsystem.com 08.17.2015
INTERCHANGE™
KIDNEY, HALF-MOON & TRAPEZOID ACTIVITY TABLES

[ 1 ] 67607 HARDWARE PACK, INTERCHANGE ACT 42” 48”
QTY 2 #77813 - 3/16” ALLEN WRENCH
QTY 4 #70867 - CONNECTOR BOLT 1/4-20 X 23MM
QTY 4 #70869 - CONNECTOR NUT 1/4-20 X 17MM
QTY 26 #70054 - #10 X 3/4” WOOD SCREW
[ 2 ] 67205 REPL. HARDWARE SILHOUETTE LEGS
QTY 2 #77813 - 3/16” ALLEN WRENCH
QTY 12 #70054 - #10 X 3/4” WOOD SCREW
QTY 4 #70086 - SCREW, CAP HEAD M8X10MM
QTY 4 #77741 - 3/8 - 16 X .625 HALF DOG SOCKET SCREW
INTERCHANGE™ ACTIVITY TABLE
REPLACEMENT HARDWARE PACKS
For Assistance in assembling product, missing or damaged parts,
or to place an order, please contact customer service at 800-328-1061
You may also place your order online at
www.smithsystem.com
Form# 179746 04/2015
Hardware and Components
Leg Set
P/N: See Table
(QTY: 1 Leg Set)
Support Channel/Brace
P/N: See Table
(QTY: 1)
Table Top
(QTY: 1)
3/16” Allen Wrench
P/N: 77813
(QTY: 2)
P/N: 70867 – Connector Bolt ¼-20 x 23mm
P/N: 70869 – Connector Nut ¼-20 x 17mm
(QTY: 4 of each)
#10x3/4” Wood Screw
P/N: 70054
(QTY: 26)
Replacement Hardware Packs:
1. 67607 – HDWR PK, Inter Act 42, 48
a. (2) 77813 – 3/16” Allen Wrench
b. (4) 70867 – Connector Bolt ¼-20 x 23mm
c. (4) 70869 – Connector Nut ¼-20 x 17mm
d. (26) 70054 - #10x3/4” Wood Screw
2. 67205 – Repl. Hardware Silhouette Legs
a. (2) 77813 – 3/16” Allen Wrench
b. (12) 70054 - #10x3/4” Wood Screw
c. (4) 70086 – Screw, cap head M8x10mm
d. (4) 77741 – 3/8-16X.625 Half Dog Socket
screw
Interchange Angle Bracket W/ Hardware
P/N: 77513
(QTY: 1 Pair)
HARDWARE AND COMPONENTS
Form# 179746 www.smithsystem.com 08.17.2015

For Assistance in assembling product, missing or damaged parts,
or to place an order, please contact customer service at 800-328-1061
You may also place your order online at
www.smithsystem.com
Form# 179746 04/2015
Assembly Instructions
Step 1: Place the top on a clean, dry surface laminate side down, so that the predrill holes face up.
Step 2: Loosely attach the support brace to the angle brackets using (4) connector bolts that were
provided with the angle brackets (77513). Then connect the Leg sets to the Angle Brackets using (4)
Connector bolts and (4) Connector nuts. Configuration should resemble Picture #1.
Step 3: Align the slots of the Leg Assembly to the pre-drilled holes of the top. Using the ¾” wood screws
provided, attach the leg assembly to the top. (Tip: Stagger the screws in the beginning. For example,
Fasten one screws on one of the legs, then another screw on the other leg. Continue to stagger the
screws until the assembly is attached to the top using all of the screws.
Step 4: Tighten the connector bolts and nuts to the channel, attached in Step 2, using both hex keys
provided.
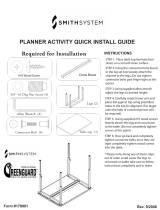
STEP 1: Place the top on a clean, dry
surface, laminate side down, so
that the predrill holes face up.
STEP 2: Loosely attach the support brace
to the angle brackets using (4)
connector bolts that were
provided with the angle
brackets (#77513). Then connect
the Leg sets to the Angle
Brackets using the (4) connector
bolts and (4) connector nuts.
(see drawing 1).
STEP 3: Align the slots of the Leg Assembly to the pre-drilled holes
of the top. Using the 3/4” wood screws provided, attach the
leg assembly to the top.
ASSEMBLY TIP: Stagger the
installation of the screws.
(i.e. fasten one screw on one
leg assembly - then move to
the other leg assembly and
fasten one screw - and then
back to the other leg
assembly and so forth)
STEP 4: Tighten the connector bolts and nuts to the channel, attached
in Step 2, using both hex keys provided.
ASSEMBLY INSTRUCTIONS
Form# 179746 www.smithsystem.com 08.17.2015

STEP 6: Use the help of at least one other person and turn the table over to the upright position.
STEP 5: Adjust the leg height as needed by loosening the set screw in the leg (use the hex key
to loosen). Tigthen the set screws. Hand tighten, using hex key provided - DO NOT use a
power tool to - ensure the set screw is inserted correctly into the height-adjustment hole.
For Assistance in assembling product, missing or damaged parts,
or to place an order, please contact customer service at 800-328-1061
You may also place your order online at
www.smithsystem.com
Form# 179746 04/2015
Step 5: Adjust the leg height as needed by loosening the set screw in the leg (use the hex key to loosen).
Tighten the set screws. Hand tighten, do not use power tool, to tighten set screw to ensure screw is
correctly located in the insert hole.
Step 6: Use the help of at least one other person and turn the table over to an upright position.
ASSEMBLY INSTRUCTIONS
Form# 179746 www.smithsystem.com 08.17.2015
/