Page is loading ...

Thank you for purchasing this HiB product.
Please read through these instructions carefully and refer back to them during installation to ensure that
your product is fitted safely and that it retains its high quality finish.
Please retain this leaflet for future reference.
Before drilling, ensure there are no hidden cables or pipes in the wall.
FI #03 013 R190520 Ver No. 1.0 July 2019
Aeon

2
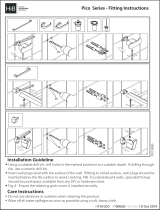
Fig. 1
Fig. 2
Fig. 3
Fig. 5
Fig. 4
Fig. 6
1
2
x4
Fig. 8
Fig. 7
x4

hib.co.uk 3
Aeon Vanity Units
1. Due to the combined weight of the product, an assessment of the wall structure should be made to determine if
it is sufficiently stable to mount the furniture. It is recommended that this furniture is installed to a solid masonry
wall - but where this is not possible, it is recommended that stud walls are sufficiently reinforced.
2. Aeon vanity units can be installed either standalone or two units can be joined together to create a larger run of
furniture. Follow steps 3 to 5 if you have purchased two Aeon vanity units to join together, otherwise proceed to
step 6 for installation of a single Aeon Vanity Unit.
3. Carefully unpack and place both vanity units down onto a flat and level surface. It may make installation easier by
removing the drawers at this point - see fig. 5.
4. Position both units next to each other so that they line up correctly, then secure them together with clamps.
Drill four evenly spaced holes right through the carcass sides to be connected. To prevent any break-out when
drilling, a sacrificial piece of wood can be secured over the exit location of the drill before drilling. Secure
together with the connecting bolts provided (Fig. 1).
5. When the two units are joined securely with the connecting bolts, remove the clamps and proceed with the
installation as follows;
6. Position the unit in a suitable location. Carefully mark the desired position of the unit using a so pencil.
7. Using a spirit level, mark a horizontal line below the pencil mark, taking into account the location of the furniture
hangers. Place brackets on the pencil line paying attention to the distance between the furniture hangers.
Carefully mark the position of the holes using a so pencil. (Fig. 2 & 3).
8. Before drilling, ensure there are no hidden cables or pipes behind the mounting points. Using a
suitable drill bit, drill holes in the marked positions to a suitable depth.
9. Insert wall plugs level with the surface of the wall. If fitting to a tiled surface, wall plugs should be inserted
below the tile surface to avoid cracking. NB. For plasterboard walls, specialist heavy duty fixings should be
purchased from any DIY or hardware store.
10. Fix the brackets to the wall using the screws provided (Fig. 2 & 3).
11. Hang the furniture unit, ensuring the claws on the hangers are securely located into the wall brackets. Using a
spirit level, make the unit level by adjusting the screws on the hangers (Fig. 4). Once level, tighten the bottom
screw until the unit is secure against the wall.
12. If necessary, the drawer runners can be adjusted in order to realign the drawer front. Ensure the securing screw
on the underside of the drawer runner is removed before adjusting the drawer runner and the screw is re
secured when adjustments have been completed. (Fig. 5).
13. With the furniture unit in place, unpack the framework and present it to the underside of the furniture, ensuring
the wall fixing holes are against the wall, not facing forwards.
14. Carefully mark the wall through the two fixing holes, before removing the framework again.
15. Before drilling, ensure there are no hidden cables or pipes behind the mounting points. Using a
suitable drill bit, drill holes in the marked positions to a suitable depth.
16. Insert wall plugs level with the surface of the wall. If fitting to a tiled surface, wall plugs should be inserted
below the tile surface to avoid cracking. NB. For plasterboard walls, specialist heavy duty fixings should be
purchased from any DIY or hardware store.
17. Fix the framework to the wall.
18. Use the four screws provided to then secure the framework to the underside of the furniture. An angled driver bit
may help this installation step.
19. Lastly, mount the basin onto the furniture unit using a fine bead of silicone to seal the washbasin to the unit and
wall edges. If required, for extra security the basin can be secured to the wall using the wall bolts provided with
the basin.

©HiB Copyright: No part of this document may be reprinted or duplicated without HiB consent. All sizes and measurements are approximate, but we do try and
make sure they are as accurate as possible. In the interest of continuous product development, HiB reserves the right to alter specifications as necessary. E & OE.
T: +44 (0)20 8441 0352 F: +44 (0)20 8441 0219 E: [email protected].uk hibnovum.co.uk
Building 3, North London Business Park, Oakleigh Road South, New Southgate, London. N11 1GN
Cleaning
To preserve the high quality finish of your HiB product, please ensure you regard the following care
and cleaning recommendations:
• Use only a so damp cloth.
• Wipe off all water spillages as soon as possible
• DO NOT USE any abrasives or solvents.
Aercare Service
In the unlikely event that this product should fail please contact the retailer from which the item was
purchased.
Furniture Removal
The Aeon furniture range is installed with safety locking wall brackets
These wall brackets securely hold the furniture in place once installed and prevent any possibility of the
furniture being lied off the wall.
If at any point the furniture needs to be removed from the wall - a pointed object such as a screwdriver
should be inserted into the wall bracket as shown in Fig. 9 below, and the furniture lied out of the wall
bracket.
Fig. 9
/