Page is loading ...

Fitting Instructions
Thank you for purchasing this HiB product.
Please read through these instructions carefully and refer back to
them during installation to ensure that your product is fitted safely
and that it retains its high quality finish.
ETHER
Ether 50: Art No 50500
Ether 60: Art No 50600
Ether 80: Art No 50700
FI#02 020 R211013 Ver No. 2.1 Oct 2021

2
Electrical Safety Information
Warnings for Safe Use
HiB recommends that all electrical bathroom products must be installed
in accordance with current building and wiring regulations.
If in doubt please contact an electrician.
Before drilling ensure that there are no hidden cables or pipes in the wall.
• This product is intended for Domestic Use only.
• Please read the instructions and warnings carefully before installing the
product and ensure this document is kept with the product for future
reference to ensure product longevity and in the interest of safety.
• If you give the product to another person, please give them this manual as
well.
• If any modification is made it will invalidate the warranty and may render the
product unsafe.
• This product is IP44 rated and suitable for installation in Zones 2 and Outside
Zones according to the IEEE regulations.
• It is not suitable for use in saunas, steam rooms and shower cubicles.
• Appropriate circuit protection should be available for the product.
• When drilling use appropriate eye protection.
• The use of a Residual Current Device (RCD) is advised for any power tools used
during the installation of this product.
• Take suitable precautions when handling glass.
• Beware of hidden cables or pipes. Take care if drilling on tiled surfaces in case
the drill slips.
• Always switch off the electrical supply to the product at the mains during
installation and maintenance.
• It is recommended that this product is installed by a person who is able to
meet the level of competence required in order to comply with relevant
regulations. If in doubt consult a qualified tradesperson.
• Do not enter IP44 box unless competent and item is isolated from mains.
• Do not use if glass is broken or unsafe.
• Do not use if any electrical wires appear damaged or degraded.
• Do not overload shelves or unit.
• This product is designed for installation into a brick or masonry block wall,
if mounting onto other substrate ensure appropriate fixing and batons (if
required) are used and the load bearing of the wall is sufficient.
• It is recommended that this product is installed by two people.
• Dispose of packaging in accordance to local authority regulations.
• At end of life dispose of item according to local authority regulations.

3
hib.co.uk
Electrical Information
All installations must comply
with guidelines which are
based on a zonal concept
and must be followed to
ensure the safe installation of
electrical appliances in the
bathroom.
These regulations apply to
domestic installations only.
Installations must be made in
accordance with the current
IEE wiring regulations and
relevant building regulations.
This product is IP44 rated and is suitable for installation in zones: 2 & Outside Zone
Wiring Diagram
Fig 1. - Zonal Diagram
What’s in the Box?
• Ether Cabinet
• Glass shelves
• Mounting bracket
• Fittings pack
live
earth
neutral
MAINS SUPPLY
LUMINAIRE
Live supply can be Red or Brown
Earth supply is Green and Yellow
Neutral supply can be Blue or Black
Live is Brown
Earth is Green and Yellow
Neutral is Blue
This product contains a light source of energy efficiency class E

4
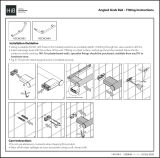
Tools Required
Figures
Pencil Spirit Level Drill Drill bit Screwdriver
Fig. 2. - Mounting Bracket
Fig. 3. - Mounting Point Fig. 4. - Internal fixing point

5
hib.co.uk
Adjustment
Fig. 5. - Shelf Bracket Adjustment

6
Installation
Before installation, ensure the domestic electrical mains supply to which the
cabinet is to be connected is turned off. Before drilling, ensure that there are
no hidden cables or pipes in the wall.
It is recommended that this product is installed by two people.
1. Position the cabinet in a suitable location, according to the zonal diagram on page 3, Fig.
1, ensuring that the mains supply cable is within reach of the cable connection point of the
cabinet.
2. Carefully mark the desired position of the top of the cabinet on the wall using a so pencil.
3. Remove the cabinet from the wall and using a spirit level, mark a horizontal line 40mm
below the pencil mark. Hold the mounting bracket in place with the holes corresponding
with the marked line. Ensure the bracket is central, and mark the position of the holes, see
Fig. 2.
4. Before drilling, ensure there are no hidden cables or pipes behind the mounting
points. Drill the required holes in the marked positions. If drilling through tile, use a ceramic
drill bit. Insert the wall plugs level with the surface of the wall. If fitting to a tiled surface, wall
plugs should be inserted below the tile surface to avoid cracking. NB. For plasterboard
walls, specialist fixings should be purchased, available from any DIY or hardware
store. Fix the bracket to the wall using the screws provided.
5. Temporarily hang the cabinet on the top bracket, see Fig.3, and mark the position of the
bottom mounting hole on the wall using a so pencil, then remove the cabinet from the
wall, see Fig. 4.
6. Drill a hole in the wall where you have marked with the so pencil. Insert a wall plug level
with the surface of the wall as per step 4.
7. Ensure the domestic electrical mains supply to which the product is being connected
is turned off. Connect the domestic mains supply according to the wiring diagram on page
3.
8. When the product is wired correctly, hang the cabinet on the top bracket, Fig. 3, and secure
the cabinet with a screw through the bottom mounting hole, see Fig. 4. Take care not to
overtighten the screw against the mirror glass, the screw is not load bearing - It is only
intended to prevent the cabinet from moving away from the wall.
9. When the cabinet is correctly fitted, adjust the shelf support brackets to your desired height
ensuring the matching brackets are level. This is done by slightly loosening the screw, do
not remove the screw completely. Once in position tighten screw to secure the bracket and
put the glass shelf into the shelf support bracket, see Fig. 5.
NB. Cabinets must be installed with a minimum distance of 150mm between the
infra-red sensor switch and any adjacent wall or object to ensure correct operation
of the sensor.

7
hib.co.uk
To switch on/off
1. Wave hand past the sensor switch
underneath the right hand side of the
cabinet, see Fig. 6.
2. Heated pad is on when the cabinet
is illuminated.
Charging Socket(s) and USB
Charger socket(s) are suitable for charging
and powering electric razors, trimmers and
toothbrushes. Some cabinets may contain
multiple charging sockets. NB. On first use
of the charger socket, inserting the plug may
prove to be stiff. Reasonable force may be
required to fully insert the plug. Aer a few
uses, stiffness will ease and the socket will
function as normal.
Operation
Fig. 6. - Switch operation

Care
Aftercare
In the unlikely event that this product should fail please contact the retailer
from which the item was purchased.
To preserve the high quality finish of your HiB product, please ensure you
regard the following care and cleaning recommendations:
• Avoid leaving excessive standing and surface water on the product for
prolonged periods of time.
• Clean the product with water and a so cloth, a mild detergent may be
used if required. Ensure any excess moisture is removed aer use.
• Do not use abrasive sponges or cleaning agents.
WEEE compliance
Must not be mixed with
general household waste
©HiB Copyright: No part of this document may be reprinted or duplicated without HiB consent. All sizes and measurements are approximate, but we do try
and make sure they are as accurate as possible. In the interest of continuous product development, HiB reserves the right to alter specifications as necessary.
E & OE.
T: +44 (0)20 8441 0352 F: +44 (0)20 8441 0219 E: [email protected].uk hib.co.uk
Building 3, North London Business Park, Oakleigh Road South, New Southgate, London. N11 1GN
/