Page is loading ...

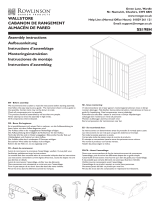
Assembly Instructions
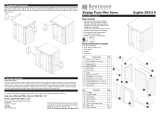
Ryton 8’x6’
Octagonal Summerhouse English SS024T
Before assembly
• We recommend that time is taken to read
the instructions before starting assembly,
then follow the easy step by step guide.
The instruction sheet is only a guide to the
assembly. Certain items may not be shown
to scale.
• Check all components prior to assembly
• This product should be assembled by no less
than two people
• Drill all components where indicated
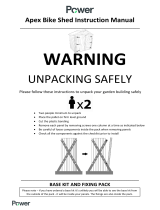
x 2 Drill Gloves
Recommended tools for assembly
• Power Drill/Screwdriver
• Crosshead drill bit
• 3mm diameter drill bit
• 12mm diameter drill bit
• Hammer
• Sharp knife
• Spirit level
• Silicon sealant
• Step ladder
• Hacksaw
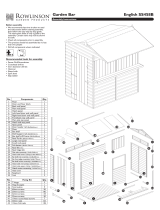
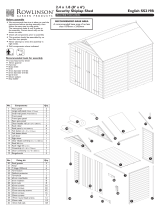
No. Components Qty.
1 Floor 1
2 Back wall panel 1
3 Plain wall panel 2
4 Small window panel 4
5 Door panel 1
6 Left door (Catch plate rebate) 1
7 Right door (Lock rebate) 1
8 Window frame 4
9 Roof centre block 1
10 Large roof panel 2
11 Small roof panel 6
12 Roofing felt roll (5m) 2
13 Roof cap (640mm) 1
14 Inside roof cover (670mm) 1
15 Acorn finial 2
16 Short bargeboard 6
17 Long bargeboard 2
18 Corner coverstrip 16
19 Window glazing (372x 263mm) 24
20 Door glazing (372x 190mm) 16
21 Window panel coverstrip (35x38x1200mm) 8
22 Window/door beading (15 x 15 x 345mm) 80
23 Window beading (15 x 15 x 270mm) 48
24 Door beading (15 x 15 x 195mm) 32
No. Fixing Kit Qty.
25 Door lock and catch plate set 1
26 Door handle kit 1
27 Door handle spindle 1
28 Door hinge 300mm (12”) 4
29 Door hinge 75mm (3”) 2
30 Tower bolt 2
31 Window hinge 8
32 Window stay (black) 4
33 63mm screws 78
34 50mm screws 28
35 25mm screws 40
36 25mm black screws 80
37 25mm brass screws 4
38 20mm screws 16
39 19mm roundhead screws 8
40 30mm nails 88
41 25mm panel pins 400
42 10mm Felt nails 220
Caution
This product
contains glass.
Wear protective
work gloves while
handling these
components.
Dimensions:
For information on
building dimensions
please see back page.
15
6
2
8
9
10
12
11
3
13
4
7
15
14
16
18
19
20
21
22
23
24
26
27
28
29
30
31
32
25
17

To VALIDATE the guarantee, this item should be erected on
50mm x 50mm treated wooden or similar bearers (These are
not supplied with the kit.) Ground contact must be avoided.
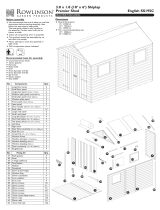
1. Floor
Prepare a level area for the summerhouse. Place the floor in to position and ensure level.
2. Doors
Lay the door panel on the floor. Position the doors in the opening, ensure the right-hand door has the holes for the door handle and lock is positioned on the right-hand side.
With the doors evenly spaced around the edge and between each door, secure the hinges in the positions shown below using 9 x 25mm black screws for the 300mm hinge
and 6 x 25mm black screws for the 75mm hinge.
3. Opening Window
Lay the window panel on the floor. Fit the hinges in the rebates on the short edge of the window frame as shown in the diagram using 2 x 20mm screws per hinge, stand the
hinge end of the window on the window panel, making sure it is centred at the top of the window opening. Open the hinges and secure them to the window panel frame
using 5 x 25mm screws per hinge. On the inside of the window panel fit the window stay and its two posts using 6 x 25mm screws as shown in the diagram.
4. Glazing
Glazing the windows can be done once the building is assembled. However, it may be easier to install the glass whilst the panels are laid flat on the ground. Working on one
panel at a time lay each door and window panel flat. Apply a very small bead of waterproof silicon sealant around each glazing rebate. Carefully place a window pane into
each rebate. Secure each pane in place by pinning the window beading into position using 2 x 25mm panel pins per horizontal bead and 3 x 25mm panel pins per vertical bead.
Repeat for each pane of glass for all windows and doors.
Important:
Ensure the door panel
is the right way up and
the right-hand door
(with the holes for door
handle and lock) is fitted
to the right-hand side.
300mm hinges
300mm hinges
75mm hinges
Window frame
Window pane
Wooden beading
25mm
3 x 25mm panel pins per vertical bead
2 x 25mm panel pins per horizontal bead.
Wear protective
gloves while
handling the glazing.
Caution Gloves
25mm
Black
25mm
Black
20mm
25mm
25mm
25mm
Black

5. Wall panels
Position a plain wall panel and a window panel on the floor as shown in the first diagram. Note how the panel frames sit on the floor with the panel cladding overhanging the
floor edge. Ensure square and secure using 4 x 63mm screws, screw through the frame of the window panel into the frame of the plain panel. Align the back panel next to
the plain panel and secure in the same way using 4 x 63mm screws. Continue to add the rest of the panels in the same way.
6. Door handle & tower bolts
Push the door lock into the rebate on the edge of the right-hand door as shown and secure using 2 x 25mm brass screws. To fit the metal door handle, it first maybe necessary
to cut the spindle bar down to 88mm. Push the spindle bar through the door latch mechanism. Fit a door handle to the metal spindle bar on each side of the door and secure
them in place using 4 x 25mm black countersunk screws per handle. On the other door fit the lock plate using 2 x 25mm brass screws. Attach the tower bolts to the inside
of the left door as shown using 4 x 19mm round head screws per bolt. Mark where the tower bolts touch the top and bottom door frame and drill a 12mm diameter hole
for each bolt.
It is recommended to drill pilot holes with a 3mm drill
bit for all screws in this section.
Panel cladding
overhangs floor edge
Panel frames rest
on the floor
Important
When attaching the door panel
ensure that the screws are
screwed though the window
panel into the door panel.
Lock catch
plate
Drill
Mark where the tower bolts touch the
top and bottom door frame and drill a
12mm diameter hole for each bolt.
12mm
Spindle may need to
be cut to 88mm
Drill
3mm
Door panel
Window panel
Window panel
Window panel
Window panel
63mm
63mm
19mm
25mm
Black
25mm
Brass
25mm
Brass

9. Roof panels
Lift a large roof panel onto the back of the building and a small roof panel on next to it. Ensure they are resting evenly next to each other and secure together through the
panel frames using 2 x 63mm screws. So that adjustments can be made do not fully tighten these screws until all roof panels are in place. Have a second person holding the
panels up while working round the roof adding the remaining panels. With all the roof panels in position and adjusted as necessary, fully tighten the screws. Attach the roof
panels to the walls using 2 x 63mm screws per panel, screw though the roof panel frame into the top frame of the wall panel.
It is recommended to drill pilot holes with a
3mm drill bit for all screws in this section.
Drill
3mm
7. Walls to floor
With all the wall panels in position, check they are all sitting square on the floor and secure to the floor using 1 x 63mm screws for each small panel and 2 x 63mm screws
for the larger back and door panels, screw through the wall panel frame and into the floor.
8. Window coverstrips
To each window panel attach two window coverstrip. On the inside, position the strip as shown and secure to the panel frame using 2 x 50mm screws per strip.
Panel frame
Floor
63mm
63mm
63mm
63mm
50mm

10. Roof felt
Unroll a roll of felt, carefully measure and cut out the six triangular shape pieces as shown in the first diagram below. For the second roll of felt carefully measure and cut out
the left and right-handed triangular pieces as per the second diagram below.
11. Fitting roof felt
Over a small roof panel lay a triangular felt piece. Align the left-hand felt edge with the edge of the roof panel. Along the bottom edge allow enough felt to fold over and cover
the felt batten. The right-hand edge should overlap the next panel round. Once in position secure down the left edge using 4 x 10mm felt nails evenly spaced. Roll back the
right-hand edge of the felt and attach another piece of felt in the same way as the first to the next panel round. Roll back into position the first felt. Repeat this for all the small
roof panels and in the same way on the left side of each large roof panel with the large left-hand felt piece. Position a right-hand large felt on the right side of each large roof
panel, ensure it overlaps the felt pieces either side and secure down one edge using 10 x 10mm felt nails evenly spaced. For each piece of felt, tension across the roof and
secure down the edge using 10 x 10mm felt nails evenly space. Fold down the bottom edge of the felt and secure to the felt batten using 5 x 10mm felt nails per felt piece
evenly spaced. If necessary trim of any excess felt along the bottom edge.
roll back
first felt
piece.
1200mm
162mm 838mm
1280mm 1280mm 1280mm 312 mm
1280mm312mm 1280mm 1280mm
60mm 940mm
1150mm
1150mm
1150mm 1150mm 1150 mm1150mm
895 mm
940mm 940mm
515mm 515mm
x6
x2 x2
515mm
515mm
ROll 1 — Triangular felt pieces
ROll 2 — Left and right hand felt pieces
10mm
Felt
Nails
10mm
Felt
Nails
10mm
Felt
Nails
10mm
Felt
Nails
10mm
Felt
Nails
10mm
Felt
Nails
10mm
Felt
Nails

Important information - retain for future reference
Shiplap buildings come ready stained but this is only a preparatory treatment. To VALIDATE the guarantee, the building must be properly treated with a recognised external
wood preserver WITHIN 3 MONTHS of assembly and RE-TREATED ANNUALLY thereafter. The building must also be erected on 50mm x 50mm treated wooden or
similar bearers (These are not supplied with the kit.) Ground contact must be avoided.
Timber Information.
As timber is a natural material, there are certain weather conditions that may affect the materials properties. In times of excessive dry spells the material may lose some of its
internal moisture causing a certain degree of shrinkage on a panel and in periods of excessive rain there will be a certain amount of swelling throughout the wooden panels.
This process can not be avoided. If you have problems with certain boards shrinking in dry spells try to decrease the amount of direct sunlight on the building or the amount
of air passing over the building. During hot spells spray water directly onto the panels with the aid of a garden hose.
If in doubt of any aspect regarding the assembly, use or safety of your summerhouse please contact us:
Help Line: (Normal Office Hours) 01829 261 121
Email: support@rowgar.co.uk
ROWLINSON GARDEN PRODUCTS LIMITED
Green Lane
Wardle Nr. Nantwich
Cheshire
CW5 6BN
www.rowgar.co.uk
We constantly improve the quality of our products,
occasionally the components may differ from the
components shown and are only correct at time
of printing. We reserve the right to change the
specification of our products without prior notice.
2018 © Rowlinson Garden Products Ltd
12. Bargeboard, finials and coverstrips
The two acorn finials centres are positioned about 90mm from the ends of the Roof cap. Secure the finials using 2 x 63mm screws per acorn. Position the roof cap centrally
on the roof centre block and secure using 6 x 50mm screws, screw through the roof cap into the block. Place the finial assembly onto the roof so that the roof centre block
fits in the hole. From inside the building attach the inside roof cover to the centre block using 6 x 50mm screws. Around the edge of the roof secure the bargeboards, ensure
the top edge of the bargeboards are flush to the roof line and secure each board using 3 x 30mm nails.
Dimensions
2460mm
(8’1”)
1945mm
(6’4.5”)
1920 mm
(6’3.5”)
2325 mm
(7’7.5”)
2480 mm
(8’1.5”)
2325mm
(7’7.5”)
1800mm
(5’11”)
Footprint Dimensions
1270mm
745mm
1800mm
2325mm
Minimum base size:
W= 2425mm
D= 1900mm
Door opening:
H= 1780mm
W= 1075mm
Finial centres are 90mm in
from the ends of the top cap
Place the finial assembly onto the
roof so that the roof centre block
fits in the hole.
Attach the roof inside cover to the
centre block.
50mm
63mm
30mm
30mm
30mm
30mm
30mm
50mm
/