Page is loading ...

User Guide
Mountbatten Learning System
Revision 2
© Harpo Sp. z o. o.
ul. 27 Grudnia 7, 61-737 Poznań, Poland
www.mountbattenbrailler.com

Thank you for purchasing a Mountbatten Learning System. Since 1990, the
Mountbatten range of Braille Writers has been offering expanded Braille
writing opportunities to people all around the world. Mountbatten Braille
Writers are in use in countries all over the world, bringing and supporting
Braille literacy in many languages.
To get the most from your new MB-LS, please read the first section,
Welcome, carefully, and follow it with the second section, Exploring the MB-
LS. After that, you can skip to the sections you want to read first, because you
will have the most important basic information.
News, resources, regular updates to this User Guide and a range of support
material can be obtained from the Mountbatten website:
www.mountbattenbrailler.com
This device complies with Part 15 of the FCC Rules. Operation is subject to the following
two conditions: (1) this device may not cause harmful interference, and (2) this device
must accept any interference received, including interference that may cause undesired
operation.

Contents
Welcome................................................................................................................................................................ 1
Reading your User Guide.................................................................................................................................. 1
Very Important!.................................................................................................................................................. 1
What can your Mountbatten Learning System do?............................................................................................1
Exploring the MB-LS.............................................................................................................................................. 3
What’s inside the box?....................................................................................................................................... 3
Removing the Shipping Lock.............................................................................................................................3
The Keyboard.................................................................................................................................................... 4
The Embossing Area......................................................................................................................................... 5
The Left Hand Side............................................................................................................................................ 7
The Right Hand Side......................................................................................................................................... 8
The Back of the MB........................................................................................................................................... 8
Loading Paper................................................................................................................................................... 9
Removing Paper.............................................................................................................................................. 10
Writing Braille....................................................................................................................................................... 11
Erasing and Correction....................................................................................................................................12
How to Move Around the Page........................................................................................................................ 12
Formatting Your Braille....................................................................................................................................13
Braille Writing Commands............................................................................................................................... 16
Embossing Speed........................................................................................................................................... 17
Using Commands................................................................................................................................................ 18
Turning the Command Key On and Off............................................................................................................18
Entering Commands........................................................................................................................................18
Chorded commands........................................................................................................................................ 19
Help Command and Options...........................................................................................................................20
Spoken or Embossed Output for Reports........................................................................................................21
Miscellaneous Commands............................................................................................................................... 21
Commands in Files or from the PC Keyboard.................................................................................................21
Essential Extras................................................................................................................................................... 23
Writing Braille Files in Memory........................................................................................................................23
Writing Braille on Heavy Card, Plastic film or Labels.......................................................................................24
Writing Braille on Small Paper.........................................................................................................................24
Using different weights of paper...................................................................................................................... 24
Embossing Speed........................................................................................................................................... 25
Speech................................................................................................................................................................. 26
Recorded Speech............................................................................................................................................ 26
No Speech....................................................................................................................................................... 26
Synthesised Speech........................................................................................................................................26
Controlling Synthesised Speech...................................................................................................................... 27
Reports and Listings - how Speech Settings affect them.................................................................................28
Nemeth Mode.................................................................................................................................................. 29
International Characters.................................................................................................................................. 30
Learn and Advanced Mode..................................................................................................................................31
Switching between Learn and Advanced Mode...............................................................................................31
In Learn Mode:................................................................................................................................................ 31
In Advanced Mode:.......................................................................................................................................... 31
Adding the Mimic and a Keyboard.......................................................................................................................33
The Mimic Display........................................................................................................................................... 33
PC Keyboard................................................................................................................................................... 34
Braille Chat.......................................................................................................................................................... 35
Conversations using Forward and Back Translation in Turn............................................................................35
Braille Translation................................................................................................................................................ 36
Very Important!................................................................................................................................................ 36
Braille Code..................................................................................................................................................... 36
International Characters.................................................................................................................................. 37
Universal Braille Settings.................................................................................................................................37
Forward Translation: Converting Print to Braille...................................................................................................38
Using a PC Keyboard......................................................................................................................................38
Forward Translation of a file from the PC........................................................................................................39
i

Forward Translation Commands......................................................................................................................41
Some Forward Translation Examples..............................................................................................................45
Saving Your Preferred Settings........................................................................................................................47
Back Translation: Converting Braille to Print........................................................................................................48
Special note about the Mimic...........................................................................................................................48
Turning Back Translation On........................................................................................................................... 48
How Back Translation Operates......................................................................................................................49
Formatting the Printed Output......................................................................................................................... 49
Formatting Your Print Page.............................................................................................................................. 50
Selecting a Printer........................................................................................................................................... 52
Embedding Commands in a File to be Back Translated..................................................................................52
Braille Translation – Using APH Patterns.............................................................................................................54
Before using Patterns......................................................................................................................................54
Using a Single Pattern Group..........................................................................................................................54
Using Multiple Pattern Groups.........................................................................................................................54
More Patterns Options.....................................................................................................................................55
Patterns Curriculum for Reading and Writing Instruction.................................................................................55
Adding Braille Rules............................................................................................................................................. 56
Adding Extra Rules to the MB-LS with an Exception Table..............................................................................56
Braille Exception Table Commands.................................................................................................................56
Exception Table Examples...............................................................................................................................56
Connecting your MB-LS.......................................................................................................................................57
Installing MB-Comm........................................................................................................................................ 57
Using MB-Comm............................................................................................................................................. 58
Starting MB-Comm and Connecting the MB-LS..............................................................................................58
Embossing a file using MB-Comm...................................................................................................................59
The MB-LS as a Personal Embosser...................................................................................................................61
Using the MB-LS with Braille Translation Software..........................................................................................61
Embossing from Word, OpenOffice or Notepad with MB-Comm.....................................................................64
Making Braille Graphics....................................................................................................................................... 65
Graphics Mode................................................................................................................................................ 65
Graphics from the Keyboard............................................................................................................................65
Embossing Graphics from the Computer.........................................................................................................66
Clock, Calendar and Diary................................................................................................................................... 67
Setting the Time and Date...............................................................................................................................67
Checking the time............................................................................................................................................ 67
Hourly Time Announcements........................................................................................................................... 68
Alarm .............................................................................................................................................................. 68
Stopwatch and Countdown Timer....................................................................................................................68
Calendar.......................................................................................................................................................... 69
The Diary......................................................................................................................................................... 70
Clock, Calendar and Diary Status Menu..........................................................................................................71
The Calculator...................................................................................................................................................... 72
The Options Menu........................................................................................................................................... 72
To use the Scientific Calculator:.......................................................................................................................72
To use the Simple Calculator:..........................................................................................................................72
Using the Calculator........................................................................................................................................ 72
Getting Started................................................................................................................................................ 73
Setting the Precision level...............................................................................................................................74
Setting the Number of Decimal Places............................................................................................................74
Embossing Calculation Results.......................................................................................................................75
Calculations in the Editor................................................................................................................................. 75
Performing Percentage Calculations...............................................................................................................75
Calculating a Square Root...............................................................................................................................75
Storing your results and using Memory Locations...........................................................................................75
Complex Functions .........................................................................................................................................77
Scientific Calculator Command Summary.......................................................................................................80
The Editor............................................................................................................................................................ 82
Getting Started................................................................................................................................................ 82
Getting Help..................................................................................................................................................... 83
Moving Around and Reading in A File.............................................................................................................83
Editor Commands............................................................................................................................................ 84
ii

The Editor Menus............................................................................................................................................ 84
Editor Definitions and Concepts...................................................................................................................... 90
Braille Music on the MB-LS.................................................................................................................................. 92
Step 1: Music Fun Mode.................................................................................................................................. 92
Step 2: Music Play Mode.................................................................................................................................93
Step 3: The Music Editor................................................................................................................................. 94
Using the Music Editor Menus.........................................................................................................................96
Embossing Your Music File.............................................................................................................................. 97
Music Mode – Tables, Usage and Examples...................................................................................................97
Braille Codes and Languages............................................................................................................................ 103
How to change between languages...............................................................................................................103
Changing the default language......................................................................................................................103
How to Insert International Characters into Your Text....................................................................................104
Using Dropped or Lower Numbers................................................................................................................104
Using ASCII or Computer Braille...................................................................................................................104
Modifying and Adapting the MB-LS Keyboard...................................................................................................106
One-Handed Braille Writing........................................................................................................................... 106
Changing the Dot Key Layout........................................................................................................................106
Special Keyboards.........................................................................................................................................108
Saving and Restoring Settings........................................................................................................................... 109
Care and Troubleshooting Guide.......................................................................................................................112
Power............................................................................................................................................................. 112
How to Check the Battery.............................................................................................................................. 112
Status and Operation Error Messages...........................................................................................................112
Procedure to Reset the MB-LS...................................................................................................................... 114
If you have to return your MB-LS for service:.................................................................................................114
Battery Care................................................................................................................................................... 115
Resources for Users, Parents and Teachers......................................................................................................117
Posture and Seating...................................................................................................................................... 117
Other Resources............................................................................................................................................ 117
Updates to this User Guide............................................................................................................................117
User Guide Index............................................................................................................................................... 118
User Guide Illustrations
The Mountbatten Learning System........................................................................................................................1
The MB-LS Shipping Lock..................................................................................................................................... 3
The MB-LS with paper bail installed.......................................................................................................................4
The MB-LS keyboard with labels........................................................................................................................... 4
The top of the MB-LS, cover off, with the Embossing Area labelled.......................................................................6
The left side of the MB-LS, showing the sockets and speaker grille......................................................................7
The right side of the MB-LS, showing the ports.....................................................................................................8
The rear of the MB-LS, showing the ports.............................................................................................................8
The three steps for loading paper into the MB-LS..................................................................................................9
Loading paper from the back of the MB-LS...........................................................................................................9
The command activation keystroke......................................................................................................................11
The three steps to enter a regular command.......................................................................................................12
The command activation keystroke......................................................................................................................18
The three steps to entering a command..............................................................................................................18
PC keyboard showing the PS/2 connector...........................................................................................................34
The two translation directions.............................................................................................................................. 36
Comparison of normal spacing and Graphics Mode spacing...............................................................................65
Moving left in the Editor....................................................................................................................................... 83
Moving right in the Editor..................................................................................................................................... 83
Speaking without moving in the Editor.................................................................................................................83
The MB-LS keyboard in Music Fun Mode............................................................................................................92
Moving left in the Music Editor............................................................................................................................. 95
Moving right in the Music Editor...........................................................................................................................95
Speaking without moving in the Music Editor.......................................................................................................95
The battery-check keystroke.............................................................................................................................. 112
iii

Welcome
We'd like to welcome you to the global society of Mountbatten users, and to introduce you to
your Mountbatten Braille Writer Learning System (MB-LS).
We have designed the MB-LS to be used by children learning Braille. We hope that you will
find it a fun and inclusive introduction to Braille literacy, providing a solid foundation for a
lifetime of learning, and that you will enjoy using the MB-LS for the very first stages of Braille
instruction, and then through to secondary school and beyond.
Reading your User Guide
Read this section to find about the MB-LS, the things it does,
and where to find information in this User Guide. When you are
more familiar with the features, the Contents or Index gives you
an easy way to find the information you want; and we have
added a Reference Section at the end for quick lookups.
The first section, Exploring the MB-LS, is to read while you open the box and look through
the contents, and while you explore the outside of the MB-LS and become familiar with the
keyboard, the connection ports and loading paper.
Very Important!
You MUST remove the shipping lock before switching your MB-LS on. If you don't, the MB-
LS could be damaged. The next section, Exploring the MB-LS, shows how to do that.
What can your Mountbatten Learning System do?
•MB-LS is a Braille Writer, with lots of added extras like erase and correct, formatting and
more. To find out all these things, check the section Writing Braille.
•MB-LS has two Modes. Learn Mode is for the very new user, and gives you access to
only some of the features. Advanced Mode gives access to absolutely everything. To find
out the differences, read the section Learn and Advanced Mode.
•The MB-LS speech output helps you to remember each new character learned, and it will
also let a new Braille user make discoveries about new characters. Try it!
•To find out about the different kinds of speech available, and how to control speech
to get the output you want, see the section Speech.
•You can use the MB-LS with other people, even if they don't know Braille; they can type
on a regular keyboard, and the MB-LS will convert their typing into Braille. And the Mimic
Display will show them the text version of the Braille you write on the Braille keyboard.
•To find out about using the Mimic Display or a regular keyboard with the MB-LS, see
the section Adding the Mimic and a Keyboard.
•To find out about using the MB-LS with Mimic and keyboard so that two students
can work together, see the section Braille Chat.
•To find out about activating translation, so that the text typed on the regular
keyboard will make proper Braille, see the section Forward Translation.
•If you're working your way through Grade 2 Braille in English, you can use the APH
Patterns Series; then the Mountbatten can print your worksheets and documents from the
computer with the right combination of Grade 1 and Grade 2, When other people type on
the PC keyboard, the Braille will come out in the right translation too.
User Guide 1
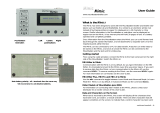
Illustration 1: The Mountbatten
Learning System

•See the section Braille Translation - APH Patterns for information on how to turn
the different Patterns levels on and off, and check the Reference Section for the
complete list of Patterns levels.
•If you need to use a different series of steps to move from Grade 1 to Grade 2, for
instance in a language other than English, you can add to the MB-LS inbuilt Braille rules
using an Exception Table. See the section Adding Braille Rules for more information on
how to use this feature.
•You can use the MB-LS to make patterns and pictures, and play Braille-learning games
that also help with computer skills.
•For the MB-LS Graphics Mode, and to get started with pictures and patterns,
see the section Making Braille Graphics.
•Contact us for more graphics, both for drawing and for embossing, by visiting
the MB-LS website, www.mountbattenbrailler.com.
•You can use the MB-LS in different languages. For language students, this can be very
helpful! See the section Braille Codes and Languages for more.
•The MB-LS has features for users who need adapted keyboard access; it can also act as
a communication device for people who have both hearing and vision impairments. See
the section Braille Chat as well as Modifying and Adapting the MB-LS Keyboard and
Connecting your MB-LS for more information.
•You can also use the MB-LS as a Braille printer. A text file can be sent to the MB-LS from
the computer, and the MB-LS can translate it to Braille, format it and emboss it. You can
also use Duxbury Braille Translator with the MB-LS.
•See the section The MB-LS as a Personal Embosser for more information.
•In fact, you can do all sorts of things when the MB-LS is connected to a computer, or a
printer. See the section Connecting your MB-LS for ideas.
•The MB-LS has an on-board clock and calendar, with an alarm function; there's also an
appointment diary, so the MB-LS can remind you about everything from tasks to
birthdays. See the section Clock, Calendar and Diary for how to use these features.
•The MB-LS has a full-featured Editor for writing and editing files; see the section The
Editor for all the information about how to use your MB-LS as a word processor.
•You can write into the Editor, and not emboss until later; you can come back and make
changes, and save them again, and still not emboss until you're ready. So you can use
the MB-LS in a classroom without the noise of Braille disturbing other people. See the
section Essential Extras for more information on controlling embossing on your MB-LS.
•The MB-LS has two Calculators: a simple Calculator for arithmetic and a full Scientific
Calculator. They can both be used from inside the Editor, and you can copy and paste
calculations into your documents. See the Calculator section for more information.
•The MB-LS is a great tool for early learners of Braille music. There are three modes, from
the very beginnings to producing a simple Braille music score.
•See the section Braille Music on the MB-LS for the ways to use these features.
•For quick lookups, there's a Reference Section, and both the User Guide and Reference
Section have an Index.
We Welcome Your Feedback!
Your feedback is very important to us! Please contact your distributor with any comments or
questions, and you can be sure they'll pass them on to us.
User Guide 2

Exploring the MB-LS
In this section we provide an overview of the physical aspects of the MB-LS, where
everything is located and what it does. We also provide an overview of the basic things you
will need to start using your new MB-LS.
What’s inside the box?
Inside the outer carton, you will find the MB-LS has been packed in a smaller carton, with
foam cutouts to support it inside the outer carton. Around the foam cutouts we have packed
all the other things you need to use the MB-LS. The MB-LS is wrapped in bubble-wrap inside
its small inner carton.
Please keep ALL the packaging - both cartons, the bubble-wrap and the foam cutouts. If you
have to return the MB-LS to us for service, or if you have to ship it somewhere, it MUST be
packed in this original packaging, so it doesn't suffer damage in transit.
When you receive your MB-LS and unpack it, please check that you have received the
following:
• The Mountbatten LS
• 1 X USB Peripheral cable
• MB-Comm software and USB drivers on CD
• This User Guide, inside which you will find:
oa warranty sheet
oA set of keyboard stickers
• A starter pack of 80-gsm paper for Brailling
• an AC mains power supply
• A power lead to connect the power supply to the wall socket.
If anything is missing, please contact us or your distributor immediately, so we can supply
you with the missing item.
Fill out the Warranty sheet and store it safely - this sheet only needs to be returned with the
MB-LS if you need service during the warranty period.
Removing the Shipping Lock
Don't switch the MB-LS on yet! First you MUST remove
the shipping lock, or you could damage your new MB-LS.
When you have the MB-LS out of its box, sit it on the table
in front of you, with the keys towards you.
Remove the top cover by reaching over to the rear of the
MB-LS, and lifting the tab that is in the middle of the cover.
Lift the cover over the MB-LS, towards you. Place the cover to one side. The cover should
come off very easily - it doesn't need any force.
You will now be able to examine the cardboard shipping lock. The two legs of the shipping
lock sit on either side of the Braille embossing head, and prevent it from moving while the
MB-LS is in transit. There is a short piece of the shipping lock which slides between the two
parts of the embossing head. The lock is held in place by the paper bail.
Before you can remove the shipping lock, you need to remove the paper bail.
User Guide 3
Illustration 2: The MB-LS Shipping Lock

Removing the Paper Bail
The Paper Bail is only needed when the MB-LS is operating as a Braille embosser.
When using the MB-LS as a Braille writer, we recommend that you remove it, because with
the Paper Bail in place, it is difficult to read the Braille just written.
To remove the Paper Bail, first lift the Paper Grip Lever, which is on the right. Then slide the
right hand margin adjuster as far right as it will go. The adjuster will not move unless the
Paper Lever has been lifted.
On the left hand end of the Paper Bail is a small spring-loaded sleeve. Take this sleeve
between your fingers and push it to the right, releasing the left side of the Paper Bail from its
slot. You can then pull the Paper Bail towards the left to release it from the slot on the right.
Lift the paper bail out and put it to one side.
Now you can remove the shipping lock, by sliding it towards the read of your MB-LS.
We suggest that you store the Paper Bail and the shipping lock in the carton, so you can find
them easily when you need them.
Instructions for re-packing your MB-LS, in case you need to transport it, can be found in the
section Care and Troubleshooting.
Now let's begin finding out more about the MB-LS by taking a tour.
The Keyboard
The keyboard is located in the centre front of the MB-LS. For added contrast, it has a bright
yellow background.
In the descriptions below, key positions are described in terms of where your fingers rest,
when both hands are in the standard position resting on the 6 Braille dot keys.
Braille Keys
The standard keys for 6-dot Braille are the black keys situated on either side of the centre of
the keyboard, arranged in a slight curve so that your fingertips rest comfortably on them.
They are oval in shape, smooth in the centre, and the edges have a ridge.
The keys are known by their dot numbers. From the centre, the left-side Braille keys are dot
User Guide 4
Illustration 3: The MB-LS with paper bail installed.
Illustration 4: The MB-LS keyboard with labels.

1, dot 2 and dot 3, and the right-side Braille keys are dot 4, dot 5 and dot 6.
The backspace Key and the enter Key
At the far right and far left of the 6 dot keys, under your little fingers, are two additional blue
keys, shaped the same as the standard keys, but with a ridged top. When you are using the
MB-LS for 6 dot Braille, the left key is the backspace and the right key is enter. These
keys can also operate as the additional keys for 8 dot Braille.
You can press the enter key when at either the left or right margin if you want to move
temporarily beyond the margin setting; for example, to continue Brailling on the same line
after reaching the right margin.
Because of this function, enter is also known as margin release.
The enter key is also used to terminate commands.
command Key
At the centre of the keyboard, between the right and left hand keys is a round, blue button
with a smooth, recessed top. This is called command, and is used for giving the MB-LS
special commands.
newline Key
Under your left thumb is the newline key. This key advances the page one line and moves
the embossing head to the beginning of the new line.
newline and space both have flat tops, and are nearly rectangular in shape, with rounded
right and left ends.
space Key
Under your right thumb is space.
tab and backtab Keys
Above your little fingers, at the top left and top right of the keyboard, are programmable
function keys. Both keys are round and blue with smooth recessed tops.
When your MB-LS arrives these keys are programmed to be tab on the left and backtab
on the right.
They can also be programmed so that they activate other functions - see the Section
Modifying and Adapting the MB-LS Keyboard for more information.
The Embossing Area
Behind the keyboard you will find the part of the MB-LS where the paper is loaded and
where all the embossing is done.
Ruler
Just before the embossing area, between the keyboard and the Embossing Head, there is a
ruler line embossed into the case of the MB-LS. You can use this to follow where your Braille
is relative to the width of the paper.
Embossing Head
The Embossing Head moves across the paper just behind the ruler. After printing a
character, it stops at the next character position to the right.
User Guide 5

Paper Lever
At the far right you will find the Paper Lever. This is a flat yellow lever; lift it from the front to
release the paper, or to allow you to load paper.
Slip your thumb into the recess from the front to lift the Paper Lever, so you can insert or
remove paper. To make this easier, you can raise the front end of the lever slightly by
pressing a finger back and down on the raised rear edge of the lever. Lowering the Lever will
make the MB-LS grip the new sheet of paper.
Each time you lower the Paper Lever, the MB-LS moves the Embossing Head over to the
Right Margin Adjuster to find out the paper width before moving back to the left. The MB-LS
also resets the line count to zero, and assumes that you are at the top of the page.
Reading Table
The Reading Table is the flat strip of metal behind the Embossing Head. It provides support
for the paper when you want to read it. A groove runs along the front of the reading table. If
you align the top of your paper with this groove when inserting a new sheet, it will be in the
right place for your Braille.
Paper Bail
The Paper Bail is the round bar that goes from left to right above the reading table. Two
rollers fixed to the Paper Bail press down the paper and guide it. These rollers can slide
along the bail to adjust for different paper widths.
The Paper Bail is not needed for daily use with single sheets of paper; it is provided to help
control continuous paper when you are using the MB-LS as an embosser. So you can put
the Paper Bail aside in a safe place until you need it.
Margin Adjusters
There are two Margin Adjusters fixed to the Reading Table, so you can adjust for different
sizes of paper.
The left Adjuster is fixed in place. When you insert paper into the MB-LS, you align the left
edge of the paper with the left Margin Adjuster, making sure the paper is under the Grip
Wheel, and then slide the right Margin Adjuster across so that it holds the right edge of the
paper.
User Guide 6
Illustration 5: The top of the MB-LS, cover off, with the Embossing Area labelled

Raise the Paper Lever to lift the Reading Table and Margin Adjusters when you are inserting
or removing paper.
Paper Grip Wheels
The Paper Grip Wheels are small rollers, at the front of the Margin Adjusters. They grip the
paper while you are Brailling, so that the MB-LS can move the paper the right amount for
each new line. Your paper must pass underneath these Grip Wheels when you are loading it.
Paper Advance Knob
This is a yellow knob set in a recess on the left of the embossing area, on the opposite side
to the Paper Lever. You can use this knob to adjust the top paper edge when you have
inserted paper. You should avoid using this knob when the paper is already inserted and you
have moved down the page, as the paper position will change, and the MB-LS will not know
where the margins and line position are.
The Left Hand Side
Headphone Socket
This is a standard 3.5mm headphone socket; when headphones are plugged in, the speech
output is directed to the headphones instead of the speaker, so that only the person wearing
the headphones can hear what the MB-LS is saying.
Speaker Grille
The speaker is located directly behind this grill. This is where speech output is normally
directed.
AC Power Socket
This is where you connect the mains power adaptor supplied with your MB-LS. You should
only use the power unit supplied.
The connector is a round DIN-type plug, which has a locator slot that has to be at the top of
the plug when you insert it. Do not use force when inserting the connector - if it is the right
way up it will go in easily.
DC Power Socket:
The MB-LS is not supplied with a DC power adaptor. If you would like to use a DC adaptor,
for instance to charge the MB-LS while in the car, please contact us or your distributor for
information about the proper adaptor.
User Guide 7
Illustration 6: The left side of the MB-LS, showing the sockets and speaker grille

The Right Hand Side
USB Port
This is used for connecting to a computer and for transferring information between the PC
and the MB-LS. Use this port with our software MB-Comm. The use of MB-Comm is
described in the section Connecting your MB-LS.
Mimic Port (S1 port)
The Mimic LCD display is connected here. For information on using the Mimic, see the
section Adding the Mimic and a Keyboard.
Note:
You can only use one port on the right hand side at any time. If the Mimic Port is being used,
you cannot use the USB at the same time (and vice versa).
The Back of the MB
PC Keyboard Port
A standard PC keyboard (PS2 type) can be used with the MB-LS. Your distributor will be able
to supply you with such a keyboard if you don't already have one.
For more information on using an external PC keyboard, see the section Adding the Mimic
and a Keyboard.
Parallel Output Port
This port, when supplied, can be used to connect a parallel printer to the MB-LS. Only
certain sorts of printers are suitable for use with the MB; see the section Selecting a Printer
in the Section Back Translation for information. You can also consult with your distributor to
find out more.
User Guide 8
Illustration 7: The right side of the MB-LS, showing the ports
Illustration 8: The rear of the MB-LS, showing the ports

It is also possible to have a parallel input (Centronics) port installed in your MB-LS to allow it
to accept parallel data from a PC. This port is an optional extra, and may be ordered from
your distributor.
Second Serial Port S2
This is the second serial port on the MB-LS. It is used for sending and receiving information
to and from a PC or Braille note taker via serial transfer. Use this port with our software MB-
Comm, which is included with your MB-LS.
Loading Paper
There are two methods for loading paper. Try each method to find the one that suits you
best.
Loading Paper: Method 1
The first method is very similar to loading paper into a typewriter.
Step 1 Lift the yellow Paper Lever, and slide the right hand margin to the position
that suits the paper size being used. Lay the paper flat on the Reading Table.
Make sure that the paper is positioned so that it goes underneath the small
rollers on the left and right margins and under the embossing head.
Step 2 Slide the paper into the unit. Some people grasp either side of the paper and
push it in. Others prefer to slide it in by pressing on the Reading Table and
sliding forward.
Step 3 When the paper is fully inserted, align the top of the page on the Reading
Table. Check that the paper is placed straight against the left hand margin.
Slide the right margin to the left until it rests against the right edge of the
paper. Flip the Paper Lever to the down position. The embossing head will
now move across to the right margin adjuster and back again, to check the
paper size.
Loading Paper: Method 2
The second method involves inserting the paper from
the rear of the MB-LS.
First lift the Paper Lever. Then locate the Paper Input
Slot at the rear of the MB-LS and insert the top of the
page into it. Simply push the paper in until it appears
on top of the Reading Table. Align the paper, adjust
the Right Margin Adjuster as needed, and move the
Paper Lever to the down position.
User Guide 9
Illustration 9: The three steps for loading paper into the MB-LS
Illustration 10: Loading paper from the back of
the MB-LS

Removing Paper
To remove paper, simply lift the Paper Lever and pull the paper back and out of the MB-LS.
For users who cannot reach to pull the paper out of the back of the MB-LS, it is possible to
eject the page from the keyboard. There are three ways to do this:
newline + enter Page eject. Press newline and enter together.
p-chord Page eject. Press p and space together, dots 1, 2,
3, 4 and space.
np Force a new page. This is a command, and can be used
by itself or in a file to be translated.
Your MB-LS will say "Page Eject" and the paper will be rolled out of the machine, ready to be
collected.
User Guide 10

Writing Braille
First, load a sheet of paper using the instructions in the previous section.
Then turn the MB-LS on using the switch, and use the six black Braille keys and space, in
exactly the same way as you would type on a mechanical Braille writer. Whatever you type
will be embossed on the paper.
The MB-LS keyboard works a little differently from a mechanical Braille writer. On a
mechanical Brailler, the keystroke makes dots when you get to the bottom; on the MB-LS the
keystroke makes dots when the keys come back up as you let go. This means that a learner
can add dots together to make up a Braille character.
End of line and Word Wrap
When you get close to the end of the line, you will hear a beep. This is the margin bell, and it
lets you know that you will soon be at the end of this line - the factory setting has the beep
sounding 5 characters before the end of the line. You can turn this bell off if you wish.
The important thing to remember is this: your MB-LS doesn't need you to do a carriage
return at the end of the line. Unless you wish to begin a new line, just keep Brailling; the MB-
LS, when it gets to the end of the line, will automatically go to the next line. This is called
Word Wrap.
In the default setting of Word Wrap, your MB-LS will take your Braille as close to the right
side of the page as it can. If the word you are Brailling isn't finished, the MB-LS will place a
hyphen, move to the next line and keep Brailling.
If you don't want hyphens, you need to use a command.
Enabling commands
When you first receive your MB-LS, it is in Learn Mode, and the command key is inactive.
command is the small round blue key in the very centre of the keyboard, between the Braille
keys. When it is active, it's easy for a beginner to activate all sorts of features and find
themselves lost. However, it's very easy to activate the command key and to deactivate it
again. These are the keys you use; they switch the
command key from inactive to active, and from active
to inactive:
tab+backtab+newline+space
When you press these keys together, your MB-LS will
say "command on" or "command off". You will know
immediately which state the command key is in.
Now that you have the command key active, you can change the Word Wrap behaviour if
you wish. The command to do this is ww.
ww Turn Word Wrap on and off.
When Word Wrap is on, the word is not embossed until space is pressed. If the word cannot
fit on the line, it is moved to the beginning of the next line. The default for ww is off. This
command is a toggle; use the same command to turn it on and off.
Entering the command
All regular commands begin with the command key, and finish with the enter key.
User Guide 11
Illustration 11: The command activation
keystroke

For example to turn the Word Wrap command on, you first press command, then type ww and
then press enter. Your MB-LS will say “on” or “off” depending on the original setting.
Toggle Commands
Some commands, like Word Wrap, are "toggle" commands, meaning that they toggle
between an on and off state, each time they are invoked. Throughout this User Guide and
the Reference Section, each toggle command will have a note as part of its description,
telling you it is a toggle command.
Commands Needing Extra Information
If your command needs you to enter a number or another parameter as well as the
command, press the command key, type the letters of the command, press space and then
type the number or other parameter. Numbers can be entered using literary or Grade Zero
numbering; use the numeral sign, dots 3,4,5,6 with the letters a to j, or use the Grade
Zero lower numbers. See the section Braille Codes and Languages for more information
on using dropped or lower numbers.
You will find more information about commands throughout this User Guide, and in the
Reference Section.
Erasing and Correction
Your MB-LS can erase or correct mistakes.
Make sure the Braille head is one space to the right of the cell you wish to change. When
you press the keys, the head will move back, make the change or erase the error, and then
return to its original position
backspace+space replaces a character with a space.
backspace+correct dots replaces a character with your desired character.
If you have typed a letter where you wanted a space, make sure you are one position to the
right of the letter you want to erase, and press backspace+space.
However, if you typed p when you wanted w, you could change the p to w. Make sure you
are one position to the right of the p, and press backspace+w (backspace+dots 2456).
How to Move Around the Page
newline+space Move down the page in same column
newline+backspace Move up the page in the same column
newline+enter Page Eject
tab Move right 5 spaces
backtab Move left 5 spaces
space Move one position right
User Guide 12
Illustration 12: The three steps to enter a regular command

backspace Move one position left
Playing Shark Attack - practise moving and correcting
"Shark Attack" is a game devised by SET-BC in Canada, to use the erase and correct
feature and all the page movement commands.
Braille the letter g, dots 1,2,4,5, about 12 times in various areas of the Braille page, in
front of the student or person who will play. Explain that these are fish swimming in the
ocean.
Bring the embossing head to the centre of the page before starting, so that there are some
fish above the embossing head as well as some below, and some to either side.
Explain that the student or player is a very hungry great white shark and that they want fresh
fish for supper. Explain that once they know how to move around and swim they can start
eating the fish.
The player then navigates to the cell immediately to the right of each fish and uses
backspace + space to gobble up the fish.
There are other variations of Shark Attack:
The Star Catcher Game - players have to catch as many stars as possible; instead of g,
Braille the letter s, dots 2,3,5 for each star.
The Hungry Wolf Game - the hungry wolf wants to eat some tasty sheep. In this variation,
the fat woolly sheep are represented by a full cell, dots 1,2,3,4,5,6.
You can vary the number of fish, stars or sheep to increase or decrease the difficulty; you
can add characters that aren't to be "eaten", and subtract points for characters eaten in error.
If you have more than one player, you can set an audible timer for 2 minutes and then count
the consumed stars, fish or sheep; the highest score wins.
Formatting Your Braille
For simple Brailling, your MB-LS will wrap the ends of lines and doesn't require you to do any
formatting. When you reach the bottom of the sheet of paper, the MB-LS will say "out of
paper", or you can remove or eject the page when finished.
If you would like to format your Braille pages, there are some commands you can use. They
fall into four different areas.
Positioning Braille on the page
With no positioning commands active, the MB-LS begins embossing from the left margin,
and doesn't align the right-hand end of each line. There are two other choices:
ce Centres your Braille on the line.
Press newline before entering this command, so that the Braille to be centred begins on a
new line, and begin typing the Braille after the command is entered.
As you type the MB-LS stores your Braille in a memory area called a buffer. It will begin
embossing the first line, centred on the page, when the buffer fills, after you press a space. If
you continue typing, the MB-LS will treat each line this way, centring it and embossing when
the buffer fills. Use this facility for centring a paragraph or a single line, or even a whole
document.
If you are Brailling a heading or a line of only a few words, press newline when you have
finished typing, and the MB-LS will centre and emboss the line.
User Guide 13

To turn Centring off, enter the ce command again; this command is a toggle. The default
state is off.
ra Aligns your Braille to the right-hand margin.
Like ce, the Right Align command stores your Braille in a buffer, and begins to emboss the
first line when the buffer has filled, after you press a space. Continuing to type will give you a
right-aligned paragraph. To right-align short lines, press newline at the end of each line,
when the line will emboss and be right-aligned.
Right Align will not work if Centring is active, even if you have it turned on first.
To turn Right Align off, enter the ra command again; this command is a toggle. The default
state is off.
Margins
When you load a new sheet of paper, the default margins are active. The MB assumes a
page length of 26 lines, with a top and bottom margin of zero; the left and right margins
depend on the width of the paper which the MB-LS discovers during the margin seek when
the paper lever is lowered, or when the MB-LS is switched on.
The left margin is hard left at a position equivalent to a little more than two characters (about
1.5 centimetres, or 9/16ths of an inch) in from the edge of the paper. The right margin is as
far right as it can be, the same distance from the right-hand edge of the paper. These are the
positions for a Left Margin of 0 (zero) and a Right Margin of 0 (zero).
To change the left and right margins, the following commands are available:
lmh Set the left margin to the embossing head position.
Use tab, space, backtab or backspace to get to the position you want before entering
this command.
lm number Set the left margin to the position given by "number", counting from the
leftmost position on the page. For instance, if you want the left margin to
be set 10 spaces more to the right than its usual place, enter the
command as lm 10.
lm Use this command to reset the left margin to zero, which is the same as
returning it to its default state.
rmh Set the right margin to the embossing head position.
Use tab, space, backtab or backspace to get to the position you want before entering
this command.
rm number Set the right margin to position given by "number", counting from the
leftmost position on the page. For instance, if you want the right margin to
be set 10 spaces more to the right than its usual place, enter the
command as lm 10.
rm Use to reset the right margin to zero, which is the same as returning it to
its default state.
When you load a new sheet, the top margin is decided by the position of the top of the sheet
of paper when you lower the paper grip lever. When you begin to Braille, the MB-LS begins
embossing immediately without inserting any lines. This is equivalent to a Top Margin of 0
(zero). To change this top margin so that the MB-LS moves the paper up a certain number of
lines before beginning to emboss, use the tm command below:
tm number Set Top Margin of Braille page in number of lines. This will set the number
of lines to feed before beginning embossing.
User Guide 14

When you are Brailling all the way down the page, the MB-LS will continue to feed a new line
up at the end of each line, or when you press newline, until the bottom of the sheet is
reached. If you would like the Braille to finish on each page before the bottom of the sheet
arrives, you can use the bm command below to change this.
bm number Set the Bottom Margin of the Braille page in number of lines. This will tell
the MB how far down the page to go before ejecting the page and asking
for a new page. The number you enter as part of the bm command is the
number of lines up from the bottom of the sheet. So if you have kept the
default page length, a Bottom Margin of 10 will give 16 lines for Braille,
less any Top Margin.
Releasing a Margin
If you are almost at the end of the line, and your word has only one character more than you
have space for, you can use enter to release the margin so you can fit the word on the
current line.
Margin Release only works if you have Manual New Line on, and the Right Margin is greater
than zero. The command for setting Manual New Line, man, is explained further on in this
section.
Tab Settings
Each time you press tab, the Braille head moves to the right 5 cells; backtab moves the
head to the left 5 cells.
If you would like tab stops in different places, first you must remove the default tab settings:
tc Clear all the currently-set tab stops.
The embossing head will now not move when either tab or backtab is pressed, and the
MB-LS will say "No tab set".
Now that the default tabs are removed, you can set your own tabs by spacing to the place
you want to set a tab stop, and then using the tsh command:
tsh Set a tab stop at the position of the embossing head.
You can set up to 10 tab stops using tsh; if you try to set more, the MB-LS will say "error".
To restore all your default tabs, use the std command or, if you have saved your default
settings, use restore. See the section Saving and Restoring Settings for more
information on how and when to do this.
Line Spacing
The default spacing for lines of Braille on the MB-LS is single line spacing. This means that
each time there is a wrap at the end of a line, or each time you press linefeed, the paper
will advance by one line. You can change this using the ls command:
ls x.y Use this command to set the line spacing.
In the command, x.y represents a decimal number; if you want a whole number of lines, it's
not necessary to enter the point or a following zero. For example, if you want a line spacing
of 1.5 lines, the command would be ls 1.5If you would like line spacing of 2 lines (double
line spacing), use ls 2.
When you are typing numbers into a command, it is often easiest to use the dropped or
lower numbers. For ls 1.5, you would type this sequence:
User Guide 15
/