Page is loading ...


Contents
Introduction..................................................................................................................................1
Mountbatten Orientation - Parts..................................................................................................2
Location of Parts.........................................................................................................................3
Mountbatten Orientation - Ports................................................................................................3
Location of Ports.........................................................................................................................5
Features for loading paper..........................................................................................................6
Loading Paper.............................................................................................................................7
Start-Up.......................................................................................................................................8
Battery Care................................................................................................................................9
The Mountbatten Keyboard.......................................................................................................10
Using the Mountbatten Keyboard..............................................................................................11
Turning Commands On and Off................................................................................................12
Why do we use commands?.....................................................................................................13
Speech Commands ..................................................................................................................14
Formatting Commands..............................................................................................................15
File Commands ........................................................................................................................16
Ways to adjust noise level.........................................................................................................17
Adjusting the Braille Impact.......................................................................................................17
Connecting Mountbatten to a PC with MB-Comm....................................................................18
Chat Mode using the PC with MB-Comm.................................................................................20
Embossing from the PC with MB-Comm..................................................................................21
Embossing Commands ............................................................................................................22
Using the Mimic ........................................................................................................................23
Forward Translation Commands .............................................................................................24
Changing the Braille Code........................................................................................................25
The Options Menu ....................................................................................................................26
The Options Menu - Calculator.................................................................................................27
The Options Menu - Music........................................................................................................29
Braille Music Notes....................................................................................................................31
Braille Graphics.........................................................................................................................31
Writing Numbers in a Command ..............................................................................................32
Braille Writing Commands ........................................................................................................32
Miscellaneous Commands........................................................................................................33
Braille characters and contractions ..........................................................................................34
Student Evaluation Tool............................................................................................................35

Introduction
This guide has been prepared to provide you with a quick reference tool to use:
during Workshop One
as a resource when using your Mountbatten
During the Workshop, we suggest you mark the Easy Guide to help you remember those
sections covered.
Some information in the Easy Guide is introduced, but not applied. This allows those
already familiar with the Mountbatten to access information when needed, and for those
beginners who want to, to go ahead!
Suggestions: Store the Easy Guide near the Mountbatten.
Introduce the Guide and how to use it to all those who may need to
access the information, such as the Aide, Class Teacher and the
student.
Copy any procedures used regularly and put them on the wall near the
Mountbatten for easy reference.
Braille out reference information as the student user learns about the
Mountbatten parts, ports and functionality so that they build skills of
independence!
1

Mountbatten Orientation - Parts
Keyboard Ergonomically designed, yellow keyboard with six black Braille
keys and seven blue keys that tell the Mountbatten what to do.
Embossing Head Silver metal with yellow marker to help indicate position on the
page. On start-up, the embossing head moves to the right hand
margin and back to identify paper size.
Reading Table A flat silver metal section on which to press when reading. The
table has a groove along it to align the top of the page. Lay a
new page flat on the table to assist with loading paper.
Margin Adjusters Both margin adjusters have grip wheels to help feed the paper
through. The left margin adjuster is fixed. The right margin
adjuster moves to accommodate paper size.
Paper Bail A long metal bar with two rubber wheels that sit across the
reading table. The paper bail holds paper in place during
embossing. It is spring loaded for easy removal. Slide the right
hand margin to far right, grip paper bail and push to left to
remove. It is best removed when a child is writing and reading
Braille, giving unimpeded access.
Paper Lever A yellow plastic lever, located to the right of the embossing area,
lifts up and back. When lifted it releases the right margin adjuster
and prompts an audio response. When returned to lock position,
the audio response prompt says “OK” and the embossing head
checks for the size of the page inserted by moving between the
margin adjusters.
Ruler A scale bar at the front of the embossing area to help re-align a
Brailled page.
Paper Advance A yellow plastic grooved roller located to the left of the reading
table. Assists with moving a new page into position.
On/Off Switch Located on the left front is the on/off switch.
Volume Control At the front of the Mountbatten and to the right of the on/off
switch is a thin yellow knob for volume control.
Carry Handle In the center front is the yellow carry handle.
Pull it out and use it to carry the Mountbatten about.
2

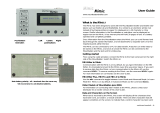
Location of Parts
Mountbatten Orientation - Ports
Starting from the right-hand side of the Mountbatten:
USB Port The USB port on the right side of the case is for making a
connection with a PC for Chat, File transfer or embossing.
Mimic Port The Mimic port on the right side of the case is for connecting
the optional Mimic display.
PC Keyboard Port On the back right rear of the unit is a round PS2 port for a
standard PC keyboard plug.
3
Left Margin Adjuster
Right Margin Adjuster
[movable]
Embossing Head
Keyboard
Ruler
Paper Advance
On/Off Switch
Volume Control
Carry Handle
Reading Table
Paper Lever

Parallel-Out Port Next is a Parallel Out port for sending information to a standard
text printer directly from the MB.
Serial Port The Serial port provides two-way file transfer options to and
from a PC or Braille note taker, and MB-Comm software
facilitates a simple file transfer program between the
Mountbatten and PC.
Speaker On the left side of the Mountbatten is the speaker for audio
output.
Headphone Port A small socket for a standard headphone jack is located next to
the speaker.
AC Adapter Port An AC Adapter input for mains power supply - this is for the
mains charger supplied with every Mountbatten.
DC Adapter Port A small socket near the corner supports an optional 12 Volt
battery charger.
Keyboard Port Beside the On/Off switch is a port suitable for customised
external keyboards to meet special needs.
4

Location of Ports
5
Mimic port
Back profile of Mountbatten
PC Keyboard Port : PS2
Speaker
Headphone Port
AC Adapter Port
DC Adapter Port
Parallel Port
Serial Port
Right side profile
Left side profile
USB port

Features for loading paper
Embossing head moves along behind the ruler and embosses Braille dots. The
embossing head leads your finger to the ruler.
Paper lever is on the right - raise it to insert or remove paper.
Reading table is the flat strip of metal which supports paper.
Metal groove in the reading table assists to align the top of the page to make
sure it is straight
Paper bail is the round bar that goes from left to the right above the reading
table. When Brailling whole pages the rollers assist with noise
reduction. It is spring loaded for easy removal.
Margin adjusters the left margin is fixed, the right margin adjuster can be adjusted
to paper size. Rollers on the margin adjusters grip paper while
brailling.
Manual paper
advance
is a knob set in a recess to the left of the paper control area. Use
it to adjust the top edge of paper when you are inserting a new
page.
Attention!! Do not use manual paper advance at other times - you will lose
the ability to correct or erase.
6
Paper bail Reading table
Margin adjuster
Paper advance
wheel
Paper leverEmbossing head

Loading Paper
Step One Lift the yellow paper lever.
Step Two Slide the right margin left or right to make room if necessary.
Step Three Lay the page flat on the reading table.
Step Four Guide the paper under the embossing head.
Step Five Push the paper carefully into the Mountbatten.
Step Six Check that the paper is placed straight against the left hand margin and
under the left grip wheel.
Step Seven Align the top of the sheet of paper with the groove at the front edge of
the reading table.
Step Eight Hold the right side of the paper against the paper roller with your left
thumb, and hold the edge up with your left index finger.
Step Nine With your right hand, slide the right margin to the left, until it rests
against the right edge of the paper. The paper should slide easily under
the right grip wheel and over the base of the margin adjuster.
Step Ten Flip the yellow paper lever back down. The embossing head will move to
check the paper size.
7

Start-Up
Step One:
Plug in
Use the information on Ports on Page 3.
Plug in the AC power adapter and switch on the power.
If it is not possible to have a power connection during usage, make
sure the battery is re-charged after 8 hours of use.
Step Two:
Switch on
The On/Off switch is on the left front of the Brailler.
Each time you turn the machine on the embossing head moves to
check the paper size
Step Three:
Listen
The audio response will greet you and tell you if:
•the battery is charging
•you are using Learn or Advanced Mode
•if the Mimic is not connected
Note: If the Mimic is connected audio response will not tell you
8

Battery Care
The Mountbatten needs power! It uses a lot of power when embossing and has a
specially designed battery.
The battery will operate the Mountbatten for up to 8 hours or a day in class. After
this it must be recharged!
If possible connect the power adapter provided, at all times. Otherwise, use the
power adapter overnight to recharge the batteries.
It is important to remember the following battery care tips:
Each time you switch the Mountbatten on, it checks the battery status. It will tell
you to charge the battery if it is low.
It is a good idea to charge the battery overnight, every night.
If the battery is not re-charged when completely run down, permanent damage
may result. Replacing a battery is expensive and often inconvenient.
It is a good idea to leave the Mountbatten plugged in wherever possible to
ensure the battery is kept charged.
You need to charge your battery for at least 24 hours prior to storing it over
period of up to 6 weeks.
To maintain the battery when Mountbatten is out of service for longer periods,
call your supplier and arrange to disconnect the battery.
You can check battery status by pressing newline + space + b - an audio
response will tell you the status.
9

The Mountbatten Keyboard
Braille Keys
The Swing Cell
The Braille Cell
10
1
2
34 5 6

Using the Mountbatten Keyboard
Moving around the page
tab Moves the head one tab stop to the right
backtab Moves the head one tab stop to the left
backspace Moves the head one space to the left
newline Moves the head to the left and advances the paper one line
space Moves the head one space to the right
Erase and Correct
space + backspace
backspace + the
correct dots
Erase - replaces a character with a space
Correct - replaces a character with desired character
More moving around the page
newline +
backspace
Move one line up the page in the same column
newline + space Move one line down the page in the same column
newline + enter Eject the paper
Brailling on small sized paper
newline + space Allows Braille writing without paper.
The two keys must be pressed while the embossing head is
moving.
11

Turning Commands On and Off
Learn Mode In Learn Mode, the command key is disabled in the default setting.
To activate
commands
Press the following 4 keys together:
space + newline + tab + backtab
To deactivate press the same 4 keys together. This is called an on/off
toggle.
Entering
commands
1. Press the command key
2. Type the command using Braille keys
3. Press the enter key
Writing
commands
Commands combine function keys and Braille letters.
For example: entering a command on the Mountbatten, use the
Command Key, Braille code, Enter Key; on the PC use the Escape,
text and the Enter key.
12

Why do we use commands?
In Learn Mode Commands are used in Learn Mode to tell the Mountbatten to:
set margins, tabs, line spacing and centring
adjust dot height and paper settings
turn embossing on and off
format the Braille page eg page numbers, word wrap
save files to memory and emboss and delete files
use graphics mode
In Advanced
Mode
Commands are used in Advanced Mode to tell the Mountbatten
to:
continue to perform all Learn Mode functions
do forward and back translation
provide structured introduction of Grade 2 Braille contractions
[using APH patterns]
do advanced editing of files in memory
control synthetic speech parameters
Toggle keys Command keys are usually ‘toggle’ keys. This means you repeat the
command to undo it.
HINTS • Never use a space at the beginning or end of a command
• If you make a mistake while entering a command, press the
‘command’ key to start again.
13

Speech Commands
For use with recorded and synthetic speech.
spk r Speaks recorded speech (default)
In MB Writer this command indicates the speaking mode is selected
spk a Speaks all keyboard keys, functions and commands
spk d Speaks dot keys only – no function keys
spk c Speaks commands, errors and prompts only – no dot keys
spk n No speech – tones only
spk s Speaks synthetic speech (only available in MB Pro)
14

Formatting Commands
ww Word wrap
ce Center text (default off - toggle)
ra Right adjust (default off - toggle)
Margins
lm Set left hand margin to 0
lmh Set left hand margin to embossing head position
lm[n] Set left hand margin [n = number of columns]
rm Set right hand margin to 0
rmh Set right hand margin to embossing head position
rm[n] Set right hand margin [n = number of columns]
tm[n] Set Braille top margin [n = number of lines]
bm[n] Set Braille bottom margin [n = number of lines]
Tab Settings
tsh Set tab at position of embossing head
tc Clear all tab settings
Line Spacing
ls 1 Line spacing 1
ls 1.5 Line spacing 1.5
ls 2 Line spacing 2
15

File Commands
Start a File
begin [filename] Opens a new file – filenames can have up to 16 characters
Close a File
end Closes an open file
Finding out what’s in the memory
dir Embosses all file names and their sizes
free Embosses all remaining free memory space
Change a File
Append [filename] Attaches more information to a file
rename filename1,
filename2
Renames ‘filename1’ and calls it ‘filename2’
Delete Files
del [filename] Deletes a file
del all Deletes all files
undel Retrieves the last deleted file. This command only works if
used before turning the unit off.
Emboss Files from the Memory
pr [filename] Prints the file
mpr n [filename] Prints ‘n’ copies of file
16

Ways to adjust noise level
Embossing
sound
The sound of the Mountbatten writing Braille can be minimised in a
number of ways:
place the Mountbatten on a soft surface like 2 computer mouse
pads
use regular photocopy paper and turn impact force or Braille
pressure to a minimum
place the Mountbatten in front of a solid object such as a book or
facing wall
Speech sound At times where a quieter class environment is needed:
adjust the volume
use headphones
Adjusting the Braille Impact
For thicker
paper and
labels
To increase the impact, press the
Command Key and the Right Function
Key together, then release them; one
press for every step higher.
For lighter
photocopy
paper
To decrease the impact, press the
Command Key and the Left Function
Key together, then release them;
one press for every step lower.
Each impact level has a number from 0 (no dots) to 9 (highest level) - later Mountbattens will
speak this level at each press.
17

Connecting Mountbatten to a PC with MB-Comm
Switch Mountbatten
OFF
Always switch off before making a connection to the MB.
Step by step: •Load the Mountbatten with paper
•Identify the USB port on the MB and the PC
•Connect the MB and the PC using the cable.
•Find the MB-Comm Icon and run MB-Comm.
•Run MB-Comm and make the connection.
You can make the connection in one of two ways:
Click the right-hand
red button
OR
On the Device Menu,
click Connect
Mountbatten
Choosing the Port A dialog box
will appear on
the screen:
18
/