Page is loading ...

LTO Standalone User’s Guide
LTO 200D and LTO 400D

ii
Copyright Notice
© 2003 ADIC
The information contained in this document is subject to change without notice.
This document contains proprietary information which is protected by copyright. All rights are reserved. No part of this
document may be photocopied, reproduced, or translated to another language without prior written consent of ADIC.
ADIC shall not be liable for errors contained herein or for incidental or consequential damages (including lost profits) in
connection with the furnishing, performance or use of this material whether based on warranty, contract, or other legal theory.
All trademarks within this document are the property of their respective owners.
Copyright Notice (Europe)
© 2003 ADIC Europe
TM
All rights reserved. No part of this document may be copied or reproduced in any form or by any means, without prior
written permission of ADIC Europe, ZAC des Basses Auges, 1 rue Alfred de Vigny, 78112 Fourqueux, France.
ADIC Europe assumes no responsibility for any errors that may appear in this document, and retains the right to make
changes to these specifications and descriptions at any time, without notice.
This publication may describe designs for which patents are pending, or have been granted. By publishing this information,
ADIC Europe conveys no license under any patent or any other right.
ADIC Europe makes no representation or warranty with respect to the contents of this document and specifically disclaims
any implied warranties of merchantability or fitness for any particular purpose. Further, ADIC Europe reserves the right to
revise or change this publication without obligation on the part of ADIC Europe to notify any person or organization of such
revision of change.
Every effort has been made to acknowledge trademarks and their owners. Trademarked names are used solely for
identification or exemplary purposes, any omission are made unintentionally.
ADIC is a registered trademark and ADIC Europe is a trademark of Advanced Digital Information Corporation.
ADIC USA
Tel.: +1 303-705-3900
Fax: +1-303-792-2465
ATAC: 1-800-827-3822
http://www.adic.com
ADIC Europe
ZAC des Basses Auges
1, rue Alfred de Vigny
78112 Fourqueux, France
Tel.: +33.1.3087.5300
Fax: +33.1.3087.5301
ADIC Germany Beteiligungs
GmbH, KG
Eschenstraße 3
D-89558 Böhmenkirch, Germany
Tel:+00.800.9999.3822
Published: May 2003 Printed in the USA
Part Number: 6-00709-01 Rev A
ADIC CORPORATE • 11431 WILLOWS ROAD, NE • REDMOND, WASHINGTON, USA • 1-800-336-1233
ADIC • 8560 UPLAND DRIVE • ENGLEWOOD, COLORADO, USA • 1-800-827-3822
ADIC • 10 BROWN ROAD • ITHACA, NEW YORK, USA • 1-607-241-4800

iii
Regulatory Notices
ADIC libraries are designed, tested, and classified for their intended electromagnetic environment. These electromagnetic environment
classifications generally refer to the following harmonized definitions:
Class A is typically for business or industrial environments.
Class B is typically for residential environments.
To determine which classification (Class A or B) applies to your tape library, examine all registration labels located on the bottom, the back
panel, or on the inside of the chassis below the magazines.
FCC Notices (USA Only)
To determine which classification applies to your library, examine all FCC registration labels located on the bottom or back panel of your
library or on installable components. If any one of the labels carries a Class A rating, your entire system is considered to be a Class A
digital device. If all labels carry either the Class B rating distinguished by either an FCC ID number or the FCC logo, (
), your system is
considered to be a Class B digital device.
Once you have determined your system’s FCC classification, read the appropriate FCC notice. Note that FCC regulations provide that
changes or modifications not expressly approved by ADIC could void your authority to operate this equipment.
This device complies with Part 15 of the FCC Rules. Operation is subject to the following two conditions:
This device may not cause harmful interference.
This device must accept any interference received, including interference that may cause undesired operation.
Note
Use only shielded cables for connecting peripherals to this device to reduce the possibility of interference with radio and television
reception. Using shielded cables ensures that you maintain the appropriate FCC radio frequency emissions compliance (for a Class
A device) or FCC Certification (for a Class A device) of this product.
The following information is provided on the device or devices covered in this document in compliance with FCC regulations:
Product Name: LTO 200D or LTO 400D
Model number: LTO 200D or LTO 400D
Company name: Advanced Digital Information Corporation
PO Box 97057
Redmond, WA 98073-9757 USA
(425) 881-8004
Class A
This equipment has been tested and found to comply with the limits for a Class A digital device pursuant to Part 15 of the FCC
Rules. These limits are designed to provide reasonable protection against harmful interference when the equipment is operated in
a commercial environment. This equipment generates, uses, and can radiate radio frequency energy and, if not installed and used
in accordance with the manufacturer’s instruction manual, may cause harmful interference with radio communications.
Operation of this equipment in a residential area is likely to cause harmful interference, in which case you will be required to
correct the interference at your own expense.
Class B
This equipment has been tested and found to comply with the limits for a Class B digital device pursuant to Part 15 of the FCC
Rules. These limits are designed to provide reasonable protection against harmful interference in a residential installation. This
equipment generates, uses, and can radiate radio frequency energy and, if not installed and used in accordance with the
manufacturer’s instruction manual, may cause interference with radio communications. However, there is no guarantee that
interference will not occur in a particular installation.

iv
If this equipment does cause harmful interference to radio or television reception, which can be determined by turning the
equipment off and on, you are encouraged to try to correct the interference by one or more of the following measures:
Reorient or relocate the receiving antenna.
Increase the separation between the equipment and the receiver.
Connect the equipment into an outlet on a circuit different from that to which the receiver is connected.
Consult the dealer or an experienced radio/television technician for help.
IC Notice (Canada Only)
Most tape devices are classified by the Industry Canada (IC) Interference-Causing Equipment Standard #3 (ICES-003) as Class B digital
devices. To determine which classification (Class A or B) applies to your tape device, examine all registration labels located on the bottom
or the back panel of your device. A statement in the form of “IC Class A ICES-3” or “IC Class B ICES-3” will be located on one of these
labels.
Note that Industry Canada regulations provide that changes or modifications not expressly approved by the tape device manufacturer could
void your authority to operate this equipment.
This Class B (or Class A, if so indicated on the registration label) digital apparatus meets the requirements of the Canadian
Interference-Causing Equipment Regulations.
Cet appareil numérique de la Classe B (ou Classe A, si ainsi indiqué sur l’étiquette d’enregistration) respecte toutes les exigences du
Reglement sur le Materiel Brouilleur du Canada.
EN 55022 Compliance (Czech Republic Only)
This device belongs to category B devices as described in EN 55022, unless it is specifically stated that it is a category A device on the
specification label. The following applies to devices in category A of EN 55022 (radius of protection up to 30 meters). The user of the
device is obliged to take all steps necessary to remove sources of interference to telecommunication or other devices.
CE Notice
Marking by the symbol indicates compliance of this device to the EMC (Electromagnetic Compatibility) directive of the European
Community. Such marking is indicative that this tape library meets or exceeds the following technical standards:
EN 55022 – “Limits and Methods of Measurements of Radio Interference Characteristics of Information Technology Equipment.” This
system is EN 55022 Class B device (CISPR 22).
EN 50081-1 – “Electromagnetic compatibility – Generic emission standard Part 1: Residential, commercial and light industry.”
EN 55024:1998 – Information technology equipment – Immunity characteristics – Limits and methods of measurements.
IEC 60950:1991+A1/A2/A3/A4 – “Safety of Information Technology Equipment including Electrical Business Equipment”.
Declaration of Conformity
The signed Declaration of Conformity is on file with Advanced Digital Information Corporation, 17275 NE 67th Court, Redmond,
Washington 98052, and ADIC Europe, ZAC des Basses Auges 1, rue Alfred de Vigny, 78112 Fourqueux,

v
Safety Notices
Warnings
This symbol should alert the
user to the presence of
"dangerous voltage" inside
the product that might cause
harm or electric shock.
C
A
UTION
R
ISK OF ELECT
R
IC SHOCK
DO NOT OPEN
C
A
UTION :
TO REDUCE
THERISKOFELECTRIC
SHOCK, DO NOT REMOVE
COVER (OR B
A
CK).
NO USER-SERVICE
A
BLE
P
A
RTS INSIDE. REFER
SERVICING TO QU
A
LIFIED
SERVICE PERSONNEL.
Caution
All safety and operating instructions must be read before this product is
operated, and must be retained for future reference. This unit has been
engineered and manufactured to assure your personal safety. Improper use can
result in potential electrical shock or fire hazards. To maintain the safeguards,
observe the following basic rules for its installation, use and servicing.
Follow all Warnings–All warnings on the product and in the operating instructions should be followed.
Read Instructions–All operating and use instructions should be read and followed.
Ventilation–The product should be situated so that its location or position does not interfere with proper ventilation.
Heat–The product should be situated away from heat sources such as radiators, heat registers, furnaces, or other heat producing
appliances.
Power Sources–The product should be connected to a power source only of the type directed in the operating instructions or as marked
on the product.
Power Cord Protection–The AC line cord should be routed so that it is not likely to be walked on or pinched by items placed upon or
against it, paying particular attention to the cord at the wall receptacle, and the point where the cord exits from the product.
Object and Liquid Entry–Care should be taken to insure that objects do not fall and liquids are not spilled into the product’s enclosure
through openings.
Servicing–The user should not attempt to service the product beyond that described in the operating instructions. All other servicing
should be referred to qualified service personnel.
Precautions
Do not use oil, solvents, gasoline, paint thinners or insecticides on the unit.
Do not expose the unit to moisture, to temperatures higher than 60ºC (140ºF) or to extreme low temperatures.
Keep the unit away from direct sunlight, strong magnetic fields, excessive dust, humidity and electronic/electrical equipment, which
generate electrical noise.
Hold the AC power plug by the head when removing it from the AC source outlet; pulling the cord can damage the internal wires.
Use the unit on a firm level surface free from vibration, and do not place anything on top of unit.

vi
Blank Page

vii
Table of Contents
Copyright Notice............................................................................................................................................... ii
Regulatory Notices .......................................................................................................................................... iii
FCC Notices (USA Only) ........................................................................................................................ iii
Class A............................................................................................................................................... iii
Class B............................................................................................................................................... iii
IC Notice (Canada Only) ..........................................................................................................................iv
EN 55022 Compliance (Czech Republic Only) ........................................................................................iv
CE Notice..................................................................................................................................................iv
Declaration of Conformity ........................................................................................................................iv
Safety Notices....................................................................................................................................................v
Warnings....................................................................................................................................................v
Precautions.................................................................................................................................................v
Table of Contents............................................................................................................................................ vii
List of Figures...................................................................................................................................................ix
List of Tables ....................................................................................................................................................xi
Introduction ...............................................................................................................................................................1
Equipment Description ......................................................................................................................................2
Drive Technology and Capacity.................................................................................................................2
Options.......................................................................................................................................................2
SCSI Interface......................................................................................................................................2
Front Panel Controls and Indicators...........................................................................................................3
Rear Panel Controls and Connectors..........................................................................................................5
LTO Tape Cartridges .................................................................................................................................5
Environmental and Shipping Information............................................................................................5
Write-Protect Switch............................................................................................................................6
Handling the Cartridges .......................................................................................................................7
Other Requirements ...................................................................................................................................7
SCSI Host Adapter...............................................................................................................................7
Application Software ...........................................................................................................................7
Installation .................................................................................................................................................................9
Installing the Host Adapter ..............................................................................................................................10
Connecting the Interface Cable........................................................................................................................10
Connecting More than One LTO Standalone Unit...........................................................................................10
Setting the SCSI ID..........................................................................................................................................12
Check the SCSI Bus Termination ....................................................................................................................13
Connecting Power and Turning the Autoloader On.........................................................................................13
Installing the Host Software.............................................................................................................................13
Operation and Maintenance .....................................................................................................................................15
Drive Status..............................................................................................................................................16
LCD Messages...................................................................................................................................16
LED Indicators...................................................................................................................................17
Normal Drive Operating Conditions........................................................................................................18
LCD Messages...................................................................................................................................18
Loading the Tape Cartridge .............................................................................................................................18
Data Protection ........................................................................................................................................20
Removing the Data Cartridge ..........................................................................................................................20
Cleaning the Drive Head..................................................................................................................................21
Cleaning the Enclosure ....................................................................................................................................21
Troubleshooting and Diagnostics.............................................................................................................................23
Troubleshooting Chart .....................................................................................................................................24
Maintenance Mode ..........................................................................................................................................25
Putting the LTO Standalone in Maintenance Mode ...........................................................................26
Diagnostic or Maintenance Functions......................................................................................................26
Exit Maintenance Mode.....................................................................................................................27

viii
Drive R/W Diagnostic........................................................................................................................27
Update Drive Firmware from FMR Tape...........................................................................................29
Create FMR Tape...............................................................................................................................31
Force a Drive Dump...........................................................................................................................33
Copy the Drive Dump to Tape [at Beginning of Tape (BOT)] ..........................................................34
SCSI Wrap Test Function ..................................................................................................................36
Unmake FMR Tape............................................................................................................................37
Display Error Code Log.....................................................................................................................39
Clear Error Log..................................................................................................................................40
Test Cartridge and Media...................................................................................................................40
Fast R/W Diagnostic..........................................................................................................................42
Test Head...........................................................................................................................................44
Error Codes and Messages.......................................................................................................................46
Code...................................................................................................................................................46
Specifications...........................................................................................................................................................49
Index........................................................................................................................................................................51

ix
List of Figures
Figure 1-1 LTO Standalone Front Panel........................................................................................................................................................... 3
Figure 1-2 LTO Standalone Rear Panel............................................................................................................................................................ 5
Figure 1-3 LT0 Data Cartridge ......................................................................................................................................................................... 6
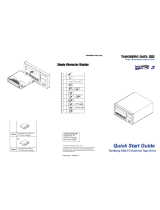
Figure 2-1 Cable Diagram for Four LTO Standalone Units............................................................................................................................ 11
Figure 2-2 SCSI ID Switch............................................................................................................................................................................. 12
Figure 3-1 Loading a Data Cartridge .............................................................................................................................................................. 19

x
Blank Page

xi
List of Tables
Table 1-1 Front Panel Controls and Indicators ................................................................................................................................................. 4
Table 1-2 Rear Panel Controls and Connectors ................................................................................................................................................ 5
Table 1-3 Recommended Operating, Storing, and Shipping Environment ....................................................................................................... 6
Table 3-1 POST LCD Messages..................................................................................................................................................................... 16
Table 3-2 Status LED States........................................................................................................................................................................... 17
Table 3-3 Normal Operating Condition LCD Messages................................................................................................................................. 18
Table 4-1 Troubleshooting Chart.................................................................................................................................................................... 24
Table 4-2 Error Codes and Messages.............................................................................................................................................................. 46

xii
Blank Page

1
Chapter
Introduction
This Chapter. . .
❐ provides a physical description of the switches, indicators and connectors on the front and rear
panels of the LTO standalone.
❐ describes other requirements (additional hardware and software) needed to use the LTO
standalone device.

2 Introduction
Equipment Description
The LTO standalone is a SCSI-compatible, high performance, tape cartridge device designed for storage of near-line and off-line data.
The LTO standalone is equipped with a 2-line by 20-character, back-lit LCD display (LCD). The LCD displays drive status messages, error
messages, and drive Power-On Self-Test (POST) result messages. The LTO standalone uses a 7-segment single-character LED (single-
character display) to communicate error conditions and informational messages. The LTO standalone also includes Flash EEPROM
technology that allows you to easily update firmware onsite from tape or from the host.
Drive Technology and Capacity
Your LTO standalone is equipped with one of the following drives:
LTO 200D
o Contains an IBM® TotalStorage™ Linear Tape Open (LTO) Ultrium 1 tape drive
o When used with generation 1 tape cartridges, the native capacity is 100 GB (200 GB compressed, assuming 2:1
compression).
LTO 400D
o Contains an IBM® TotalStorage™ LTO Ultrium 2 tape drive
o When used with generation 2 tape cartridges, the native capacity is 200 GB (400 GB compressed, assuming 2:1
compression).
Options
SCSI Interface
The LTO standalone is available with either an Ultra-2 or Ultra-3, Low Voltage Differential/Single Ended (LVD/SE) SCSI interface, or an
Ultra-2, High-Voltage Differential (HVD) SCSI interface. The LTO 200D uses Ultra-2 and is available either with LVD/SE or HVD SCSI
connections. The LTO 400D uses Ultra-3 and is only available with LVD/SE connections.
Caution
Single-Ended (SE) and LVD/SE SCSI devices are not compatible with HVD
SCSI devices. Equipment damage may occur if you connect your LTO
standalone to an incompatible SCSI bus.

Introduction 3
Front Panel Controls and Indicators
Figure 1-1 shows the controls and indicators located on the front panel of the LTO standalone. Table 1-1 provides a brief functional
description of the front panel controls and indicators.
Figure 1-1 LTO Standalone Front Panel
LCD
Single-character display
Unload Button
Status LED
Single Red Dot
(400D only)

4 Introduction
Table 1-1 Front Panel Controls and Indicators
Control or Indicator Purpose
LCD
2-line by 20-character LCD. Displays drive status, error messages, and POST results.
Status LED
(green/amber)
Provides information about the state of the drive. The Status LED is either green or
amber, and can be solid or flashing (refer to Table 3-2 in Chapter 3 Operation and
Maintenance for a description of the Status LED states).
Single-Character
Display
Blank (off) during normal operation, the single-character display presents a single-
character code for:
Diagnostic or maintenance functions
Error conditions and informational messages
Single Red Dot
(LTO 400D only) The Single Red dot is located on the single-character display. When
it is on, the drive has created a dump. For information on copying the dump to a tape,
see Maintenance Mode.
Unload Button
The Unload button enables you to perform several functions.
Press the Unload button once to start a manual unload of the tape.
Note
During a rewind and eject operation, your LTO standalone will not accept
SCSI commands from your host.
Press the Unload button three times within one second to place your LTO standalone
in Maintenance Mode (refer to Chapter 4 Troubleshooting and Diagnostics for a
description of Maintenance Mode functions and a description of the functions the
Unload button can perform while in this mode).
Note
While in Maintenance Mode, your LTO standalone will not accept SCSI
commands from your host.
Press and hold the Unload button for 10 seconds while your LTO standalone is in
normal operating mode, to force a drive dump (save a microcode trace). The drive
places the dump data into a special dump area where it is retrievable (refer to Chapter
4 Troubleshooting and Diagnostics for a description of the Force Drive Dump
function and information about retrieving the data.).
Note
After you force a drive dump, do not turn off power to your LTO
standalone or you may lose the dump data.

Introduction 5
Rear Panel Controls and Connectors
Figure 1-2 shows the controls and connectors located on the rear panel of the LTO standalone.
Figure 1-2 LTO Standalone Rear Panel
Table 1-2 Rear Panel Controls and Connectors
Control or Connector Purpose
Power Switch
Turns power to the unit on and off.
AC Power Connector
Receptacle for AC power cord.
SCSI Connectors
Connections for the interface cable that connects the unit with the host computer
and/or to other devices on the SCSI channel. The interface cable can be attached
to either connector.
Your LTO standalone is equipped with a 68-pin high density SCSI device
connector.
SCSI ID Switch
Used to select the SCSI ID for the LTO drive. Factory set at 0.
LTO Tape Cartridges
To ensure that your LTO standalone conforms to ADIC specifications for reliability, use industry-approved LTO Ultrium tape cartridges.
Other certified LTO Ultrium data cartridges supported by your LTO standalone include: 10GB, 30GB, and 50GB.
Environmental and Shipping Information
Whenever possible, store LTO Ultrium Tape Cartridges in the following room-environment conditions:
Temperature of 20°C, to 5°C (68°F, to 9°F)
Relative humidity of 50% (20%)
AC Power Connector
SCSI Connectors
Power Switch
SCSI ID Switch

6 Introduction
The best storage container for unused cartridges is the original shipping container. The plastic wrapping prevents dirt from accumulating on
the cartridges and partially protects them from humidity changes.
You can store tape cartridges in the maximum environmental conditions for up to four weeks without damaging the data or the cartridge.
Do not store cartridges for an extended time period in maximum temperature and humidity conditions.
When you ship a cartridge, place it in a sealed, moisture-proof bag to protect it from moisture, contaminants, and physical damage. Ship the
cartridge in a shipping container that has enough packing material to cushion the cartridge and prevent it from moving within the container.
Table 1-3 lists the recommended environment for operating, storing, and shipping LTO Ultrium data cartridges.
Table 1-3 Recommended Operating, Storing, and Shipping Environment
Environmental
Factor
Operating Storage Shipping
Temperature 10°C to 40°C
(50°F to 104°F)
16°C to 32°C
(61°F to 90°F)
-23°C to 49°C
(-9°F to 120°F)
Relative humidity
(noncondensing)
20% to 80% 20% to 80% 20% to 80%
Wet bulb temperature 26°C
(79°F)
26°C
(79°F)
26°C
(79°F)
Figure 1-3 LT0 Data Cartridge
Write-Protect Switch
The write-protect switch is used to prevent recording over existing data. To prevent recording or deleting, set the write-protect switch to the
closed position ( ). The drive senses the position of the switch and will not allow writing in this position. When installing cartridges in
your LTO standalone, place the switch in the open position (
), unless you do not wish to record on a specific cartridge. To set the write-
protect switch, slide it left or right to the desired position.
If the switch is set to
data cannot be written to the tape.
If the switch is set to
data can be written to and read from the tape.
Cautions
Always remove any cartridge from the drive before turning off the host system
power. Failure to remove a cartridge can result in cartridge and drive damage.
When a cartridge is removed from the drive, return it to the plastic case to
prolong the cartridge life.
Write-Protect Switch

Introduction 7
Handling the Cartridges
Incorrect handling or an incorrect environment can damage the magnetic tape or the cartridges. To avoid damage to your tape cartridge and
to ensure the continued high reliability of your LTO standalone, pay attention to the following guidelines.
Before using a cartridge, let it acclimate to the normal operating environment for at least 24 hours.
Ensure that all surfaces of a cartridge are dry before inserting it into drive.
Do not insert a damaged cartridge into the drive. A damaged cartridge can interfere with the reliability of the drive. Before
inserting a cartridge, inspect the cartridge case, cartridge door, and write-protect switch for cracks and breaks. If you need to
recover data from a damaged cartridge, call your service representative.
Do not open the cartridge case at any time. The upper and lower parts of the case are welded; separating them destroys the
usefulness of the cartridge.
Do not handle tape that is outside the cartridge. Handling the tape can damage the tape surface or edges, which may interfere with
read or write reliability. Pulling on tape that is outside the cartridge case can damage the tape and the brake mechanism in the
cartridge.
Do not stack more than six cartridges. Although cartridges are shipped and should be stored with the reel in the vertical position,
you can temporarily lay the cartridges flat when moving them. The bottom of each cartridge has four raised areas that fit into the
indented areas on the top of another cartridge. This construction helps prevent the cartridges from sliding while you move them.
Do not expose the cartridge to moisture or direct sunlight.
Do not expose recorded or blank tape cartridges to stray magnetic fields greater than 100 oersteds (such as those existing near
high-current cables or power supplies). Such exposure can cause loss of recorded data or make the blank cartridge unusable.
Other Requirements
SCSI Host Adapter
Your LTO standalone must be connected to either an integrated SCSI host or a separate SCSI interface (host adapter) card installed in the
computer–either directly to the I/O connector on the card or as part of an existing SCSI bus. The host adapter you choose must support the
same SCSI interface as your LTO standalone (LVD/SE or HVD). The need for additional host adapter features will depend on your host
system requirements. If you are not sure about your host adapter requirements, please call the ADIC Technical Assistance Center (ATAC)
and ask for assistance.
Caution
SE and LVD/SE SCSI devices are not compatible with HVD SCSI devices.
Equipment damage may occur if you connect your ADIC LTO standalone to an
incompatible SCSI bus.
Note
In the United States and Canada, call ATAC at (800) 827-3822. In
Europe, call ATAC at +800.9999.3822.
Application Software
A variety of backup and data storage software is available for use with your LTO standalone. The software you use will depend upon your
storage needs and the system you are using. Please check with ADIC Sales or Customer Assistance if you have a question concerning the
compatibility of a particular software package.
Now you are ready to connect the LTO standalone to your host computer. Follow the instructions provided in the next chapter.

8 Introduction
Blank Page
/