Dell PowerVault LTO3-060 User guide

Type
User guide
Dell™ PowerVault™ LTO-2-024 Tape Drive User's
Guide
Introduction Troubleshooting
Installation Internal Drive Getting Help
Installation External Drive Contacting Dell
Specifications Glossary
Operation
Notes, Notices, and Cautions
Note: A note indicates important information that helps you make better use of your computer.
Notice: A notice indicates either potential damage to hardware or loss of data and tells you how to avoid the
problem.
CAUTION: A CAUTION indicates a potential for property damage, personal injury, or death.
Information in this document is subject to change without notice.
© 2006-2007 Dell Inc. All rights reserved.
Trademarks used in this text: the Dell logo, Dimension, OptiPlex, Precision, Latitude, Inspiron, DellNet, PowerEdge,
PowerConnect, and PowerVault, are trademarks of Dell Inc. Microsoft Windows, and Windows Server are registered
trademarks of Microsoft Corporation; Novell and NetWare are registered trademarks of Novell, Inc.; UNIX is a registered
trademark of The Open Group in the United States and other countries; Red Hat is a registered trademark of Red Hat,
Inc.; TapeWare is a registered trademark of Yosemite Technologies, Inc.; VERITAS is a registered trademark and Backup
Exec is a trademark of VERITAS Software Corporation in the USA and/or other countries. CommVault is a registered
trademark of CommVault Systems, Inc.; LEGATO is a registered trademark of LEGATO Software.
Other trademarks and trade names may be used in this document to refer to either the entities claiming the marks and
names or their products. Dell Inc. disclaims any proprietary interest in trademarks and trade names other than its own.
All other trademarks are registered marks of their respective owners.
Initial release: May 2007
Introduction
Overview
Features
Capacity and Transfer Rates
SCSI Bus Interface
Tape Backup Software
Data Compression
Front Panel LEDs
Overview
Thie Dell™ PowerVault™ LTO-2-024 is a third generation LTO tape drive designed for high performance, high capacity,
and high reliability data storage in a small form factor. Due to the low power consumption, low heat dissipation, and
multiple mounting holes, the PowerVault LTO-2-024 can easily be integrated into desktop workstations and servers, as
well as in a table-top version connected externally to the server. Using advanced technologies, this drive offers twice the
capacity and data transfer rates of the preceding generation but needs only half the space.
The external table-top version has a rugged design that allows for an easy connection to the host system.
Figure 1: The PowerVault LTO-2-024 Tape Drive
Internal drive External drive
Features
The tape drive has the following features:
Ultra160 SCSI interface
Provides excellent performance.
High speed back-up.
Provides 24 MByte/sec native transfer rate
Backward compatible for investment protection
Read/write compatible with LTO2 and LTO1 media.
Embedded quality monitoring and test features
Provides preventive maintenance information for reduced down time.
Small footprint
5.25 inch half-height form factor with several mounting capabilities for easy and trouble free integration into
servers and workstations.
Rugged external table-top version.
Media Management
Keeps track of Read/Write performance and detects when the drive needs cleaning, if there is a defective or worn
media, or the tape drive head has degraded.
Stand Alone Diagnostics
Provides self-diagnostic routines independent of the host to troubleshoot the drive.
Intelligent Head Cleaning
Determines and initiates a head brush cleaning when needed as well as indicating the need for a cleaning cartridge
when required.
Intelligent Thermal Guard
Provides drive and media protection by monitoring the internal temperature. The drive will slow down or even stop
an operation if needed to avoid destruction of critical drive components or the media.
Smart Gripper
TM
Catches and holds the tape pin firmly avoiding "lost leader" problems
Variable Speed
Provides host transfer rate matching by dynamically selecting between five different transfer rates (12 - 24
MB/sec).
Capacity and Transfer Rates
Characteristic Value
Tape length (m) 609
Native capacity (GB) 200
Compressed capacity (GB) assuming 2:1 compression 400
Native transfer rate (MB/sec) 24
Variable speed transfer rates (MB/sec) 12, 15, 18, 21, 24
SCSI Bus Interface
The PowerVault LTO-2-024 tape drive is designed to operate with a burst transfer rate up to 160 MB/sec, and may be
attached to an Ultra160 or Ultra 320 low voltage differential (LVD) SCSI bus.
The tape drive features a high density 68-pin (HD-68) connector for attachment to the server or to the interface
connector in an external tabletop device.
Note: Dell recommends that you attach the tape drive to SCSI controllers that support the SCSI LVD interface only.
Attaching the tape drive to a non-LVD SCSI controller or an 8-bit narrow SCSI controller will degrade the
performance of your tape drive and backup operations. Performance will also be degraded if you attach non-LVD
SCSI devices on the same bus cable as your LVD connection. If you install an adapter, it is recommended that you
purchase a SCSI LVD controller kit that includes the SCSI cable and terminator.
Do not connect the tape drive to a disk RAID controller (disk RAID controllers are not supported). If, however, your
system is a Dell server with an embedded RAID solution that can be configured for RAID/SCSI operation, the tape
drive can be connected to the SCSI channel.
Tape Backup Software
You will need tape backup software that supports the Dell PowerVault™ tape drive. Note that native backup applications
(for example, the UNIX
®
.tar command) generally do not provide the required data streaming rate to get the full
performance out of your tape drive. (However, if for some reason you need to use the Microsoft
®
Windows
®
native
backup software, the drivers for your tape drive under Windows 2003 are included on the CD that came with the drive.)
Dell recommends using a backup application that provides improved memory management as well as other useful
features, such as TapeAlert.
See the User's Operating Guide supplied with your Tape Backup application. For the latest supported software versions, go
to the Dell Support website at www.
support.dell.com or visit the support site of your backup software vendor.
Data Compression
Data Compression is a way to increase capacity on a storage device. Compression ratios are normally specified to be 2:1,
assuming that it is possible to store twice as much data on the tape as without data compression. However, the
compression rate is dependant on the type of data (i.e. ordinary text files can be compressed in a much higher rate than
program, media, and picture files).
There are two ways to compress data, hardware compression and software compression. Hardware compression means
that the data compression is done by the electronics in the storage device. Software compression means that an
application program in the host computer is compressing the data before it is sent to the storage device. Hardware
compression is much more efficient and works much faster than software compression.
The PowerVault LTO-2-024 tape drive uses SLDC hardware compression to compress data. This feature is enabled per
default but the user may turn off data compression through the application software.
Note: If the data is compressed by software in the host computer, and then sent to a device that does hardware
compression, the data have a tendency to expand instead of being compressed because the control data used on the
tape.
Be sure to turn the software data compression off if using the PowerVault LTO-2-024 - which has embedded
hardware compression.
Front Panel LEDs
Figure 2: Status indicators (LEDs) on the front panel
Table 1: Front-Panel LEDs
READY LED
(Green)
Activity LED
(Green)
CLEAN LED
(Amber)
FAULT LED
(Amber)
For complete information including failure conditions and FW loading see Front LED Indicators.
Troubleshooting
Hardware
Software
Verifying Recent Changes
Standalone Diagnostics
Media Management Reporting
Problem Situations
In case of problems with the operation of your PowerVault LTO-2-024 tape drive and before contacting the Customer
Services Group, ensure that you check the following:
Hardware Troubleshooting
1. Check that the system recognizes the tape drive during the boot process.
2.
Check that the SCSI host adapter recognizes the tape drive during its initialization.
3.
Check the tape drive front panel LED status.
4.
Check that the SCSI ID of the drive is not conflicting on the SCSI bus.
5.
Check that the power cable is inserted correctly.
6.
Check that the SCSI cable connections including termination are made correctly.
Software Troubleshooting
1. Check that the operating system does not report a problem during the boot.
2.
Check that the driver for the SCSI host adapter is present and loaded properly.
3.
Check that the correct tape device driver has been installed properly - if applicable.
4.
Check that the backup software does not report any error messages when loading.
5.
If any problem occurs, reinstall the backup application software and check that the PowerVault LTO-2-024 is
recognized.
Verifying Recent Changes
If the PowerVault LTO-2-024 has been installed previously and operating correctly but is now incurring a problem, verify
any recent changes to the system to ensure that these changes are not causing the problem. Try the following:
1.
If the system configuration has changed:
Remove the change to see if it affected the tape drive.
2.
If an operating system corrective patch has been installed:
Remove it to see if it affected the tape drive.
3.
If a SCSI device has been added:
Check for SCSI ID conflicts.
4.
If a SCSI device has been added:
Check the SCSI termination.
Standalone Diagnostics
The main objective of Standalone Diagnostics test is to test the complete drive as comprehensively and quickly as possible
without any drive configuration or host support. The tool can also be used to verify tapes.
Starting the Test
A Standalone Diagnostic test requires a tape that is not write-protected. The media type can be any media type that
supports a tape format that can be written by the drive.
Notice: Since the test involves write operations, the existing tape contents will be destroyed.
Note: If the Clean LED is On, it will remain On after a test is run. To clear the Clean LED, run a cleaning cartridge.
1. Ensure that no cartridge is loaded. If a cartridge is loaded it can be ejected by double-clicking the eject button.
2.
Enter Service Mode by keeping the Eject button pressed for at least 6 seconds.
The Ready LED (on the left) starts flashing quickly (indicating the drive is in Service Mode and that Service entry
number 1 is active).
3.
Insert the tape cartridge into the drive within 15 seconds.
The drive loads the cartridge and the Ready LED starts flashing indicating that Standalone Diagnostics has started.
The eject button has now returned to normal mode. During the Standalone Diagnostics test, it is possible to abort
the test and eject the cartridge by clicking the eject button. The drive indicates the detection of the abort request
by flashing both the Ready and Activity LEDs. Depending on which stage the test is aborted, it may take a while
before the drive starts the eject operation. When the cartridge has been ejected, all LEDs are turned off. The
Clean LED may still be On.
The Ready LED will continuously flash during the entire testing process. The Activity LED will flash as the tape is in
motion during testing.
If no cartridge has been inserted after 15 seconds, the LEDs revert back to their initial state and the eject button
must be pressed for 6 seconds again to get back to Service Mode.
Test Sequence
The Standalone Diagnostics test will perform the following operations:
Collect Information: Reads and stores drive and media information:
Firmware and drive ID
Tape type and format
Cartridge serial number
Error History Log and Log page 0x33 from EEPROM
Run-time counters from EEPROM
Mainboard Test. Tests the mainboard hardware.
Cartridge Manipulation Test: The Cartridge Manipulation Test performs the same mechanical movement operations as
those performed during Cartridge Load and Eject.
Read/Write Test: This test involves actual reading and writing on the tape medium. A write pass and a read pass are
executed.
When the test has completed without errors the tape cartridge is ejected. No LEDs will be lit. The Clean LED may be On.
Failure Indication
When a failure has been detected the tape is not ejected and the Failure LED will be flashing.
Note for programmers:
Detailed test results are available through the Receive Diagnostics SCSI command. To use this command, Support-only
tools are required.
If a write protected, unsupported, or damaged tape cartridge is inserted prior to starting the Standalone Diagnostics test,
it will be ejected by the drive and the Failure and Activity LEDs will be flashing while the Ready LED is off. The two
flashing LEDs can be turned off by clicking the eject button.
Media Management Reporting
Media Management (MM) is a feature embedded in the PowerVault LTO-2-024 tape drive’s firmware that monitors the
read and write performance of the tape drive and media. Write performance information is written on the media header
every time the media is rewound, and before the media is unloaded.
Cleaning is Required
If the write performance falls below a set re-write threshold, the PowerVault LTO-2-024 reports that cleaning is required
by setting the Clean LED to a steady amber. If you are using a backup application that supports TapeAlert then the
application will also report that the drive requires cleaning. See Cleaning Procedure
for instructions on how to clean.
Degraded Media
If the write performance is still below the re-write threshold after cleaning, MM illuminates the Clean LED (set to steady
amber) and reports to the backup application software that the media is degraded.
The degraded media warning means that the cartridge should not be used; it may become worn to the point where drive
cannot write or read successfully using this cartridge.
Problem Situations
Dead on Arrival
1. Check LED activity at power up.
All four LEDs should flash for two seconds at power up and the Ready LED flashes for several seconds while the
power-on self test is running.
2.
Make sure that the power supply used is working:
Measure with an external voltmeter or use a verified supply.
3.
Perform “drive dead test when supply is verified.
Push the eject button for at least 6 seconds to enter the “drive dead test”. The Activity LED should keep flashing
for approximately 15 seconds.
If the drive still looks dead try to remove all cables except power and rerun the “drive dead test.” A defective cable or
SCSI host bus adapter may affect the drive.
Drive Not Detected by the Operating System
1. Check LED activity at Power Up.
All four LEDs should flash for two seconds at power up and the Ready LED flashes for several seconds while the
power-on self test is running.
2.
Check the SCSI ID.
Each device on the SCSI bus needs a unique SCSI ID. The SCSI ID is set with jumpers on the back of the drive.
See SCSI Configuration
.
3.
Check SCSI termination.
The SCSI bus should be terminated at the end of the cable. A defective terminator may affect the drive.
Will Not Insert/Hold Media or Media is Not Recognized
1. Check the cartridge type.
The PowerVault LTO-2-024 will only accept LTO-3, LTO-2 or LTO-1 type data or cleaning cartridges.
If a wrong type of cartridge is inserted, the drive will eject the media with the Activity LED and Fault LED flashing.
2.
Check media orientation.
The arrow on the cartridge must point into the tape drive facing up when the tape drive is mounted horizontally
with the LEDs on the right.
Media can be inserted only one way and there are mechanical blocks to prevent improper insertion.
3.
Try using a new cartridge.
If it loads correctly, check the failing cartridge for damage.
4.
Check failing media for pin damage (buckling pin).
Hold the cartridge in your hand with the write protect switch to your left and orientation arrow pointing from you.
On the right side, all the way towards the front is a small door that can be opened by sliding the door towards
you. Inside the cartridge you should see a metal pin that is held tightly in place and has media attached to it. If
the pin is missing, loose or damaged the tape will be rejected from the drive.
Noisy Tape Drive
There are no fans in the PowerVault LTO-2-024 tape drive and any noise should be very low in idle mode. When the tape
is in motion, noise can come from the media and motors when loading or reading/writing data. The sound should be
steady when streaming but may be intermittent if the host is not delivering data at the data rate of the drive.
1.
Check if the noise comes from the cartridge.
Insert new media – first check this media for any damage.
2.
Check that the PowerVault LTO-2-024 is mounted correctly.
If the PowerVault LTO-2-024 is mounted incorrectly, it can produce abnormal noise when the tape moves.
Cartridge is Stuck Inside the Drive
1. Try to eject the cartridge by pushing the Eject button
2.
Do a drive reset using the Service mode.
Service mode is entered by keeping the eject button pressed for at least six seconds. The Activity LED starts
flashing.
To reset the drive, push the eject button once more to make the Activity LED flash. While
the Activity LED is
flashing, double-click the eject button. This should invoke a reset of the drive.
If the button is not pushed for 15 seconds, the eject button reverts back to its original cartridge eject function.
3. Power cycle the drive (switch power on/off, if possible).
Fault LED Flashes Amber and the Activity LED is Off
The tape drive reports that it has a failure.
1.
Do a Drive reset using the Service mode.
Service mode is entered by keeping the Eject button pressed for at least six seconds. The Ready LED will start
flashing.
To reset the drive, push the eject button once more to make the Activity LED flash. While this LED is flashing,
double-click the eject button. This should make the drive do a reset.
If the button is not pushed for 15 seconds, the eject button reverts back to its original cartridge eject function.
2.
Power cycle the drive (switch power on/off, if possible).
Fault LED Flashes Amber and the Activity LED is Flashing
The drive signals Media Error.
To eject media, press the Eject button.
1.
Ensure the media is the correct type and compatible.
2.
Check the write protection switch position.
3.
Check if the media is damaged (see Will Not Insert/Hold Media or Media is Not Recognized).
4.
Check if an expired cleaning cartridge was used (Clean LED is On).
Clean LED is On
The Clean LED will be lit 100 hours after the last cleaning operation or after an unrecoverable read or write error. These
errors are often caused by debris on the head indicating the drive should be cleaned. See Cleaning Procedure
for cleaning
instruction.
Incorrect Data Compression
1. Check if data is already compressed
Data may have been compressed by software in the host computer.
In some cases data will actually expand when subjected to both the hardware and software compression. This can
occur when sending data already compressed at the software application level to the drive and the compression
option is enabled. If this is the case the drive may try to turn compression on and off to optimize the data storage
having the negative unintended result of data expansion.
Note: The PowerVault LTO-2-024 has compression On by default. The compression can be turned Off by
using the SCSI Mode Select command.
2. Turn Off any software compression in use.
The compression is already being accomplished at the hardware level of the PowerVault LTO-2-024 drive.
Therefore any other compression software in the host or on the host bus adapter should be turned off.
The data is compressed using the SLDC (Streaming Lossless Data Compression) algorithm that is based on ALDC
(Adaptive Lossless Data Compression). The SLDC format is defined in the ECMA-321 standard. Two enhancements
are introduced:
o Two methods to reduce expansion of uncompressible data.
o Embedded code word.
Slow Performance
Check that the software driver used for the PowerVault LTO-2-024 is the latest version.
Check the SCSI ID
Each device on the SCSI bus needs a unique SCSI ID. The SCSI ID is set with jumpers on the back of the drive.
Check SCSI termination
The SCSI bus should be terminated at the end of the cable. A defective terminator may affect the drive.
Clean the tape drive.
Perform a Drive Diagnostics test.
Intermittent Failures
If the drive fails intermittently:
1.
Clean the tape drive.
2.
Check the SCSI termination on the SCSI bus.
3.
Check the operating system logs for any errors.
If the problem occurs in the middle of an operation:
1.
Use a different data cartridge.
2.
If the error occurs when the software scans for the files to be backed up, please operate a SCANDISK (or similar)
operation to check the state of the File Systems(s) and hard disk.
If the error consistently occurs on the same file or directory:
1.
Try to remove the file or directory from the backup operation to see if that corrects the problem.
2.
Use a different data cartridge before the drive is sent for service.
3.
If the issue is still not resolved, contact technical support.
Installation - Internal drive
Pre-Installed Drives
Installing the Drive
Installing the Drive: SCSI Configuration and Connection
Installing the Drive: Mechanical Installation
Installing Tape Backup Software
Installing Software Device Drivers
Verifying Tape Drive Operation
CAUTION: Before performing any of the procedures in this section, read and follow the safety
instructions located in your tape drive's Product Information Guide.
Pre-Installed Drives
Dell™ installs and configures drives that are shipped as part of the system. However, the tape backup software is not
installed by Dell. Installation instructions are provided with the software.
Store the tape backup software CD/diskette that ships with your system in a safe place in case you ever need to reinstall
the software.
Installing the Drive
If your tape drive is not pre-installed, the installation instructions are in the following sections.
Installing the Drive: Prerequisites
You need the following items to install your internal tape drive:
Ensure that the SCSI host bus adapter is one of the supported types. For a list of the supported SCSI adapters, go
to the Dell Support website at www.
support.dell.com.
5.25-inch half-height bay.
Internal SCSI-cable with an LVD terminator attached.
Backup application software that supports the internal tape drive.
Phillips screwdriver, if your system uses Phillips screws.
Flat-bladed screwdriver, if your system uses flathead screws.
TORX screwdriver, if your system uses TORX screws.
System documentation, which you can refer to during the installation.
Mounting Bay and Hardware
You need one industry standard, 5 1/4-inch, half-height bay to install the PowerVault LTO-2-024 drive.
CAUTION: The computer must provide forced cooling and be capable of drawing 6 cfm (0.17 cubic
meters/minute or 10.08 cubic meters/hour) of air through the tape drive.
See your system documentation to ensure that your system meets these requirements. Also, the documentation specifies
if any special mounting brackets are needed. Next, ensure that all fans in your system are in place and operational and
that empty bays have the appropriate blanking plates so that airflow is maintained.
Installing the Drive: SCSI Configuration and Connection
The PowerVault LTO-2-024 tape drive is designed to operate on an Ultra160 or Ultra320 low voltage differential (LVD)
SCSI bus with an LVD SCSI terminator.
SCSI Configuration
All devices on a SCSI bus need their own unique identification, called the SCSI ID. If a SCSI ID conflict exists, some of the
SCSI devices will not be recognized by your system. Normally the SCSI Host Adaptor (HBA) uses SCSI ID 7 and the
default for the drive is SCSI ID 6. The SCSI ID is set with Jumpers as shown below.
Figure 1: Drive connectors, internal model
A = Power Connector
B = Service Connector (the right-most 4 strap pin pairs of the complete connector)
C = SCSI connector
Table 1: Service Connector strap settings for SCSI ID (Dark = Strap mounted)
If the tape drive is going to share the SCSI bus with other devices, check the SCSI ID numbers used by the other devices,
then set the drive’s SCSI ID to a number that is not being used.
Note: Notice that the SCSI host adapter uses ID 7.
For optimal performance Dell recommends that the tape drive be the only device on the SCSI bus.
SCSI Termination
A SCSI bus must be terminated at both ends. The SCSI Host Adaptor provides the termination for one end but the tape
drive does not provide termination for the other. Therefore, if the tape drive is the last device on the bus, a cable with
proper LVD termination is required within 10 cm of the drive as illustrated below.
Figure 2: SCSI cable
PowerVault LTO-2-024 has a combined SCSI-LVD/SE interface embedded. The PC-98 Specification specifies that the
termination of the SCSI bus system is a part of the SCSI-cable and not a part of the SCSI-device.
For internal devices, a SCSI-cable with an integrated terminator or a separate terminator applied to the end connector of
the cable, 10 cm from the last device must be used.
Installing the Drive: Mechanical Installation
Mechanical mounting specifications are specified in the illustration below.
Figure 3: Allowed mounting orientations
Mounting Screw Requirements
The tape drive occupies a half-height 5.25" slot within your system.
Depending on the server design, the tape drive may be supplied with shoulder screws or flat screws, provided in a
separate bag.
Figure 4: Mounting specifications, shoulder screws
The shoulder screws shall be mounted in the four upper mounting holes of the drive. Fix the screws firmly without using
excess force. Slide the drive with the shoulder screws attached into the mounting slot of the server.
If the server is designed for flat screws, it shall be mounted in a carrier sled using mounting brackets:
1. Place drive in carrier and align screw mounting holes in the drive near front of screw hole slots in the carrier (For
best fit, the drive screw holes should be as close to the front of the carrier screw slots as possible.)
2. Using the M3x3mm screws, attach drive to carrier sled through the exposed mounting holes.
Tape Drive Installation
CAUTION: To avoid personal injury or damage to the computer or tape drive, ensure that the system is
disconnected from the main power source while you install the drive.
Figure 5: Installing the internal tape drive
1. Gather the necessary tools and materials.
2.
Shut down the system and turn off any connected peripherals.
3.
Remove the side cover, front panel (if necessary), and filler panel from a 5.25-inch bay of your system as detailed
in the system’s documentation.
4.
Orient the drive as shown in figure 6.
5.
Secure the tape drive to the bay.
NOTE:
If shoulder screws are already attached to the drive then slide the drive in the system until it is secure.
If screws are provided in a separate bag install shoulder screws as shown in figure 4.
If the screws provided are flat screws, install the mounting rails as given by the server documentation.
6.
Connect the power and SCSI cable, as shown in figure 6. Be careful to connect the cables in the right orientation.
Before powering on the server, check the SCSI settings as detailed in the next section.
Figure 6: Connecting the cables to the tape drive
Installing Tape Backup Software
Install your backup program as specified in the software’s documentation.
Installing Software Device Drivers
Note: Most backup applications provide all the necessary device driver support for your drive. However, if you intend
to use the drive with the Microsoft
®
Windows
®
native backup software you will need the drivers included with the
Dell PowerVault LTO-2-024 Tape Drive Documentation and Drivers CD. The latest drivers can be downloaded from
www.
support.dell.com.
Windows Server 2003
Windows Tape Driver Installation
1. Right-click My Computer.
2.
Select Manage, you should see the tape drive under "Other devices" with a "?".
3.
Select the device, right click and select Properties.
4.
Select the appropriate driver location.
5.
Follow the instructions on the screen.
Backup Utility for Windows
The Backup application is included in the Windows Operating System.
Before running the application, make sure the tape driver for your PowerVault LTO-2-024 tape drive is properly installed.
To start the application, click Start Programs Accessories System Tools Backup.
Linux
SCSI Host Adapter
Linux contains a driver for most SCSI host adapters. For more information, see the documentation provided with the SCSI
host adapter.
If the driver cannot be found, see the documentation provided with the SCSI host adapter.
Linux System Command
TAR, CPIO and DD allow simple backup, verify or restore operations to be performed.
Two different device drivers can be used:
A Non Rewind device driver (used to perform append backup)
A Rewind device driver (used only to perform overwrite backup)
Tar command examples:
tar cvf /dev/st0 /etc performs the backup of the /etc directory
tar tvf /dev/st0 reads the data on the tape
tar xvf /dev/st0 restores the data from the tape to the current directory tree
Note: For a complete explanation on how to use the system commands, please refer to the Linux documentation, or
the online help. (MAN command).
Verifying Tape Drive Operation
Once you have installed the PowerVault LTO-2-024 tape drive, verify that it is functioning properly before you attempt to
store data.
1.
Switch on the host computer.
2.
The PowerVault LTO-2-024 tape drive starts a power on self test (POST) that exercises most of its functionality.
3.
All four LEDs light up for 2 seconds during power-up (see Front LED Indicators).
4.
The Activity LED flashes during POST.
5.
When complete only the Ready LED will remain on.
If there is an error, the tape drive will flash the Fault LED. Please refer to Troubleshooting
if this happens.
6.
Firmly push the cartridge to its end stop, then release the cartridge.
The Activity LED will start flashing.
The cartridge will move back a short section.
The cartridge will then be lowered into the drive.
The tape will be loaded. The sound of the gears may be heard.
When the tape is fully loaded, the Activity LED will stop blinking, and the Ready LED will remain on.
Getting Help
Technical Assistance
Dell Enterprise Training and Certification
Problems With Your Order
Product Information
Returning Items for Warranty Repair or Credit
Before You Call
Technical Assistance
If you need assistance with a technical problem, perform the following steps:
1. Complete the procedures in "Troubleshooting Your System."
2. Run the system diagnostics and record any information provided.
3. Make a copy of the Diagnostics Checklist
, and fill it out.
4. Use Dell's extensive suite of online services available at Dell Support at www.support.dell.com
for help with
installation and troubleshooting procedures.
For more information, see "Online Services."
5. If the preceding steps have not resolved the problem, call Dell for technical assistance.
NOTE: Call technical support from a phone near or at the system so that technical support can assist you with any
necessary procedures.
NOTE: Dell's Express Service Code system may not be available in all countries.
When prompted by Dell's automated telephone system, enter your Express Service Code to route the call directly to
the proper support personnel. If you do not have an Express Service Code, open the Dell Accessories folder,
double-click the Express Service Code icon, and follow the directions.
For instructions on using the technical support service, see "Technical Support Service
" and "Before You Call."
NOTE: Some of the following services are not always available in all locations outside the continental U.S. Call your local
Dell representative for information on availability.
Online Services
You can access Dell Support at support.dell.com. Select your region on the WELCOME TO DELL SUPPORT page, and
fill in the requested details to access help tools and information.
You can contact Dell electronically using the following addresses:
World Wide Web
www.dell.com
www.dell.com/ap (Asian/Pacific countries only)
www.dell.com.cn
(China only)
www.dell.com/jp
(Japan only)
www.euro.dell.com
(Europe only)
www.dell.com/la (Latin American countries)
www.dell.ca
(Canada only)
Anonymous file transfer protocol (FTP)
ftp.dell.com/
Log in as user:anonymous, and use your e-mail address as your password.
Electronic Support Service
[email protected] (Asian/Pacific countries only)
[email protected] (China only)
support.jp.dell.com (Japan only)
support.euro.dell.com(Europe only)
Electronic Quote Service
[email protected] (Asian/Pacific countries only)
[email protected] (Canada only)
Electronic Information Service
AutoTech Service
Dell's automated technical support service—AutoTech—provides recorded answers to the questions most frequently asked
by Dell customers about their portable and desktop computer systems.
When you call AutoTech, use your touch-tone telephone to select the subjects that correspond to your questions.
The AutoTech service is available 24 hours a day, 7 days a week. You can also access this service through the technical
support service. See the contact information for your region.
Automated Order-Status Service
To check on the status of any Dell™ products that you have ordered, you can go to www.support.dell.com, or you can
call the automated order-status service. A recording prompts you for the information needed to locate and report on your
order. See the contact information for your region.
Technical Support Service
Dell's technical support service is available 24 hours a day, 7 days a week, to answer your questions about Dell hardware.
Our technical support staff use computer-based diagnostics to provide fast, accurate answers.
To contact Dell's technical support service, see "Before You Call
" and then see the contact information for your region.
Dell Enterprise Training and Certification
Dell Enterprise Training and Certification is available; see www.dell.com/training for more information. This service
may not be offered in all locations.
Problems With Your Order
If you have a problem with your order, such as missing parts, wrong parts, or incorrect billing, contact Dell for customer
assistance. Have your invoice or packing slip available when you call. See the contact information for your region.
Product Information
If you need information about additional products available from Dell, or if you would like to place an order, visit the Dell
website at www.dell.com
. For the telephone number to call to speak to a sales specialist, see the contact information
for your region.
Returning Items for Warranty Repair or Credit
Prepare all items being returned, whether for repair or credit, as follows:
1. Call Dell to obtain a Return Material Authorization Number, and write it clearly and prominently on the outside of
the box.
For the telephone number to call, see the contact information for your region.
2. Include a copy of the invoice and a letter describing the reason for the return.
3. Include a copy of any diagnostic information (including the Diagnostics Checklist) indicating the tests you have run
and any error messages reported by the system diagnostics.
4. Include any accessories that belong with the item(s) being returned (such as power cables, media such as CDs and
diskettes, and guides) if the return is for credit.
5. Pack the equipment to be returned in the original (or equivalent) packing materials.
You are responsible for paying shipping expenses. You are also responsible for insuring any product returned, and
you assume the risk of loss during shipment to Dell. Collect-on-delivery (C.O.D.) packages are not accepted.
Returns that are missing any of the preceding requirements will be refused at our receiving dock and returned to you.
Before You Call
NOTE: Have your Express Service Code ready when you call. The code helps Dell's automated-support telephone system
direct your call more efficiently.
Remember to fill out the Diagnostics Checklist. If possible, turn on your system before you call Dell for technical
assistance and call from a telephone at or near the computer. You may be asked to type some commands at the
keyboard, relay detailed information during operations, or try other troubleshooting steps possible only at the computer
system itself. Ensure that the system documentation is available.
CAUTION: Before servicing any components inside your computer, see your System Information Guide
for important safety information.
Diagnostics Checklist
Name:
Date:
Address:
Phone number:
Service Tag (bar code on the back of the computer):
Express Service Code:
Return Material Authorization Number (if provided by Dell support technician):
Operating system and version:
Peripherals:
Expansion cards:
Are you connected to a network? Yes No
Network, version, and network card:
Programs and versions:
See your operating system documentation to determine the contents of the system's start-up files. If possible, print
each file. Otherwise, record the contents of each file before calling Dell.
Error message, beep code, or diagnostic code:
Description of problem and troubleshooting procedures you performed:
Back to Contents Page
Installation External Drive
Accessories
Installing the Drive
Drive orientation
External Tape Drive Installation
Installing the Drive: SCSI Configuration and Connection
Installing Tape Backup Software
Installing Software Device Drivers
Verifying Tape Drive Operation
CAUTION: Before performing any of the procedures in this section, read and follow the safety instructions located in your tape drive's Product Information Guide.
A
ccessories
Check that the
following accessories are delivered with the External drive:
External PowerVault LTO-2-024 tape drive
Power cable
SCSI cable
Terminator
Cleaning cartridge
Documentation and drivers CD
Placemat
Product Information Guide
SCSI Adapter (HBA) (optional)
Tape backup software (optional)
Store the tape backup software CD/diskette that came with your system in a safe place in case you ever need to reinstall the software.
Installing the Drive
The installation instructions are in the following sections.
Installing the Drive: Prerequisites
Before installing the external tape drive, ensure that
the following items are available:
Ensure that the SCSI host bus adapter is one of the supported types. For a list of the supported SCSI adapters, go to the Dell Support website at www.support.dell.com
External SCSI cable and an LVD terminator
Power cable
Backup application software that supports the tape drive
System documentation
Drive orientation
The external drive should be mounted in a horizontal position.
Figure
1: Recommended mounting orientation
External Tape Drive Installation
CAUTION: Do not apply or insert power cord until all connections have been made.
1.
Turn off the power on your server/PC system.
2.
Open your system and install the SCSI controller card in the appropriate slot. When complete, close your system. Connect the tape drive to your Server/PC with the SCSI cable provided to any of the two available SCSI connectors. Remember to place the termination on the free connector on the back of the tape drive.
3.
Connect the power cable provided to the power connector on the tape drive and to the power outlet.
4.
Turn on the power to the tape drive with the ON/OFF switch.
5.
Turn on the power to your server/PC and check that all your SCSI devices are recognized by the SCSI controller board.
Figure
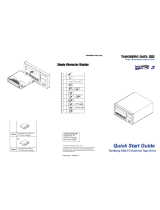
2 Drive connectors, external tabletop model
A= ON/OFF Switch
B = Power Connector
C = SCSI Interface and Terminator Connectors
D = SCSI-ID Switch
Installing the Drive: SCSI Configuration and Connection
The
PowerVault LTO-2-024 tape drive is designed to operate on an Ultra160 and Ultra320 low voltage differential (LVD) SCSI bus with an LVD SCSI terminator.
SCSI Configuration
All devices on a SCSI bus need their own unique identification, called the SCSI ID. If a SCSI ID conflict exists, some of the SCSI devices will not be recognized by your system. Normally the SCSI Host Adapter uses SCSI ID 7 and the default for the external drive is SCSI ID 6.
For the external drives, you will find the SCSI-ID setting switch on the rear end of the unit box:
Figure 3.
SCSI-ID Thumb-wheel
If the tape drive is going to share the SCSI bus with other devices, check the SCSI ID numbers used by the other devices,
then set the drive’s SCSI ID to a number that is not being used.
Note: The SCSI host adapter normally uses ID 7.
SCSI-bus Termination
External Tape Drives
For optimal performance, Dell recommends
that the PowerVault LTO-2-024 is the only device on the external SCSI-bus. In that case it must be terminated using the external SCSI termination installed in the second SCSI connector position.
Figure 4: Termination of external SCSI devices
A = Terminator
B = External SCSI cable
Note: Make certain the terminator is connected to the second SCSI connector.
If other external devices are present, the PowerVault LTO-2 -024 tape drive can be installed in any position on the SCSI-bus. The PowerVault LTO -2-024 tape drive must be terminated if installed at the end of the SCSI-bus.
Installing Tape Backup Software
To install the tape
backup software, see the documentation that ships with the software.
Installing
Software Device Drivers
Note: Most backup applications provide all the necessary device driver support for your drive. However, if you intend to use the drive with the Microsoft
®
Windows
®
native backup software you will need the drivers included with the Dell PowerVault LTO-2-024 Documentation and Drivers CD. For the latest drivers go to the Dell Support website at www.support.dell.com.
Windows Server 2003
Windows Tape Driver
Installation
1. Right-click My Computer.
2.
Select Manage, you should see the tape drive under "Other devices" with a "?".
3.
Select the device, right click and select Properties.
4.
Select the appropriate driver location.
5.
Follow the instructions on the screen.
Backup
Utility for Windows
The Backup application is included in the Windows Operating System.
Before running the application,
ensure that the tape driver for your PowerVault LTO-2-024 tape drive is properly installed.
To start
the application, click Start Programs Accessories System Tools Backup .
Linux
Linux System Command
TAR
, CPIO and DD allow simple Backup, Verify or Restore operations to be performed.
Two different device drivers can be used:
A Non Rewind device driver (used to perform append backup)
A Rewind device driver (used only to perform overwrite backup)
Tar command examples:
tar
cvf /dev/st0 /etc performs the backup of the /etc directory
tar
tvf /dev/st0 reads the data on the tape
tar
xvf /dev/st0 restores the data from the tape to the current directory tree
Note: For any questions related to this operating system or its embedded backup applet, see the documentation provided on the Linux CD-ROM.
Verifying Tape Drive Operation
Once you have installed the PowerVault LTO-2- 024 tape drive, verify that it is functioning properly before you attempt to store data.
1. Switch on the external PowerVault LTO-2-024 (The LEDs may be flickering until the host computer is switched on)
2.
Switch on the host computer.
3.
The PowerVault LTO-2-024 tape drive starts a power on self test (POST) that exercises most of its functionality.
4.
All four LEDs light up for 2 seconds during power-up (see Front LED Indicators).
5.
The Activity LED flashes during POST.
6.
All LED's will turn off except for the Ready LED.
If there was an error, the tape drive will flash the Fault LED. Please refer to Troubleshooting if this happens.
7.
Firmly push the cartridge in until the loading mechanism is activated, then release the cartridge.
· The Activity LED will start flashing.
· The cartridge will move back a short section.
· The cartridge will then be lowered into the drive.
· The tape will be loaded. The sound of the gears may be heard.
· When the tape is fully loaded, the Activity LED will stop blinking, and the Ready LED will be on.
  • Page 1 1
  • Page 2 2
  • Page 3 3
  • Page 4 4
  • Page 5 5
  • Page 6 6
  • Page 7 7
  • Page 8 8
  • Page 9 9
  • Page 10 10
  • Page 11 11
  • Page 12 12
  • Page 13 13
  • Page 14 14
  • Page 15 15
  • Page 16 16
  • Page 17 17
  • Page 18 18
  • Page 19 19
  • Page 20 20
  • Page 21 21
  • Page 22 22
  • Page 23 23
  • Page 24 24
  • Page 25 25
  • Page 26 26
  • Page 27 27
  • Page 28 28
  • Page 29 29
  • Page 30 30
  • Page 31 31
  • Page 32 32
  • Page 33 33
  • Page 34 34
  • Page 35 35
  • Page 36 36
  • Page 37 37
  • Page 38 38
  • Page 39 39
  • Page 40 40
  • Page 41 41
  • Page 42 42

Dell PowerVault LTO3-060 User guide

Type
User guide

Ask a question and I''ll find the answer in the document

Finding information in a document is now easier with AI