Page is loading ...

ELCMBP_11_14
InstallationInstructions
CastStoneMailboxPost
English
2
Readytomixconcrete
One4”x4”x8’or4”x6”x8’pressure
treatedwoodenpost
Shovelorpostholedigger
Tapemeasure
Powerdrill&bits
Level
Saw
Phillipsscrewdriver
Pencil
8”or12”Concreteformingtube(optional)
MaterialsandToolsRequired
Item Quantity Description
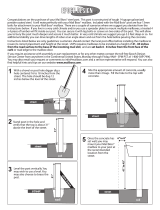
A.1 MailboxPost
B.1 MilledMailboxPlatform
C.1 DecorativeScroll
D. 1 MountingBracket
E. 6 MountingScrews
F. 1 ScrollScrew
G. 4 MailboxScrews
H. 1 InstallationManual
PartsIncludedwiththisProduct
Congratulationsonyourpurchaseofthismailboxpostkit.
Beforeyoubegin,pleaserefertothepartslisttoensureallmateri alsneededforassemblyhavebeenreceived.
Questions?ContactyourlocalEyeLevelDealerorEyeLevelCustomerServiceat888.782.1760,option3.
EyeLevelRepresentativesareavailableweekdays8:00a.m.to5:00p.m.EST.
B.
A.
C. D.
F.
E.
G.

ELCMBP_11_14
InstallationInstructions
CastStoneMailboxPost
English
3
IMPORTANTNOTES:
*Beforedigging,checkforundergroundutilities.TheNorthAmericanOneCallReferralServiceat1.888.258.0808
connectsyoutoanationaldirectoryof utilitycompanies.
**TheUnitedStatesPostalServicerequiresmailboxestobeinstalledwiththebottomoftheboxataverticalheightof
between41to
45inchesfromtheroadsurfaceand6to8inchesfromthefrontfaceofthecurbtothemailboxdoor.
ReadeachstepthoroughlypriortoinstallingtheCastStoneMailboxPost:
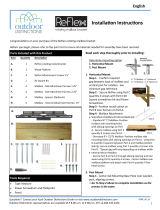
1: Digahole8"‐12”indiameterapproximately24”‐36”deep.*ReviewUSPSmailbox
requirement
fromthecurb.**
2: Determinetheheightofthe4”x4”or4”x6”woodenpostbyaddingthedepthoftheholeplus
40”fromgroundlevel.Markwoodenpostaccordinglyandcutoffexcessmaterialwithasaw.
3: Placewoodenpostincenterofhole
orconcreteformingtubeandfillevenlywith
pre‐mixedconcretetothetopofthehole.Usealeveltomakesurethewoodenpostisstraight
andsecureuntilconcretecures.Ifusinga4”x6”postmakesurethenarrowsideisfacingthe
street.
4:
SlidetheCastStoneMailboxPost(A)overthewoodenpostwiththenarrowersidefacingthe
street.Positioncaststonepostflushtothegroundandflushtothemiddleofthewoodenpost
facingthestreet.
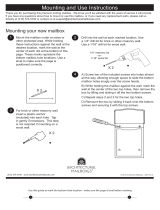
5: PositionMountingBracket(D)toMailboxPost(A)so itis
centeredandevenwiththe
topofthepost.Drillthroughthe2pre‐drilledholesonthemountingbracketand
throughthecaststonepost,andintothewoodenpostwithamasonrybit.Secure
MountingBracket(D)toMailboxPost(A)with2MountingScrews(E)intowooden
post.Drillingsmallpilotholesintowoodenpostwillmakeinsertingthescrewseasier.
6: AttachDecorativeScroll(C)toMailboxPlatform(B)usingScrollScrew(F).
7: PositionthemailboxplatformanddecorativescrollassembledinStep6ontopofthe
caststonemailboxpost.InsertMounting
Screws(E)into4pre‐drilledholesin
MailboxPlatform(B)untilscrewtipsarevisiblethroughotherside.Alignthe4screws
withthewoodenpostandcenterdecorativescrollwithmountingbracket,then
securescrews.
8: MailboxInstallation:Toinstallmailboxontomailboxplatform,followthemailbox
manufacturer’s
installationinstructions.
SideMount:CentermailboxanddrillpilotholesinMailboxPlatform(B)before
attaching.Attachstandardmailbox(notincluded)withMailboxMountingScrews(G).
Oversizedmailboxmayrequirelongerscrews(notincluded).
InsideMount:Centermailbox,markholelocation,anddrillpilotholesintopof
MailboxPlatform(B).Attachwithmailboxmanufacturer’sscrews.
Step5
Questions?ContactyourlocalEyeLevelDealerorEyeLevelCustomerServiceat888.782.1760,option3.
EyeLevelRepresentativesareavailableweekdays8:00a.m.to5:00p.m.EST.
CAREANDMAINTENANCE:
Tocleanthisproduct,useamildsoapinwatersolutionandrubgentlywithsponge.Rinsethoroughlywithwater.
Powerwashingandabrasivematerialsarenotrecommendedandcancausedamage.Mailboxpostismadefrom
GFRC.
Step6
Step7
/


