Page is loading ...

Thank You For Choosing Kohler Company
Thank you for choosing Kohler Company. Your Kohler Company product reflects the
true passion for design, craftsmanship, artistry, and innovation Kohler Company stands
for. We are confident its dependability and beauty will surpass your highest expectations,
satisfying you for years to come.
All the information in this guide is based upon the latest product information available
at the time of publication. At Kohler Company, we strive to fulfill our mission of
improving the level of gracious living for each person who is touched by our products
and services. We reserve the right to make changes in product characteristics, packaging,
or availability at any time without notice.
Please take a few minutes to review this guide. If you encounter any installation or
performance problems, please call 1-800-4-KOHLER from within the USA, 1-800-964-5590
from within Canada, or 001-877-680-1310 from within Mexico.
Merci d’avoir choisi la compagnie Kohler
Merci d’avoir choisi la compagnie Kohler. Votre produit de la compagnie Kohler reflète la
véritable passion du design, d’artisanat, d’art et d’innovation représentant la compagnie
Kohler. Nous sommes confiants que sa fiabilité et beauté surpasseront vos exigences les
plus élevées, vous satisfaisant pendant les années à venir.
Toute l’information dans ce guide est basée sur la dernière disponible au moment de la
publication. A la compagnie Kohler, nous aspirons à remplir notre mission d’améliorer le
niveau de vie gracieux pour chaque individu affecté par nos produits et services. Nous
nous réservons le droit d’apporter toutes modifications aux caractéristiques, emballages
ou disponibilités des produits, et ceci à tout moment et sans préavis.
Veuillez prendre s’il vous plaît quelques minutes pour étudier ce guide. En cas de
problème d’installation ou de performance, veuillez composer le 1-800-4-KOHLER à
partir des É.U., le 1-800-964-5590 à partir du Canada, ou le 001-877-680-1310 à partir du
Mexique.
Gracias por elegir los productos Kohler
Gracias por elegir los productos de Kohler. Su producto de Kohler Company refleja la
verdadera pasión por el diseño, la mano de obra, la artesanía y la innovación que
forman parte de Kohler Company. Estamos seguros que su confiabilidad y belleza
excederán sus más altas expectativas, dándole satisfacción por años.
Toda la información que aparece en la guía está basada en la información más reciente
disponible al momento de publicación. En Kohler Company, nos esforzamos por alcanzar
nuestra misión de mejorar el nivel del buen vivir de quienes disfrutan de nuestros
productos y servicios. Nos reservamos el derecho de efectuar cambios en las
características, embalaje o disponibilidad del producto en cualquier momento, sin previo
aviso.
Dedique unos minutos para leer esta guía. Si tiene algún problema de instalación o
funcionamiento, llámenos al 1-800-4-KOHLER desde los EE.UU., 1-800-964-5590 desde
Canadá, ó 001-877-680-1310 desde México.
1063221-2-B 2 Kohler Co.

Tools/Outils/Herramientas
Before You Begin
CAUTION: Risk of injury or product damage. Unframed tempered glass should
not contact hard surfaces or it may shatter. Do not touch the edge of the tempered
glass panel with tools or any hard objects. Do not set unframed tempered glass
directly on the floor or any other hard surface.
CAUTION: Risk of injury or product damage. Do not cut tempered glass. It will
shatter.
IMPORTANT! Pay special attention to the section titled ″Important″ Failure to follow
the directions could result in product damage.
NOTE: When using a retractable case tape measure, make sure you add the length of
the case to the measurement or measure in a manner that excludes the case.
The shower bath or receptor should be installed/prepared, including finished wall
materials, before continuing.
Before starting the installation, lay out and identify all of the parts. Inspect them
for damage.
Once inspected, return the glass panels to their packaging and place them in a
safe area until they are needed.
Kohler Co. reserves the right to make revisions in the design of products without
notice, as specified in the Price Book.
Avant de commencer
ATTENTION: Risque de blessure ou d’endommagement du produit. Le verre
trempé non encadré ne doit pas être en contact avec les surfaces dures pour ne
pas briser. Ne pas toucher les bords du panneau de verre avec des outils ou des
matériaux durs. Ne pas placer le panneau non encadré directement sur le sol ou
autre surface solide.
ATTENTION: Risque de blessure ou d’endommagement du produit. Ne pas
découper le verre trempé. Il se brisera.
Silicone Sealant
Joint en silicone
Sellador de silicona
Masking Tape
Ruban-cache
Cinta de enmascarar
• Drop Cloth/Toile de protection/Lona
Plus/Plus/Más:
Center Punch
Poinçon
Punzón
Miter Saw or Hacksaw with 32 Teeth Per Inch
Blade
Scie à onglets ou à métaux avec des lames
de 32 dents par pouce
Serrucho de costilla o sierra para metales con
hoja de 32 dientes/pulg
Kohler Co. 3 1063221-2-B
Page is loading ...
Page is loading ...

Important/Important/Importante
IMPORTANT!
Most Common Installation Mistake.
Do not cut the top and bottom track the same length for this installation.
Please read these installation instructions carefully before cutting the top and bottom
track. If uncertain about cutting tracks, please contact a customer service
representative.
1-800-4-KOHLER
IMPORTANT!
L'erreur la plus commune d'installation.
Ne pas couper le rail supérieur et inférieur à la même longueur pour cette installation.
Veuillez s'il vous plaît lire avec attention ces instructions d'installation avant de couper le
rail supérieur et inférieur. Si vous ne savez pas vraiment comment couper les rails,
veuillez contacter un représentant du service clientèle.
1-800-4-KOHLER
¡IMPORTANTE!
Error de instalación más común.
No corte el carril superior e inferior a la misma longitud para esta instalación.
Por favor, lea estas instrucciones de instalación antes de cortar el carril superior e inferior.
Si no está seguro de cómo cortar los carriles, llame a nuestro Departamento de Servicio
al Cliente.
1-800-4-KOHLER
1063221-2-B 6 Kohler Co.

1. Prepare the Bottom Track
WARNING: Risk of personal injury. Always wear safety glasses when cutting
materials.
NOTICE: Risk of product damage. Do not cut the top track at this time. The top
track dimension is not the same as the bottom track.
IMPORTANT! If your shower has a curve in the corners where they meet the
sidewalls, be sure to measure from wall to wall above the curves. Failure to measure
above the curve or angle could result in the bottom track being cut too short.
Measure from wall to wall at the flattest part of the shower ledge (dimension ″D″).
Mark dimension ″D″ on the bottom track.
IMPORTANT! For best results, use a 32-teeth hacksaw blade and a miter box to cut
the bottom track.
Subtract 1-1/8″ (2.9 cm) from dimension ″D″ and cut the bottom track to this
dimension.
File the rough edges smooth where the bottom track was cut, taking care not to
mar the finished surface.
NOTE: If there are curves where the sidewalls meet the threshold, use a file to
contour the bottom track edges to match the curves as necessary.
Préparer le rail inférieur
AVERTISSEMENT: Risque de blessures corporelles. Porter des lunettes de
protection lors de la découpe des matériaux.
NOTICE: Risque d’endommagement du produit. Ne pas couper le rail supérieur à
ce moment. La dimension du rail supérieur n’est pas la même que le rail inférieur.
IMPORTANT! Si la baignoire à des coins arrondis, veiller à mesurer d’un mur à
l’autre au-dessus des courbes. Ne pas mesurer au-dessus de la courbe ou de l’angle
pourrait résulter en une découpe trop courte du rail inférieur.
D
Measure here.
Mesurer ici.
Mida aquí.
Measure distance "D"
above curves in the
corners.
Mesurer la distance "D"
au-dessus des courbes
des angles.
Mida la distancia "D" por
encima de las curvas en
las esquinas.
Curved Base
Base courbée
Base curva
Angled Base
Base inclinée
Base en ángulo
Measure here.
Mesurer ici.
Mida aquí.
Kohler Co. 7 1063221-2-B
Page is loading ...

2. Locate the Bottom Track
NOTE: The bottom track must sit flat. If the bath/shower ledge has a curve in the
corners or is constructed of fiberglass, it may be necessary to shape the ends of the
track with a file.
Place the bottom track on the flattest part of the bath/shower ledge with the leg
toward the outside of the shower.
Position the bottom track so there is an equal gap between each wall and the ends
of the bottom track.
Temporarily secure the bottom track to the ledge with masking tape.
Mark the ledge along the front edge of the bottom track with a soft pencil.
Déterminer l’emplacement du rail inférieur
REMARQUE: Le rail inférieur doit reposer à plat. Si le rebord de la
baignoire/douche est arrondi aux coins ou est construit en fibres de verre, il serait
peut-être nécessaire de les limer les extrémités du rail.
Placer le rail inférieur sur le point le plus plat du rebord de la baignoire/douche,
avec le pied orienté vers l’extérieur de la douche.
Positionner le rail inférieur de manière à ce qu’il y ait un espacement égal entre
chaque mur et extrémité du rail inférieur.
Sécuriser temporairement le rail inférieur au rebord de baignoire ou de douche
avec du ruban-cache.
À l’aide d’un crayon, marquer le rebord le long du rebord avant du rail inférieur.
Masking Tape
Ruban-cache
Cinta de enmascarar
Bottom Track
Rail inférieur
Carril inferior
Leg faces outside of shower.
Pied vers l'extérieur de la douche.
Pata orientada hacia el exterior de la ducha.
Kohler Co. 9 1063221-2-B

Coloque el carril inferior
NOTA: El carril inferior debe quedar completamente plano. Si el reborde de la
bañera/ducha es curvo en las esquinas o está hecho de fibra de vidrio, puede que sea
necesario contornear con una lima los extremos del carril.
Coloque el carril inferior en la parte más plana del reborde de la bañera/ducha
con la pata hacia el exterior de la ducha.
Coloque el carril inferior de manera que la separación entre cada pared y los
extremos del carril inferior sean iguales.
Fije provisionalmente el carril inferior al reborde con cinta de enmascarar.
Marque el reborde a lo largo del borde frontal del carril inferior con un lápiz de
mina blanda.
3. Locate the Wall Jambs
Position a wall jamb against the wall directly over the bottom track. The wall jamb
should sit flat against the wall.
Slide the wall jamb down over the bottom track until the wall jamb and bottom
track are fully engaged.
NOTE: The wall jamb must sit flat on the bottom ledge. If your ledge has a curve in
the corners at the side wall, it may be necessary to shape the bottom end of the wall
jamb with a file.
Use a level to plumb the wall jamb vertically.
Using the pre-drilled screw holes as a guide, mark the hole locations on the wall.
Level
Niveau à bulle
Nivel
Anchor
Ancrage
Anclaje
Wall Jamb
Montant du mur
Jamba mural
Anchor
Ancrage
Anclaje
Bottom Track
Rail inférieur
Carril inferior
Insert anchors.
Insérer les dispositifs d'ancrage
Inserte los anclajes.
Drill holes.
Percer des trous.
Taladre los orificios.
Insert bottom anchor.
Insérer le dispositif d'ancrage inférieur.
Inserte el anclaje inferior.
Mark each hole location.
Marquer chaque
emplacement d'orifice.
Marque la ubicación de
cada orificio.
Masking Tape
Ruban-cache
Cinta de enmascarar
1063221-2-B 10 Kohler Co.

Locate the Wall Jambs (cont.)
Repeat the procedures with the second wall jamb.
Remove the bottom track and wall jambs.
NOTE: When installing on ceramic tile, use a center punch to nick the surface of the
glaze. Tap the center punch lightly with a hammer to avoid cracking the tile.
Lightly center punch the hole locations.
Drill a 5/16″ hole at each mark. Use a tile or masonry bit for ceramic tile.
Thoroughly clean the shower floor ledge and wall.
Insert plastic anchors in each hole.
Localiser les montants du mur
Positionner le montant du mur contre le mur directement sur le rail inférieur. Le
montant du mur devrait bien reposer à plat contre le mur.
Glisser le montant du mur sur le rail inférieur jusqu’à ce qu’ils soient
complètement engagés.
REMARQUE: Le montant du mur doit reposer à plat sur le rail inférieur. Si le rebord
est courbé aux angles au mur latéral, il sera peut-être nécessaire de limer le rebord
inférieur du montant du mur s’il est arrondi.
Niveler le montant du mur verticalement.
En utilisant les orifices de vis préalablement percés comme guide, marquer les
emplacements des orifices sur le mur.
Répéter les procédures avec le second montant du mur.
Retirer le rail inférieur et les montants du mur.
REMARQUE: Lors de l’installation sur des carreaux en céramique, utiliser un
pointeau pour ébrécher la surface glacée. Taper sur le pointeau central légèrement
avec un marteau pour éviter une craquelure du carreau.
Pointer délicatement les emplacements des trous.
Percer un trou de 5/16″ à chaque marque. Utiliser une mèche à maçonnerie pour
des carreaux céramiques.
Nettoyer à fond le rebord du sol de douche et le mur.
Insérer des pièces d’ancrage en plastique dans chaque trou.
Coloque las jambas murales
Coloque una jamba mural contra la pared directamente sobre el carril inferior. La
jamba mural debe estar plana contra la pared.
Deslice la jamba mural sobre el carril inferior hasta que ambos encajen
completamente.
NOTA: La jamba mural debe quedar completamente plana sobre el reborde inferior.
Si el reborde es curvo en las esquinas de la pared lateral, puede que sea necesario
contornear con una lima el extremo inferior de la jamba mural.
Utilice un nivel para aplomar verticalmente la jamba mural.
Utilizando los orificios taladrados como guía para los tornillos, marque en la
pared los lugares para los orificios.
Repita estos procedimientos con la segunda jamba mural.
Retire el carril inferior y las jambas murales.
Kohler Co. 11 1063221-2-B

Coloque las jambas murales (cont.)
NOTA: Cuando instale en azulejos de cerámica, utilice un punzón de marcar para
marcar levemente la superficie vidriada. Golpee el punzón de marcar levemente con
un martillo para evitar fisurar el azulejo.
Marque ligeramente los orificios con un punzón de marcar.
Taladre un orificio de 5/16″ en cada lugar marcado. En azulejo de cerámica, utilice
una broca para azulejo o mampostería.
Limpie a fondo el reborde del piso de la ducha y la pared.
Inserte los anclajes de plástico en cada orificio.
4. Install the Bottom Track
Apply a 1/4″ (6 mm) bead of silicone sealant into the groove on the underside of
the track.
Install the bottom track with the sealant side down and the front leg facing the
outside of the shower, along the pencil mark previously made.
Front Leg
Pied avant
Pata frontal
Seal here.
Sceller ici.
Selle aquí.
Groove
Rainure
Ranura
1063221-2-B 12 Kohler Co.
Page is loading ...

5. Install the Wall Jambs
Place a wall jamb over the bottom track. Align the holes in the wall jamb with the
holes in the wall.
Secure the wall jamb to the wall with three #8-18 x 1-1/2″ panhead screws.
NOTE: The middle screw should be inserted through a bumper before being
installed. Do not overtighten the middle screw or damage to the bumper may occur.
Repeat the procedures with the other wall jamb.
Installer les montants du mur
Placer un montant du mur sur le rail inférieur. Aligner les orifices du montant
avec les orifices du mur.
Sécuriser le montant de mur à l’aide de trois vis à tête ronde #8-18 x 1-1/2″.
REMARQUE: La vis du milieu devrat être insérée à travers un amortisseur avant
d’être installée. Un endommagement de l’amortisseur pourrait avoir lieu si la vis du
milieu est trop serrée.
Bumper/Amortisseur/Tope
Bottom Track
Rail inférieur
Carril inferior
#8-18 x 1-1/2"
Panhead Screw
Vis à tête ronde
#8-18 x 1-1/2"
Tornillo de cabeza
redonda del
#8-18 x 1-1/2"
1063221-2-B 14 Kohler Co.

Installer les montants du mur (cont.)
Répéter les procédures avec l’autre montant du mur.
Instale las jambas murales
Coloque una jamba mural sobre el carril inferior. Alinee los orificios de las jambas
murales con los orificios de la pared.
Fije la jamba mural a la pared con tres tornillos de cabeza redonda del #8-18 x
1-1/2″.
NOTA: El tornillo central debe insertarse a través de un tope antes de instalarlo. No
apriete demasiado el tornillo central, pues se puede dañar el tope.
Repita los procedimientos con la otra jamba mural.
6. Install the Top Track
Carefully measure the wall to wall opening (dimension ″A″) above the installed
wall jambs.
NOTE: For best results, use a 32-teeth per inch hacksaw blade and a miter box.
Subtract 1/32″ (1 mm) from dimension ″A″and cut the top track to this
dimension.
Taking care not to scratch the finished surfaces, carefully file the rough edges at
the cut end of the top track.
Install the top track over the ends of both wall jambs.
A
Top Track
Rail supérieur
Carril superior
Top Track Length = A – 1/32" (1 mm)
Longueur du rail supérieur = A – 1/32" (1 mm)
Longitud del carril superior = A – 1/32" (1 mm)
Inside of Shower
Intérieur de la douche
Interior de la ducha
Wall Jamb
Montant du mur
Jamba mural
Outside of Shower
Extérieur de la douche
Exterior de la ducha
Top Track
Rail supérieur
Carril superior
Kohler Co. 15 1063221-2-B
Page is loading ...

7. Install the Hanging Brackets — Inside Panel
CAUTION: Risk of injury or product damage. Unframed tempered glass should
not contact hard surfaces or it may shatter. Do not touch the edge of the tempered
glass panel with tools or any hard objects. Do not set unframed tempered glass
directly on the floor.
Insert a bushing into one of the holes at the top of the inside glass panel.
Install a hanging bracket over the glass panel, aligning the hole in the bracket
with the bushing.
Insert a blind nut into the hanging bracket hole and bushing. Secure with a #8-32
x 1/4″ machine screw.
Repeat the steps to install the other bracket on the inside panel.
IMPORTANT! The steel side of the roller must be installed against the hanging
brackets.
The inside panel is installed on the showerhead side of the bath or shower.
Install the rollers on the same side as the bottom frame holes.
Assemble the rollers and #8-32 x 3/8″ machine screws to the hanging brackets
through the center hole of the bracket.
Secure the rollers.
Bushing/Manchon/Buje
Hanging Bracket
Support d' accrochage
Soporte de suspensión
Rollers on same side as bottom frame hole.
Placer les rouleaux du même côté que
l'orifice du cadre inférieur.
Las ruedas deben estar en el mismo lado
que el orificio del marco inferior.
Roller/Rouleau/Rueda
Blind Nut
Écrou borgne
Tuerca ciega
8-32 x 3/8" Machine Screw
Vis mécanique 8-32 x 3/8"
Tornillo para metal 8-32 x 3/8"
8-32 x 1/4" Bolt
Boulon 8-32 x 1/4"
Perno 8-32 x 1/4"
Install inside panel roller.
Installer le rouleau du panneau intérieur.
Instale la rueda del panel interior.
Kohler Co. 17 1063221-2-B
Page is loading ...

8. Install the Hanging Brackets — Outside Panel
CAUTION: Risk of injury or product damage. Unframed tempered glass should
not contact hard surfaces or it may shatter. Do not touch the edge of the tempered
glass panel with tools or any hard objects. Do not set unframed tempered glass
directly on the floor.
Insert a bushing into one of the holes at the top of the outside glass panel.
Install a hanging bracket over the glass panel, aligning the hole in the bracket
with the bushing.
Insert a blind nut into the hanging bracket hole and bushing. Secure with a #8-32
x 1/4″ machine screw.
Repeat the steps to install the other bracket on the outside panel.
IMPORTANT! The steel side of the roller must be installed against the hanging
brackets.
Install the rollers on the same side as the bottom frame leg.
Assemble the rollers and #8-32 x 3/8″ machine screws to the hanging brackets
through the center hole of the bracket.
Secure the rollers.
Bushing/Manchon/Buje
Hanging Bracket
Support d' accrochage
Soporte de suspensión
8-32 x 3/8" Machine Screw
Vis mécanique 8-32 x 3/8"
Tornillo para metal 8-32 x 3/8"
Rollers on same side as bottom frame leg.
Placer les rouleaux du même côté du pied de cadre inférieur.
Las ruedas deben estar en el mismo lado que la pata del
marco inferior.
Install outside panel roller.
Installer le rouleau du
panneau extérieur.
Instale la rueda del panel
exterior.
Roller/Rouleau/Rueda
Blind Nut
Écrou borgne
Tuerca ciega
8-32 x 1/4" Bolt
Boulon 8-32 x 1/4"
Perno 8-32 x 1/4"
Kohler Co. 19 1063221-2-B
Page is loading ...

9. Install the Inside Panel
NOTICE: Risk of product damage. For the protection of your bath unit, use a drop
cloth or similar material as a protective cover during these steps.
From outside of the shower, install the inside panel first. Position the panel with
the rollers toward the inside of the shower.
Carefully lift the inside panel up inside the top track and hang the rollers on the
inside rail.
Roll the panel back and forth along the track to make sure it operates smoothly.
Align the panel with the showerhead side wall jamb.
If the panel does not operate smoothly, adjustment may be needed. If adjustment
is needed, remove the panel.
NOTE: Moving the rollers to the top hole of the hanger brackets will cause the glass
to hang lower. Moving the rollers to the bottom hole of the hanging brackets will
cause the glass to hang higher.
Loosen the roller screw(s) and move the roller to another hole in the hanging
bracket. Insert and tighten the screw(s) and rehang the panel.
Inside Panel
Panneau intérieur
Panel interior
Kohler Co. 21 1063221-2-B
Page is loading ...

10. Install the Outside Panel
From outside of the shower, install the outside panel. Position the panel with the
rollers facing the outside of the shower/bath.
Carefully lift the door panel up inside of the top track and hang the rollers on the
outside rail.
Roll the panel back and forth along the track to make sure it operates smoothly.
Align the panel with the wall jamb opposite the showerhead side of the
shower/bath.
If the panel does not operate smoothly, adjustment may be needed. If adjustment
is needed, remove the panel.
NOTE: Moving the rollers to the top hole of the hanger brackets will cause the glass
to hang lower. Moving the rollers to the bottom hole of the hanging brackets will
cause the glass to hang higher.
Loosen the roller screw(s) and move the roller to another hole in the hanging
bracket. Insert and tighten the screw(s) and rehang the panel.
Outside Panel
Panneau extérieur
Panel exterior
Kohler Co. 23 1063221-2-B
Page is loading ...

11. Install the Panel Guide
NOTE: Perform this step from inside the shower.
Engage the inside panel guide into the opening of the bottom track.
Align the slots in the panel guide with holes in the bottom of the inside frame
panel.
Install two #8-18 x 3/8″ panhead screws through the slots in the inside panel
guide and into the holes in the bottom frame of the panel. Do not tighten the
screws at this time.
Push the panel guide up into the bottom track. The felt should face the outside of
the shower.
Lower the panel guide slightly for clearance and tighten the screws. Do not
overtighten. If the screws are overtightened the door may not operate properly.
Move the panel back and forth along the full width of the opening and make sure
it operates smoothly.
If the panel binds, loosen the screws and lower the inside panel guide.
NOTE: If the door still does not operate smoothly, the rollers may need to be
adjusted. See the steps in the ″Install the Outside Panel″ section.
Installer le guide de panneau
REMARQUE: Réaliser cette étape à l’intérieur de l’enceinte.
Loger le guide de panneau interne dans l’ouverture de rail inférieur.
Aligner les rainures du guide du panneau avec les orifices de la base de l’intérieur
du panneau du cadre.
Installer deux vis à tête ronde #8-18 x 3/8″ à travers les rainures de guide de
panneau interne et dans les orifices au cadre inférieur du panneau. Ne pas serrer
les vis à ce moment.
Presser le guide du panneau dans le rail inférieur. L’asphalte devrait faire face à
l’extérieur de la douche.
Inside Panel
Panneau intérieur
Panel interior
Inside Panel Guide
Guide du panneau intérieur
Guía del panel interior
#8-18 x 3/8" Panhead Screw
Vis à tête ronde #8-18 x 3/8"
Tornillo de cabeza redonda del #8-18 x 3/8"
Inside Panel Guide
Guide du panneau
intérieur
Guía del panel
interior
Kohler Co. 25 1063221-2-B
Page is loading ...

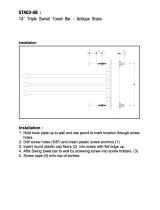
12. Install the Towel Bars
NOTE: Installation of the towel bar is easiest with two people.
Place a washer onto the screw.
Insert the screw through the mounting hole in the panel.
Slide a washer over the screw.
IMPORTANT! Do not overtighten the screws. The glass may break.
Fully tighten both screws. Do not overtighten.
Position the towel bar over the screw and tighten the screw by inserting a 5/64″
hex wrench into the hole in the screw head and turning. Do not overtighten or the
glass may break.
Repeat this procedure for the remaining towel bar.
Installer les porte-serviettes
REMARQUE: L’installation du porte-serviettes est plus facile avec deux personnes.
Placer une rondelle sur la vis.
Insérer la vis à travers l’orifice de fixation dans le panneau.
Glisser une rondelle sur la vis.
IMPORTANT! Ne pas trop serrer les vis. Le verre peut casser.
Serrer complètement les deux vis. Ne pas trop serrer.
Washer/Rondelle/Arandela
Towel Bar
Porte-serviettes
Toallero de barra
Insert a 5/64" hex wrench into hole
in screw head and turn clockwise to
secure towel bar.
Introduire une clé hexagonale de
5/64" (dans le trou de la tête de la
vis et tourner dans le sens horaire
pour fixer le porte serviettes.
Introduzca una llave hexagonal de
5/64" en el orificio de la cabeza del
tornillo y gire a la derecha para fijar
el toallero de barra.
1/4" x 20 Screw
Vis 1/4" x 20
Tornillo de 1/4" x 20
Kohler Co. 27 1063221-2-B
Page is loading ...

13. Apply Silicone Sealant
NOTE: Thoroughly clean all dust, dirt, or grease from the bottom track and shower
ledge surfaces where sealant will be applied. Make sure the surfaces are dry.
Apply sealant where the wall jambs and wall meet.
Apply sealant where the wall jambs and bottom track meet.
Fill the channel where the wall jamb and bottom track meet at the front with
sealant. Refer to the illustration for correct placement of sealant.
Allow sealant to fully cure following the sealant manufacturer’s instructions before
using the shower/bath.
Channel
Canal
Canal
Apply silicone
sealant.
Appliquer du
mastic à la
silicone.
Aplique sellador
de silicona.
Bottom Track
Rail inférieur
Carril inferior
Wall Jamb
Montant du mur
Jamba mural
Kohler Co. 29 1063221-2-B
Page is loading ...

Instale los cubre tornillos
Instale los cubre tornillos provistos en todos tornillos expuestos.
Care and Cleaning
For best results, keep the following in mind when caring for your KOHLER product:
•
Use a mild detergent such as liquid dishwashing soap and warm water for
cleaning. Do not use abrasive cleaners that may scratch or dull the surface.
•
Carefully read the cleaner product label to ensure the cleaner is safe for use on the
material.
•
Always test your cleaning solution on an inconspicuous area before applying to
the entire surface.
•
Do not allow cleaners to sit or soak on the surface.
•
Wipe surfaces clean and rinse completely with water immediately after cleaner
application. Rinse and dry any overspray that lands on nearby surfaces.
•
Use a soft, dampened sponge or cloth. Never use an abrasive material such as a
brush or scouring pad to clean surfaces.
For detailed cleaning information and products to consider, visit www.kohler.com/clean.
To order Care & Cleaning information, call 1-800-456-4537 and press 1 for Kohler
Products and then 3 for Literature.
Entretien et nettoyage
Pour de meilleurs résultats, prendre ce qui suit en considération lors de l’entretien de
votre produit KOHLER:
•
Utiliser un détergent doux tel que liquide pour vaisselle et de l’eau chaude pour
nettoyer. Ne pas utiliser de nettoyants abrasifs car ils pourraient rayer ou abîmer
la surface.
•
Lire attentivement l’étiquette du produit de nettoyage pour vérifier qu’il soit
adéquat à utiliser sur le matériau.
•
Toujours tester la solution de nettoyage sur une surface la moins évidente avant
de l’appliquer sur la totalité de la surface.
•
Ne pas permettre aux nettoyants de reposer sur la surface.
•
Essuyer les surfaces et rincer complètement avec de l’eau immédiatement après
l’application du nettoyant. Rincer et sécher tout éclaboussement sur les surfaces
avoisinantes.
•
Utiliser une éponge ou un chiffon doux et humide. Ne jamais utiliser de matériau
abrasif tel que brosse ou éponges à récurer pour nettoyer les surfaces.
Pour l’information détaillée de nettoyage et des produits à considérer, visiter
www.kohler.com/clean. Pour commander des informations d’entretien et de nettoyage,
composer le 1-800-456-4537 puis presser 1 pour les produits Kohler et 3 pour littérature.
Cuidado y limpieza
Para obtener los mejores resultados, tenga presente lo siguiente al limpiar su producto
KOHLER:
•
Para la limpieza, utilice solamente un detergente suave como el jabón líquido para
lavar platos y agua tibia. No utilice limpiadores abrasivos que puedan rayar u
opacar la superficie.
•
Lea atentamente la etiqueta del producto de limpieza para asegurar que no
presente riesgos al usarse en el material.
•
Siempre pruebe la solución de limpieza en un área oculta antes de aplicarla a toda
la superficie.
•
No deje por tiempo prolongado los limpiadores en la superficie.
Kohler Co. 31 1063221-2-B

Cuidado y limpieza (cont.)
•
Limpie con un trapo y enjuague completa e inmediatamente con agua después de
aplicar limpiadores. Enjuague y seque las superficies cercanas que se hayan
rociado.
•
Utilice una esponja o trapo suave y húmedo. Nunca utilice materiales abrasivos
como cepillos o estropajos de tallar para limpiar las superficies.
Para obtener información detallada de limpieza y los limpiadores a considerar, visite
www.kohler.com/clean. Para solicitar información sobre el cuidado y la limpieza, llame
al 1-800-456-4537 y presione 1 para productos Kohler y luego 3 para documentos.
One-Year Limited Warranty - USA and Canada
KOHLER plumbing products are warranted to be free of defects in material and
workmanship for one year from date of installation.
Kohler Co. will, at its election, repair, replace or make appropriate adjustment where
Kohler Co. inspection discloses any such defects occurring in normal usage within one
(1) year after installation. Kohler Co. is not responsible for removal or installation costs.
Use of in-tank toilet cleaners will void the warranty.
To obtain warranty service contact Kohler Co. either through your Dealer, Plumbing
Contractor, Home Center or E-tailer, or by writing Kohler Co., Attn.: Customer Service
Department, 444 Highland Drive, Kohler, WI 53044, USA, or by calling 1-800-4-KOHLER
from within the USA, 1-800-964-5590 from within Canada and 001-877-680-1310 from
within Mexico.
Implied warranties including that of merchantability and fitness for a particular
purpose are expressly limited in duration to the duration of this warranty. Kohler Co.
and/or seller disclaims any liability for special, incidental or consequential damages.
Some states/provinces do not allow limitations on how long an implied warranty lasts,
or the exclusion or limitation of special, incidental or consequential damages so these
limitations and exclusions may not apply to you. This warranty gives you specific legal
rights. You may also have other rights which vary from state/province to state/province.
This is Kohler Co.’s exclusive written warranty.
Garantie limitée d’un an - É.U. et Canada
Les produits de plomberie KOHLER sont garantis contre tout défaut matériel et de
fabrication pour un an, à partir de la date de l’installation.
Kohler Co. jugera à sa discrétion, de la réparation, du remplacement ou du réglage
approprié et ceci après toute inspection faite par Kohler Co. de tous défauts dûs à une
utilisation normale et ceci pendant un (1) an à partir de la date d’installation. Kohler Co.
n’est pas responsable des coûts de démontage ou d’installation.
Pour obtenir un service-garantie, contacter Kohler Co. par l’intermédiaire de votre
vendeur, plombier, centre de rénovation, revendeur par internet ou par écrit à Kohler Co.
à l’attention de: Département du service clientèle, 444 Highland Drive, Kohler, Wisconsin
53044, USA, ou en composant le 1-800-4-KOHLER à partir des É.U., le 1-800-964-5590 à
partir du Canada et le 001-877-680-1310 depuis le Mexique.
Les garanties implicites, y compris celles de qualité marchande et d’aptitude à un
emploi particulier, se limitent expressément à la durée de la présente garantie. Kohler
Co. et/ou le vendeur déclinent toutes responsabilités contre tous dommages
occasionnés, imprévisibles ou corrélatifs.
Certains états/provinces ne permettent pas la limitation sur la durée de la garantie, ou
1063221-2-B 32 Kohler Co.

Garantie limitée d’un an - É.U. et Canada (cont.)
l’exclusion ou la limitation spéciale, de dommages occasionnés, ou corrélatifs à un
accident, ainsi ces limitations ou exclusions pourraient ne pas s’appliquer dans votre cas.
Cette garantie vous donne des droits légaux spécifiques. Vous pouvez également avoir
d’autres droits qui varient d’un état/province à l’autre.
Ceci constitue la garantie écrite exclusive de Kohler Co.
Garantía limitada de un año - Estados Unidos y Canadá
Se garantiza que los productos de plomería KOHLER están libres de defectos de material
y mano de obra por un año a partir de la fecha de instalación.
Kohler Co., a su criterio, reparará, reemplazará o realizará los ajustes pertinentes en los
casos en que la inspección realizada por Kohler Co. determine que dichos defectos
ocurrieron durante el uso normal en el transcurso de un (1) año a partir de la fecha de la
instalación. Kohler Co. no se hace responsable de los gastos de desinstalación o
instalación.
Para obtener el servicio de garantía, comuníquese con Kohler Co. a través de su
distribuidor, contratista de plomería o distribuidor a través de Internet, o escriba
directamente a: Kohler Co., Attn.: Customer Service Department, 444 Highland Drive,
Kohler, WI 53044, USA, o llame al 1-800-4-KOHLER desde los Estados Unidos, al
1-800-964-5590 desde Canadá, o al 001-877-680-1310 desde México.
Toda garantía implícita en relación a productos de uso comercial, incluyendo la
comercialización e idoneidad del producto para un uso determinado, se limita
expresamente a la duración de la presente garantía. Kohler Co. y/o el vendedor no se
hacen responsables por concepto de daños particulares, incidentales o indirectos.
Algunos estados/provincias no permiten limitaciones en cuanto a la duración de una
garantía implícitaoalaexclusión o limitación de daños particulares, incidentales o
indirectos, por lo que estas limitaciones y exclusiones pueden no aplicar a su caso. Esta
garantía le otorga ciertos derechos legales específicos. Además, usted puede tener otros
derechos que varían de estado a estado y provincia a provincia.
El presente documento constituye la garantía exclusiva por escrito de Kohler Co.
One-Year Warranty - Mexico
KOHLER CO.
It is recommended that at the time of purchase, you verify that all accessories and
components are complete in this package.
This Kohler product is warranted to be free of defects in material and workmanship for
one (1) year from the date of purchase as shown on the invoice or receipt.
1. Kohler Co. will only service its commercialized products through its authorized
distributors.
2. To obtain warranty service, please present the invoice and corresponding warranty.
3. Through its authorized distributors, Kohler Co. promises to repair the defective
product or provide a new replacement or an equivalent model (in those cases that the
model has been discontinued) when the product is beyond repair, without any charge to
the consumer.
4. The time of repair will not exceed six (6) weeks commencing on the date the product
is received.
Kohler Co. 33 1063221-2-B
Page is loading ...
Page is loading ...
Page is loading ...
Page is loading ...
Page is loading ...
Page is loading ...
Page is loading ...
Page is loading ...
Page is loading ...
Page is loading ...
Page is loading ...
/