Page is loading ...

Installation and Care Guide
Guide d’installation et d’entretien
Guía de instalación y cuidado
Bypass Shower Doors
Portes coulissantes de douche
Puertas corredizas de ducha
Phone: 1-888-STERLING (1-888-783-7546)
Mexico: 001-877-680-1310
SterlingPlumbing.com
©2008 by Kohler Co.
5400 Series/Séries 5400/Serie 5400
1063216-2-E

Thank You For Choosing Sterling
We appreciate your commitment to Sterling value. Please take a few minutes to review
this manual before you start installation. If you encounter any installation or
performance problems, please don’t hesitate to contact us. Our phone numbers are listed
within this manual. Thanks again for choosing Sterling.
Merci d’avoir choisi Sterling
Nous apprécions votre engagement envers la qualité Sterling. Veuillez prendre s’il vous
plaît quelques minutes pour lire ce manuel avant de commencer l’installation. Ne pas
hésiter pas à nous contacter en cas de problème d’installation ou de fonctionnement. Nos
numéros de téléphone sont listés dans ce manuel. Merci encore d’avoir choisi Sterling.
Gracias por elegir los productos de Sterling
Le agradecemos que haya elegido a Sterling por la calidad que ofrece al mejor precio.
Dedique unos minutos para leer este manual antes de comenzar la instalación. En caso
de problemas de instalación o de funcionamiento, no dude en contactarnos. Este manual
contiene nuestros números de teléfono. Gracias nuevamente por escoger a Sterling.
Tools/Outils/Herramientas
Before You Begin
CAUTION: Risk of eye injury. Always wear safety glasses when cutting or
drilling.
CAUTION: Risk of injury or product damage. Do not attempt to cut tempered
glass.
IMPORTANT! Pay special attention to the section titled ″IMPORTANT.″ Failure to
follow the directions could result in product damage.
NOTE: When using a retractable case tape measure, make sure you add the length of
the case to the measurement or measure in a manner that excludes the case.
Lay out and identify the parts. Inspect them for damage.
Silicone Sealant
Joint en silicone
Sellador de silicona
Masking Tape
Ruban-cache
Cinta de enmascarar
• Drop Cloth/Toile de protection/Lona
Plus/Plus/Más:
Center Punch
Poinçon
Punzón
Miter Saw or Hacksaw with 32 Teeth Per Inch
Blade
Scie à onglets ou à métaux avec des lames
de 32 dents par pouce
Serrucho de costilla o sierra para metales con
hoja de 32 dientes/pulg
1063216-2-E 2 Sterling

Parts ID/Identification des pièces/Identificación de piezas
1
3
2
18
17
15
14
13
11
4
5
6
7
8
9
10
1 Top Track/Rail supérieur/Carril superior
2 Blind Nut/
Écrou borgne/Tuerca ciega
3 Bushing/Bague/Buje
4 Anchor/Ancrage/Anclaje
5 Bumper/Butée/Tope
6 Wall Jamb/Montant du mur/Jamba mural
7 Door Panel/Panneau de porte/Panel de la puerta
8 Insert/Insertion/Pieza de inserción
9 Bottom Track/Rail inférieur/Carril inferior
10 Center Guide/Guide de centre/Guía central
11 Screw/Vis/Tornillo
12 Screw/Vis/Tornillo
13 Cover/Couvercle/Tapa
14 Towel Bar Assembly/Ensemble de porte-serviettes/Montaje del toallero de barra
15 Sex Bolt/Boulon hexagonal/Perno hembra
16 Screw/Vis/Tornillo
17 Roller/Rouleau/Rueda
18 Hanger Bracket/Support d'ancrage/Soporte de suspensión
12
16
1063216-2-E 4 Sterling

Important/Important/Importante
IMPORTANT!
Most Common Installation Mistake.
Do not cut the top and bottom track the same length for this installation.
Please read these installation instructions carefully before cutting the top and bottom
track. If uncertain about cutting tracks, please contact a customer service
representative.
1-888-783-7546
IMPORTANT!
L'erreur la plus commune d'installation.
Ne pas couper le rail supérieur et inférieur à la même longueur pour cette installation.
Veuillez s'il vous plaît lire avec attention ces instructions d'installation avant de couper le
rail supérieur et inférieur. Si vous ne savez pas vraiment comment couper les rails,
veuillez contacter un représentant du service clientèle.
1-888-783-7546
¡IMPORTANTE!
Error de instalación más común.
No corte el carril superior e inferior a la misma longitud para esta instalación.
Por favor, lea estas instrucciones de instalación antes de cortar el carril superior e inferior.
Si no está seguro de cómo cortar los carriles, comuníquese con un representante de
servicio al cliente.
1-888-783-7546
Sterling 5 1063216-2-E

1. Measure and Cut the Bottom Track
CAUTION: Risk of personal injury. Always wear safety glasses when cutting
materials.
IMPORTANT! If your shower has a curve in the corners where they meet the
sidewalls, be sure to measure from wall to wall above the curves. Failure to measure
above the curve or angle could result in the bottom track being cut too short.
Trim the edges off the insert in the last 2″ (5.1 cm) of one end of the insert.
Slide the trimmed end of the insert into the groove in the bottom track.
Bend the trimmed end of the insert so the end can be grasped and pull the insert
until it runs the length of the bottom track.
Make sure the insert is flush with far end of the bottom track and trim off the
excess insert
Measure from wall to wall at the flattest part of the shower ledge (dimension ″D″).
Mark dimension ″D″ on the bottom track.
IMPORTANT! For best results, use a 32-teeth per inch hacksaw blade and a miter
box to cut the bottom track.
Subtract 1-1/8″ (2.9 cm) from dimension ″D″ and simultaneously cut the bottom
track and insert to this dimension.
File the rough edges smooth where the bottom track was cut, taking care not to
mar the finished surface.
NOTE: If there are curves where the sidewalls meet the threshold, use a file to
contour the bottom track edges to match the curves.
D
Curved Base
Base courbée
Base curva
Angled Base
Base inclinée
Base en ángulo
Insert
Insertion
Pieza de inserción
Bottom Track
Rail inférieur
Carril inferior
Trimmed
Insert
Insertion raccource
Pieza de inserción recortada
Utility Knife
Couteau tout usage
Cuchillo
Measure Here.
Mesurer ici.
Mida aquí.
Measure Here.
Mesurer ici.
Mida aquí.
Measure distance "D" above curves in the corners.
Mesurer la distance "D" au-dessus des courbes des angles.
Mida la distancia "D" por encima de las curvas en las esquinas.
DD
Insert
Insertion
Pieza de
inserción
1063216-2-E 6 Sterling

Mida y corte el carril inferior (cont.)
Lime el filo áspero del corte del carril inferior, teniendo cuidado de no dañar la
superficie acabada.
NOTA: Si hay curvas donde las paredes laterales se juntan con el umbral, utilice una
lima para contornear los filos del carril inferior para que correspondan con las curvas.
2. Locate the Bottom Track
NOTE: The bottom track must sit flat. If the bath/shower ledge has a curve in the
corners or is constructed of fiberglass, it may be necessary to shape the ends of the
track with a file.
Place the bottom track on the flattest part of the bath/shower ledge with the leg
toward the outside of the shower.
Position the bottom track so there is an equal gap between each wall and the ends
of the bottom track.
Temporarily secure the bottom track to the ledge with masking tape.
Mark the ledge along the front edge of the bottom track with a soft pencil.
Déterminer l’emplacement du rail inférieur
REMARQUE: Le rail inférieur doit reposer à plat. Si le rebord de la
baignoire/douche est arrondi aux coins ou est construit en fibres de verre, il serait
peut-être nécessaire de les limer les extrémités du rail.
Placer le rail inférieur sur le point le plus plat du rebord de la baignoire/douche,
avec le pied orienté vers l’extérieur de la douche.
Leg faces outside of shower.
Pieds orientés vers l'extérieur de la douche.
La pata queda hacia el exterior de la ducha.
Bottom Track
Rail inférieur
Carril inferior
Masking Tape
Ruban cache
Cinta de enmascarar
1063216-2-E 8 Sterling

3. Mark the Wall Jambs
Position a wall jamb against the wall directly over the bottom track with the short
legs against the wall. The wall jamb should sit flat against the wall.
Slide the wall jamb down over the bottom track until the wall jamb and bottom
track are fully engaged.
IMPORTANT! The wall jamb must sit flat on the bottom ledge. If your ledge has a
curve in the corners at the side wall, it may be necessary to shape the bottom end of
the wall jamb with a file.
Use a level to plumb the wall jamb vertically.
Using the pre-drilled screw holes as a guide, mark the hole locations on the wall.
Repeat the procedures with the second wall jamb.
NOTE: When installing on ceramic tile, use a center punch to nick the surface of the
glaze. Tap the center punch lightly with a hammer to avoid cracking the tile.
Lightly center punch the hole locations.
Drill a 3/16″ hole at each mark. Use a tile or masonry bit for ceramic tile.
Thoroughly clean the shower floor ledge and wall.
Insert plastic anchors in each hole.
Level
Niveau à bulle
Nivel
Wall Jamb
Montant du mur
Jamba mural
Threshold
Seuil
Umbral
Square end of wall
jamb
Extrémité carrée
du montant du mur
Extremo cuadrado
de la jamba mural
Contoured (rounded)
end of wall jamb
Extrémité contournée
(arrondie) du montant
du mur
Extremo contorneado
(redondeado) de la
jamba mural
Mark holes.
Marquer les orifices.
Marque los orificios.
Drill holes.
Percer des trous.
Taladre los orificios.
Insert anchors.
Insérer les dispositifs d'ancrage
Inserte los anclajes.
1063216-2-E 10 Sterling

4. Caulk the Bottom Track
Remove the bottom track.
Apply silicone sealant in the front groove on the underside of the bottom track.
Install the bottom track on the ledge at the marked location.
Appliquer du mastic au rail inférieur
Retirer le rail inférieur.
Appliquer du mastic à la silicone dans la rainure au-dessous du rail inférieur.
Installer le rail inférieur sur le rebord à l’emplacement marqué.
Aplique sellador al carril inferior
Retire el carril inferior.
Aplique sellador de silicona en la ranura frontal del dorso del carril inferior.
Instale el carril inferior en el lugar marcado en el reborde.
Seal here.
Sceller ici.
Selle aquí.
Groove
Rainure
Ranura
Bottom Track
Rail inférieur
Carril inferior
1063216-2-E 12 Sterling

5. Install the Wall Jambs
Place a wall jamb over the bottom track. Align the holes in the wall jamb with the
holes in the wall.
NOTE: The top and bottom screws should be inserted through bumpers before being
installed. Do not overtighten the screws or damage to the bumpers may occur.
Secure the wall jamb to the wall with three #8-18 x 1-1/2″ panhead screws.
Repeat the procedures with the other wall jamb.
Installer les montants du mur
Placer un montant du mur sur le rail inférieur. Aligner les orifices du montant
avec les orifices du mur.
REMARQUE: Les vis supérieures et inférieures devraient être insérées à travers des
amortisseurs avant d’être installées. Un endommagement des amortisseurs pourrait
avoir lieu si les vis sont trop serrées.
Sécuriser le montant de mur à l’aide de trois vis à tête ronde #8-18 x 1-1/2″.
Répéter les procédures avec l’autre montant du mur.
Instale las jambas murales
Coloque una jamba mural sobre el carril inferior. Alinee los orificios de las jambas
murales con los orificios de la pared.
NOTA: Los tornillos superiores e inferiores deben insertarse en los topes antes de
instalarlos. No apriete demasiado los tornillos, pues se pueden dañar los topes.
Fije la jamba mural a la pared con tres tornillos de cabeza redonda del #8-18 x
1-1/2″.
Repita los procedimientos con la otra jamba mural.
#8-18 x 1-1/2" Panhead Screw
Vis à tête ronde #8-18 x 1-1/2"
Tornillo de cabeza redonda del
#8-18 x 1-1/2"
Bumper/Amortisseur/Tope
Top Track
Rail supérieur
Carril superior
Measure here.
Mesurer ici.
Mida aquí.
Sterling 13 1063216-2-E

6. Install the Top Track
NOTE: The top track is designed so either side may be positioned facing outward
according to your preference.
Measure the distance from wall to wall above the wall jambs.
Mark the top track at the determined dimension.
NOTE: For best results use a 32-teeth per inch hacksaw and miter box.
Cut the top track on the inside edge of the mark [approximately 1/32″ (1 mm)
from the mark] to allow space for the top track to slide into place easily.
Carefully file the rough edges smooth where the top track was cut, taking care to
avoid damaging finished surfaces.
Position the top track over the wall jambs and gently push down.
Installer le rail supérieur
REMARQUE: Le rail supérieur est conçu afin que chaque côté puisse être positionné
vers l’extérieur selon la préférence.
Mesurer la distance de mur à mur au-dessus des montants du mur.
Marquer le rail supérieur à la dimension déterminée.
REMARQUE: Pour des meilleures résultats, utiliser une scie à métaux à 32 dents et
une boîte à onglets.
Découper le rail supérieur au rebord intérieur de la marque 1/32″ (1 mm) afin de
permettre au rail supérieur de glisser en place aisément.
Limer délicatement les rebords rugueux à l’endroit de découpe du rail supérieur
en évitant d’endommager les surfaces finies.
Positionner le rail supérieur sur les montants du mur et presser gentiment.
Instale el carril superior
NOTA: El carril superior está diseñado para que cualquier lado se pueda colocar
orientado hacia fuera según se prefiera.
Mida la distancia entre las paredes arriba de las jambas murales.
Marque la distancia medida en el carril superior.
NOTA: Para obtener mejores resultados, utilice una hoja de sierra para metales de 32
dientes por pulgada y una caja de ingletes.
Corte el carril superior por el borde interno de la marca [aproximadamente a
1/32″ (1 mm) de la marca] para dejar espacio para que el carril superior encaje
con facilidad.
Con cuidado lime el filo áspero del corte en el carril superior, teniendo cuidado de
no dañar las superficies acabadas.
Coloque el carril superior sobre las jambas murales y presione suavemente.
1063216-2-E 14 Sterling

7. Install the Hanger Bracket
Insert a bushing into one of the holes at the top of one of the glass panels.
Install a hanger bracket over the glass panel with the mounting hole aligned with
the bushing.
Insert a blind nut through the hanger bracket hole and bushing. Secure with a
bolt.
Repeat the procedure with each hanger bracket on the door panels.
NOTE: The steel side of the roller must be installed against the hanger bracket.
NOTE: There is a label on the each glass panel identifying the ″Non-coated side″ of
the panel.
Use #8-32 x 3/8″ panhead screws to attach two rollers on each glass panel. The
rollers on one glass panel should be installed on the ″Non-coated side″ of the
door. This will be the outside panel. The rollers on the other door panel should be
installed opposite the ″Non-coated side″ of the door panel. This is the inside
panel.
Installer le support d’ancrage
Insérer une bague dans un des orifices au dessus d’un des panneaux en verre.
Installer un support d’accrochage sur le panneau en verre avec l’orifice de
montage aligné avec la bague.
Insérer un écrou borgne dans l’orifice de support d’accrochage et dans la bague.
Sécuriser avec un boulon.
Roller
Rouleau
Rueda
Blind Nut
Écrou borgne
Tuerca ciega
Bolt
Boulon
Perno
Bushing
Bague
Buje
Roller Steel Side
Côté rouleau en acier
Lado de acero de la rueda
Hanger Bracket
Support d'ancrage
Soporte de suspensión
Hanger Bracket
Support d'ancrage
Soporte de suspensión
#8-32 x 3/8" Screw
Vis #8-32 x 3/8"
Tornillo del #8-32 x 3/8"
Sterling 15 1063216-2-E

8. Install the Door Panels
NOTE: Perform these installation steps from outside the bath/shower.
Install the Inside Panel
Lift the inside door panel with the rollers facing away from you.
Position the rollers on the inside rail of the top track.
Check the panel for proper alignment and smooth operation. Adjust as needed
(directions below).
Adjusting the Rollers
Remove the door panel.
Remove the roller screw(s) from the roller(s).
Move the roller(s) to another hole in the hanger bracket.
Thread the screw(s) into the roller(s) and tighten.
Tighten the screws and reinstall the panel.
Install the Outside Panel
Lift the outside door panel with the rollers facing you and position the rollers on
the outside rail.
Check the panel for proper alignment and smooth operation. If adjustment is
needed, follow the adjustment directions above.
Inside of Bath/Shower
Intérieur de baignoire/douche
Interior de la bañera/ducha
Inside of Bath/Shower
Intérieur de baignoire/douche
Interior de la bañera/ducha
Top Track/Rail supérieur/Carril superior
Roller/Rouleau/Rueda
Roller
Rouleau
Rueda
Inside Rail
Rail intérieur
Riel interior
Outside Rail
Rail extérieur
Riel exterior
Inside Panel
Panneau intérieur
Panel interior
Outside Panel
Panneau extérieur
Panel exterior
Bottom Track Leg
Pied de rail inférieur
Pata del carril inferior
Sterling 17 1063216-2-E

9. Install the Center Guide
Make a small mark on the threshold at the center of the bottom track on the
inside of the shower using a pencil.
Position the center guide on the bottom track with the front lip of the center guide
in the groove of the bottom track.
Position both door panels so they are aligned in the slots in the center guide.
Holding the center guide tightly against the bottom track, make sure the door
panels can roll from wall-to-wall without binding.
If the doors bind, refer to the panel installation sections and make the needed
adjustments.
IMPORTANT! Risk of product damage. Do not overtighten the screws. The center
guide may crack.
While holding the center guide tightly against the bottom track, drive in the
provided self-tapping screw with a screwdriver. Repeat with the second screw.
Installer le guide central
Faire une petite marque au crayon sur le seuil au centre du rail inférieur de
l’intérieur de la douche.
Positionner le guide central du rail inférieur avec la lèvre frontale du guide central
dans la rainure du rail inférieur.
Positionner les deux panneaux de porte de manière à ce qu’ils soient alignés dans
les rainures du guide central.
En maintenant le guide central fermement contre le rail inférieur, s’assurer que les
panneaux de porte peuvent rouler de mur à mur sans coincer.
Si les portes coincent, se référer aux sections d’installation du panneau et faire les
réglages nécessaires.
IMPORTANT! Risque d’endommagement du produit. Ne pas trop serrer les vis. Le
guide central pourrait craquer.
Panels
Panneaux
Paneles
Panels
Panneaux
Paneles
Center Guide
Guide central
Guía central
Threshold
Seuil
Umbral
Bottom Track
Rail inférieur
Carril inferior
Self-Tapping Screws
Vis tarauds
Tornillos autorroscantes
Bottom Track
Rail inférieur
Carril inferior
Center Guide
Guide central
Guía central
Sterling 19 1063216-2-E

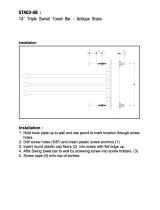
10. Install the Towel Bar
Place a clear washer then a clear sleeve onto each 1/4 x 20 screw.
From the inside side of the outside panel, insert a screw into each mounting hole
in the panel.
Slide a washer over the screw on the outside of the panel.
Position the towel bar over the screw and finger tighten the screw.
Insert the second screw into the door panel, slide a washer over the screw, align
the second end of the towel bar, and finger tighten the screw.
Insert a small hex wrench into the side hole in each screw head. Turn each screw
clockwise to tighten. Do not overtighten or the glass may be damaged.
Repeat the procedures for the inside panel towel bar.
Insert a small hex wrench into hole in screw
head and turn clockwise to secure towel bar.
Insérer une petite clé hexagonale dans
l'orifice de la tête de la vis et tourner vers la
droite pour sécuriser le porte-serviettes.
Introduzca una llave hexagonal pequeña en
el orificio de la cabeza del tornillo y gire hacia
la derecha para fijar el toallero.
Washer
Rondelle
Arandela
Sleeve
Manchon
Manga
Washer
Rondelle
Arandela
Towel Bar
Porte-serviettes
Toallero de barra
1/4" x 20 Screw
Vis 1/4" x 20
Tornillo de 1/4" x 20
Sterling 21 1063216-2-E

Install the Screw Covers (cont.)
Install screw covers over the
•
six wall jamb screws.
Installer les cache-vis
Installer des cache-vis sur
•
les six vis de montant du mur.
Instale los cubre tornillos
Instale cubre tornillos en los
•
seis tornillos de jamba mural.
12. Final Caulking
IMPORTANT! Carefully follow the silicone sealant manufacturer’s instructions for
application and curing time.
NOTE: Your shower door may not appear exactly as shown. The application of
silicone sealant is the same.
NOTE: Thoroughly clean and dry all dust, dirt, and grease from the bottom track and
Seal here.
Sceller ici.
Selle aquí.
Inside of Unit
Intérieur de l'unité
Interior de la unidad
Seal here.
Sceller ici.
Selle aquí.
Seal here.
Sceller ici.
Selle aquí.
Seal here.
Sceller ici.
Selle aquí.
Sterling 23 1063216-2-E

Final Caulking (cont.)
shower ledge surfaces where silicone sealant will be applied.
Carefully apply silicone sealant where:
the wall jambs and wall meet inside the shower.
the bottom track and wall jamb meet.
the outside area of the bottom track meets the bath/shower threshold on the
outside of the door.
Allow the silicone sealant to cure, following the sealant manufacturer’s
instructions, before using the bath/shower.
Mastic final
IMPORTANT! Suivre avec précaution les instructions du fabricant du mastic à la
silicone pour l’application et durée de durcissement.
REMARQUE: La porte de douche peut différer de l’illustration. L’application de la
silicone est la même.
REMARQUE: Nettoyer à fond de toute poussière, saleté et graisse du rail inférieur et
des surfaces de rebord de la douche où le mastic à la silicone sera appliqué.
Appliquer avec précaution le mastic à la silicone là où:
les montants du mur et le mur se rencontrent à l’intérieur de la douche.
le rail inférieur et les montants du mur se rencontrent.
l’extérieur du rail inférieur rencontre le rebord de la baignoire/douche à
l’extérieur de la porte.
Laisser le mastic à la silicone prendre en suivant les instructions du fabricant du
mastic avant d’utiliser la baignoire/douche.
Sellado final
¡IMPORTANTE! Con cuidado siga las instrucciones del fabricante del sellador de
silicona para la aplicación y el tiempo de secado.
NOTA: Tal vez su puerta de ducha no sea exactamente la ilustrada. La aplicación del
sellador de silicona es la misma.
NOTA: Limpie bien el polvo, la suciedad y la grasa del carril inferior y las superficies
del reborde de la ducha donde aplicará el sellador de silicona.
Con cuidado aplique sellador de silicona donde:
hacen contacto las jambas murales y la pared, en el interior de la ducha.
hacen contacto el carril inferior y la jamba mural.
hacen contacto el área exterior del carril inferior y el umbral de la bañera/ducha,
en el exterior de la puerta.
Deje secar el sellador de silicona, siguiendo las instrucciones del fabricante, antes
de utilizar la bañera/ducha.
1063216-2-E 24 Sterling

Care and Cleaning Instructions
Glass Surfaces:
Use a squeegee to clean your glass door surfaces after showering. Do not use a bristle
brush or abrasive sponges, as they will scratch some glass surfaces. Never use abrasive
cleansers, and do not allow cleaners to sit or soak on surfaces. Please use only the
following cleaning products on your shower door’s glass surfaces: Formula 409
®
Glass
and Surface Citrus Scent, Glass Plus
®
, and Windex
®
Original.
Finished, Metallic or Painted Surfaces:
Never use cleaners containing abrasive cleansers, ammonia, bleach, acids, waxes, alcohol,
or solvents for cleaning, as they may damage the finish. By taking the time to dry your
shower door after each use, you can prevent soap and water deposits from forming.
Failure to comply with these cleaning instructions may void Sterling’s warranty
obligations.
Instructions d’entretien et de nettoyage
Surfaces en verre:
Nettoyer les surfaces vitrées avec une raclette après chaque douche. Ne pas utiliser de
brosses ou d’éponges abrasives car elles pourraient abîmer les surfaces en verre. Ne
jamais utiliser de nettoyants abrasifs, et ne pas laisser les détergents ou le savons sur les
surfaces. Veuillez s’il vous plait n’utliser que les produits nettoyants suivants sur les
surfaces vitrées de votre porte de douche: Formula 409
®
Vitre et Surface Senteur citron,
Vitre Plus
®
,etWindex
®
Original.
Surfaces finies, métalliques ou peintes:
Ne jamais utiliser de nettoyants abrasifs qui contiennent de l’ammoniac, de l’eau
javellisée, des acides, des cires, de l’alcool ou des solvants car ils peuvent endommager
la finition. Si vous prenez le temps d’essuyer souvent vos accessoires, vous pouvez
empêcher la formation de dépôts de savon et d’eau. La non-observation de ces
instructions de nettoyage peut entraîner en l’annulation de la garantie Sterling.
Instrucciones de cuidado y limpieza
Superficies de vidrio:
Utilice un jalador limpiaventanas para limpiar las superficies de las puertas de vidrio
tras ducharse. No utilice cepillos de cerdas duras o esponjas abrasivas, pues pueden
rayar algunas superficies de vidrio. Nunca utilice productos abrasivos y no deje por
tiempo prolongado los productos de limpieza en las superficies. Utilice solamente los
siguientes productos de limpieza en las superficies de su puerta de ducha: Formula 409
®
para vidrios y superficies con fragancia de limón, Glass Plus
®
,yWindex
®
Original.
Superficies acabadas, metálicas o pintadas:
Nunca utilice productos de limpieza que contengan limpiadores abrasivos, amoníaco,
cloro (lejía), ácidos, ceras, alcohol o disolventes, pues pueden dañar el acabado. Si dedica
tiempo para secar la puerta de ducha tras cada uso, puede evitar la acumulación de
depósitos de jabón y agua. El incumplimiento de estas instrucciones de limpieza puede
anular las obligaciones establecidas en la garantía de Sterling.
Sterling 25 1063216-2-E

Limited Warranty
5 YEARS LIMITED 3 YEARS LIMITED 1 YEAR LIMITED
5100 Series 5700 Series 1500 Series 5900 Series 600 Series 950 Series 2800 Series
5300 Series 6300 Series 1900 Series 6065 Series 660 Series 1000 Series 2900 Series
5400 Series 6500 Series 2200 Series 6075 Series 690 Series 1100 Series 3100 Series
Based on the classification specified above, Sterling Plumbing, a division of Kohler Co.,
(Sterling) bath and shower doors are warranted to be free of manufacturing defects
within the time of the specified model’s limited warranty from date of sale.
Sterling will, at its election, repair, rectify or replace a fixture when Sterling’s inspection
discloses any such defects occurring in normal usage within the time period of coverage
stated above. Sterling is not responsible for removal or installation costs where
replacement is indicated. Damages due to improper handling, installation or maintenance
are not considered manufacturing defects and are not covered by this warranty. This
warranty is valid for the original consumer purchaser only.
To obtain warranty service, contact Sterling, either through your plumbing contractor,
home center, wholesaler or dealer, or by calling or writing Sterling Plumbing, Consumer
Services, 444 Highland Drive, Kohler, Wisconsin 53044, 1-888-783-7546.
To the extent permitted by law, all implied warranties including those of
merchantability and fitness for a particular purpose are hereby disclaimed. Sterling
disclaims any liability for special, incidental, or consequential damages. Some
states/provinces do not allow limitations on how long an implied warranty lasts, or the
exclusion or limitation of special, incidental or consequential damages, so these
limitations and exclusions may not apply to you. This warranty gives you specific legal
rights. You may have other rights which vary from state/province to state/province.
This is our exclusive written warranty.
Garantie limitée
LIMITÉ 5 ANS LIMITÉ 3 ANS LIMITÉ 1 AN
Séries 5100 Séries 5700 Séries 1500 Séries 5900 Séries 600 Séries 950 Séries 2800
Séries 5300 Séries 6300 Séries 1900 Séries 6065 Séries 660 Séries 1000 Séries 2900
Séries 5400 Séries 6500 Séries 2200 Séries 6075 Séries 690 Séries 1100 Séries 3100
Selon la classification décrite ci-dessus, Sterling Plumbing, une division de Kohler Co.
(Sterling), garantit les baignoires et portes de douche contre tout défaut de fabrication à
partir de la date d’achat, pour le temps qui correspond à chaque produit en particulier.
Sterling, à son choix, réparera, rectifiera, ou remplacera un appareil, si un défaut est
décelé après inspection Sterling en cours d’usage normal domestique pendant la période
de couverture citée ci-dessus. Sterling n’est pas responsables des coûts d’installation ou
de démontage, dans le cas où un remplacement est nécessaire. Tous dommages dûs à
une manipulation ou installation erronées ou à un mauvais entretien du produit ne
seront pas considérés comme défauts de fabrication, et ne seront pas couverts par la
présente garantie. Cette garantie est accordée uniquement à l’acquéreur initial.
Pour vous prévaloir du service en vertu de cette garantie, contactez votre
Concessionnaire, Entrepreneur Plombier, Centre de Rénovation, ou encore par écrit à
Sterling Plumbing, Consumer Services, 444 Highland Drive, Kohler, Wisconsin 53044,
1-888-783-7546.
Dans la limite permise par la loi, toutes les garanties implicites y compris celles de
qualité marchande et d’aptitude à un emploi particulier sont déclinées ici. Sterling
1063216-2-E 26 Sterling
/