Page is loading ...

CiA 402 – SC6, SI6
Manual
en-US
07/2023
ID 443080.02

Table of contents STOBER
2
07/2023 | ID 443080.02
Table of contents
Table of contents ...................................................................................................................................................... 2
1 Foreword .................................................................................................................................................................. 5
2 User information....................................................................................................................................................... 6
2.1 Storage and transfer................................................................................................................................................ 6
2.2 Described product ................................................................................................................................................... 6
2.3 Directives and standards ......................................................................................................................................... 6
2.4 Timeliness................................................................................................................................................................ 6
2.5 Original language..................................................................................................................................................... 6
2.6 Limitation of liability................................................................................................................................................ 7
2.7 Formatting conventions .......................................................................................................................................... 7
2.7.1 Display of safety instructions.................................................................................................................. 7
2.7.2 Markup of text elements ........................................................................................................................ 8
2.7.3 Mathematics and formulas..................................................................................................................... 8
2.8 Trademarks.............................................................................................................................................................. 9
3 General safety instructions.......................................................................................................................................10
4 What you should know before commissioning .........................................................................................................11
4.1 Program interfaces ................................................................................................................................................ 11
4.1.1 DS6 program interface.......................................................................................................................... 11
4.1.2 TwinCAT 3 program interface............................................................................................................... 14
4.2 Meaning of parameters......................................................................................................................................... 15
4.2.1 Parameter groups................................................................................................................................. 15
4.2.2 Parameter types and data types........................................................................................................... 16
4.2.3 Parameter types ................................................................................................................................... 17
4.2.4 Parameter structure ............................................................................................................................. 17
4.2.5 Parameter visibility............................................................................................................................... 18
4.3 Signal sources and process data mapping............................................................................................................. 19
4.4 Non-volatile memory............................................................................................................................................. 19
5 Commissioning.........................................................................................................................................................20
5.1 DS6: Configuring the drive controller .................................................................................................................... 21
5.1.1 Initiating the project ............................................................................................................................. 21
5.1.2 Parameterizing general EtherCAT settings ........................................................................................... 24
5.1.3 Configuring PDO transmission .............................................................................................................. 24
5.1.4 Mapping the mechanical axis model .................................................................................................... 25
5.1.5 Synchronizing EtherCAT nodes ............................................................................................................. 31
5.1.6 Transmitting and saving the configuration........................................................................................... 31
5.1.7 Activating the control panel and testing the configuration.................................................................. 33

STOBER Table of contents
07/2023 | ID 443080.02
3
5.2 TwinCAT 3: Putting the EtherCAT system into operation...................................................................................... 34
5.2.1 Creating and exporting an ESI file......................................................................................................... 34
5.2.2 Activating the EtherCAT master ........................................................................................................... 35
5.2.3 Scanning the hardware environment ................................................................................................... 36
5.2.4 Expanding the startup list..................................................................................................................... 37
5.2.5 Configuring synchronization using distributed clocks .......................................................................... 39
5.2.6 Configuring synchronization via SyncManager event........................................................................... 40
5.2.7 Controller-based axis control ............................................................................................................... 40
5.2.8 Drive-based axis control ....................................................................................................................... 42
5.2.9 Configuring EoE communication .......................................................................................................... 43
5.2.10 Configuring a Station Alias.................................................................................................................... 44
5.2.11 Transmitting the configuration............................................................................................................. 44
5.2.12 Checking the functionality of the axes ................................................................................................. 45
5.3 CODESYS V3: Putting the EtherCAT system into operation................................................................................... 46
5.3.1 Creating a standard project .................................................................................................................. 46
5.3.2 Adding a drive controller ...................................................................................................................... 46
5.3.3 Configuring synchronization using distributed clocks .......................................................................... 47
5.3.4 Controller-based axis control ............................................................................................................... 48
5.3.5 Drive-based axis control ....................................................................................................................... 50
5.3.6 Configuring EoE communication .......................................................................................................... 50
5.3.7 Transmitting the configuration............................................................................................................. 50
5.3.8 Checking the functionality of the axes ................................................................................................. 51
5.3.9 Special case: Adding to the PDO transmission ..................................................................................... 51
6 More about CiA 402?................................................................................................................................................52
6.1 CiA 402 – Concept ................................................................................................................................................. 52
6.1.1 Activation.............................................................................................................................................. 53
6.1.2 Operating modes .................................................................................................................................. 53
6.1.3 Source for digital signals....................................................................................................................... 53
6.1.4 User-defined status word ..................................................................................................................... 53
6.1.5 Additional functions ............................................................................................................................. 53
6.1.6 Control panels....................................................................................................................................... 54
6.1.7 Motion core .......................................................................................................................................... 54
6.2 Axis model ............................................................................................................................................................. 55
6.3 Limit switches ........................................................................................................................................................ 57
6.3.1 Real axes ............................................................................................................................................... 57
6.3.2 Special cases ......................................................................................................................................... 61
6.4 Referencing............................................................................................................................................................ 62
6.4.1 Referencing methods............................................................................................................................ 62
6.4.2 Reference position................................................................................................................................ 88
6.4.3 Reference retaining .............................................................................................................................. 88
6.5 CiA 402 device control........................................................................................................................................... 89
6.5.1 CiA 402 device state machine............................................................................................................... 89
6.5.2 Commands, states and transitions ....................................................................................................... 90

Table of contents STOBER
4
07/2023 | ID 443080.02
6.6 Operating modes in detail ..................................................................................................................................... 94
6.6.1 Interpolated position mode (ip) ........................................................................................................... 94
6.6.2 Cyclic synchronous position mode (csp)............................................................................................... 97
6.6.3 Cyclic synchronous velocity mode (csv)................................................................................................ 98
6.6.4 Cyclic synchronous torque mode (cst).................................................................................................. 99
6.6.5 Profile position mode (pp).................................................................................................................. 100
6.6.6 Velocity mode (vl)............................................................................................................................... 102
6.6.7 Profile velocity mode (pv)................................................................................................................... 105
6.6.8 Profile torque mode (pt)..................................................................................................................... 107
6.6.9 Homing mode ..................................................................................................................................... 108
6.6.10 Jog....................................................................................................................................................... 110
6.7 Switching condition ............................................................................................................................................. 112
6.8 Operating modes in accordance with CiA 402 – Commands............................................................................... 113
6.9 Feedforward control............................................................................................................................................ 115
6.9.1 Controller-generated external feedforward control .......................................................................... 115
6.9.2 Drive-generated internal feedforward control................................................................................... 116
6.9.3 Without feedforward control ............................................................................................................. 116
6.9.4 Setting up feedforward control in DS6 ............................................................................................... 116
6.10 Interpolation........................................................................................................................................................ 118
6.11 Touch probe – Examples ..................................................................................................................................... 119
6.12 Cycle times........................................................................................................................................................... 121
7 Appendix................................................................................................................................................................122
7.1 EtherCAT and CiA 402 standard mapping............................................................................................................ 122
7.1.1 SC6, SI6: CiA402 receive process data ............................................................................................... 122
7.1.2 SC6, SI6: CiA402 transmit process data ............................................................................................. 124
7.2 Supported communication objects ..................................................................................................................... 126
7.2.1 CiA 402 Drives and motion control: 6000 hex – 65FF hex .................................................................. 126
7.2.2 CiA 402 Drives and motion control: 6800 hex – 6DFF hex.................................................................. 130
7.2.3 Touch probe source: Values ............................................................................................................... 134
7.2.4 Manufacturer-specific parameters: 2000 hex – 53FF hex .................................................................. 135
7.2.5 Manufacturer-specific parameters: A000 hex – D3FF hex ................................................................. 137
7.3 Detailed information ........................................................................................................................................... 139
7.4 Formula symbols ................................................................................................................................................. 140
7.5 Abbreviations ...................................................................................................................................................... 141
8 Contact ..................................................................................................................................................................142
8.1 Consultation, service and address....................................................................................................................... 142
8.2 Your opinion is important to us........................................................................................................................... 142
8.3 Close to customers around the world ................................................................................................................. 143
Glossary .................................................................................................................................................................144
List of figures..........................................................................................................................................................146
List of tables...........................................................................................................................................................147

STOBER 1 | Foreword
07/2023 | ID 443080.02
5
1 Foreword
The DriveControlSuite commissioning software for STOBER 6th generation drive controllers offers convenient functions for
efficient project configuration and commissioning of drive controllers in multi-axis and single-axis applications.
The CiA 402 application included in the software contains both controller-based and drive-based operating modes along
with the associated position, velocity and torque/force control types. For commissioning, emergency operation and
maintenance or repair work, the STOBER-specific jog mode is also available.
This documentation describes the general functions of the CiA 402 application and guides you step by step through the
setup and project configuration of your drive project in the individual operating modes.

2 | User information STOBER
6
07/2023 | ID 443080.02
2 User information
This documentation supports you in the setup and project configuration of your drive system with the CiA 402 application,
which is based on the internationally standardized CANopen CiA 402 device profile for electric drives in accordance with
IEC 61800-7.
Commissioning is described using examples of an EtherCAT network with STOBER drive controllers from the 6th generation
in combination with a CODESYS SoftMotion controller or, as an alternative, working with a controller from Beckhoff
Automation GmbH & Co. KG.
Technical knowledge
To be able to commission one or more drive controllers in combination with a controller using the CiA 402 application, you
should have basic knowledge of handling 6th generation STOBER drive controllers and of the DriveControlSuite
commissioning software. Operating an EtherCAT network also requires having familiarity with the basics of the EtherCAT
network technology.
Technical requirements
Before you begin operating your EtherCAT network, you need to wire the drive controllers and initially check that they are
functioning correctly. To do this, follow the instructions in the manual for the relevant drive controller.
2.1 Storage and transfer
As this documentation contains important information for handling the product safely and efficiently, it must be stored in
the immediate vicinity of the product until product disposal and be accessible to qualified personnel at all times.
Also pass on this documentation if the product is transferred or sold to a third party.
2.2 Described product
This documentation is binding for:
SC6 or SI6 series drive controllers in conjunction with the
DriveControlSuite software (DS6) in V 6.5-K or later and associated firmware in V 6.5-K-EC or later.
2.3 Directives and standards
Refer to the drive controller documentation for the European directives and standards relevant to the drive controller and
accessories.
2.4 Timeliness
Check whether this document is the latest version of the documentation. We make the latest document versions for our
products available for download on our website:
http://www.stoeber.de/en/downloads/.
2.5 Original language
The original language of this documentation is German; all other language versions are derived from the original language.

STOBER 2 | User information
07/2023 | ID 443080.02
7
2.6 Limitation of liability
This documentation was created taking into account the applicable standards and regulations as well as the current state of
technology.
No warranty or liability claims for damage shall result from failure to comply with the documentation or from use that
deviates from the intended use of the product. This is especially true for damage caused by individual technical
modifications to the product or the project configuration and operation of the product by unqualified personnel.
2.7 Formatting conventions
Orientation guides in the form of signal words, symbols and special text markups are used to emphasize specific
information so that you are able identify it in this documentation quickly.
2.7.1 Display of safety instructions
Safety instructions are identified with the following symbols. They indicate special risks when handling the product and are
accompanied by relevant signal words that express the extent of the risk. Furthermore, useful tips and recommendations
for efficient, error-free operation are specially highlighted.
ATTENTION!
Attention
This indicates that damage to property may occur
▪ if the stated precautionary measures are not taken.
CAUTION!
Caution
This word with a warning triangle indicates that minor personal injury may occur
▪ if the stated precautionary measures are not taken.
WARNING!
Warning
This word with a warning triangle means there may be a considerable risk of fatal injury
▪ if the stated precautionary measures are not taken.
DANGER!
Danger
This word with a warning triangle indicates that there is a considerable risk of fatal injury
▪ if the stated precautionary measures are not taken.
Information
Information indicates important information about the product or serves to emphasize a section in the documentation that
deserves special attention from the reader.

2 | User information STOBER
8
07/2023 | ID 443080.02
2.7.2 Markup of text elements
Certain elements of the continuous text are distinguished as follows.
Important information Words or expressions with a special meaning
Interpolated position mode Optional: File or product name or other name
Detailed information Internal cross-reference
http://www.samplelink.com External cross-reference
Software and other displays
The following formatting is used to identify the various information content of elements referenced by the software
interface or a drive controller display, as well as any user entries.
Main menu
Settings
Window names, dialog box names, page names or buttons, combined
proper nouns, functions referenced by the interface
Select
Referencing method A
Predefined entry
Save your
<own IP address>
User-defined entry
EVENT 52:
COMMUNICATION
Displays (status, messages, warnings, faults)
Keyboard shortcuts and command sequences or paths are represented as follows.
[Ctrl], [Ctrl] + [S]
Key, shortcut
Table > Insert table Navigation to menus/submenus (path specification)
2.7.3 Mathematics and formulas
The following signs are used to represent mathematical relationships and formulas.
– Subtraction
+ Addition
× Multiplication
÷ Division
| | Absolute value

STOBER 2 | User information
07/2023 | ID 443080.02
9
2.8 Trademarks
The following names used in connection with the device, its optional equipment and its accessories are trademarks or
registered trademarks of other companies:
CANopen®,
CiA®
CANopen® and CiA® are registered European Union trademarks of CAN in
AUTOMATION e.V., Nuremberg, Germany.
EnDat®EnDat® and the EnDat® logo are registered trademarks of Dr. Johannes Heidenhain
GmbH, Traunreut, Germany.
EtherCAT®,
Safety over EtherCAT®,
TwinCAT®
EtherCAT®, Safety over EtherCAT® and TwinCAT® are registered trademarks of
patented technologies licensed by Beckhoff Automation GmbH, Verl, Germany.
HIPERFACE®HIPERFACE® and the HIPERFACE DSL® logo are registered trademarks of SICK
STEGMANN GmbH, Donaueschingen, Germany.
PLCopen®PLCopen® is a registered trademark of the PLCopen Organisation, Gorinchem,
Netherlands.
All other trademarks not listed here are the property of their respective owners.
Products that are registered as trademarks are not specially indicated in this documentation. Existing property rights
(patents, trademarks, protection of utility models) are to be observed.

3 | General safety instructions STOBER
10
07/2023 | ID 443080.02
3 General safety instructions
WARNING!
Risk of fatal injury if safety instructions and residual risks are not observed!
Failure to observe the safety instructions and residual risks in the drive controller documentation may result in accidents
causing serious injury or death.
▪ Observe the safety instructions in the drive controller documentation.
▪ Consider the residual risks in the risk assessment for the machine or system.
WARNING!
Malfunction of the machine due to incorrect or modified parameterization!
In the event of incorrect or modified parameterization, malfunctions can occur on machines or systems which can lead to
serious injuries or death.
▪ Observe the security notes in the drive controller documentation.
▪ Protect the parameterization, e.g. from unauthorized access.
▪ Take appropriate measures for possible malfunctions (e.g. emergency off or emergency stop).

STOBER 4 | What you should know before commissioning
07/2023 | ID 443080.02
11
4 What you should know before commissioning
The following chapters provide a quick introduction to the structure of the program interface and accompanying window
designations as well as relevant information about parameters and generally saving your project configuration.
4.1 Program interfaces
The following chapters include an overview of the program interfaces for the described software components.
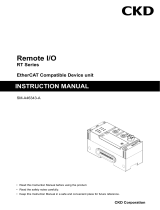
4.1.1 DS6 program interface
Using the graphical interface of the DriveControlSuite commissioning software (DS6), you can project, parameterize and
commission your drive project quickly and efficiently. In case of service, you can evaluate diagnostic information such as
operating states, fault memories and fault counters of your drive project using DriveControlSuite.
Information
The program interface of DriveControlSuite is available in German, English and French. To change the language of the
program interface, select Settings > Language.
Information
The DriveControlSuite help in the menu bar can be reached via Help > Help for DS6 or via the
[F1]
key on your keyboard.
When you press
[F1]
in an area of the program, the corresponding help topic opens.
1 2
3
4
5
6 7 8
9
Fig.1: DS6: Program interface

4 | What you should know before commissioning STOBER
12
07/2023 | ID 443080.02
No. Area Description
1Menu bar Using the File, View, Settings and Window menus, you can open and save projects, display
and hide program windows, select the interface language and access level and change
between different windows in the workspace.
2Toolbar The toolbar enables quick access to frequently needed functions, like opening and saving
projects and hiding and displaying windows in the program interface.
3Project tree The project tree forms the structure of your drive project in the form of modules and drive
controllers. Select an element using the project tree first in order to edit it using the
project menu.
4Project menu The project menu offers you various functions for editing the project, module and drive
controller. The project menu adapts to the element that you selected in the project tree.
5Workspace The different windows which can be used to edit your drive project, such as the
configuration dialog, wizards, the parameter list or the scope analysis tool, open in the
workspace.
6Parameter check The parameter check points out irregularities and inconsistencies that were detected in
the plausibility check of calculable parameters.
7Messages The entries in the messages log the connection and communication status of the drive
controllers, incorrect inputs caught by the system, errors when opening a project or rule
violations in the graphical programming.
8Variable parameter
lists
You can use variable parameter lists to compile any parameters in individual parameter
lists for a quick overview.
9Status bar In the status bar, you can find the specifications of the software version and get additional
information about the project file, the devices and the progress of the process during
processes such as loading projects.
4.1.1.1 Configuring the view
In DriveControlSuite, you can change the visibility and arrangement of areas and windows, such as to optimize the available
space in the workspace when working with smaller screens.
Showing/hiding areas
Use the icons in the toolbar or the items in the View menu to show or hide specific areas in DriveControlSuite as needed.
Icon Item Description
–Reset Resets the view to factory settings.
Project Shows/hides the Project window (project tree, project
menu).
Messages Shows/hides the Messages window.
Parameter check Shows/hides the Parameter check window.
Variable parameter lists Shows/hides the Variable parameter lists window.

STOBER 4 | What you should know before commissioning
07/2023 | ID 443080.02
13
Arrange and group areas
You can undock and rearrange the individual areas via drag and drop. If you drag an undocked window to the edge of
DriveControlSuite, you can release it there in a color-highlighted area either next to or on top of another window to redock
it.
When you release the window onto another window, the two areas are merged into one window where you can use tabs to
switch between the areas.
4.1.1.2 Navigation using sensitive circuit diagrams
Fig.2: DriveControlSuite: Navigation using text links and symbols
In order to illustrate graphically the processing sequence of actual and set values, the use of signals or certain drive
component arrangements and to make configuring the accompanying parameters easier, they are displayed on the
respective wizard pages of the workspace in the form of circuit diagrams.
Blue text links or clickable icons indicate links within the program. These refer to the corresponding wizard pages and, as a
result, allow you to reach additional helpful detail pages with just a click.

4 | What you should know before commissioning STOBER
14
07/2023 | ID 443080.02
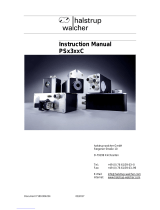
4.1.2 TwinCAT 3 program interface
In TwinCAT 3, you operate your EtherCAT system using TwinCAT XAE. The following graphic shows the interface elements
relevant to this documentation.
3
4
5
8
21
6
7
Fig.3: TwinCAT 3 (TwinCAT XAE): Program interface
No. Area Description
1 Menu bar The menu bar shows the menus set by default. Editor-specific menus appear only when the
corresponding editor is open. Using the Tools menu, you can configure the user interface
and add to existing menus or define new ones, for example.
2 Toolbar The toolbar enables quick access to frequently used functions, such as opening and saving
projects.
3 Solution explorer The solution explorer maps the structure of your project with the project elements it
contains. First select an element using the solution explorer to edit it in the main window.
4 Main window (editor) In the main window, you define and edit objects, e.g. graphical programming elements.
5 Message window The message window informs you of any errors or warnings currently present. You also
receive messages about the syntax check, compilation process, etc.
6 Properties window The properties window shows the properties of the element selected in the solution
explorer.
7 Toolbox Displays the "tools" available for the active editor, such as graphical programming
elements.
8 Information and status
bar
The information and status bar informs you about the state of the system (Config, Run,
Stop or Exception mode). In online operation, you can see the current status of the
program. If an editor window is active, the current position of the cursor and the set
editing mode are also displayed.

STOBER 4 | What you should know before commissioning
07/2023 | ID 443080.02
15
4.2 Meaning of parameters
You can use parameters to adapt the function of the drive controller to your individual application. In addition, parameters
visualize the current actual values (actual velocity, actual torque, etc.) and trigger actions such as Save values, Test phase,
etc.
Interpretation of parameter identification
Parameter identification consists of the following elements, where short forms are also possible, i.e. only specifying a
coordinate or the combination of coordinate and name.
E50 V0
Coordinate Name Version
Drive controller G6
Drive controller
generation/series
4.2.1 Parameter groups
Parameters are assigned to individual groups by topic. The 6th generation of STOBER drive controllers differentiates
between the following parameter groups.
Group Topic
A Drive controllers, communication, cycle times
B Motor
C Machine, velocity, torque/force, comparators
D Set value
E Display
F Terminals, analog and digital inputs and outputs, brake
G Technology – Part 1 (application-dependent)
H Encoder
I Motion (all motion settings)
J Motion blocks
K Control panel
L Technology – Part 2 (application-dependent)
M Profiles (application-dependent)
N Additional functions (application-dependent; e.g. extended cam control unit)
P Customer-specific parameters (programming)
Q Customer-specific parameters, instance-dependent (programming)
R Production data for the drive controller, motor, brakes, motor adapter, gear unit and geared motor
S Safety (safety technology)
T Scope
U Protection functions
Z Fault counter
Tab. 1: Parameter groups

4 | What you should know before commissioning STOBER
16
07/2023 | ID 443080.02
4.2.2 Parameter types and data types
In addition to topic-based sorting in individual groups, all parameters belong to a certain data type and parameter type. The
data type of a parameter is displayed in the parameter list, properties table. The connections between parameter types,
data types and their value range can be found in the following table.
Data type Parameter type Length Value range (decimal)
INT8 Integer or selection 1 byte (signed) -128 – 127
INT16 Integer 2 bytes (1 word, signed) -32768 – 32767
INT32 Integer or position 4 bytes (1 double word,
signed)
-2147483648 – 2147483647
BOOL Binary number 1 bit (internal:
LSB in 1 byte)
0, 1
BYTE Binary number 1 byte (unsigned) 0 – 255
WORD Binary number 2 bytes (1 word, unsigned) 0 – 65535
DWORD Binary number or parameter
address
4 bytes (1 double word,
unsigned)
0 – 4294967295
REAL32
(single type according to
IEE754)
Floating-point number 4 bytes (1 double word,
signed)
-3.40282 × 1038 – 3.40282 ×
1038
STR8 Text 8 characters —
STR16 Text 16 characters —
STR80 Text 80 characters —
Tab. 2: Parameters: data types, parameter types, possible values
Parameter types: Use
§Integer, floating-point number
For general computing processes
Example: Set and actual values
§Selection
Numeric value to which a direct meaning is assigned
Example: Sources for signals or set values
§Binary number
Bit-oriented parameter information that is collected in binary
Example: Control and status words
§Position
Integer combined with associated units and decimal places
Example: Actual and set values of positions
§Velocity, acceleration, deceleration, jerk
Floating-point number combined with associated units
Example: Actual and set values for velocity, acceleration, deceleration, jerk
§Parameter address
Referencing of a parameter
Example: In F40 AO1 source, for example, E08 n-motor filtered can be parameterized
§Text
Outputs or messages

STOBER 4 | What you should know before commissioning
07/2023 | ID 443080.02
17
4.2.3 Parameter types
The following types of parameters are differentiated.
Parameter type Description Example
Simple parameters Consist of one group and one line with a
defined value.
A21Brake resistor R: Value = 100ohms
Array parameters Consist of a group, a line and multiple
sequential (listed) elements, which have the
same properties but different values.
A10Access level
§A10[0] access level: Value = Access level
via operating unit
§A10[2] access level: Value = Access level
via CANopen and EtherCAT
§A10[4] access level: Value = Access level
via PROFINET
Record parameters Consist of a group, a line and multiple
sequential (listed) elements, which can have
different properties and different values.
A00Save values
§A00[0] Start: Value = Start action
§A00[1] Progress: Value = Display action
progress
§A00[2] Result: Value = Display action
result
Tab. 3: Parameter types
4.2.4 Parameter structure
Every parameter has specific coordinates with the following structure.
E250 [2] .3
Axis
Group
Line
1.
Element
Bit
§Axis (optional)
In case of multiple axes, the one to which a parameter is assigned; not applicable for global parameters (value range:
1 – 4).
§Group
The thematic group to which a parameter belongs (value range: A – Z).
§Line
Distinguishes the parameters within a parameter group (value range: 0 – 999).
§Element (optional)
Elements of an array or record parameter (value range: 0 – 16000).
§Bit (optional)
Selection of a single bit for complete data addressing; depends on the data type (value range: 0 – 31).

4 | What you should know before commissioning STOBER
18
07/2023 | ID 443080.02
4.2.5 Parameter visibility
The visibility of a parameter is primarily controlled by the access level you set in DriveControlSuite and by the properties
you project for the respective drive controller (e.g. hardware, firmware and application). A parameter can also be shown or
hidden depending on other parameters or settings. For example, the parameters of an additional function are only shown
as soon as you activate the relevant additional function.
Access level
The access options for the individual software parameters are ranked hierarchically and divided into individual levels. This
means that parameters can be hidden for a specific purpose and, relatedly, their configuration options can be locked
starting from a specific level.
Each parameter has one access level for read access (visibility) and one access level for write access (editability). The
following levels are present:
§Level 0
Elementary parameters
§Level 1
Important parameters of an application
§Level 2
Important parameters for service with extensive diagnostic options
§Level 3
All parameters needed for commissioning and optimizing an application
The parameter A10Access level controls general access to parameters:
§Over CANopen or EtherCAT (A10[2])
§Over PROFINET (A10[3])
Information
It is not possible to write to or read the parameter hidden in DriveControlSuite during communication via fieldbus.
Hardware
Which parameters are available to you in DriveControlSuite is determined by which series you select in the configuration
dialog for the drive controller, for example, or whether you project an option module. Basically, the only parameters that
are displayed are the ones you need to parameterize the configured hardware.
Firmware
Due to the further development and updating of functions for the 6th generation of STOBER drive controllers, new
parameters and also new versions of existing parameters are continuously being implemented in DriveControlSuite and in
the firmware. The parameters are displayed in the software according to the DriveControlSuite version used and the
configured firmware version of the respective drive controller.
Applications
Applications generally differ in terms of functions and their control. For this reason, different parameters are available with
each application.

STOBER 4 | What you should know before commissioning
07/2023 | ID 443080.02
19
4.3 Signal sources and process data mapping
The transmission of control signals and set values in DriveControlSuite meets the following principles.
Signal sources
Drive controllers are controlled either over a fieldbus, using mixed operation consisting of a fieldbus system and terminals
or exclusively using terminals.
You can use the corresponding selection parameters, referred to as signal sources, to configure whether the control signals
and set values of the application are obtained over a fieldbus or using terminals.
In case of activation over a fieldbus, parameters that are selected as data sources for control signals or set values must be
part of the subsequent process data mapping. In the case of activation using terminals, the respective analog or digital
inputs are specified directly.
Process data mapping
If you are working with a fieldbus system and have selected the source parameters for control signals and set values,
configure the fieldbus-specific settings, e.g. the assignment of the process data channels for transmitting receive and
transmit process data, as the last step. The respective procedure can be found in the accompanying STOBER fieldbus
manuals.
4.4 Non-volatile memory
All project configurations, parameterizations and related changes to parameter values are in effect after transmission to the
drive controller, but are only stored in volatile memory.
Saving to a drive controller
To save the configuration in non-volatile memory on a drive controller, you have the following options:
§Saving the configuration using the Save values wizard:
Project menu > Wizards area > Projected axis > Save values wizard: Select the Save values action
§Saving the configuration using the parameter list:
Project menu > Parameter list area > Projected axis > Group A: Drive controller > A00 Save values: Set the parameter
A00[0] to the value 1: Active
Saving to all drive controllers within a project
To save the configuration in non-volatile memory on several drive controllers, you have the following options:
§Saving the configuration using the toolbar:
Toolbar > Save values icon: Click the Save values icon
§Saving the configuration using the Online functions window:
Project menu > Online connection button > Online functions window: Click on Save values (A00)
Information
Do not shut off the drive controller while saving. If the supply voltage to the control unit is interrupted while saving, the
drive controller will start without an executable configuration the next time it is switched on. In this case, the configuration
must be transferred to the drive controller again and stored in non-volatile memory.

5 | Commissioning STOBER
20
07/2023 | ID 443080.02
5 Commissioning
Are you looking to operate drive controllers with a controller over an EtherCAT network?
The following chapters describe commissioning using the DriveControlSuite commissioning software in combination with
the TwinCAT3 or CODESYSV3 automation software.
We assume the following system environment as an example so that you can follow the individual commissioning steps
exactly:
§Drive controllers from the SC6 or SI6 series with firmware version 6.5-K-EC or later
§DriveControlSuite commissioning software version 6.5-K or later
Either in combination with
§Beckhoff CX2030 embedded PC
§Beckhoff TwinCAT3 automation software
Or in combination with
§CODESYS SoftMotion controller
§CODESYSV3 automation software
Commissioning is divided into the following steps:
1. DriveControlSuite
Project all of the drive controllers, i.e. application type, device control systems, process data for fieldbus
communication and mechanical axis model in DriveControlSuite.
Depending on the selected application (CiA 402 or CiA 402 HiRes Motion), scale your axis models on the drive
controller side or the controller side.
In both cases, transfer your configuration to the drive controllers of the system network.
2. TwinCAT3 or CODESYSV3
Scale your axis model if necessary and then map your entire hardware environment in the respective software.
Synchronize the operation of the distributed clocks in all EtherCAT nodes and configure the communication of
individual nodes over the EoE protocol.
Finally, transfer the entire configuration to the controller and then start up your EtherCAT system.
/