

Digital Camera User Guide
Table of Contents
Lincense Agreement . . . . . . . . . . . . . . . . . . . . . . . . . . . . . . . . . . . . . . . . 1
Electromagnetic Compatibility Notice . . . . . . . . . . . . . . . . . . . . . . . . . . . . 1
Caution . . . . . . . . . . . . . . . . . . . . . . . . . . . . . . . . . . . . . . . . . . . . . . . . . . . . 1
Attention . . . . . . . . . . . . . . . . . . . . . . . . . . . . . . . . . . . . . . . . . . . . . . . . . . . 1
In This Package . . . . . . . . . . . . . . . . . . . . . . . . . . . . . . . . . . . . . . . . . . . . 2
System Requirements . . . . . . . . . . . . . . . . . . . . . . . . . . . . . . . . . . . . . . . 2
Getting Started . . . . . . . . . . . . . . . . . . . . . . . . . . . . . . . . . . . . . . . . . . . . 2
• Nomenclature . . . . . . . . . . . . . . . . . . . . . . . . . . . . . . . . . . . . . . . . . . 2
Batteries Installation . . . . . . . . . . . . . . . . . . . . . . . . . . . . . . . . . . . . . . . . 3
Prepare to Upload the Photos . . . . . . . . . . . . . . . . . . . . . . . . . . . . . . . . . . 3
Installing Digital Camera CD-ROM Software . . . . . . . . . . . . . . . . . . . . . . . . . 3
Running Digital Camera Suite . . . . . . . . . . . . . . . . . . . . . . . . . . . . . . . . 3
Uninstalling Digital Camera Suite . . . . . . . . . . . . . . . . . . . . . . . . . . . . . 3
AVI Creator Program . . . . . . . . . . . . . . . . . . . . . . . . . . . . . . . . . . . . . . . . 4
Connecting Your Digital Camera to the PC/Mac . . . . . . . . . . . . . . . . . . . . . . . . . . . . . 4
Taking Photos . . . . . . . . . . . . . . . . . . . . . . . . . . . . . . . . . . . . . . . . . . . . . 5
Holding the Camera . . . . . . . . . . . . . . . . . . . . . . . . . . . . . . . . . . . . . . . . . 5
• LCD panel information . . . . . . . . . . . . . . . . . . . . . . . . . . . . . . . . . . 5
Changing the Capture Mode . . . . . . . . . . . . . . . . . . . . . . . . . . . . . . . . . . 6
• Select the Low Resolution Mode . . . . . . . . . . . . . . . . . . . . . . . . . . . 6
• Select the Continuous Mode . . . . . . . . . . . . . . . . . . . . . . . . . . . . . . . 6
• Select the Self-timer Mode . . . . . . . . . . . . . . . . . . . . . . . . . . . . . . . 6
• Clear all the photos . . . . . . . . . . . . . . . . . . . . . . . . . . . . . . . . . . . . 6
Auto Off . . . . . . . . . . . . . . . . . . . . . . . . . . . . . . . . . . . . . . . . . . . . . . . . . . 6
Low Battery . . . . . . . . . . . . . . . . . . . . . . . . . . . . . . . . . . . . . . . . . . . . . . . . 6
Getting Started with Digital Camera Suite . . . . . . . . . . . . . . . . . . . . . . 7
PhotoFantasy . . . . . . . . . . . . . . . . . . . . . . . . . . . . . . . . . . . . . . . . . . . . . 7
• To Launch PhotoFantasy . . . . . . . . . . . . . . . . . . . . . . . . . . . . . . . 7
• Quick Guide for Select Input Source from Digital Camera . . . . . . . . . . . . . . 7
• Main Screen . . . . . . . . . . . . . . . . . . . . . . . . . . . . . . . . . . . . . . . . . . 8
• Get Fantasy Screen . . . . . . . . . . . . . . . . . . . . . . . . . . . . . . . . . . . . 9
• Get Photo Screen . . . . . . . . . . . . . . . . . . . . . . . . . . . . . . . . . . . . 10
PhotoPrinter . . . . . . . . . . . . . . . . . . . . . . . . . . . . . . . . . . . . . . . . . . . . . . 11
• To Launch PhotoPrinter . . . . . . . . . . . . . . . . . . . . . . . . . . . . . . . . 11
• Quick Guide for Select Input Source from Digital Camera . . . . . . . . . . . . . . 11
• PhotoPrinter Main Screen . . . . . . . . . . . . . . . . . . . . . . . . . . . . . . 12
PhotoStudio . . . . . . . . . . . . . . . . . . . . . . . . . . . . . . . . . . . . . . . . . . . . . . 13
• Select Input Source from Digital Camera . . . . . . . . . . . . . . . . . . . . . . 13
• PhotoStudio Main Screen . . . . . . . . . . . . . . . . . . . . . . . . . . . . . . 14
AVI Creator . . . . . . . . . . . . . . . . . . . . . . . . . . . . . . . . . . . . . . . . . . . . . . 15
• To Launch AVI Creator . . . . . . . . . . . . . . . . . . . . . . . . . . . . . . . . . 15
• Create your AVI Video File . . . . . . . . . . . . . . . . . . . . . . . . . . . . . . 15
Hints On Taking Quality Photos . . . . . . . . . . . . . . . . . . . . . . . . . . . . . . 16
Trouble Shooting . . . . . . . . . . . . . . . . . . . . . . . . . . . . . . . . . . . . . . . . . . 17
Product Specification . . . . . . . . . . . . . . . . . . . . . . . . . . . . . . . . . . . . . . . . . 18
Appendix I Installing PC Driver & upload photos . . . . . . . . . . . . . . . . 19
Appendix II Installing Mac Driver & upload photos . . . . . . . . . . . . . . . . 22
Appendix III FAQ ( Frequently Asked Questions ) . . . . . . . . . . . . . . . . 25

Digital Camera User Guide
License Agreement
Microsoft, Windows, Windows 95, Windows 98, Windows NT, Me are registered trademark of
Microsoft Corporation. Pentium is a registered trademark of Intel Corporation. The TWAIN driver
and the AVI Creator is developed by VLSI Vision Ltd.,UK. The Photo Fantasy, Photo Printer and
Photo Studio is licensed by Arcsoft, USA.
All other product names mentioned here in are trademarks or registered trademarks of their
respective owners.
Electromagnetic Compatibility Notice
This equipment has been tested and found to comply with the limits for a Class B digital device,
pursuant to Part 15 of the FCC rules. These limits are designed to provide reasonable protection
against harmful interference in a residential installation. This equipment generates, uses, and can
radiate radio frequency energy, and if not installed and used in accordance with the instructions,
may cause harmful interference to radio communications. However, there is no guarantee that
interference will not occur in a particular installation.
If the unit does cause harmful interference to radio or television reception, which can be determined
by turning the equipment off and on, the user is encouraged to try to correct the interference by
one or more of the following measures:
Re-orient or relocate the receiving antenna.
• Increase the separation between the equipment and receiver.
• Connect the equipment into an outlet on a circuit different from that to which the receiver
is connected.
• Consult the dealer or any experienced TV/radio technician for help.
Caution
In order to maintain compliance with FCC regulations, shielded cables must be used with
this equipment. Operation with non-approved equipment or unshielded cables is likely to
result in interference to radio and TV reception.
To comply with the limits for a class B digital device, pursuant to part 15 of the FCC rules, this
device must only be installed on computer equipment certified to comply with the Class B limits.
In addition, only the supplied power cables should be used with the product. Operation with non-
certified computers, use of a cable other than that supplied, or modification of the device may result
in interference to radio or television reception and could void the user’s authority to operate this
device.
Attention
Thank you for selecting Digital Camera. Please read the instructions carefully for a thorough
understanding before taking pictures.
• This camera is not resistant to water and should not be used outdoors in snow or rain. If
accidentally dropped in water, please quickly pour out the water. Let it to dry by sunlight or
by air-blower.
• Protect it from excessive humidity. It will wet the lens and picture will be blured.
• Do not attempt to disassemble the camera yourself. Always take it to an authorized service
facility for repair.
• Remove the batteries if you do not expect to use the camera for 1 month or longer.
• To store the camera, wrap it in a clean, soft cloth and place in a cool, dry, dust-free place.
Also it should not be placed in a very hot temperature condition or in direct sun light.
• The battery may explode or cause burns if disassembled, recharged, shorted, exposed to high
temperature, or disposed of in fire.
• Take care on the lens. Use special cloth to clean it.
• Condensation is a problem when bringing cold equipment into a warm room. Try to put the
camera in plastic bag so condensation forms on the outside of the bag.
• If nothing at all is displayed in the LCD panel, the battery may be inserted in opposite polarity.
• Turning off the power will cause the loss of all stored photos. Make sure you have uploaded
the photos to the PC before turning the power switch to Off.
• You will hear a ‘Gi’ sound and the camera will not function to take a photo if the environment
is too dark or too bright. It will operate properly for normal light intensity.
1

In This Package
• Digital Camera
• Digital Camera Software CD-ROM
• USB cable
Note: 3 x AAA batteries needed for the Digital Camera are NOT included.
System Requirements
• Multimedia PC Pentium 133 or higher / Mac G3 or higher
• Windows 98 / 98SE/Me/2000/NT for USB port / Mac OS 8.6 or higher
• 32MB RAM (Me is recommended to use 128MB)*
• 500MB hard disk space recommended
• CD-ROM drive
• Color monitor with 16 bit or above
• USB port for connection
• Color Inkjet or Laser Printer to output photos (optional)
* Photo Studio for Mac requires 64MB SDRAM
Getting Started
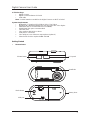
• Nomenclature
Digital Camera User Guide
Shutter button LCD panel
Viewfinder
Battery Door
Mode button
USB port
2

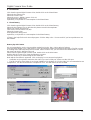
Prepare to Upload the Photos
Digital Camera User Guide
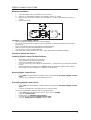
Batteries Installation
1. Open the battery door at the back of your camera.
2. Install 3 x AAA Alkaline batteries into Digital Camera, as shown.
3. Make sure to orient the positive (+) and negative (-) ends of the batteries exactly as
shown.
4. Replace the door.
CAUTION – To avoid battery leakage:
• Non-rechargeable batteries are not to be recharged.
• Be sure to insert the battery with the correct polarities according to battery manufacturer’s
instructions.
• Remove the battery from product before extended storage.
• Always remove an old or dead battery from the product.
• Do not short-circuit the supply terminals.
• Check that the contact surfaces are clean and bright before installing the battery.
Installing Digital Camera CD-ROM Software
• Insert the CD-ROM disc into your drive.
• The installation will start automatically.
• Follow the installation instructions.
• You can choose any of the three Arcsoft software – PhotoFantasy, PhotoStudio & Photo
Printer.
• After installation is complete, click ‘Finish’ button to install the Digital Camera driver.
• The system must be restarted to complete the installation.
Running Digital Camera Suite
• Click ‘Start’ from the Windows Taskbar, then search through ‘Programs’/Digital Camera
Suite.
• Choose any of the three Arcsoft software to run it.
Uninstalling Digital Camera Suite
• Click ‘Start’ from the Windows Taskbar, then search through ‘Programs’/Digital Camera
Suite.
• Click the Uninstall icon and follow the on-screen prompts.
Or you can uninstall the software with the following steps:
• Click ‘Start’ from the Windows Taskbar, then click on ‘Setting’.
• Click on ‘Control Panel’.
• Double click on ’Add/Remove Programs’.
• Scroll down and highlight ‘Digital Camera Suite’.
• Click on ’Add/Remove Programs’ and the ’OK’.
3

Digital Camera User Guide
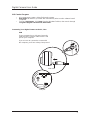
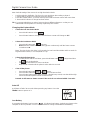
Connecting Your Digital Camera to the PC / Mac
USB
If your computer has a USB port, insert the
USB plug of the camera cable into the USB
port on your computer.
If you success to connect the camera with
the computer, you’ll hear a beep, beep sound.
AVI Creator Program
• It is a program to create a video file from the camera.
• AVICreator will install in your hard disk automatically after Arcsoft’s software install
completed.
• To launch AVICreator, click ‘Start’ from the Windows Taskbar, then search through
‘Programs’/Digital Camera Suite/ AVICreator’.
USB cable
PC
USB port
4

Taking Photos
Once your Digital CD-ROM software is installed, you’re ready to learn about taking photos.
Holding the Camera
Hold the camera as shown below when taking photos.
• The camera will turn on once batteries are installed.
• A beep sound will play and the LCD panel will turn on indicating the camera is on.
• The LCD will show the capture mode first then skip to the frame counter .
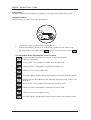
The information shown below appears on the LCD panel
: Activate High Resolution Mode (VGA) from Low Resolution Mode
"FINE" Icon will display
: Frame counter - Max. number of available shots in FINE mode
: Continuous Mode - taking photos continuously in FINE mode
: Self-timer - 10 seconds in FINE mode
: Clear all the photos included all the high resolution and the low resolution photos.
: Activate Low Resolution Mode (QVGA) from High Resolution Mode, "BASIC" Icon
will display.
: Frame counter - Max. number of available shots in BASIC mode.
: Continuous mode - taking photos continuously in BASIC mode.
: Self-timer - 10 seconds in BASIC mode.
: Clear all the photos included all the high resolution and the low resolution photos.
Digital Camera User Guide
5

Digital Camera User Guide
Changing the Capture Mode
• Select the Low Resolution Mode
• Press Mode button to select
• Press Shutter button to change it then the frame counter will change to 107.
• Select the Continuous Mode
• Press Mode button until
is shown.
• Hold down the Shutter button for taking photos continuously until the frame counter
countdown to 00.
Note: The time for the AVI video is 15 seconds for Low Resolution Mode and 3 seconds for
High Resolution Mode, in a Frame/Rate at 7 fps.
• Select the Self-timer Mode
• To take photos with the self-timer, press Mode button until for High Resolution
or
for Low Resolution.
• Press the Shutter button to start count down.
• Beep sound is heard until the photo is taken after 10 seconds.
• Clear all the photos
• Press Mode button until or shown.
• Press Shutter button then the rubbish bin icon will start to flash.
• Press Shutter button again and you’ll hear a double beep sound, note that all the High
and Low resolution photos will be cleared at once.
Remark: It will return to frame counter if the mode is not selected within 5 seconds.
Auto Off
It will Auto Off after 30 seconds without pressing any button. Press the
‘Mode’ button to power on it.
Low Battery
If at anytime the battery icon becomes " " , it indicates low battery. Upload your photos to the
computer as fast as possible. You are recommended to change new batteries immediately.
Note: Default setting of the camera is on High Resolution Mode.
• Look through the viewfinder. The focus is set to work best when taking a photo of
a subject that is minimum 2 feet away from the camera.
• Press the Shutter button, you’ll hear a beep sound and the frame counter will count down
1 frame which indicates an image has been taken.
TIP: It is recommended that you take a few test shots at different distances so that you can
understand how the photos are actually captured by the camera.
6

Getting Started with Digital Camera Suite
PhotoFantasy
This is a funny role play program. In just a few seconds, you can become a supermodel, a pro
athlete, a caveman or even Santa Claus. Let’s go into the program now.
• To Launch PhotoFantasy
1. Click ‘Start’ from the Windows Taskbar, then search through ‘Programs’/
Digital Camera Suite.
2. Choose PhotoFantasy to run it.
Digital Camera User Guide
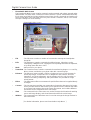
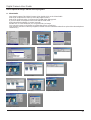
• Quick Guide for Select Input Source from Digital Camera
1. Click ‘Get Fantasy’ button in the top left corner of the Main Screen.
2. Get Fantasy Screen appears. You can select the fantasy background from Digital Camera
or software CD-ROM.
3. Get photo from Digital Camera, click ‘Scan’ button.
4. The Input Source dialog box appears, highlight ‘Digital Camera’ then click ‘Select’ button.
5. Choose your photo and click ‘Capture’ button.
6. After you prepare the fantasy background in the Main Screen, click ‘Get Photo’ button.
7. Get Photo Screen appears. Click ‘Acquire’ button to upload photo from Digital Camera.
8. The Input Source dialog box appears, highlight ‘Digital Camera’ then click ‘Select’ button.
9. Choose your photo and click ‘Capture’ button.
(For further information, please read the following description.)
7
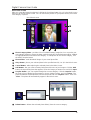
• Opening Screen

1
Get Fantasy Button : opens the Get Fantasy Screen, so you can select the fantasy background
for your photo fantasy. From this screen, you can also create your own fantasies.
2
Get Photo Button 1,2 or 3 : each of these buttons corresponds to a particular mask/ photo
in a fantasy background.
3
Save As Button : opens the standard Windows Save As dislog box so you can save your
finished photo fantasy under a specific path, file name and file format.
4
Print Button : opens the standard Windows Print Setup dialog box so you can select your
printer settings and begin printing your finished photo fantasy.
5
Send Button : automatically lauches your e-mail program so you can e-mail your finished
photo fantasy.
6
Start Over Button : revert the main display area.
7
Flip : flips your photo horizontally so it faces the opposite direction.
8
Move : moves the photo up, down, left and right.
9
Resize : makes the photo larger or smaller.
10
Rotate : turns your photo in a clockwise or counter-clockwise direction.
11
Add Text : opens a text box so you can add text to your photo fantasy.
12
Match Color : automatically adjusts the skin tone in your photo to better match the skin tone
in your selected fantasy background. To revert to the original color, click again.
13
Brightness : slide the bar to the right or left to adjust the brightness in your photo.
Contrast : slide the bar to the right or left to adjust the contrast in your photo.
Saturation : slide the bar to the right or left to adjust the saturation in your photo.
14
Zoom In : close-up look at the photo in your photo.
Zoom Out : returns the photo fantasy to the original view.
Digital Camera User Guide
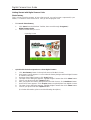
• Main Screen
The Main Screen contains controls that allow you to access the other program screens, as
well as to make final adjustments and enhancements to your photo fantasy.
8
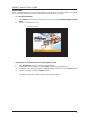
• Main Screen
1
2
3
4
5
6
7
8
9
10
11
12
13
14

1
Fantasy Category Menu : provides a list of available fantasy categories. This list includes
categories contained on your CD-ROM and a ‘My Fantasy’ category for adding your own
fantasy backgrounds.
TIP: Remember to insert your Software CD in your CD-ROM drive to access the full selection
of fantasy backgrounds.
2
Fantasy Slides : small thumbnail images of your fantasy background.
3
Okay Button : places your selected photo in the Main Screen.
4
Cancel Button : without placing the selected photo in the Main Screen.
5
Add Button : lets you create a fantasy background from one of your images. Click the ‘Add’
button, the Open dialog box that appears, locate the image you want to use and click ‘Open’.
6
Scan Button : lets you create a fantasy background from Acquired image or a scanner. Click
the ‘Scan’ button, the Select Source dialog box that appears, choose ‘Digital Camera’ and
click ‘Select’. The photos thumbnails will be uploaded. Choose the photo and click ‘Capture’
button. The photo will automatically appear in the Create Display area. Use the Masking Tools
to create your masks.
7
Edit Button : opens the Create Fantasy Background Screen.
8
Delete Button : deletes the selected fantasy slide(s) from the ‘My Fantasy’ category.
Digital Camera User Guide
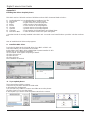
Get Fantasy Screen
Clicking the Get Fantasy Button takes you to Get Fantasy Screen. Here you can select the fantasy
background from software CD and create your own fantasy background.
9
• Select Sources: Digital Camera
• Thumbnails Uploading
• Get Fantasy Screen
1
2
3
5
4
6 7 8
• Click Scan

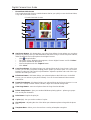
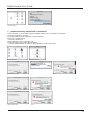
Get Photo Screen
After you create the fantasy background, clicking the ‘Get Photo Button 1,2 or 3’ in the Main Screen
takes you to the Get Photo Screen. You can choose the photos for your photo fantasy and create
new category of photos.
Digital Camera User Guide
1
Photo Category Menu : provides a list of available fantasy categories. You can make your
own category of photos, choose the ‘New’ option from the list. The default name will be ‘Untitled-
#’. Highlight the title and rename the category. To add photos to the current category, click
the Add or Acquire button.
2
Photo Slides : small thumbnail image of your actual photo files.
3
Okay Button : places your selected photo in the specified mask (1,2 or 3) in the Main Screen.
4
Cancel Button : without placing the selected photo in the Main Screen.
5
Add Button : lets you create a fantasy background from one of your images. Click the ‘Add’
button, the Open dialog box that appears, locate the image you want to use and click ‘Open’.
6
Acquire Button : you can acquired image into current category. Click the ‘Acquire’ button,
the Select Source dialog box that appears, choose ‘Digital Camera’ and click ‘Select’. The
photo thumbnails will be uploaded. Choose the photo and click ‘Capture’ button. Then click
‘Close’. The photo will automatically appear in the Main Screen.
7
Delete Button : deletes the selected photo slide(s) from the current category.
10
• Get Photo Screen
1
2
3
5
4
6 7
• Select Sources: Digital Camera
• Thumbnails Uploading
• Click Acquire

PhotoPrinter
This is a simple program for you to print the picture in several steps. Go into the program and upload
the pictures from the camera. Select a feature to print the photo to your favor.
• To Launch PhotoPrinter
1. Click ‘Start’ from the Windows Taskbar, then search through ‘Programs’/Digital Camera
Suite.
2. Choose PhotoPrinter to run it.
Digital Camera User Guide
• Quick Guide for Select Input Source from Digital Camera
1. Click ‘Get Photos’ button in the Main Preview Screen.
2. Photo Album Screen appears. Click ‘Acquire’ button to upload photo from .
3. The Input Source dialog box appears, highlight ‘Digital Camera’ then click ‘Select’ button.
4. Choose your photo and click ‘Capture’ button.
(For further information, please read the following description.)
11
• Opening Screen

1
Get Photos Button : this button takes you to the Photo Album Screen where you can select
photo(s) for printing. Here you will find buttons that make it easy to create new photo albums,
delete thumbnails and acquire photos from Digital Camera.
• Click
Acquire button.
• The Select Source dialog box that appears, choose ‘Digital Camera’ and click ‘Select’.
• The photos thumbnails will upload.
• Choose the photo and click ‘Capture’ button.
• Click ‘Close’.
2
Crop Photo Button : this button brings your selected photo to the Crop Screen. In the Crop
Screen, you can trim your photo, keeping just the portion you want to print. You can choose
between Landscape and Portrait crop orientations. Adjust the position and scale of the crop
selection box with your cursor.
3
Edit Photo Button : this button brings your selected photo to the Edit Screen. In the Edit
Screen, you can enhance your photo instantly. You can choose between Enhancements
and Effects.
4
Frame Photo Button : this button brings your selected photo to the Frame Screen. You can
place it in a variety of artistic frames, borders, edges and calender background.
5
Clear Page Button : removes all photos from the Page Preview Window.
6
Printer Setup Button : gives you standard Windows printing options - printer type, paper
size and layout orientation.
7
Print Button : begins the print job.
8
Copies (+/-) : lets you set the number of copies.
9
Size Adjuster : adjusting the size of the white space between photos along with the photo
size.
10
Template Menu : allows you to choose from a variety of template categories.
Digital Camera User Guide
• PhotoPrinter Main Screen
The PhotoPrinter Main Screen contains buttons that let you quickly access the Photo Album,
Crop, Edit and Frame Screens.
12
• PhotoPrinter Main Screen
1
2
6
10
8
3
4
5
7
9

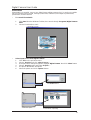
PhotoStudio
PhotoStudio is a powerful, easy-to-use, digital image editing program for PC’s running. It enables
full-color images to be acquired, managed, enhanced, retouched, and output for publications,
presentation, and the internet.
• To Launch PhotoStudio
1. Click ‘Start’ from the Windows Taskbar, then search through ‘Programs’/Digital Camera
Suite.
2. Choose PhotoStudio to run it.
Digital Camera User Guide
• Select Input Source from Digital Camera
1. Click ‘File’ on the pull down menu.
2. Choose ‘Acquire’ and click ‘select Source...’.
3. The Input Source dialog box appears, highlight ‘Digital Camera’ then click ‘Select’ button.
4. Choose ‘Acquire’ again and select Acquire... .
5. The photos thumbnails will upload.
6. Select the photos and click ‘Capture’ button.
13
3. Highlight ‘Digital Camera’ &
click ‘Select’ button
• Opening Screen
5. Thumbnails Uploading
1~2. Select Source...
4. Select Acquire...

• File : The File menu contains a number of commands to manage and manipulate
image file.
• Edit : The Edit menu contains commands for editing images. Selections can be
controlled by cutting them out, copying them to or pasting them from the clipboard,
or by filling them with other colors.
• Mask : Add a mask for your photo.
• Transform: The Transform menu contains commands for transforming images. You can Flip,
Mirror, Rotate, and Resize your photo under this command group.
• Enhance : The Enhance menu provides a full line of advanced, easy-yo-use features for
enhancing images. Commands such as Brightness and Contract, Hue and
Saturation, and Tone Adjustment are the primary tools for color correction. A
variety of smoothing, sharpening, and special filters are provided for image
enhancement.
• Effect : The Effect menu offers an assortment of special effects that can be applied directly
to images.
• Convert : The Convert menu provides you commands to change the data type of an image.
It also provides functions which allow you to split the various channels that make
up an image into separate Grayscale image documents, and combine different
channels to form a single RGB True color image.
• View : The commands in the View menu are used to manage the PhotoStudio working
space and image display, and show information about the active image.
• Window : The commands in the Windows menu is used to manage the image windows in
the PhotoStudio.
[ For further information, please see PhotoStudio’s Help Menu. ]
Digital Camera User Guide
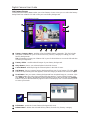
• PhotoStudio Main Screen
The PhotoStudio Main Screen contains commonly used commands and options grouped under
different titles: File, Edit, Mask, Transform, Enhance, Effects, Convert, View Window and Help.
Each menu group title has its own pull-down menu where specific commands and options are
found. Some items in the pull-down menu may also contain a submenu, which, once clicked,
will open a dialog box on the desktop.
14
• PhotoStudio Main Screen

AVI Creator
AVI Creator can transfer your Digital Camera photos to AVI (Video) format. The total time is 15
seconds for CIF (Low Resolution) photo and 3 seconds for VGA (High Resolution) photo.
• To Launch AVI Creator
1. Click ‘Start’ from the Windows Taskbar, then search through ‘Programs’/Digital Camera
Suite/ AVICreator’.
Digital Camera User Guide
1
Frame Rate Silde Button : silde this button to change the playback frame rate of the AVI
file. ‘7’ represents normal speed. Larger than ‘7’ means faster playback speed. Less than
‘7’ means slower than normal. (Default is ‘7’)
2
Compression Check Box : click this check box to reduce the size of your AVI file. It does
not affect the quality of the video.
3
File Control Panel : Click this button to open the AVI file. The Open dialog box will
appear, select your file and click ‘Open’ button.
Close the opening AVI file.
Play button - click this button to play the AVI file.
Stop button - click this button to stop playing the AVI file.
Rewind button
Fast Forward button
4
Quit Button : quit the AVICreator program.
5
Create Button : create your Digital Camera photos to AVI file.
• Create your AVI Video File
• Recommend: Select . It will display ‘107’. Select . Aim
to the object. Press and hold the ‘Shutter’ button until all photos
are taken.
• Make sure your Digital Camera is connected to PC.
• Launch the AVICreator program.
• Set your Frame Rate, Compression.
• Click ‘Create’ button. A dialog box will appear.
• Input a file name and click ‘Open’ button.
• It will save the photos as AVI file in the hard disk of your PC.
• Use the File Control Panel to playback your AVI video file.
• Playing your file
15
• AVI Creator Main Screen
1
2
5
3
4
• File creating...

Hints On Taking Quality Photos
• If you want to take a photo of your friend, try to take at least half the body size. You will not
get her eyes clearly if you take the whole body.
• Take care of the background light intensity. It will affect the exposure of the main object. The
camera can calculate the total light intensity of the picture to fine adjust the exposure. If the
background is too dark, the object will be too bright. If the background is too bright, the object
will then be too dark.
• Even you take photos outdoor, you should not let the object under the shadow. The object is
not shined by the sun means for staying in the dark. The result is unclear object and bright
background.
• Hold the camera with both hands. Use the first finger of your right hand to press the shutter.
Do not stand on unstable position. Any movement on the camera will cause fuzzy photos.
• Do not cover the lens with your fingers. It will obstruct the object. If greasy is attached on the
lens, clean it with a dry and soft cloth.
• It will affect the color if the light source is the fluorescent lamp or light bulb. Green color will
be increased under fluorescent lamps. Yellow color will be more under light bulbs. You can
recover the original color by using the photo editing software.
• It is better to use the USB port for upload. The power is supplied by the USB port so the battery
power can be saved.
• Keep the view finder horizontal to get correct view of image. Try to kneel down if possible.
Digital Camera User Guide
16

Trouble Shooting
• Turning off the power will cause the loss of all stored photos. Please make sure you have
uploaded the important photos before the switch is turned to off without the USB power
provided.
• If you disconnect the USB cable during operation, you need to close the Acquire dialog panel
and then re-open it again for the PC to recognize the unit.
• The camera is set to your country’s AC mains frequency. If you use it in another country with
different frequency (either 50 or 60Hz), you should not take the photo under the lamp.Black
strips of line will be seen in the picture due to incorrect mains frequency. It is no problem
under the sunlight.
• The camera will turn off automatically after 30 seconds without pressing the buttons. This
can save the battery life. You need not to take off the battery when it is not in use. Just take
off it if the pictures are uploaded or you will not use it for a long time, say 2 days or more.
• When the LCD is blinking, it means the battery power is low. You need to change batteries.
You can take up to all 20 photos even it is blinking. Then upload the photos to the PC and
change the empty batteries.
• It is not recommended to use re-chargeable batteries. Because the output voltage is lower
than the alkaline battery. It will get battery low easily.
• If the PC cannot recognize the camera when you run the Photo program, you need to dis-
connect and re-connect the USB cord to the camera.
• You will hear a ‘Gi’ sound and the Digital Camera will not function to take a photo if the
environment is too dark. Try to use spot light or turn on the fluorescent lamp to get more
light.
• After power on, it will take about 2 seconds to initialize the internal set-up. Then you will see
the number of pictures remained. So it cannot take the picture immediately after power on or
awake from sleep mode.
• You would better to adjust the gamma of your monitor through some programs to fine tune
the color in order to get a vivid photo on the monitor. Actually, the Photo Studio has the
gamma adjustment to the photo.
Digital Camera User Guide
17

Digital Camera User Guide
Product Specifications
• Digital Camera
1. Resolution : 640x480 pixels (VGA), 320x240 (QVGA)
2. Lens : Plastic, two elements, F 3.0, 35mm (Equiv.)
3. Memory : 8MB SDRAM
4. Number of Pictures : 26 for VGA, 107 for CIF
5. View Finder : Yes.
6. LCD : Status LCD with ICON display
7. Buzzer : Yes. Beep sound indicates working mode
8. Picture Retention : Yes. By main power batteries.
9. Battery Power : 3A battery x 3 pcs ( 4.5V)
10. Auto-Off : Yes. When no key is pressed for 30 seconds
11. Upload speed : USB approximate 2 seconds per VGA photo
• Digital Camera Suite Software (PC version)
1. AVICreator : AVI video playback, approximate 15 seconds for
QVGA.
2. PhotoPrinter : Print the photo in simple steps
3. PhotoFantasy : Role play program
4. PhotoStudio : Photo editing program
5. USB driver : For Win98 / 98SE/Me/2000/NT
• Digital Camera Suite Software (Mac version)
1. PhotoPrinter : Print the photo in simple steps
2. PhotoFantasy : Role play program
3. PhotoStudio : Photo editing program
4. USB driver : For Mac OS 8.6 or higher
Responsible Party in USA
Legal Company Name: Argus Industries, Inc.
Address: 1100 Howard street
Elk Grove Village, IL 60007
www.arguscamera.com
E-Mail : [email protected]
*
Specification are subject to change without prior notice
*
18
Page is loading ...
Page is loading ...
Page is loading ...
Page is loading ...
Page is loading ...
Page is loading ...
Page is loading ...
Page is loading ...
Page is loading ...
-
 1
1
-
 2
2
-
 3
3
-
 4
4
-
 5
5
-
 6
6
-
 7
7
-
 8
8
-
 9
9
-
 10
10
-
 11
11
-
 12
12
-
 13
13
-
 14
14
-
 15
15
-
 16
16
-
 17
17
-
 18
18
-
 19
19
-
 20
20
-
 21
21
-
 22
22
-
 23
23
-
 24
24
-
 25
25
-
 26
26
-
 27
27
-
 28
28
-
 29
29


Ask a question and I''ll find the answer in the document
Finding information in a document is now easier with AI
Related papers
Other documents
-
Primera Impressa IP60 Owner's manual
-
 Argus Camera DC1510 User manual
-
 Cobra Digital DC325 User manual
-
VistaQuest VQ200 User manual
-
ArcSoft 2000 PRO User manual
-
Sakar 69052 User manual
-
Laser AO-DIGICAM06 User manual
-
Hasbro Yahoo Digital Camera Operating instructions
-
CONCORD Eye-Q Fun.Cam User manual
-
AEL DC-31U User manual

