Page is loading ...

15) Make wire connections (connectors not provided). Reference
chart below for correct connections and wire accordingly.
16) Push fixture to ceiling, carefully passing mounting screws
through holes in canopy.
17) Thread knurl knobs onto mounting screws. Tighten knurl
knobs to secure fixture to ceiling.
18) Lower glass down over socket. Pass hole in glass over socket.
19) Lower larger washer down over socket. Pass hole in washer
over socket. Set washer down inside glass.
20) Thread socket ring onto socket. Tighten socket ring to hold
glass in place. (DO NOT over tighten.)
21) Insert recommended bulb. CAUTION: DO NOT touch bulb
with bare hands. If this happens, clean bulb with denatured
alcohol and a lint free cloth.
22) Lower glass sleeve down over bulb. Carefully thread glass
sleeve onto socket. (DO NOT over tighten.)
Connect Black or
Red Supply Wire to:
Connect
White Supply Wire to:
Black White
*Parallel cord (round & smooth) *Parallel cord (square & ridged)
Clear, Brown, Gold or Black
without tracer
Clear, Brown, Gold or Black
with tracer
Insulated wire (other than green)
with copper conductor
Insulated wire (other than green)
with silver conductor
*Note: When parallel wires (SPT I & SPT II)
are used. The neutral wire is square shaped
or ridged and the other wire will be round in
shape or smooth (see illus.)
Neutral Wire
IMPORTANT SAFETY INSTRUCTIONS
LIGHTED BULB IS HOT!
WARNING: To reduce the risk of FIRE or INJURY TO PERSON:
• Turnoffandallowtocoolbeforereplacingbulb.
• BulbgetsHOTQUICKLY!Contactswitchonlywhenturningoff.
• DONOTremaininlightifskinfeelswarm.(Lightisintense,
may cause “sunburn”)
• DONOTlookdirectlyatlightedbulb.
• Keepmaterialsawayfrombulbthatmayburn.
• UseONLYwithwattagespeciedorlower.
• DONOTtouchbulbatanytime,useasoftcloth.Oilfromskin
may damage bulb.
• DONOToperatexturewithmissingordamagedglass.
1) Pass wire through stem and screw stem to coupling on top
of fixture body. NOTE: Thread locking compound must be
applied to all stem threads as noted with symbol (3) to prevent
accidental rotation of fixture during cleaning, relamping, etc.
2) Pass wire through remaining stems and screw stems
together.
3) Pass fixture wire through swivel. Thread swivel onto end of
last stem.
4) Pass fixture wire through small threaded pipe. Screw end of
small threaded pipe into end of swivel.
5) Pass fixture wire through hole in canopy. Lower canopy
down and pass hole in canopy over end of threaded pipe on
swivel.
6) Pass fixture wire through hole in lockwasher. Thread
lockwasher onto end of threaded pipe protruding from
inside canopy.
7) Pass fixture wire through hole in loop on end of safety cable.
Pass hole in loop on safety cable over end of threaded pipe.
8) Pass fixture wire through hole in lockwasher. Thread
lockwasher onto end of threaded pipe protruding from loop
on safety cable.
9) Pass fixture wire through hole in hexnut. Thread hexnut onto
end of threaded pipe.
10) TURN OFF POWER.
IMPORTANT:Beforeyoustart,NEVERattemptanywork
without shutting off the electricity until the work is done.
a) Go to the main fuse, or circuit breaker, box in your
home. Place the main power switch in the “OFF”
position.
b) Unscrew the fuse(s), or switch “OFF” the circuit breaker
switch(s), that control the power to the fixture or room
that you are working on.
c) Place the wall switch in the “OFF” position. If the fixture
to be replaced has a switch or pull chain, place those in
the “OFF” position.
11) Find the appropriate threaded holes on mounting strap.
Assemble mounting screws into threaded holes.
12) Attach mounting strap to outlet box. (Screws not provided).
Mounting strap can be adjusted to suit position of fixture.
13) Connect safety cable assembled to canopy to mounting
strap. (This will allow for fixture to be supported while wire
connections are made.)
14) Groundinginstructions:(SeeIllus.AorB).
A) On fixtures where mounting strap is provided with a
hole and two raised dimples. Wrap ground wire from
outlet box around green ground screw, and thread into
hole.
B) Onxtureswhereacuppedwasherisprovided.Attach
ground wire from outlet box under cupped washer and
green ground screw, and thread into mounting strap.
If fixture is provided with ground wire. Connect fixture
ground wire to outlet box ground wire with wire connector
(not provided.) after following the above steps. Never
connect ground wire to black or white power supply wires.
Date Issued: 3/28/14 IS-44008-US
GREEN GROUND
SCREW
CUPPED
WASHER
A
B
OUTLET BOX
GROUND
FIXTURE
GROUND
DIMPLES
WIRE CONNECTOR
(NOT PROVIDED)
OUTLET BOX
GROUND
GREEN GROUND
SCREW
FIXTURE
GROUND
SEE OTHER SIDE FOR SPANISH TRANSLATIONS.
VEA EL OTRO LADO DE TRADUCCIONES AL ESPAÑOL.
We’re here to help 866-558-5706
Hrs: M-F 9am to 5pm EST
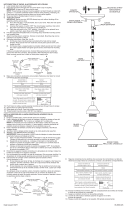
MOUNTING STRAP
ABRAZADERADEMONTAJE
CANOPY
ESCUDETE
FIXTUREBODY
CUERPO DEL
ARTEFACTO
KNURLKNOB
PERILLA ESTRADA
3
STEM
VASTAGO
GLASS
VIDRIO
BULB
BOMBILLA
GLASSSLEEVE
CAMISADEVIDRIO
SOCKETRING
ANILLO DEL
CASQULLO
3
SAFETYCABLE
CABLEDE
SEGURIDAD
3
LOCKWASHER
ARANDELA DE
SEGURIDAD
HEXNUT
TUERCAHEXAGONAL
LARGEWASHER
ARANDELA MÁS
GRANDE
SWIVEL
UNIÓN GIRATORIA
SMALLTHREADEDPIPE
PEQUEÑOTUBOROSCADO

Si la lámpara viene con alambre a tierra. Conecter el
alambre a tierra de la lámpara al alambre a tierra de la caja
tomacorriente con un conector de alambres (no incluido)
espués de seguir los pasos anteriores. Nunca conectar el
alambra a tierra a los alambres eléctros negro o blanco.
15) Hagalesconexionesdelosalambres(noseproveenlos
connectores.) La tabla de referencia de abajo indica las
conexiones correctas y los alambres correspondientes.
16) Empuje el artefacto hacia el techo, pasando cuidadosamente
los tornillos de montaje a través de los orificios en el
escudete.
17) Atornille las perillas estriadas en los tornillos de montaje.
Ajuste las perillas estriadas para fijar el artefacto en el
techo.
18) Bajeelvidriohaciaelartefacto.Pasarelagujeroenelvidrio
sobre el casquillo.
19) Descienda la arandela más grande sobre el casquillo. Pase
el agujero en la arandela sobre el casquillo. Coloque la
arandela hacia abajo en el vidrio interior.
20) Rosque el anillo del casquillo al casquillo. Apriete el anillo
del casquillo para sujetar el vidrio en el lugar. (NO apriete
excesivamente.)
21) Inserte la bombilla recomendada. PRECAUCIÓN: NO toque
la bombilla con las manos sin guantes. Si esto sucede, limpie
la bombilla con alcohol desnaturalizado y una tela sin pelusas.
22) Descienda la camisa de vidrio sobre el foco (bombilla).
Rosque cuidadosamente la camisa de vidrio sobre el
casquillo. (NO apriete demasiado).
ARANDELA
CONCAVA
A
B
TIERRA DE LA
CAJA DE SALIDA
TORNILLO DE TIERRA,
VERDE
DEPRESIONES
TIERRA
ARTEFACTO
CONECTOR DE ALAMBRE
(NO SE PROVEE)
TIERRA DE LA
CAJA DE SALIDA
TORNILLO DE TIERRA,
VERDE
TIERRA
ARTEFACTO
INSTRUCCIONES IMPORTANTES DE SEGURIDAD
LA BOMBILLA ENCENDIDA ES CALIENTE
ADVERTENCIA: Para disminuir el riesgo de INCENDIO o LESIO-
NES A LAS PERSONAS:
• Apagueydejequeseenfríeantesdecambiarlabombilla.
• LabombillaSECALIENTARÁPIDAMENTE.Useelinterruptor
sólo para apagar.
• NOpermanezcaenlaluzsisientecalientelapiel.(Laluzes
intensa y puede causar “quemaduras”).
• NOmiredirectamentealabombillaencendida.
• Mantengaalejadosdelabombillalosartículosquepuedan
quemarse.
• UseSOLAMENTEconelvatiajeespecicadoomasbajo.
• NOtoquelabombillaenningúnmomento,useunatelasuave.
La grasa de la mano puede dañar la bombilla.
• NOhagafuncionarelartefactoconlabombilladañadao
faltante.
1) Pase el alambre desde el artefacto a través del vástago y
atornille el vástago en el acoplamiento a la parte superior
del artefacto. NOTA: Se debe aplicar el compuesto para
rosca estanca a todas las roscas de los vástagos tal como
esanotadoconelsímbolo(3) para evitar la rotación accidental
del artefacto durante la limpieza, el cambio de la bombilla o
foco, etc.
2) Pase el cable del artefacto a través de los vástagos restantes
y atornille juntos todos los vástagos.
3) Pase el alambre del artefacto a través de la unión giratoria.
Rosquelaunióngiratoriasobreelextremodelúltimovástago.
4) Pase el alambre del artefacto a través del tubo roscado
pequeño. Atornille el extremo del tubo roscado pequeño
dentro del extremo de la unión giratoria.
5) Pase el alambre del artefacto a través del agujero en el
escudete. Descienda el escudete y pase el agujero del
escudete sobre el extremo del tubo roscado en la unión
giratoria.
6) Pase el alambre del artefacto a través del agujero en la
arandela de seguridad. Rosque la arandela de seguridad
dentro del extremo del tubo roscado que sobresale del
escudete interior.
7) Pase el alambre del artefacto a través del agujero en el
circuito en el extremo del cable de seguridad. Pase el agujero
en el circuito en el cable de seguridad sobre el extremo del
tubo roscado.
8) Pase el alambre del artefacto a través del agujero en la
arandela de seguridad. Rosque la arandela de seguridad
sobre el extremo del tubo roscado que sobresale del circuito
en el cable de seguridad.
9) Pase el alambre del artefacto a través del agujero en la tuerca
hexagonal. Rosque la tuerca hexagonal sobre el extremo del
tubo roscado.
10) APAGUE LA ALIMENTACIÓN ELÉCTRICA.
IMPORTANTE: Antes de comenzar, NUNCA trate de trabajar
sin antes desconectar la corriente hasta que el trabajo se
termine.
a) Vayaalacajaprincipaldefusibles,ointerruptorocaja
de circuitos de su casa. Coloque el interruptor de la
corriente principal en posición de apagado “OFF”.
b) Desatornille el (los) fusible (s), o coloque el interruptor o
interruptores del breaker en posición de apagado
“OFF”, que controla (n) la corriente hacia el artefacto o
habitación donde está trabajando.
c) Coloque el interruptor de pared en posición de apagado
“OFF”. Si el artefacto que se va a reemplazar tiene un
interruptor o cadena que se jala, colóquelos en la
posición de apagado “OFF”.
11) Encontrar los agujeros roscados correctos en la abrazadera
de montaje. Instalar los tornillos de montaje en los agujeros
roscados.
12) Unir la abrazadera de montaje a la caja de conexiones. (No
se proveen tornillos). La abrazadera de montaje puede
ajustarse para acomodar la posición del artefacto.
13) Acople el cable de seguridad en la ranura de la abrazadera
de montaje.
14) Instrucciones de conexión a tierra solamente para los
EstadosUnidos.(VealailustracionAoB).
A) En las lámparas que tienen el fleje, de montaje con un
agujero y dos hoyue los realzados. Enrollar el alambre a
tierra de la caja tomacorriente alrededor del tornillo verde y
pasarlo por el aquiero.
B) Enlaslámparasconunaarandelaacopada.Fijarel
alambre a tierra de la caja tomacorriente del ajo de la
arandela acoada y tornillo verde, y paser por el fleje de
montaje.
Date Issued: 3/28/14
IS-44008-US
SEE OTHER SIDE FOR ENGLISH TRANSLATIONS.
VEA EL OTRO LADO DE TRADUCCIONES AL INGLÉS.
We’re here to help 866-558-5706
Hrs: M-F 9am to 5pm EST
Conectar el alambre de
suministro negro o rojo al
Conectar el alambre de
suministro blanco al
Negro Blanco
*Cordon paralelo (redondo y liso)
*Cordon paralelo (cuadrado y estriado)
Claro, marrón, amarillio o negro
sin hebra identificadora
Claro, marrón, amarillio o negro
con hebra identificadora
Alambre aislado (diferente del verde)
con conductor de cobre
Alambre aislado (diferente del
verde) con conductor de plata
*Nota: Cuando se utiliza alambre paralelo
(SPT I y SPT II). El alambre neutro es de forma
cuadrada o estriada y el otro alambre será de
forma redonda o lisa. (Vea la ilustracíón).
Hilo Neutral
CONSULTE AL ACCESORIO DE DIBUJO EN EL
DORSO.

IMPORTANT SAFETY INSTRUCTIONS
LIGHTED BULB IS HOT!
WARNING: To reduce the risk of FIRE or INJURY TO PERSON:
• Turnoffandallowtocoolbeforereplacingbulb.
• BulbgetsHOTQUICKLY!Contactswitchonlywhenturningoff.
• DONOTremaininlightifskinfeelswarm.(Lightisintense,
maycause“sunburn”)
• DONOTlookdirectlyatlightedbulb.
• Keepmaterialsawayfrombulbthatmayburn.
• UseONLYwithwattagespeciedorlower.
• DONOTtouchbulbatanytime,useasoftcloth.Oilfromskin
maydamagebulb.
• DONOToperatexturewithmissingordamagedglass.
1) Passwirethroughstemandscrewstemtocouplingontop
ofxturebody.NOTE:Threadlockingcompoundmustbe
appliedtoallstemthreadsasnotedwithsymbol(3)toprevent
accidentalrotationofxtureduringcleaning,relamping,etc.
2) Passwirethroughremainingstemsandscrewstems
together.
3) Passxturewirethroughswivel.Threadswivelontoendof
laststem.
4) Passxturewirethroughsmallthreadedpipe.Screwendof
smallthreadedpipeintoendofswivel.
5) Passxturewirethroughholeincanopy.Lowercanopy
downandpassholeincanopyoverendofthreadedpipeon
swivel.
6) Passxturewirethroughholeinlockwasher.Thread
lockwasherontoendofthreadedpipeprotrudingfrom
insidecanopy.
7) Passxturewirethroughholeinlooponendofsafetycable.
Passholeinlooponsafetycableoverendofthreadedpipe.
8) Passxturewirethroughholeinlockwasher.Thread
lockwasherontoendofthreadedpipeprotrudingfromloop
onsafetycable.
9) Passxturewirethroughholeinhexnut.Threadhexnutonto
endofthreadedpipe.
10)TURN OFF POWER.
IMPORTANT:Beforeyoustart,NEVERattemptanywork
withoutshuttingofftheelectricityuntiltheworkisdone.
a) Gotothemainfuse,orcircuitbreaker,boxinyour
home.Placethemainpowerswitchinthe“OFF”
position.
b) Unscrewthefuse(s),orswitch“OFF”thecircuitbreaker
switch(s),thatcontrolthepowertothextureorroom
thatyouareworkingon.
c) Placethewallswitchinthe“OFF”position.Ifthexture
tobereplacedhasaswitchorpullchain,placethosein
the“OFF”position.
11)Findtheappropriatethreadedholesonmountingstrap.
Assemblemountingscrewsintothreadedholes.
12)Attachmountingstraptooutletbox.(Screwsnotprovided).
Mountingstrapcanbeadjustedtosuitpositionofxture.
13)Connectsafetycableassembledtocanopytomounting
strap.(Thiswillallowforxturetobesupportedwhilewire
connectionsaremade.)
14) Makewireconnections(connectorsnotprovided.)Reference
chartbelowforcorrectconnectionsandwireaccordingly.
15) Pushxturetoceiling,carefullypassingmountingscrews
throughholesincanopy.
16) Threadknurlknobsontomountingscrews.Tightenknurl
knobstosecurexturetoceiling.
17) Lowerglassdownoversocket.Passholeinglassoversocket.
18) Lowerlargerwasherdownoversocket.Passholeinwasher
oversocket.Setwasherdowninsideglass.
Connect Black or
Red Supply Wire to:
Connect
White Supply Wire to:
Black White
*Parallel cord (round & smooth)
*Parallel cord (square & ridged)
Clear, Brown, Gold or Black
without tracer
Clear, Brown, Gold or Black
with tracer
Insulated wire (other than green)
with copper conductor
Insulated wire (other than green)
with silver conductor
*Note: When parallel wires (SPT I & SPT II)
are used. The neutral wire is square shaped
or ridged and the other wire will be round in
shape or smooth (see illus.)
Neutral Wire
DateIssued:3/28/14 IS-44008-CB
INSTRUCTIONS
For Assembling and Installing Fixtures in Canada
Pour L’assemblage et L’installation Au Canada
We’re here to help 866-558-5706
Hrs: M-F 9am to 5pm EST
SEE OTHER SIDE FOR CANADIAN FRENCH TRANS-
LATIONS.
VOIR L’AUTRE CÔTÉ POUR LES CANADIENS TRA-
DUCTIONS EN FRANÇAIS.
MOUNTINGSTRAP
PATTEDEFIXATION
CANOPY
CACHE
KNURLKNOB
BOUTONMOLETÉ
STEM
TIGE
FIXTUREBODY
LUMINAIRE
4
GLASS
VERRE
BULB
L’AMPOULE
GLASSSLEEVE
MANCHONDE
VERRE
SOCKET
RING
ANNEAUDE
LADOUILLE
SAFETYCABLE
CÂBLEDESÉCURITÉ
19) Threadsocketringontosocket.Tightensocketringtohold
glassinplace.(DONOTovertighten.)
20) Insertrecommendedbulb.CAUTION: DONOTtouchbulb
withbarehands.Ifthishappens,cleanbulbwithdenatured
alcoholandalintfreecloth.
21) Lowerglasssleevedownoverbulb.Carefullythreadglass
sleeveontosocket.(DONOTovertighten.)
3
HEXNUT
ECROUHEXAGONAL
LOCKWASHER
RONDELLEDE
BLOCAGE
SMALLTHREADEDPIPE
PETITTUBEFILETÉ
LARGE
WASHER
GRANDE
RONDELLE
SWIVEL
PIVOT
4
COUPLING
ACCOMPLAMIENTO

IMPORTANTES CONSIGNES DE SÉCURITÉ
UNE AMPOULE ALLUMÉE EST BRÛLANTE !
AVERTISSEMENT: Pour réduire les risques D’INCENDIE ou DE
BLESSURE:
• Éteindreetlaisserrefroidiravantderemplacerl’ampoule.
• LesampouleschauffentTRÈSRAPIDEMENT!N’éteindrequ’à
l’aidedel’interrupteur.
• NEPASresterdanslalumièresiunesensationdechaleurest
ressentiesurlapeau.(Lalumièreestintenseetpeutprovoquer
descoupsdesoleil).
• NEJAMAISregarderdirectementuneampouleallumée.
• Tenirlesmatériauxàl’écartd’uneampoulepouréviterqu’ils
nebrûlent.
• UtiliserUNIQUEMENTdesampoulesàlapuissancenominale
indiquée(watts)ouàunepuissanceinférieure.
• NEJAMAIStoucherl’ampouleàmainnue,seservird’untissu
doux.L’huiledelapeaupeutendommagerl’ampoule.
1) Passezleldanslatigeetvissezlatigeaucouplageen
hautducorpsduluminaire.REMARQUE:Appliquerlefrein
letsurtouslesletsdelatigeindiquésparlesymbole(3)
pourempêcherlarotationaccidentelleduluminairependant
lenettoyage,remplacementdelampe,etc.
2) Passezleldanslestigesrestantesetvissezlestiges
ensemble.
3) Passerlelduluminaireparlepivot.Visserlepivotsur
l’extrémitédeladernièretige.
4) Passerlelduluminaireparlepetittubeleté.Visser
l’extrémitédupetittubeletédansl’extrémitédupivot.
5) Passerlelduluminaireparletrousituédanslecache.
Abaisserlecacheetpasseruntroudanslecachepar-dessus
l’extrémitédutubeletésurlepivot.
6) Passerlelduluminaireparletrousituédanslarondellede
blocage.Visserlarondelledeblocagesurl’extrémitédu
tubeletésortantducache.
7) Passerlelduluminaireparletroudanslabouclesituée
surl’extrémitéducâbledesécurité.Passerletroudansla
bouclesurlecâbledesécuritésurl’extrémitédutubeleté.
8) Passerlelduluminaireparletrousituédanslarondellede
blocage.Visserlarondelledeblocagesurl’extrémitédu
tubeletésortantdelabouclesurlecâbledesécurité.
9) Passerlelduluminaireparletrousituédansl’écrou
hexagonal.Visserl’écrouhexagonalsurl’extrémitédutube
leté.
10)COUPERLECOURANT.
IMPORTANT:TOUJOURScouperl’électricitéavantde
commencerletravail.
a) Localiserlecoffretàfusiblesouledisjoncteurdu
domicile.Mettrel’interrupteurprincipalenposition
d’Arrêt.
b) Dévisserleoulesfusibles(oumettreledisjoncteursur
Arrêt)quicontrôlentl’alimentationversleluminaireoula
piècedanslaquelleletravailesteffectué.
c) Mettrel’interrupteurmuralenpositiond’Arrêt.Sileluminaire
àremplacerestdotéd’uninterrupteuroud’unechaîne
connectéeàl‘interrupteur,placercesélémentsen
positiond’Arrêt.
11)Trouverlestrousletésappropriéssurlabarrettede
montage.Vissezlesvisdemontagedanslestrousletés.
12)Visserlabarrettedemontageàlaboitedejonction.(Visnon
fournies).Labarrettedemontagepeutetreajustéepour
conveniràlapositiondel’applique.
13)Fixerlecâbledesécuritéàlafentedanslesupportde
montage.
14) Connecterlesls(connecteursnonfournis).Sereporterau
tableauci-dessouspourfairelesconnexions.
DateIssued:3/28/14 IS-44008-CB
INSTRUCTIONS
For Assembling and Installing Fixtures in Canada
Pour L’assemblage et L’installation Au Canada
Connecter le fil noir ou
rouge de la boite
Connecter le fil blanc de la boîte
A Noir A Blanc
*Au cordon parallèle (rond et lisse)
*Au cordon parallele (à angles droits el strié)
Au bransparent, doré, marron, ou
noir sans fil distinctif
Au transparent, doré, marron, ou
noir avec un til distinctif
Fil isolé (sauf fil vert) avec
conducteur en cuivre
Fil isolé (sauf fil vert) avec
conducteur en argent
*Remarque: Avec emploi d’un fil paralléle
(SPT I et SPT II). Le fil neutre est á angles
droits ou strié et l’autre fil doit étre rond ou
lisse (Voir le schéma).
Fil Neutre
We’re here to help 866-558-5706
Hrs: M-F 9am to 5pm EST
SEE OTHER SIDE FOR ENGLISH TRANSLATIONS.
VOIR L’AUTRE CÔTÉ DES TRADUCTIONS EN ANGLAIS.
15) Pousserleluminaireversleplafondenpassantsoigneusement
lesvisdemontageparlestrousdanslecache.
16) Visserlesboutonsmoletéssurlesvisdexation.Resserrerles
boutonsmoletéspourxerleluminaireauplafond.
17) Placerleverresurladouille.
18) Abaisserlaplusgranderondellesurladouille.Passerle
troudelarondellesurladouille.Logerlarondelleà
l’intérieurduverre.
19) Serrerl’anneaudeladouillesurladouille.(NEPASserrer
avecexcès).
20)Introduirel’ampoulerecommandée.ATTENTION:NEPAS
toucherl’ampouleàmainnue.Silapeauentreencontact
avecl’ampoule,nettoyerl’ampouleavecdel’alcooldénaturé
etuntissunonpelucheux.
21) Abaisserleverreversl’ampoule.Visserdélicatementle
manchondeverredansladouille.(NEPASserreravecexcès).
MOUNTINGSTRAP
PATTEDEFIXATION
CANOPY
CACHE
KNURLKNOB
BOUTONMOLETÉ
STEM
TIGE
FIXTUREBODY
LUMINAIRE
4
GLASS
VERRE
BULB
L’AMPOULE
GLASSSLEEVE
MANCHONDE
VERRE
SOCKET
RING
ANNEAUDE
LADOUILLE
SAFETYCABLE
CÂBLEDESÉCURITÉ
3
HEXNUT
ECROUHEXAGONAL
LOCKWASHER
RONDELLEDE
BLOCAGE
SMALLTHREADEDPIPE
PETITTUBEFILETÉ
LARGE
WASHER
GRANDE
RONDELLE
SWIVEL
PIVOT
4
COUPLING
ACCOMPLAMIENTO
/