Page is loading ...

IMPORTANT SAFETY INSTRUCTIONS
LIGHTED BULB IS HOT!
WARNING: To reduce the risk of FIRE or INJURY TO PERSON:
• Turnoffandallowtocoolbeforereplacingbulb.
• BulbgetsHOTQUICKLY!Contactswitchonlywhenturningoff.
• DONOTremaininlightifskinfeelswarm.(Lightisintense,
maycause“sunburn”)
• DONOTlookdirectlyatlightedbulb.
• Keepmaterialsawayfrombulbthatmayburn.
• UseONLYwithwattagespeciedorlower.
• DONOTtouchbulbatanytime,useasoftcloth.Oilfromskin
maydamagebulb.
• DONOToperatexturewithmissingordamagedglass.
1) Passxturewirefromeachcouplingontopofxture
throughonestemforeachsideandscreweachsteminto
eachcoupling.NOTE: Threadlockingcompoundmustbe
appliedtoallstemthreadsasnotedwithsymbol(3)to
preventaccidentalrotationofxtureduringcleaning,
relamping,etc.
2) Passxturewirethroughremainingstemsandscrewstems
together.
3) Threadonesmallthreadedpipeintoendofeachsmallloop.
4) Passxturewirethroughrstloop.Threadonerstloop
ontoendofeachlaststem.
5) Passxturewirethroughsecondloopandthroughholein
canopy.Passthreadedpipeatendofsecondloopthrough
holeincanopy.
6) Passxturewirethroughholeinlockwasher.Thread
lockwasherontoendofthreadedpipeprotrudingfrom
insidecanopy.
7) Passxturewirethroughholeinhexnut.Threadhexnutonto
endofthreadedpipe.
8) Repeatsteps5-7toattachlaststemtocanopy.
9) Attachchainlinktosmallloopatendofeachstemandto
eachlooponcanopy.
10) TURN OFF POWER.
IMPORTANT:Beforeyoustart,NEVERattemptanywork
withoutshuttingofftheelectricityuntiltheworkisdone.
a) Gotothemainfuse,orcircuitbreaker,boxinyour
home.Placethemainpowerswitchinthe“OFF”
position.
b) Unscrewthefuse(s),orswitch“OFF”thecircuitbreaker
switch(s),thatcontrolthepowertothextureorroom
thatyouareworkingon.
c) Placethewallswitchinthe“OFF”position.Ifthexture
tobereplacedhasaswitchorpullchain,placethosein
the“OFF”position.
11)Findtheappropriatethreadedholesonmountingstrap.
Assemblemountingscrewsintothreadedholes.
12)Attachmountingstraptooutletbox.(Screwsnotprovided).
Mountingstrapcanbeadjustedtosuitpositionofxture.
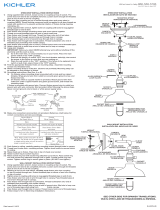
13)Groundinginstructions:(SeeIllus.AorB).
A) Onxtureswheremountingstrapisprovidedwitha
holeandtworaiseddimples.Wrapgroundwirefrom
outletboxaroundgreengroundscrew,andthreadinto
hole.
B) Onxtureswhereacuppedwasherisprovided.Attach
groundwirefromoutletboxundercuppedwasherand
greengroundscrew,andthreadintomountingstrap.
Ifxtureisprovidedwithgroundwire.Connectxture
groundwiretooutletboxgroundwirewithwireconnector
(notprovided.)afterfollowingtheabovesteps.Never
connectgroundwiretoblackorwhitepowersupplywires.
MOUNTINGSTRAP
ABRAZADERADEMONTAJE
CANOPY
ESCUDETE
DateIssued:10/17/14 IS-43686-US
GREEN GROUND
SCREW
CUPPED
WASHER
AB
OUTLET BOX
GROUND
FIXTURE
GROUND
DIMPLES
WIRE CONNECTOR
(NOT PROVIDED)
OUTLET BOX
GROUND
GREEN GROUND
SCREW
FIXTURE
GROUND
SEE OTHER SIDE FOR SPANISH TRANSLATIONS.
VEA EL OTRO LADO DE TRADUCCIONES AL ESPAÑOL.
KNURLKNOB
PERILLAESTRADA
SMALLLOOP
ARGOLLA
PEQUEÑA
CHAINLINK
ESLABÓNDECADENA STEM
VASTAGO
We’re here to help 866-558-5706
Hrs: M-F 9am to 5pm EST
GLASS
VIDRIO
14) Makewireconnections(connectorsnotprovided).Reference
chartbelowforcorrectconnectionsandwireaccordingly.
15) Pushxturetoceiling,carefullypassingmountingscrews
throughholesincanopy.
16) Threadknurlknobsontomountingscrews.Tightenknurl
knobstosecurexturetoceiling.
17) Raiseglassuptoxture.Passtopofglassthroughholein
bottomofxturebody.Passholeinglassoversocket.
18) Slipspaceroversocket.
19) Attachsocketringtosocketringtool.
20) Raisesocketringtoolwithsocketringattacheduptoxture
Passsocketringtoolwithsocketringattachedthroughholein
glass.Threadsocketringontosocket.Tightensocketringto
secureglassinplace.(DONOTovertighten.)
21) Insertrecommendedbulb.CAUTION: DONOTtouchbulb
withbarehands.Ifthishappens,cleanbulbwithdenatured
alcoholandalintfreecloth.
22) Slipglasssleeveoverbulb.Carefullythreadglasssleeve
ontosocket.(DONOTovertighten.)
HEXNUT
TUERCA
HEXAGONAL
Connect Black or
Red Supply Wire to:
Connect
White Supply Wire to:
Black White
*Parallel cord (round & smooth) *Parallel cord (square & ridged)
Clear, Brown, Gold or Black
without tracer
Clear, Brown, Gold or Black
with tracer
Insulated wire (other than green)
with copper conductor
Insulated wire (other than green)
with silver conductor
*Note: When parallel wires (SPT I & SPT II)
are used. The neutral wire is square shaped
or ridged and the other wire will be round in
shape or smooth (see illus.) Neutral Wire
LOCKWASHER
ARANDELADE
SEGURIDAD
3
3
3
SOCKETRING
ANILLODELCASQUILLO
SPACER
ESPACIADOR
SOCKETRINGTOOL
HERRAMIENTADEL
ANILLODELCASQUILLO
FIXTUREBODY
CUERPODELARTEFACTO
BULB
BOMBILLA
GLASSSLEEVE
CAMISADEVIDRIO

Silalámparavieneconalambreatierra.Conecterel
alambreatierradelalámparaalalambreatierradelacaja
tomacorrienteconunconectordealambres(noincluido)
espuésdeseguirlospasosanteriores.Nuncaconectarel
alambraatierraalosalambreseléctrosnegrooblanco.
14) Hagalesconexionesdelosalambres(noseproveenlos
connectores.)Latabladereferenciadeabajoindicalas
conexionescorrectasylosalambrescorrespondientes.
15) Empujeelartefactohaciaeltecho,pasandocuidadosamente
lostornillosdemontajeatravésdelosoriciosenel
escudete.
16) Atornillelasperillasestriadasenlostornillosdemontaje.
Ajustelasperillasestriadasparajarelartefactoeneltecho.
17)Levanteelvidriohastaelartefacto.Passerlapartesuperior
delvidrioatravésdelagujeroenlaparteinferiordelcuerpo
delartefacto.Passerletroudansleverresurladouille.
18)Pongaelespaciadorencimadelcasquillo.
19)Acopleelanillodelcasquilloalaherramientadelanillodel
casquillo.
20)Bajelaherramientadelanillodelcasquilloconelanillodel
casquilloacopladoabajoatravésdelvidrio.Rosqueelanillo
delcasquilloalcasquillo.Aprieteelanillodelcasquillopara
sujetarelvidrioenellugar.(NOaprieteexcesivamente.)
21) Insertelabombillarecomendada.PRECAUCIÓN:NOtoque
labombillaconlasmanossinguantes.Siestosucede,limpie
labombillaconalcoholdesnaturalizadoyunatelasinpelusas.
22) Resbalelacamisadevidriosobrelabombilla.Rosque
cuidadosamentelacamisadevidriosobreelcasquillo.(NO
aprietedemasiado).
INSTRUCCIONES IMPORTANTES DE SEGURIDAD
LA BOMBILLA ENCENDIDA ES CALIENTE
ADVERTENCIA: ParadisminuirelriesgodeINCENDIOoLESIO-
NESALASPERSONAS:
• Apagueydejequeseenfríeantesdecambiarlabombilla.
• LabombillaSECALIENTARÁPIDAMENTE.Useelinterruptor
sóloparaapagar.
• NOpermanezcaenlaluzsisientecalientelapiel.(Laluzes
intensaypuedecausar“quemaduras”).
• NOmiredirectamentealabombillaencendida.
• Mantengaalejadosdelabombillalosartículosquepuedan
quemarse.
• UseSOLAMENTEconelvatiajeespecicadoomasbajo.
• NOtoquelabombillaenningúnmomento,useunatelasuave.
Lagrasadelamanopuededañarlabombilla.
• NOhagafuncionarelartefactoconlabombilladañadao
faltante.
1) Paseelcabledecadaacoplamientosituadoarribadelartefacto
deiluminaciónatravésdeunvástagoencadalado.Luego
enrosquecadavástagoenelacoplamientocorrespondiente.
NOTA:Elcompuestopararoscaestancasedebeaplicara
todaslasroscasdelvástagocomosenotóconelsímbolo(3)
paraimpedirlarotaciónaccidentaldelartefactodurantela
limpieza,instalacióndeunabombillanueva,etc.
2) Paseelcableporlosvástagosrestantesyluegoenrosque
losvástagosentresíparaunirlos.
3) Enrosqueunpequeñotuboroscadoenelextremodecada
anillito.
4) Paseelcabledelartefactoporelprimeranillo.Luego
enrosqueunprimeranilloenelextremodecadavástago
nal.
5) Paseelcabledelartefactoporelsegundoanilloyluegopor
eloriciodelescudete.Paseeltuboroscadoqueestá
conectadoalextremodelsegundoanilloporeloriciodel
escudete.
6) Paseelcabledelartefactoporeloriciodelaarandelade
seguridad.Enrosquelaarandeladeseguridadenelextremo
deltuboroscadoquesobresaledelacarainteriordel
escudete.
7) Paseelcabledelartefactoporeloriciodelatuerca
hexagonal.Luegoenrosquelatuercahexagonalenel
extremodeltuboroscado.
8) Repitalospasos5al7paraconectarelúltimovástagoal
escudete.
9) Engancheeleslabóndelacadenaalpequeñoanillodel
extremodecadavástagoyluegoacadaanillodelescudete.
10) APAGUELAALIMENTACIÓNELÉCTRICA.
IMPORTANTE: Antesdecomenzar,NUNCAtratedetrabajar
sinantesdesconectarlacorrientehastaqueeltrabajose
termine.
a) Vayaalacajaprincipaldefusibles,ointerruptorocaja
decircuitosdesucasa.Coloqueelinterruptordela
corrienteprincipalenposicióndeapagado“OFF”.
b) Desatornilleel(los)fusible(s),ocoloqueelinterruptoro
interruptoresdelbreakerenposicióndeapagado
“OFF”,quecontrola(n)lacorrientehaciaelartefactoo
habitacióndondeestátrabajando.
c) Coloqueelinterruptordeparedenposicióndeapagado
“OFF”.Sielartefactoquesevaareemplazartieneun
interruptorocadenaquesejala,colóquelosenla
posicióndeapagado“OFF”.
11)Encontrarlosagujerosroscadoscorrectosenlaabrazadera
demontaje.Instalarlostornillosdemontajeenlosagujeros
roscados.
12)Unirlaabrazaderademontajealacajadeconexiones.(No
seproveentornillos).Laabrazaderademontajepuede
ajustarseparaacomodarlaposicióndelartefacto.
13)Instruccionesdeconexiónatierrasolamenteparalos
EstadosUnidos.(VealailustracionAoB).
A) Enlaslámparasquetieneneleje,demontajeconun
agujeroydoshoyuelosrealzados.Enrollarelalambrea
tierradelacajatomacorrientealrededordeltornilloverdey
pasarloporelaquiero.
B) Enlaslámparasconunaarandelaacopada.Fijarel
alambreatierradelacajatomacorrientedelajodela
arandelaacoadaytornilloverde,ypaserporelejede
montaje.
DateIssued:10/17/14 IS-43686-US
ARANDELA
CONCAVA
AB
TIERRA DE LA
CAJA DE SALIDA
TORNILLO DE TIERRA,
VERDE
DEPRESIONES
TIERRA
ARTEFACTO
CONECTOR DE ALAMBRE
(NO SE PROVEE)
TIERRA DE LA
CAJA DE SALIDA
TORNILLO DE TIERRA,
VERDE
TIERRA
ARTEFACTO
Conectar el alambre de
suministro negro o rojo al
Conectar el alambre de
suministro blanco al
Negro Blanco
*Cordon paralelo (redondo y liso) *Cordon paralelo (cuadrado y estriado)
Claro, marrón, amarillio o negro
sin hebra identificadora
Claro, marrón, amarillio o negro
con hebra identificadora
Alambre aislado (diferente del verde)
con conductor de cobre
Alambre aislado (diferente del
verde) con conductor de plata
*Nota: Cuando se utiliza alambre paralelo
(SPT I y SPT II). El alambre neutro es de forma
cuadrada o estriada y el otro alambre será de
forma redonda o lisa. (Vea la ilustracíón). Hilo Neutral
SEE OTHER SIDE FOR ENGLISH TRANSLATIONS.
VEA EL OTRO LADO DE TRADUCCIONES AL INGLÉS.
We’re here to help 866-558-5706
Hrs: M-F 9am to 5pm EST
VEA EL OTRO LADO PARA LA ILUSTRACIÓN
DEL APARATO.
/