Page is loading ...

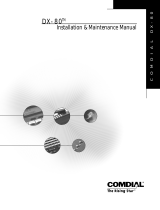
MOUNTING INSTRUCTIONS
DIRECTORY LAMP INSTALLATION:
LE-Bn INSTALLATION INSTRUCTIONS
(SUPPLEMENT TO THE PRODUCT INSTRUCTIONS)
1. Cut a hole in the wall that is 9-1/16” X 6-1/8”. (Ensure
that a mounting depth of at least 2-11/16” is available.)
2. Pass cable through knockout holes.
3. Secure mounting box to wall so that front of mounting
box is flush with the outside edge of the wall.
4. Connect wires to the unit. (See wiring diagram)
5. Attach the unit to mounting box using the supplied
screws.
1. Attach the lamp mounting plate as shown in the
drawing using the supplied screws. The lamp should
face the back of the mounting box and point down.
2. Connect the RED wire to “+” of the PS-12C.
3. Connect the BLACK wire to the “-” of the PS-12C.
4. Lamp is 12VDC, 1W.
1. Remove the directory card cover by pressing on edge
of the card cover next to the call button.
2. Remove the directory card in the same manner.
3. Fill in the tenant’s name in the space provided.
4. Replace card and cover.
ENTERING TENANT’S NAME:
Aiphone Communication Systems
1700 130th Ave. N.E.
Bellevue, WA 98005
(425) 455-0510
FAX (425) 455-0071
TOLL FREE TECHNICAL SUPPORT:
(800) 692-0200
TOLL FREE FAX LINE:
(800) 832-3765
E-MAIL: [email protected]
LEB24610 Sup
0199bkjd
Press here to
remove cover
and card.
Special
Order
Products
LE-B2, LE-B4, LE-B6, LE-B10 Selective Call Entry Station for LEM, LEF Masters
(Illustration
only. Number
of wires vary.)
/