Page is loading ...

PC PC PC PC PC PC PC PC
• 1 PN0108 Station
• 1 AC Source Power Cord
• 8 Power Outlet Power Cord
• 8 Safe Shutdown Cables
• 1 PON Cable (DB9 F to DB9 M)
• 1 User Manual
• 1 Quick start guide
• 1 Rack Mount Kit (Brackets and Phillips head hex M3 x 8 screws)
• 4 Foot Pads
• 1 Software CD
The complete package consists of:
4
Package Contents
1Single Stage Installation
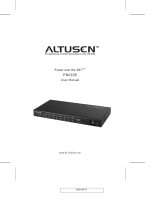
2The PN0108 (Front View)
1. Port LEDs
2. Firmware Upgrade Switch
3. Power Control Buttons
4. Reset Switch
5. Station ID LED
6. Power Switch
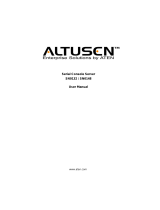
3The PN0108 (Rear View)
4-1
1. Power Socket
2. Circuit Breaker
3. AC Power Outlets
4. Safe Shutdown Ports
5. PON (Power over the NET) Output Port
6. PON (Power over the NET) Input Port
2
2
3
3
4
4
5
5
1
1
6
6
3
1
2
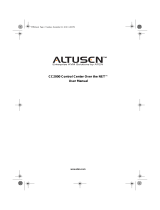
3. For Windows XP, 2000, Vista, and Windows Server 2003 systems, for each
computer use a Safe Shutdown cable to connect from the PN0108’s Safe
Shutdown port to the computer’s Serial port.
Note: This step is optional.
4. You must connect the computer to the same letter designation for both the
AC Outlet and Safe Shutdown ports.
5. Use the AC power cord provided with this package to connect the
PN0108’s Power Socket to an AC power source.
6. Turn on the PN0108.
7. Turn on the devices.
To set up a single stage installation, refer to the installation
diagram below and do the following:
1. Use the PON cable that was provided with this package to
connect the PN0108’s PON IN port to the PON port of the
device you are connecting it to .
2. For each device, use an AC Output cable to connect from
any available PN0108 output port to the device’s AC socket.
Single Stage Installation
Remote Adminstrator
CN8000
Over IP compatible devices.
TCP/IP
These instructions show how to install the PN0108
Power over the NET.
For detailed information, refer to the user manual
included in the kit.
PN0108 Power over the NET Quick Start Guide
© Copyright 2010 ATEN® International Co., Ltd. www.aten.com
Altusen and the Altusen logo are trademarks of ATEN International Co., Ltd.
All rights reserved. All other trademarks are the property of their respective owners.
This product is RoHS compliant PAPE-1214-I00G Printing Date: 12/2010
Online Registration
International:
• http://support.aten.com
North America:
• http://www.aten-usa.com/product_registration
Technical Phone Support
International:
• 886-2-8692-6959
China:
• 86-10-5255-0110
Japan:
• 81-3-5323-7178
Korea:
• 82-2-467-6789
North America:
• 1-888-999-ATEN Ext: 4988
United Kingdom:
• 44-8-4481-58923

7Specifications
6Browser operation
Logging In:
Remote operation of the PN0108 is browser based. For example purposes, we
will access a PN0108 connected to a CN8000 KVM on the NET module or
other Over IP compatible devices.
1. In the browser’s URL location bar, specify the IP address of the CN8000
that the PN0108 you want to access is connected to.
Note: If you don’t know the IP address, get it from the CN8000
administrator.
2. A Security Alert dialog box appears. Accept the certificate. The CN8000
login page appears
After you have successfully logged in, Click the Power Management icon.
3. A File Download dialog box comes up asking what you want to do with
the PowerMan.jar file. You can either run it from your browser (click
Open), or save it to disk and run it from your computer. If your browser
permits, run it from your browser.
4. If you save the file and run it from your computer, with your browser still
open, go to the directory where the PowerMan.jar file resides and either
double click its icon, or, from a command window, enter the following
command:
java -jar PowerMan.jar
5
To manage even more devices, up to 15 additional PN0108s can be daisy
chained down from the top level unit. Up to 128 devices can be managed on
a complete installation. To set up a daisy chained installation do the
following:
1. For each PN0108 that you add to the chain, use the DB-9 to DB-9 PON
cable that was provided with it to connect the parent PN0108’s PON OUT
port to the child PN0108’s PON IN port.
2. Power up the daisy chained PN0108s in sequence starting with the highest
level parent and working down. In each case, wait for the PN0108’s
Station ID to be ascertained and displayed on the Station ID LED before
powering on the next unit.
The Station ID for First Stage unit is 01; the ID for the Second Stage unit
is 02, etc.
3. After all the PN0108s are up, power on the devices.
Daisy Chaining Installation
6. After you have successfully logged
in, the PN0108 Main Screen appears:
Note: If you are the administrator, and
are logging in for the first time,
use the default Username:
administrator; and the default
Password: password. For security
purposes, we strongly recommend
you remove these and give
yourself a unique Username and
Password
5. The PN0108 login dialog box comes
up. Provide a valid Username and
Password (set by the PN0108
administrator), then Click Login to
continue.
Power cord : The power source is a 220- 240 V AC supply, use a tandem (T blade) type
attachment plug with ground conductor power cord that meets the respective European
country's safety regulations, such as VDE for Germany. Plug should comply with the VDE
0620 specification; the connector should comply with the VDE 0625 specification. A
minimum 10A, 0.75 mm2 x 3G power cord (H05VV-F or VW-1) should be used.
Power outlet cord : Connector should comply with the VDE 0625 or EN60320
specification. A minimum 10A, 0.75 mm2 x 3G power cord (H05VV-F or VW-1) should
be used.
Note:
Use the power cord supplied with this package. If you need to purchase additional
power cord, you must choose ones that comply with the above specifications.
Function PN0108A PN0108G
Power Characteristics 100–240 VAC; 15A* 100–240 VAC; 10A**
Power Inlets 1 x IEC 60320/C14 (M)
Power Outlets 8 x IEC 60320/C13 (F)
I/P Rating (Total input - max) 100–120 VAC; 50/60Hz; 12A 220–240 VAC; 50/60Hz; 10A
O/P Rating Per Port (max) 100–120 VAC; 50/60Hz; 9A 220–240 VAC; 50/60Hz; 9A
Total (max) 100–120 VAC; 50/60Hz; 11A 220–240 VAC; 50/60Hz; 9A
LEDs
Outlet Power 8 (orange)
Remote Access 8 (green)
Station ID 2 x 7 segment (yellow)
Connectors
PON In 1 x DB-9 (F)
PON Out 1 x DB-9 (M)
Safe Shutdown 8 x 6-pin Safe Shutdown Jacks (F)
Switches
Power 1 x Rocker
Outlet On / Off
Remote On / Off 8 x Pushbutton
FW Upgrade 1 x 2 position slide
Reset 1 x Semi hidden
Power Consumption (no load) 120V; 60Hz; 16W 230V; 50Hz; 16W
Power Consumption (max. load) 120V; 60Hz; 1440W 230V; 50Hz; 2300W
Environment
Operating Temp. 0-40oC
Storage Temp. -20-60oC
Humidity 0-80% RH Noncondensing
Physical
Properties
Housing Metal
Weight 3.7 kg
Dimensions
(LxWxH) 43.20 x 21.00 x 4.40 cm
* Units are certified to 80% of max. current rating (100—120 VAC).
** Units are certified to 220—240 VAC.
/