Page is loading ...

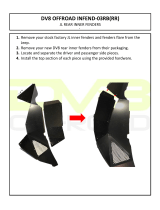
2018+ Jeep JL Rear Bumper Install Manual
Please review these instructions before beginning the install, if you do not feel that you are capable of per-
forming this install please give us a call at 951-680-9595 and we will direct you to a qualified installer in
your area. Use common sense when installing this product. These are basic guidelines for an easier install.
DV8 Offroad is not responsible for any injury or harm to the vehicle as a result of an improper install.
OEM Rear Bumper Removal:
1) Start by unplugging the rear bumper harness connector, then release the two clips holding
the harness to the vehicle. This will be located under the vehicle on the drivers side.
2) Remove the spare tire.
3) Use a 16mm socket to remove the 2 bolts holding the bumper to the frame near the hitch
area. If the Jeep is equipped with a hitch also remove the two bolts holding the trailer plug
bracket.
4) Use a 16 mm socket to remove the side frame bolts holding the bumper to the vehicle
5) Use a 17mm socket to remove the bumper mounting nuts that hold the bumper to the
mounting bracket that is connected to the frame. Now remove the bumper assembly.
6) Use an 8mm socket to remove the inner fender liner bolts (total of 6). Remove the lower
inner fender liners
7) Remove each bumper side support bracket, then remove the factory tow hook. All thread-
ed holes on the rearmost part of the frame should be empty at this time.
Note: Steps 8 and 9 are for vehicles with parking sensors only, if your Jeep is not equipped
skip to step 10.
8) If you have a metal OEM bumper then remove those sensors by spreading the tabs on the
inner mounting rings and releasing the sensor out of the back side of the bumper. Then
spread the tabs on the outer mounting ring to remove it from the inner mounting ring. Press
the tabs on the final mounting ring to push it out the front of the bumper
9) If you have a plastic OEM bumper spread the outer tabs to release the sensor out of the
back of the bumper. Then use a scraper or putty knife to break the plastic welds holding the
entire bracket to the bumper. KEEP TRACK OF HOW THESE ARE MOUNED AS
THEY’LL NEED TO GO INTO THE NEW BUMPER THE SAME WAY.

10) Remove the entire OEM bumper harness from the bumper.
11) Now is a good time to place your license plate onto the bumper and to create the wiring
connections for any lights that you wish to use with the bumper.
12) If you have an OEM steel bumper reverse the process that you used to place the sensors
back into the new DV8 bumper.
13) If you have and OEM plastic bumper use a strong epoxy to adhere the plastic housings to
the bumper using the same configuration that was on the factory bumper then place the sensor
into the housing reversing the steps used to remove it. NOTE: the housings may need to be
trimmed slightly in order to fit properly.
14) Use the factory license plate light wiring to wire in the new LED license plate light by cut-
ting the factory plug off and using butt connectors. Twist both OEM black wires and both
OEM red wires together and wire them RED to RED and BLACK to BLACK.
15) Cover the connection with electrical tape.
Installing the new bumper:
16) Slide the included nut plate into the passenger side frame rail as shown below.
17) Hold the bumper up to where the OEM bumper was mounted. The two frame rail brackets
will slide over the frame as shown in the illustration below.

18) Using the OEM Hardware and the threaded holes in the frame attach the bumper to the ve-
hicle. Tighten to OEM specs.
19) Use the two large kit bolts on the passenger side where the nut plate was installed in step
16. Tighten to 80 ft/lbs.
20) Ensure that all hardware is tight and that all electrical connections are taped off and have a
solid connection. If necessary use zip ties to secure the harness to the frame.
If you have any questions or concerns about this product or how to install it please call us at
951-680-9595 or send us an email at info@dv8offroad.com .
We will be happy to help you!
/