Page is loading ...

MeshWorks
®
shelving
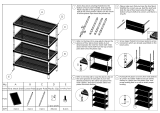
Parts List
Mesh Shelf
(A) x3
Top Pole Section
(B) x4
Bottom Pole Section
(C) x4
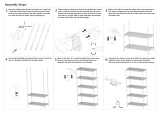
Step 1
Threaded Insert
(D) x4
Leveling Foot
(G) x4
Shelf Clip
(E) x12 clips (24 pieces)
Plastic Cap
(F) x4
! Do not throw away packaging materials until assembly is complete.
! To clean, wipe with a soft, dry cloth. Spot clean with a damp cloth if needed.
Bottom pole section (C)
does not have groove.
Bottom pole section (C)
Leveling Foot (G)
Attach all 4 top pole sections (B) to all 4 bottom pole sections (C) using the threaded inserts (D). Screw a leveling foot (G) into the
bottom of each pole.
Pole (B & C)
Assembly
Scan here to watch the
instructional video.

Step 2
Once poles are assembled, select the groove (spaced in 1” increments) where you’d like your lowest shelf to rest.
Position the two halves of your shelf clip (E) so that the beveled edge is facing the top. Snap the clip together around the
pole and adjust until you feel it locate the groove. Once clips are snapped into place at equal heights on each of the 4
poles, slide a shelf down from the top to rest on the clips. Gently tap with a rubber mallet if needed to secure shelf.
Repeat with remaining clips and shelves, working your way to the top.
Step 3
With the unit fully assembled, press a plastic cap (F) into the hole in the top of each pole. To level your assembled unit,
adjust the feet by twisting to the desired height.
Shelf Clip (E) Assembly
If having difficulties getting the shelf
into place, use a rubber mallet. Use
only a rubber mallet to avoid damage.
The designs, images, artwork, product descriptions and data shown in this document are protected by U.S. and foreign patent, copyright, trade dress and contract law and may not be copied, imitated,
duplicated or used in any manner other than as herein proposed. Design Ideas oers these materials to viewer solely for the purpose of allowing viewer to reference assembly or care instructions for the
depicted products purchased from Design Ideas. By viewing them, viewer agrees to this restriction and not to any other use of same whatsoever. Any other use or further distribution of the shown designs,
images, artwork, text and/or data by viewer or further recipients of same is strictly forbidden. Design Ideas, Ltd. will enforce its intellectual property rights in this material to the fullest extent of the law.
Designs and contents copyright 2017 Design Ideas, Ltd. DESIGN IDEAS and other trademarks are registered and/or owned by Design Ideas, Ltd.
E
E
A
E

MeshWorks
®
rayonnages
Parts List
Etagère Mesh
(A) x3
Barre du haut
(B) x4
Barre du bas
(C) x4
Step 1
Insert fileté
(D) x4
Pied réglable
(G) x4
Pince de fixation
(E) x12 fixation (24 fragment)
Capuchon en plastique
(F) x4
Ne jetez pas les emballages tant que le montage n’est pas terminé.
Pour le nettoyage, utilisez un chiffon doux et sec. Enlevez les taches avec
un chiffon humide si nécessaire.
Les barres du bas (C)
n’ont pas de rainure.
Barre du bas (C)
Pied réglable (G)
Rattachez les 4 barres du haut (B) aux 4 barres du bas (C) en utilisant les inserts filetés (D). Vissez un pied réglable (G) en
dessous de chaque barre.
Assemblage des barres
(B et C)
Scannez ici pour regarder
la vidéo didactique.

Step 2
Une fois que les barres sont assemblées, sélectionnez la rainure (espacées par multiple de 2,5 cm) où vous souhaitez positionner
l’étagère la plus basse. Placez les deux parties de votre pince de fixation (E) de façon à ce que le bord biseauté soit vers le haut.
Clipser la pince autour de la barre jusqu’à ce que vous sentiez qu’elle soit placée au niveau de la rainure. Une fois que toutes les
pinces sont fixées à la même hauteur sur les 4 barres, glissez une étagère à partir du haut pour la placer sur les pinces. Tapez
doucement avec un maillet en caoutchouc pour fixer l’étagère si nécessaire. Répétez l’opération avec les pinces et étagères
restantes, en continuant vers le haut.
Step 3
Une fois l’étagère complètement assemblée, enfoncez un capuchon en plastique (F) dans le haut de chaque barre. Pour
régler la hauteur de votre étagère, ajuster les pieds en tournant jusqu’à la hauteur souhaitée.
Assemblage des pinces de fixation
Utilisez uniquement un maillet en caoutchouc
pour ne pas abîmer l’étagère.
E
E
A
E
/