Page is loading ...

GetFace IP
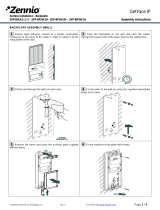
Flush installation - Box - 1 module
ZVP-FBOX1 Assembly instructions
© Zennio Avance y Tecnología S.L. Ed. 1 For more info www.zennio.com Page 1 / 10
Note: This product must be purchased together with the frame ZVP-FFRA1
ASSEMBLY OF FLUSH-MOUNT BOX ON A WALL IN ONE COLUMN LAYOUT
1 Please make a hole in the wall with the suitable dimensions
and considering that the cables must remain inside the hole.
2 Fix the box by means of mortar, adhesive cement or any
other similar construction material. Please, respect the top
orientation mark and recover the cables.
3 After the setting time, please remove the auxiliary parts and
cut the flaps.

© Zennio Avance y Tecnología S.L. Ed. 1 For more info www.zennio.com Page 2 / 10
ASSEMBLY OF FLUSH-MOUNT BOX ON A DRYWALL
1 Please make a hole in the drywall with the suitable
dimensions and considering that the cables must remain inside
the hole.
2 Place the box in the hole, recover the cables and fix the
flush-mount box to the drywall by means of the screws that
adjust the flaps to the drywall thickness. Please, pay attention to
the top orientation mark.
3 Cut and remove the flaps.

GetFace IP
Flush installation - Box - 2 modules
ZVP-FBOX2 Assembly instructions
© Zennio Avance y Tecnología S.L. Ed. 1 For more info www.zennio.com Page 3 / 10
Note: This product must be purchased together with the frame ZVP-FFRA2
ASSEMBLY OF FLUSH-MOUNT BOX ON A WALL (ONE-COLUMN LAYOUT)
1 Please make a hole in the wall with the suitable dimensions
and considering that the cables must remain inside the hole.
2 Install the auxiliary parts for the flush-mount assembly.
3 Fix the box by means of mortar, adhesive cement or any
other similar construction material. Please, respect the top
orientation mark and recover the cables.
4 After the setting time, please remove the auxiliary parts and
cut the flaps.

© Zennio Avance y Tecnología S.L. Ed. 1 For more info www.zennio.com Page. 4 / 10
ASSEMBLY OF FLUSH-MOUNT BOX ON A DRYWALL (ONE-COLUMN LAYOUT)
1 Please make a hole in the drywall with the suitable
dimensions and considering that the cables must remain inside
the hole.
2 Place the box in the hole, recover the cables and fix the
flush-mount box to the drywall by means of the screws that
adjust the flaps to the drywall thickness. Please, pay attention to
the top orientation mark.
3 Cut and remove the flaps.

© Zennio Avance y Tecnología S.L. Ed. 1 For more info www.zennio.com Page. 5 / 10
ASSEMBLY OF FLUSH-MOUNT BOX ON A WALL (MULTIPLE-COLUMN LAYOUT)
1 Please make a hole in the wall with the suitable dimensions
and considering that the cables must remain inside the hole.
2 Cut the flaps and open the marked holes in the adjoining
sides of the boxes.
3 Assemble the boxes by using the auxiliary parts (A and B)
and the tube-shape parts. Fix it with the screws.
4 Install the auxiliary parts (A and B) as shown in the figure
below.
5 Fix the box by means of mortar, adhesive cement or any
other similar construction material. Please, keep the top
orientation mark and recover the cables.
6 After setting time, please remove the auxiliary parts and cut
the flaps.

© Zennio Avance y Tecnología S.L. Ed. 1 For more info www.zennio.com Page. 6 / 10
ASSEMBLY OF FLUSH-MOUNT BOX ON A DRYWALL (MULTIPLE-COLUMN LAYOUT)
1 Please make a hole in the drywall with the suitable
dimensions and considering that the cables must remain inside
the hole.
2 Cut the flaps and open the marked holes in the adjoining
sides of the boxes.
3 Assemble the boxes by using the auxiliary parts (A and B)
and the tube-shape parts. Fix it with the screws.
4 Place the assembled box in the hole, recover the cables
and fix the flush-mount box to the drywall by means of the
screws that adjust the flaps to the drywall thickness. Please,
pay attention to the top orientation mark.
5 Cut and remove the flaps.

GetFace IP
Flush installation - Box - 3 modules
ZVP-FBOX3 Assembly instructions
© Zennio Avance y Tecnología S.L. Ed. 1 For more info www.zennio.com Page 7 / 10
Note: This product must be purchased together with the frame ZVP-FFRA3
ASSEMBLY OF FLUSH-MOUNT BOX ON A WALL (ONE-COLUMN LAYOUT)
1 Please make a hole in the wall with the suitable dimensions
and considering that the cables must remain inside the hole.
2 Install the auxiliary parts for the flush-mount assembly.
3 Fix the box by means of mortar, adhesive cement or any
other similar construction material. Please, respect the top
orientation mark and recover the cables.
4 After the setting time, please remove the auxiliary parts and
cut the flaps.

© Zennio Avance y Tecnología S.L. Ed. 1 For more info www.zennio.com Page 8 / 10
ASSEMBLY OF FLUSH-MOUNT BOX ON A DRYWALL (ONE-COLUMN LAYOUT)
1 Please make a hole in the drywall with the suitable
dimensions and considering that the cables must remain inside
the hole.
2 Place the box in the hole, recover the cables and fix the
flush-mount box to the drywall by means of the screws that
adjust the flaps to the drywall thickness. Please, pay attention to
the top orientation mark.
3 Cut and remove the flaps.

© Zennio Avance y Tecnología S.L. Ed. 1 For more info www.zennio.com Page 9 / 10
ASSEMBLY OF FLUSH-MOUNT BOX ON A WALL (MULTIPLE-COLUMN LAYOUT)
1 Please make a hole in the wall with the suitable dimensions
and considering that the cables must remain inside the hole.
2 Cut the flaps and open the marked holes in the adjoining
sides of the boxes.
3 Assemble the boxes by using the auxiliary parts (A and B)
and the tube-shape parts. Fix it with the screws.
4 Install the auxiliary parts (A and B) as shown in the figure
below.
5 Fix the box by means of mortar, adhesive cement or any
other similar construction material. Please, keep the top
orientation mark and recover the cables.
6 After setting time, please remove the auxiliary parts and cut
the flaps.

© Zennio Avance y Tecnología S.L. Ed. 1 For more info www.zennio.com Page 10 / 10
ASSEMBLY OF FLUSH-MOUNT BOX ON A DRYWALL (MULTIPLE-COLUMN LAYOUT)
1 Please make a hole in the drywall with the suitable
dimensions and considering that the cables must remain inside
the hole.
2 Cut the flaps and open the marked holes in the adjoining
sides of the boxes.
3 Assemble the boxes by using the auxiliary parts (A and B)
and the tube-shape parts. Fix it with the screws.
4 Place the assembled box in the hole, recover the cables
and fix the flush-mount box to the drywall by means of the
screws that adjust the flaps to the drywall thickness. Please,
pay attention to the top orientation mark.
5 Cut and remove the flaps.
/