Page is loading ...

GetFaceIP
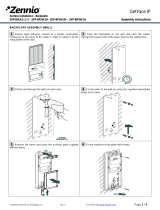
Flushinstallation‐Frame–1module
ZVP‐FFRA1
Assemblyinstructions
©ZennioAvanceyTecnologíaS.L. Ed.2 Formoreinfowww.zennio.com
Page 1 / 1
Note: This product must be purchased together with the frame ZVP-FBOX1
ASSEMBLY OF FRAME
1 Please remove the additional module from the enclosure
and place the metallic auxiliary parts supplied with the frame.
2 Place the enclosure inside the flush-mount box and recover
the cables. Fix the module with the screws (included).
3 Connect the additional module to the bus.
4 Fix the additional module with the supplied screws.
5 Place the frame.
6 Fix the frame by using the supplied Allen key.
Dimensions: 151 x 129 x 5.5 mm

GetFace IP
Flush installation - Frame - 2 modules
ZVP-FFRA2 Assembly instructions
© Zennio Avance y Tecnología S.L. Ed. 3 For more info www.zennio.com Page 1 / 3
Note: This product must be purchased together with the frame ZVP-FBOX2
ASSEMBLY OF FRAME (ONE-COLUMN LAYOUT)
1 Please remove the basic unit blind panel and place the
auxiliary parts supplied with the frame.
2 Place the basic unit inside the flush-mount box and recover
the cables. Fix the enclosure with the screws (included).
3 Connect the cables to the basic unit and interconnect the
additional modules with the bus.
4 . Fix the blind panel (or additional modules that remain in
sight) with the supplied screws and put the labels with captions
next to the buttons.
5 Place the frame.*
6 Fix the frame by using the supplied Allen key.
*In case of acoustic deficiencies, Zennio may supply a modified frame. In such case, though, it is essential that the microphone remains properly
connected.
Dimensions: 255 x 129 x 5.5 mm

© Zennio Avance y Tecnología S.L. Ed. 3 For more info www.zennio.com Page 2 / 3
ASSEMBLY OF FRAME (MULTIPLE-COLUMN LAYOUT)
1 Please remove the blind panels and the additional modules
from the enclosures. After that, assemble the additional module
enclosures, opening the gaps previously. Then, fix the assembly
using the supplied parts and screws (included).
2 Place the metallic parts supplied with the frame. Put the
assemblies inside the flush-mount box, pass previously the bus
through the gaps and recover the cables.
3 Fix the assemblies to the flush-mount boxes with screws.
4 Make the connections of the basic unit and prepare the
additional modules. Pass the bus cables through the gaps.
5 Interconnect the additional modules with the bus as
indicated in the schema and then, fix the additional modules
with the supplied screws.
6 Place the frames and fix them by using the supplied Allen
key.*
*In case of acoustic deficiencies, Zennio may supply a modified frame. In such case, though, it is essential that the microphone remains properly
connected.

© Zennio Avance y Tecnología S.L. Ed. 3 For more info www.zennio.com Page 3 / 3
ASSEMBLY OF FRAME (MODIFIED FRAME)
1 In case of acoustic deficiencies, Zennio may supply a modified frame. In this case, the microphone will be attached to the
frame.
2 Introduce the cable of the microphone through the gap
of the basic unit as shown in the image. After that, connect it
to the “MIC” connection of the basic unit.
3 In case the modified frame needs to be removed, please be careful during this step as sudden actions may damage the
microphone or its cable, as indicated above.
Microphone
Microphone
LAN
(PoE)
RG
Y
+ -
IN1
+ -
OUT1
RELAY12
+ -
12V
DC
2A
RESET
BUS
LINE
OUT
MIC
Note:
After the connection of the microphone and
during the installation of any other modules of
the assembly, please hold the modified frame
firmly to avoid damage to the microphone due to
its weight. It is highly advisable to perform this
step with the help of another operator.

GetFace IP
Flush installation - Frame - 3 modules
ZVP-FFRA3 Assembly instructions
© Zennio Avance y Tecnología S.L. Ed. 3 For more info www.zennio.com Page 1 / 3
Note: This product must be purchased together with the frame ZVP-FBOX3
ASSEMBLY OF FRAME (ONE-COLUMN LAYOUT)
1 Please remove the blind panels and the additional modules. After
that, assemble the additional module enclosures, opening the gaps
previously. Then, fix the assembly using the supplied parts and screws.
Move the microphone to the lower enclosure* and place the metallic
parts supplied with the frame.
2 Place the assembly inside the flush-mount box and recover the
cables. Fix the module with the screws (included).
3 Connect the cables to the basic unit and interconnect the additional
modules with the bus as shown in the schema.
4 Fix the blind panel (or additional modules that remain in sight) with
the supplied screws and put the labels with captions next to the buttons.
5 Place the frame.*
6 Fix the frame by using the supplied Allen key.
*In case of acoustic deficiencies, Zennio may supply a modified frame for whose installation step number 1 should be ignored. In such case,
though, it is essential that the microphone remains properly connected.
Dimensions:
360 x 129 x 5.5 mm

© Zennio Avance y Tecnología S.L. Ed. 3 For more info www.zennio.com Page 2 / 3
ASSEMBLY OF FRAME (MULTIPLE-COLUMN LAYOUT)
1 Please remove the blind panels and the additional modules. After
that, assemble the additional module enclosures, opening the gaps
previously. Then, fix the assembly using the supplied parts and screws.
Move the microphone to the lower module.*
2 Place the metallic parts supplied with the frame. Put the assemblies
inside the flush-mount box, pass previously the bus through the gaps
and recover the cables.
3 Fix the assemblies to the flush-mount boxes with screws.
4 Make the connections of the basic unit and prepare the additional
modules. Pass the bus cables through the gaps.
5 Interconnect the additional modules with the bus as indicated in the
schema and then, fix the additional modules with the supplied screws.
6 Place the frames and fix them by using the supplied Allen key.*
*In case of acoustic deficiencies, Zennio may supply a modified frame for whose installation step number 1 should be ignored. In such case,
though, it is essential that the microphone remains properly connected.

© Zennio Avance y Tecnología S.L. Ed. 3 For more info www.zennio.com Page 3 / 3
ASSEMBLY OF FRAME (MODIFIED FRAME)
1 In case of acoustic deficiencies, Zennio may supply a modified frame. In this case, the microphone will be attached to the
frame.
2 Introduce the cable of the microphone through the gap
of the basic unit as shown in the image. After that, connect it
to the “MIC” connection of the basic unit.
3 In case the modified frame needs to be removed, please be careful during this step as sudden actions may damage the
microphone or its cable, as indicated above.
Microphone
Microphone
LAN
(PoE)
RG
Y
+ -
IN1
+ -
OUT1
RELAY12
+ -
12V
DC
2A
RESET
BUS
LINE
OUT
MIC
Note:
After the connection of the microphone and
during the installation of any other modules of
the assembly, please hold the modified frame
firmly to avoid damage to the microphone due to
its weight. It is highly advisable to perform this
step with the help of another operator.
/