Page is loading ...

GetFaceIP
Surfaceinstallation‐Frame‐1module
ZVP‐CB1M
Assemblyinstructions
©ZennioAvanceyTecnologíaS.L. Ed.2 Formoreinfowww.zennio.com
Page 1 / 1
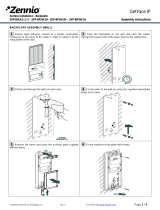
ASSEMBLY OF THE FRAME
1 Please remove the additional module from the enclosure
and place the metallic auxiliary parts supplied with the frame.
2 Place the additional module enclosure correctly levelled on
the wall and drill two holes for the expanding plugs. Recover the
cables and fix the enclosure with the screws (included).
3 Connect the bus to the additional module.
4 Fix the additional module with the supplied screws.
5 Place the frame.
6 Fix the frame by using the supplied Allen key.
Note: It is recommended to install the backplate (ZVP-BPLA1) if the wall surface irregularity is greater than 0.5mm.
Dimensions: 128 x 106.5 x 27.5 mm

GetFaceIP
Surfaceinstallation‐Frame‐2modules
ZVP‐CB2M
Assemblyinstructions
©ZennioAvanceyTecnologíaS.L. Ed.2 Formoreinfowww.zennio.com
Page 1 / 2
ASSEMBLY OF THE FRAME (ONE-COLUMN LAYOUT)
1 Please remove the blind panel of the basic unit and place
the metallic auxiliary parts supplied with the frame.
2 Place the basic unit correctly levelled on the wall and drill
two holes for the expanding plugs. Recover the cables and fix
the module with the screws (included).
3 Connect the cables to the basic unit and interconnect the
additional modules with the bus.
4 Fix the blind panel (or additional modules that remain in
sight) with the supplied screws and put the labels with captions
next to the buttons.
5 Place the frame.
6 Fix the frame by using the supplied Allen key.
Note: it is recommended to install the backplate (ZVP-BPLA2) if the wall surface irregularity is greater than 0.5mm.
Dimensions:
232 x 106.5 x 27.5 mm

©ZennioAvanceyTecnologíaS.L. Ed.2 Formoreinfowww.zennio.com Page 2 / 2
ASSEMBLY OF THE FRAME (MULTIPLE-COLUMN LAYOUT)
1 Please remove the blind panels and the additional
modules. After that, assemble the additional module enclosures
by opening the gaps previously. Then, fix the assembly by using
the supplied parts and screws. Place the metallic parts supplied
with the frame.
2 Place the left assembly correctly levelled on the wall and
drill two holes for the expansive plugs. Recover the cables and
fix the module with the screws (included).
3 Place the right assembly on the wall by using the T-shape
parts. Mark the position of the holes, drill them and afterwards
place an expansive plug inside them.
4 Fix the right assembly to the wall with screws. Make the
connections of the basic unit and prepare the additional
modules. Pass the bus cable through the gaps.
5 Interconnect the additional modules with the bus as
indicated in the schema and then fix the additional modules with
screws.
6 Place the frames and fix them by using the supplied Allen
key.
Note: it is recommended to install the backplate (ZVP- BP2W2H) if the wall surface irregularity is greater than 0.5mm.
2x

GetFaceIP
Surfaceinstallation‐Frame‐3modules
ZVP‐CB3M
Assemblyinstructions
©ZennioAvanceyTecnologíaS.L. Ed.2 Formoreinfowww.zennio.com
Page 1 / 2
ASSEMBLY OF THE FRAME (ONE-COLUMN LAYOUT)
1
Please remove the blind panels and the additional modules. After
that, assemble the additional module enclosures, opening the gaps
previously. Then fix the assembly by using the supplied parts and
screws. Place the metallic auxiliary parts supplied with the frame. Move
the microphone to the lower enclosure.
2
Place the basic unit correctly leveled on the wall and drill two holes
for the expanding plugs. Recover the cables and fix the module with the
screws (included).
3
Connect the cables to the basic unit and interconnect the additional
modules with the bus as shown in the schema.
4
Fix the blind panel and additional modules that remain in sight with
supplied screws and put the labels with captions next to the buttons.
5
Place the frame.
6
Fix the frame using by the supplied Allen key.
Note: it is recommended to install the backplate (ZVP-BPLA3) if the wall surface irregularity is greater than 0.5mm.
Dimensions:
337 x 106.5 x 27.5 mm

©ZennioAvanceyTecnologíaS.L. Ed.2 Formoreinfowww.zennio.com Page 2 / 2
ASSEMBLY OF THE FRAME (MULTIPLE-COLUMN LAYOUT)
1 Please remove the blind panels and the additional modules. After
that, assemble the additional module enclosures by opening the gaps
previously. Then, fix the assembly by using the supplied parts and
screws. Place the metallic parts supplied with the frame. Move the
microphone to the lower enclosure.
2 Place the left assembly correctly leveled on the wall and drill two
holes for the expansive plugs. Recover the cables, place the bus and fix
the left assembly with the screws (included).
3 Place the right assembly on the wall by using the T-shape parts.
Mark the position of the holes, drill them and afterwards place
expansive plugs inside.
4 Fix the right assembly to the wall with screws. Make the
connections of the basic unit and prepare the additional modules. Pass
the bus cable through the gaps.
5 Interconnect the additional modules with the bus as indicated in the
schema and then fix the additional modules with the screws.
6 Place the frames and fix them by using the supplied Allen key.
Note: it is recommended to install the backplate (ZVP-BP2W3H, ZVP- BP3W3H) if the wall surface irregularity is greater than 0.5mm.
4x
/