Page is loading ...

SPECIFICATIONS ARE SUBJECT TO CHANGE WITHOUT NOTICE.
/ No.40012 No.40011
OPERATING YOUR
MODEL SAFELY
13
RADIO PREPARATION
3
BEFORE YOU BEGIN
2 3
ASSEMBLY
12
MAST ADJUSTMENT
FUNDAMENTALS OF SAILING
4 11
EXPLODED VIEW
14 16
HOW TO REMOVE THE MAST
17
SPARE PARTS
OPTIONAL PARTS
18
REQUIRED FOR OPERATION
TOOLS REQUIRED
2
THE FINEST RADIO CONTROL MODELS
R
INSTRUCTION MANUAL
SAFETY PRECAUTIONS
This radio control model is not a toy!
First-time builders should seek the advice of experienced modellers
before commencing assembly and if they do not fully understand
any part of the construction.
Assemble this kit only in places out of children’s reach!
Take enough safety precautions prior to operating this model.
You are responsible for this model’s assembly and safe operation!
Always keep this instruction manual ready at hand for quick
reference, even after completing the assembly.
© 2001 KYOSHO
RADIO CONTROLLED SAILING YACHT
FORTUNE 612
LENGTH : 612 mm
LENGTH : 612 mm
Before commencing assembly, please read these instructions thoroughly!

TOOLS REQUIRED
Sharp Hobby Knife
Phillips Screwdriver (L.M.S) Pliers (L)
Awl
Scissors
Wire Cutters
Instant Glue
1
Read through the manual before you begin, so
you will have an overall idea of what to do.
1 BEFORE YOU BEGIN (1)
Check all parts. If you find any defective or missing parts,
contact your local dealer or our Kyosho Distributor.
2
3
Symbols used throughout the instruction manual, comprise:
Do not do that!
REQUIRED FOR OPERATION
2
Stick-type 2 channel radio
3 8
AA-size Batteries
(For Transmitter) 8 pcs.
For proper radio handling, refer to its manual.
AAAA
AAAA
2 2
2 channel & 2 servo radio for R/C models, and battery box.
Battery Box
AAAA
4
AA-size Batteries
(For Receiver) 4 pcs.
If already supplied with the radio,
there is no need to purchase a
battery box separately.
If using a radio you are in possession of, check the dimensions
of its servos against the diagram below.
< Suitable servo dimensions >
With a standard radio
approx. 40mm
approx. 20mm
approx. 36mm
Apply instant glue (CA glue, super glue).
Assemble left and right sides the
same way.
Must be purchased separately!
Tentatively tighten.
Cut off excess.
Drill holes with the specified diameter
(here: 2mm).
Ensure smooth non-binding movement
while assembling.
Pay close attention here!
Assemble in the specified order.
2mm
Cut off shaded portion.
Only supplied with Ready sets.
Must be purchsed separately with other sets.
Put the code through.
Pliers firmly.
Put the code through.
2

2 BEFORE YOU BEGIN (2)
5
The threads are stripped.Overtightened.
4
Types of screws:
Screw
Set ScrewSelf-tapping (TP) Screw
How size of screw is given:
Screw
3mm
12mm
TP
Self-tapping (TP) screws cut threads into the parts when being
tightened. Excessive force may permanently damage parts when
tightening TP screws. It is recommended to stop tightening when
the part is securely attached or when some resistance is felt after
the threaded portion enters the plastic.
This kit contains many screws in and other hardware different metric
sizes and shapes. For your reference, the figures in the manual
show actual sizes. (Some screws are extras.)
CH-2 CH-1
BATT.
RADIO PREPARATION
Transmitter Modification
Set up a radio control system as indicated below.
1
Plug in connectors.
2
Install the AA-size batteries.
3
Extend the transmitter antenna. If not, the
range of the transmitter will not be sufficient!
4
Undo the receiver antenna. If not, the
range of the receiver will not be sufficient!
5
Center all trims. (Transmitter)
6
Switch on. (Transmitter)
7
Switch on. (Receiver)
8
Check that the servos move acc-
ording to your inputs. (Transmitter)
10
Switch off. (Transmitter)
11
Retract the antenna. (Transmitter)
9
Switch off. (Receiver)
Antenna
Connector
Receiver
Connector
Rudder Stick
Rudder Servo
Sail Control Servo
Switch
Battery Box
CH.2
CH.1
BATT
Rudder Trim
Sail Control Stick
Sail Control Trim
Stick for sail control
to open and
close.
For adjusting sail closed
angle.
Rudder Stick
In addition to this page, read the instruc-tion
manual supplied with your radio as well.
For steering (left and
right bends).
CH-2 CH-1
BATT.
CH-2 CH-1
BATT.
Rudder Trim
For adjusting straightline
running.
Sail Control Stick
Sail Control Trim
Battery Cover
Handle
Antenna
Switch
3
Switch the sail control reverse switch
(transmitter).
Modify your transmitter so the sail control stick will remain in any position you moved it to, even when releasing it. For this, remove
the little spring which makes the sail control stick recoil into neutral position. This modification will make sailing much easier. For
more details, refer to the trans-mitter instruction manual.

If you are assembling readyset go
section 12 .
Wenn Sie die Ready-Set-Version
vorliegen haben, fahren Sie mit
Baustufe 12 fort.
Si vous assemblez la version
Readyset aller à la section 12 .
Si usted está montando la versión
readyset, vaya al paso 12 .
Switch
Schalter
Interrupteur
Interruptor
Switch
Schalter
Interrupteur
Interruptor
1
2
2
2
2
2
3
3
3
3
2
1
4
2
3
1
Pay close attention here!
Vorsicht! Wichtiger Hinweis!
Attention! Avis important!
Preste atención.
Come with readyset.
Im Readyset enthalten.
Livré dans la version Readyset.
Incluido en el Readyset.
Apply instant glue (CA glue, super glue).
Verwenden Sie Sekundenkleber.
Collez avec de la colle cyanoacrylate.
Aplique pegamento cianoacrilato.
/ Radio
RC-Anlage / Radio / Equipo de radio
/ Stand
Ständer / Support / Soporte
/ Hull
Rumpf / Coque / Casco

2
1
Connect as per radio instruction manual.
Schließen Sie die Servos gemäß der
Bedienungsanleitung Ihrer RC-Anlage an.
Branchez selon la notice de la radio.
Conecte siguiendo las instrucciones del
manual del equipo de radio.
3x8mm
3x8mm
4
Antenna Cord
Antennenkabel
Cable d'antenne
Cable antena
Receiver
Empfänger
Récepteur
Receptor
Rudder Servo
Ruderservo
Servo de direction
Servo de dirección
Sail Servo
Segelverstellservo
Servo treuil
Servo de velas
LK Treibschraube
Vis autotaraudeuse
Tornillo 3 x 8mm TP
48
5
5
4
Come with readyset.
Im Readyset enthalten.
Livré dans la version Readyset.
Incluido en el Readyset.
TP
8
3 x 8mm
TP Screw
Assemble in the specified order.
Bauen Sie die Stufen in der angegebenen Reihenfolge.
Assemblez dans l’ordre indiqué.
Realice el montaje en el orden señalado.
/ Radio
RC-Anlage / Radio / Equipo de radio
/ Radio
RC-Anlage / Radio / Equipo de radio

2x6mm 2x6mm
20mm
20mm
6
5
Rigging cord
Takelgarn
Fil de gréement
Cabo
7
Use this hole.
Dieses Loch benutzen.
Utilisez ce trou
Utilice este agujero.
7
Cut off.
Abschneiden.
Couper.
Cartar.
6
Rigging cord
Takelgarn
Fil de gréement
Cabo
7
6
Cord Lock
Hülse
Bague de serrage
Cierre
1
2 x 6mm
TP Screw
4
7
Come with readyset.
Im Readyset enthalten.
Livré dans la version Readyset.
Incluido en el Readyset.
Cut off shaded portion.
Schneiden Sie die schraffierten Flächen heraus.
Coupez la partie grisée.
Corte la zona oscurecida.
6
/ Radio
RC-Anlage / Radio / Equipo de radio
/ Radio
RC-Anlage / Radio / Equipo de radio
LK Treibschraube
Vis autotaraudeuse
Tornillo 2 x 6mm TP
01234567891011121314152122232425 1617189120
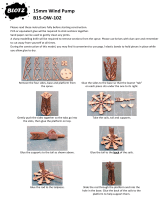
Put the code through.
Seil durchführen, wie dargestellt.
Passer la corde au travers comme indiqué.
Pasar el cabo tal y como muestra el dibujo.

6
6
7
7
Straighten the code.
Seil straffen.
Redresser la corde.
Estirar el cabo.
Mark the code at this place.
Seil hier markieren.
Placer la corde comme indiqué.
Marcar en el lugar indicado.
Set on the marked place.
Hülse aufschieben, wie dargestellt.
Ajuster comme indiqué.
Ajustar tal y como indica el dibujo.
Marked at section 8.
Markierung aus Baustufe 8.
Repéré à la section 8.
Marcado en el paso 8.
7
7
7
Slide to the end.
Hülse bis zum Ende schieben.
Introduire la pièce jusqu'au bout.
Pasar hasta el tope.
7
7
Rigging cord
Takelgarn
Fil de gréement
Cabo
6
Rigging cord
Takelgarn
Fil de gréement
Cabo
Rigging cord
Takelgarn
Fil de gréement
Cabo
Cut off.
Abschneiden.
Couper.
Cartar.
6
7
9
10
8
1
7
1
7
/ Radio
RC-Anlage / Radio / Equipo de radio
/ Radio
RC-Anlage / Radio / Equipo de radio
/ Radio
RC-Anlage / Radio / Equipo de radio
Put the code through.
Seil durchführen, wie dargestellt.
Passer la corde au travers comme indiqué.
Pasar el cabo tal y como muestra el dibujo.
Cord Lock
Hülse
Bague de serrage
Cierre
Cord Lock
Hülse
Bague de serrage
Cierre

1
2
3
174mm
13mm
2mm
Firmly tighten the set screws to the flats.
Kunststoffschraube auf dem abgeflachten Teil festziehen.
Visser fermement les vis jusqu'au méplat.
Apriete los prisioneros firmemente en las partes planas del eje.
11
10
12
13
14
8
9
Use this hole.
Dieses Loch benutzen.
Utilisez ce trou
Utilice este agujero.
Parallel
Parallel
Parallèle
Paralelo
Use this hole.
Dieses Loch benutzen.
Utilisez ce trou
Utilice este agujero.
8
12
Keel
11
Keel Nut
Kielmutter
Ecrou de quille
Tuerca quilla
1
3 x 10mm
Plastic head screw
Kunststoffschraube
Vis à tâte plastique
Tornillo cabeza plástica
1
10
12
Pay close attention here!
Vorsicht! Wichtiger Hinweis!
Attention! Avis important!
Preste atención.
Assemble in the specified order.
Bauen Sie die Stufen in der angegebenen Reihenfolge.
Assemblez dans l’ordre indiqué.
Realice el montaje en el orden señalado.
Tentatively tighten.
Vorläufig festziehen.
Vissez temporairement.
Apriete temporalmente.
/ Radio
RC-Anlage / Radio / Equipo de radio
Cut off shaded portion.
Schneiden Sie die schraffierten Flächen heraus.
Coupez la partie grisée.
Corte la zona oscurecida.
Kiel / Quille / Quilla

Peel off a tape.
Schutzfolie vom Klebeband abziehen.
Retirer l'adhésif.
Pegar cinta adhesiva.
15
For readyset, take off battery holder and set AA batteries.
Setzen Sie 4 Mignon Batterien in den Batteriehalter ein, auf korrekte Polung achten!
Pour la version Readyset, retirer le boitier porte
piles et placer les batteries de type AA.
En la versión readyset, retire el soporte de
baterías e instale pilas/baterías AA.
Peel off a tape.
Batteriehalter mit doppelseitigem Klebeband im Modell sichern.
Retirer l'adhésif.
Pegar cinta adhesiva.
Battery Box
Batteriehalter
Boîtier à piles
Portapilas
Untie the code.
Seil lösen.
Dénouer la corde.
Desatar.
Magic Tape
Klettenband
Bande velcro
Velcro
Plug in.
Anschließen.
Branchez.
Conecte.
Must be purchased separately!
Das Teil ist nicht im Bausatz enthalten!
Doit être acheté séparément!
Debe comprarse por separado!
9
14
13
Come with readyset.
Im Readyset enthalten.
Livré dans la version Readyset.
Incluido en el Readyset.
/ Mast
Mástil / Mast / Mât
/ Radio
RC-Anlage / Radio / Equipo de radio

Wind 4-5 times.
4 - 5 Windungen umwickeln.
Nouer 4 à 5 fois.
Anudar 4-5 veces.
Wind 1 time.
1 Windung umwickeln.
Nouer 1 fois.
Anudar 1 vez.
Set longer cord at front.
Das längere Seil nach vorne legen.
Ajuster la taille de la corde.
Colocar el más largo en la parte delantera.
< >
< When the sails are closed. >
< >
< When the sails are open. >
When the sail control stick are at the bottom position as shown below,
adjust the cord to be 2-3 .
Senderknüppel für das Segel ganz nach unten drücken und das
Segel mit dem Seil auf einen Winkel von 2 - 3 justieren.
Lorsque le manche de contrôle des voiles est en position basse comme
indiqué, ajuster à 2 ou 3 la corde.
Cuando el stick de velas esté en la posición baja, tal y como muestra el dibujo,
ajuste el cabo para que tenga un ángulo de 2-3º
Sail Control Stick
Sail Control Stick
Sail Control Servo
2 3
Sail Control Servo
Sails
Sails
Wind 4-5 times.
4 - 5 Windungen umwickeln.
Nouer 4 à 5 fois.
Anudar 4-5 veces.
16
16
16 16
16
16
16
16
16
10
16
15
Pay close attention here!
Vorsicht! Wichtiger Hinweis!
Attention! Avis important!
Preste atención.
/ Mast
Mástil / Mast / Mât
/ Mast
Mástil / Mast / Mât

Note the direction.
Einbaurichtung beachten.
Notez le sens.
Fíjese en el dibujo.
Push these spots.
An diesen Stellen drücken.
Positionner sur les trous et
pousser pour fixer.
Apretar en los puntos indicados.
Note the direction.
Einbaurichtung beachten.
Notez le sens.
Fíjese en el dibujo.
Taken off at section 2 .
Teile aus Baustufe 2 verwenden.
Pièces retirées à la section 2 .
Desmontados en la sección 2 .
3 3
( )
3
3 3
( )
The decal numbers between brackets are only for the opposite side.
Die Aufkleber in Klammern slnd für die andere Selte.
Les autocollants entre parenthéses sont pour le côté opposé.
Los números entre paréntesis son para el lado opuesto.
Place the decals as shown below.
Bringen Sie die Aufkleber wie unten beschrieben an.
Placez les autocollants comme cl-dessous.
Coloque los adhesivos como muestra el dibujo.
11
18
17
Pay close attention here!
Vorsicht! Wichtiger Hinweis!
Attention! Avis important!
Preste atención.
/ Decals
Aufkleber / Autocollants / Adhesivos
/ Hull
Rumpf / Coque / Casco

The property of a straight sailing yacht to point its bow into the wind- is called “weather
helm”. The property to point its bow away from the wind, is called “lee helm”. Both
properties can be adjusted by tilting the mast back or forth using the rigging cords.
Adjust so the yacht de-monstrates slight “weather helm” properties.
Wind
Weather Helm
Lee Helm
Weather Helm
Lee Helm
B
C
A
Wind
A
Rudder ...... Proceed into wind (toward A)
by tacking (zigzagging).
Sails .......... Keep sails without making
them shiver.
Rudder ..... When bow heads for B, return
rudder to neutral position.
Sails ......... Set sails perpendicular to wind.
Rudder ..... Slowly move rudder to left.
Sails
.......
Maintain sails as they are.
A
Rudder ..... Proceed into wind (toward A)
by tacking (zigzagging).
Sails
.......
Maintain sails without making
them shiver.
Rudder ..... Return rudder to neutral position.
Sails
.......
Slowly open sails without making
them shiver.
Rudder ..... Steer hard to left.
Sails
.......
At the same time, close sails.
Rudder ...... When bow is on course towards C,
return rudder to neutral position.
Sails
........
Maintain sails as they are.
How to control rudder and sail movement
for skillful sailing.
45
The closest possible heading into the wind is a little
over 45 to either side of the wind. Any closer and
the sails will shiver (flap uselessly).
12
MAST ADJUSTMENT
FUNDAMENTALS OF SAILING
With R/C yachts, discover a new
world of pleasure. Whether you
sail your yacht on ponds, lakes,
rivers or elsewhere, take precau-
tionary measures to avoid acci-
dents.
Warning!
Avoid windy and stormy weather since it is impossible
to sail your yacht.

OFF
OFF ON
OFF
ON
OPERATING YOUR MODEL SAFELY
Before Running
Kyosho R/C models can move at
high speed and therefore cause
serious injury to people or damage
to property. It is your responsibility
to operate your model safely.
For handling the radio properly,
refer to its instruction manual.
Ensure all rigging cords are taut
and adjusted as per instruction
manual.
If the yacht begins to move by it-
self, somebody else is on your
frequency. Do not operate it under
such conditions for it may go out of
control.
Fully extend
the transmitter
antenna.
Switch on the transmitter.
Switch on the receiver.
While Running
Ensure the yacht turns as per
transmitter input. (rudder control
stick)
Ensure the sails open and close
as per your transmitter inputs.
(sail control stick)
After Running
OFF
Switch off the receiver.
OFF
Switch off the transmitter.
Cautions for Safety
ON
ON
OFF
Never sail your yacht near people
or in places with strong currents!
Never sail your yacht in unsafe
places!
Should water come inside the
yacht, wipe it up and let dry
the inside.
With light winds or your yacht run-
ning at faster speed, close the
sails.
Put the sail boat to water, expos-
ing its sails to the wind blowing
from the side.
Never swim after your yacht to
retrieve it! This is very dangerous
to life!
After sailing, wipe the hull dry and
regrease all moving and rotating parts.
With strong winds or your yacht
running at low speed, open the
sails.
Kinds of sailing
270
45 45
Wind
It is impossible to sail
directly into the wind.
ABEAM ABEAM
RUNNING
QUARTERQUARTER
CLOSE HAULEDCLOSE HAULED
DANGER
Wind
Starboard Tack: sails are
on the left side.
Port Tack: sails are on
the right side.
13
Wind
Wind

EXPLODED VIEW (1)
16
2x6mmTP
7
7
FO14
FO14
7
FO14
7
FO14
7
FO14
7
FO14
7
FO14
7
FO14
7
FO14
7
FO14
7
FO14
7
FO14
7
FO14
6
FO14 (85cm)
6
FO14 (35cm)
6
FO14 (15cm)
6
FO14
(40cm)
6
FO14
(35cm)
6
FO14
(35cm)
6
FO14 (20cm)
6
FO14 (110cm)
6
FO14 (15cm)
6
FO14
(90cm)
FO04
16
FO04
16
FO04
16
FO04
16
FO04
46
FO13
35
FO05
37
FO05
38
FO05
46
FO13
44
FO08
46
FO13
46
FO13
46
FO13
46
FO13
7
FO14
46
FO13
45
FO12
45
FO12
45
FO12
45
FO12
45
FO12
45
FO12
45
FO12
45
FO12
45
FO12
23
FO04
40
FO05
35
FO05
16
FO04
2x6mm
TP
2x6mm
TP
2x6mm
TP
2x6mmTP
23
FO04
42
FO07
41
FO07
47
FO10
39
FO05
39
FO05
46
FO13
9
FO10
2x6mmTP
23
FO04
2x6mmTP
14

34
EXPLODED VIEW (2)
EXPLODED VIEW (3)
2x6mmTP
1
FO09
1
FO09
2
FO09
2
FO09
2
FO09
2
FO09
2
FO09
2
FO09
3
FO09
3
FO09
FO02
3
FO09
3
FO09
33
FO02
34
FO02
34
FO02
34
FO02
31 34
FO02
34
FO02
FO02
FO02
34
FO02
33
FO02
33
FO04
25
FO04
24
FO04
24
FO04
24
FO04
26
FO04
27
FO02
33
FO04
22
FO02
33
FO02
32
FO02
33
2x6mmTP
2x6mmTP
2x6mmTP
2x6mmTP
2x6mmTP
2x6mmTP
FO04
25
FO04
25
2x10mmTP
15

EXPLODED VIEW (4)
2x6mmTP
2x6mmTP
6
FO14
4
FO10
6
FO14
9
FO10
8
FO10
5
FO06
(125cm)
6
FO14 (45cm)
30
FO06
50
FO10
19
FO01
20
FO04
20
FO04
28
FO06
11
FO06
10
DL22
29
FO06
28
FO06
20
FO04
20
FO04
21
FO04
21
FO04
21
FO04
23
FO04
12
FO15
14
FO03
18
FO03
17
FO03
13
FO03
15
90497
22
FO04
50
FO10
48
FO06
3x8mmTP
3x8mmTP
3x8mmTP
3x8mmTP
2x6mmTP
2x6mmTP
2x6mmTP
2x10mmTP
2x6mmTP
2x6mmTP
2x6mmTP
2x10mmTP
2x10mmTP
2x8mmTP
22
FO04
7
FO14
7
FO14
2x6mmTP
2x6mmTP
2x6mmTP
2x6mmTP
2x6mmTP
16

1
6
6
6
2
7
7
7
7
3
3
3
3
3
3
5
4
Untie the code.
Seil lösen.
Dénouer la corde.
Desatar.
/ How to remove the mast / So demontieren Sie den Mast / Comment retirer le mât / Desmontaje del mástil
2x6mm
2x6mm
Turn 90 .
90 drehen.
Tourner de 90 .
Girar 90º.
Pull off.
abziehen.
Retirer.
Quitar.
17
Assemble in the specified order.
Bauen Sie die Stufen in der angegebenen Reihenfolge.
Assemblez dans l’ordre indiqué.
Realice el montaje en el orden señalado.

Some of the parts included are not available as spare parts.
Purchase optional parts instead.
18
SPARE PARTS
*FOR JAPANESE MARKET ONLY.
/