Page is loading ...

SPECIFICATIONS ARE SUBJECT TO CHANGE WITHOUT NOTICE.
No.40610
LENGTH : 900 mm
LENGTH : 900 mm
OPERATING YOUR
MODEL SAFELY
19
RADIO PREPARATION
3
BEFORE YOU BEGIN
2 3
ASSEMBLY
18
TRANSMITTER MODIFICATION
MAST ADJUSTMENT
FUNDAMENTALS OF SAILING
4 17
SPARE PARTS
OPTIONAL PARTS
20
REQUIRED FOR OPERATION
TOOLS REQUIRED
2
THE FINEST RADIO CONTROL MODELS
R
INSTRUCTION MANUAL
SAFETY PRECAUTIONS
This radio control model is not a toy!
First-time builders should seek advice from people having building
experience in order to assemble the model correctly and to produce
its performance to full extent.
Assemble this kit only in places out of childrenÕs reach!
Take enough safety precautions prior to operating this model.
You are responsible for this modelÕs assembly and safe operation!
Always keep this instruction manual ready at hand for quick
reference, even after completing the assembly.
Before commencing assembly, please read these instructions thoroughly!
© 1999 KYOSHO

2
REQUIRED FOR OPERATION
2
Stick-type 2 channel radio
3 8
AA-size Batteries
(For Transmitter) 8 pcs.
For proper radio handling, refer to its manual.
TOOLS REQUIRED
2 2
2 channel radio for R/C models with 2 servos, and battery box.
Ballast
Battery Box
Y-8
ÒBallastÓ
4
AA-size Batteries
(For Receiver) 4 pcs.
If already supplied with the radio,
there is no need to purchase a battery
box separately.
Scissors
Sharp Hobby Knife
Phillips Screwdriver (S) (L)
Needle Nose Pliers
Awl
Wire Cutters
Instant Glue
With a standard sail servo
Epoxy Glue
Cross Wrench
1
Read through the instruction manual before starting to build, so youÕll have an overall idea of what to do.
2
Check all parts. If you find any defective or missing parts, contact your local dealer or our Kyosho Distributor.
3
This kit contains screws of different metric sizes and shapes. (Some screws are extra.) For your easier identification of them, the figures in the
manual show actual sizes.
4
How to understand the figures.
6
Excessive force may permanently damage parts when tightening self-tapping screws. It is
recommended to stop tightening when some resistance is felt after the threaded portion
enters the plastic or as soon as the part to be attached is securely attached.
3 x 15mm
Screw
3mm
Nut ¥ Washer
15mm
3mm
3mm
Ordinary Screws TP (Self-tapping) Screw
Fine Thread Coarse Thread
Some of them have pointed tips.
The threads are strippedOvertightened
Correct
Wrong
Sizes of screws
5
1 BEFORE YOU BEGIN (1)
Wood Glue
Epoxy A
Epoxy B
( : 9.3Kg~) ¥¥¥ 1
Sail servo
(Output torque : 9.3Kg~) ¥¥¥ 1
The use of only one channel on your 2ch radio is sufficient enough.
However, the purchase of a sail servo is recommended.

RADIO PREPARATION
Set up the radio as per explanations below.
Install the 4 AA-size batteries into the battery box.
1
Extend the antenna of the transmitter.
2
3
4
Unwind the antenna of the receiver.
5
Center the trims.
6
Switch on the transmitter.
7
Switch on the receiver.
8
Ensure the servos move as per your transmitter inputs.
9
When the control sticks on the transmitter are in neutral,
the servo horns must be in neutral as well. (See left)
10
10
8
5
4
3
1
2
START
FINISH
7
6
9
Switch off the receiver.
11
Switch off the transmitter.
Retract the antenna of the transmitter.
12
13
If the servo horns are not in neutral, unscrew the servo
horns and adjust their neutral position.
Install the 8 AA-size batteries into the transmitter.
After installing the batteries, connect the battery box.
3
7
2 BEFORE YOU BEGIN (2)
Symbols used throughout the instruction manual, comprise:
Do not overlook this symbol!
Beachten Sie dieses Symbol!
Notez ce symbole!
ÁAviso! Preste atenci—n en este paso.
Warning!
Do not do that!
Nicht tun! Verboten!
D fense de faire!
No realice esa operaci—n!
Assemble in the specified order.
Bauen Sie die Stufen in der angegebenen Reihenfolge.
Assemblez dans lÕordre indiqu .
Realice el montaje en el orden se–alado.
Pay close attention here!
Vorsicht! Wichtiger Hinweis!
Attention! Avis important!
Preste atenci—n.
Assemble as many times as indicated (here: twice).
Arbeitsschritt sooft wie angegeben wiederholen (hier: zweimal).
Assemblez autant de fois quÕindiqu (ici: deux fois).
Repita el proceso las veces indicadas.
2mm
Drill holes with the specified diameter.
Lšcher bohren im angegebenen ¯.
Percez des trous dans le ¯ indiqu .
Perfore agujeros con el di‡metro se–alado.
2mm
Ensure smooth non-binding movement while assembling.
Das Teil mu§ sich leicht bewegen lassen.
La pi ce doit pouvoir pivoter autour de la vis.
Asegœrese que la pieza se mueve libremente.
Make a knot.
Machen Sie einen Knoten.
Faites un nÏud.
Realizar un nudo.
30mm
Cut off shaded portion.
Schneiden Sie die schraffierten FlŠchen heraus.
Coupez la partie gris e.
Corte la zona oscurecida.
x2
Apply epoxy glue.
Verwenden Sie 2-Komponentenkleber.
Collez avec de la colle poxy.
Aplique pegamento epoxy.
Apply instant glue (CA glue, super glue).
Verwenden Sie Sekundenkleber.
Collez avec de la colle cyanoacrylate.
Aplique pegamento cianoacrilato.
Assemble left and right sides the same way.
Beide Seiten auf die gleiche Weise bauen.
Assemblez les deux c™t s de la m me fa on.
Realice en montaje de igual forma para ambos lados.
Must be purchased separately!
Teil ist nicht im Bausatz enthalten.
Doit tre achet s parement.
Debe comprarse por separado.

1
Stand
StŠnder
Support
Soporte
2
3
Hull
Rumpf
Coque
Casco
4
8mm
7mm
50mm
1mm
x8
40mm
1
1
2
2 ( 3 )
2 ( 3 )
4
4
3
4
4
10mm
4mm
x4
5
4mm
4 x 40 mm
4 x 10 mm
4 x 10 mm
4mm
4mm
4mm
6
6
7
7
4
Nail
Nagel
Clou
Clavo
16
4 x 40mm
Screw
RK Schraube
Vis ˆ t te ronde
Tornillo 4 x 40mm
4 x 10mm TP
TP Screw
LK Treibschraube
Vis autotaraudeuse
Tornillo 4 x 10mm TP
4mm
Nut
LK Treibschraube
Vis autotaraudeuse
Tornillo 4 x 40mm
4mm
Washer
Scheibe
Rondelle
Arandela 4mm
4
2
2
8
Assemble as many times as indicated (here: twice).
Arbeitsschritt sooft wie angegeben wiederholen (hier: zweimal).
Assemblez autant de fois quÕindiqu (ici: deux fois).
Repita el proceso las veces indicadas.
2mm
Drill holes with the specified diameter.
Lšcher bohren im angegebenen ¯.
Percez des trous dans le ¯ indiqu .
Perfore agujeros con el di‡metro se–alado.
2mm
Cut off shaded portion.
Schneiden Sie die schraffierten FlŠchen heraus.
Coupez la partie gris e.
Corte la zona oscurecida.
x2
Apply epoxy glue.
Verwenden Sie 2-Komponentenkleber.
Collez avec de la colle poxy.
Aplique pegamento epoxy.
Stand
StŠnder
Support
Soporte

4
Keel
Kiel
Quille
Quilla
5
Hull
Rumpf
Coque
Casco
6
Hull
Rumpf
Coque
Casco
5
The amount of ballast depends on whether or not you are using a sail servo.
Die benštigte Menge an Ballast hŠngt davon ab, ob Sie ein Segel-verstell-servo
benutzen oder nicht.
La quantit de lest ˆ utiliser d pend si vous utilisez un servo treuil ou pas.
La cantidad de contrapeso depende si va a utilizar un servo de velas.
Y-8
ÒBallastÓ
ÒBallastÓ
ÒLestÓ
ÒContrapesoÓ
with sail servo
mit Segelverstellservo
avec servo treuil
con servo de velas
without sail servo
ohne Segelverstellservo
sans servo treuil
sin servo de velas
2.0kg
(15mm)
90¡
1.7kg
(30mm)
Wood Glue
Holzkleber
Colle ˆ bois
Pegamento para madera
W-02
W-01
W-01
W-03
W-03
4
W-07
W-08
W-07
W-07
W-08
W-08
W-09
W-09
W-10
8
8
8
8
W-12
W-11
Eyehook
Ringšse
Piton ˆ visser
Tornillo
S125
With a Futaba S125 sail servo:
Mit einem Futaba S125 Segelverstell--
servo:
Avec un servo treuil Futaba S125:
Con servo de velas Futaba S125:
W-01 W-02
Pay close attention here!
Vorsicht! Wichtiger Hinweis!
Attention! Avis important!
Preste atenci—n.
Apply epoxy glue.
Verwenden Sie 2-Komponentenkleber.
Collez avec de la colle poxy.
Aplique pegamento epoxy.
Must be purchased separately!
Teil ist nicht im Bausatz enthalten.
Doit tre achet s parement.
Debe comprarse por separado.

7
Hull
Rumpf
Coque
Casco
8
Hull
Rumpf
Coque
Casco
6
9
Hull
Rumpf
Coque
Casco
x2
W-06
W-05
W-05
A
A=AÕ
AÕ
W-13
1
9
Grommet
TakelgarnfŸhrung
Sortie dÕ coute
Tope de goma
9
Waterproof the plywood parts by painting
them.
Lackieren Sie die Holzteile zum Schutz
gegen Wasser.
Peignez les pi ces en bois pour pro-tection
contre lÕeau.
Pinte las piezas de madera con pintura
resistente al agua.
Pay close attention here!
Vorsicht! Wichtiger Hinweis!
Attention! Avis important!
Preste atenci—n.
Assemble as many times as indicated (here: twice).
Arbeitsschritt sooft wie angegeben wiederholen (hier: zweimal).
Assemblez autant de fois quÕindiqu (ici: deux fois).
Repita el proceso las veces indicadas.
x2
Apply epoxy glue.
Verwenden Sie 2-Komponentenkleber.
Collez avec de la colle poxy.
Aplique pegamento epoxy.
Apply instant glue (CA glue, super glue).
Verwenden Sie Sekundenkleber.
Collez avec de la colle cyanoacrylate.
Aplique pegamento cianoacrilato.

10
Rudder
Ruder
Gouvernail
Timon
7
12
11
Rudder Linkage
RudergestŠnge
Tringlerie de direction
Varillaje de direcci—n
Rudder
Ruder
Gouvernail
Timon
90¡90¡
11
10
A-1
1
11
Rudder Pipe
RuderhŸlse
Tuyau de gouvernail
Tubo de timon
90¡90¡
2mm
3 x 8mm TP
TP Screw
LK Treibschraube
Vis autotaraudeuse
Tornillo 3 x 8mm TP
1
Snap Ring
Schnappring
Manille rapide
Clip
1
12
O
O-ring
O-Ring
Joint
Junta
1
3 x 8mm
Screw
RK Schraube
Vis ˆ t te ronde
Tornillo 3 x 8mm
1
3mm
Washer
Scheibe
Rondelle
Arandela 3mm
1
W-04
3 x 8mm
(TP)
3 x 8mm
3mm
13
12
14
10
10
10
4~5mm
15
16
13
14
Do not do that!
Nicht tun! Verboten!
D fense de faire!
No realice esa operaci—n!
Pay close attention here!
Vorsicht! Wichtiger Hinweis!
Attention! Avis important!
Preste atenci—n.
Ensure smooth non-binding movement while assembling.
Das Teil mu§ sich leicht bewegen lassen.
La pi ce doit pouvoir pivoter autour de la vis.
Asegœrese que la pieza se mueve libremente.
Apply epoxy glue.
Verwenden Sie 2-Komponentenkleber.
Collez avec de la colle poxy.
Aplique pegamento epoxy.

13
Radio
RC-Anlage
Radio
Equipo de radio
Radio
RC-Anlage
Radio
Equipo de radio
14
15
8
Radio
RC-Anlage
Radio
Equipo de radio
90¡90¡
13mm
40mm
Double-sided Tape
Doppelseitiges Klebeband
Adh sif ˆ double face
Cinta adhesiva de doble cara
17
17
Rudder Servo
Ruderservo
Servo de direction
Servo de direcci—n
Mark
Markierung
Marque
Marca
18
Mark
Markierung
Marque
Marca
Sail Servo
Segelverstellservo
Servo treuil
Servo de velas
Rubber band
Gummiband
Elastic
Goma el‡stica
90¡90¡
Pay close attention here!
Vorsicht! Wichtiger Hinweis!
Attention! Avis important!
Preste atenci—n.
Must be purchased separately!
Teil ist nicht im Bausatz enthalten.
Doit tre achet s parement.
Debe comprarse por separado.
Cut off shaded portion.
Schneiden Sie die schraffierten FlŠchen heraus.
Coupez la partie gris e.
Corte la zona oscurecida.

16
18
Cabin
Deck
Pont
Cabina
17
Hull
Rumpf
Coque
Casco
9
2mm
Receiver
EmpfŠnger
R cepteur
Receptor
Battery Box
Batteriehalter
Bo”tier ˆ piles
Portapilas
Switch
Schalter
Interrupteur
Interruptor
Switch
Schalter
Interrupteur
Interruptor
A-2
19
18
Decal (margin)
Aufkleber (Rand)
Autocollant (marge)
Adhesivo (borde)
Antenna Cord
Antennenkabel
Cable d'antenne
Cable antena
1mm
2
.
5
mm
1mm
1mm
3mm
1mm
2
.
5
mm
2
.
5
mm
3mm
4mm
4mm
3mm
3mm
3mm
Radio
RC-Anlage
Radio
Equipo de radio
Rubber band
Gummiband
Elastic
Goma el‡stica
Pay close attention here!
Vorsicht! Wichtiger Hinweis!
Attention! Avis important!
Preste atenci—n.
2mm
Drill holes with the specified diameter.
Lšcher bohren im angegebenen ¯.
Percez des trous dans le ¯ indiqu .
Perfore agujeros con el di‡metro se–alado.
2mm
Assemble left and right sides the same way.
Beide Seiten auf die gleiche Weise bauen.
Assemblez les deux c™t s de la m me fa on.
Realice en montaje de igual forma para ambos lados.
Must be purchased separately!
Teil ist nicht im Bausatz enthalten.
Doit tre achet s parement.
Debe comprarse por separado.

2 x 8mm TP
TP Screw
RK Treibschraube
Vis autotaraudeuse
Tornillo 2 x 8mm TP
8
3 x 8mm TP
TP Screw
LK Treibschraube
Vis autotaraudeuse
Tornillo 3 x 8mm TP
8
2 x 8mm TP
TP Screw
RK Treibschraube
Vis autotaraudeuse
Tornillo 2 x 8mm TP
14
A-8
A-7
A-6
B-2
B-1
A-6 A-8
B-1 B-2
20
2 x 8mm
A-4 A-5
B-1 B-4
2 x 8mm
2 x 8mm
3 x 8mm
3 x 8mm
2 x 8mm
2 x 8mm
A-7
A-5
B-3
B-4
A-3
B-4
B-1
A-4
1mm
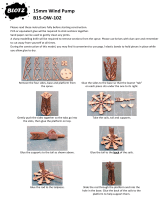
15 cm x 1
Rigging cord
Takelgarn
Fil de gr ement
Cabo
21
Make a knot.
Machen Sie einen Knoten.
Faites un nÏud.
Realizar un nudo.
Apply instant glue (CA glue, super glue).
Verwenden Sie Sekundenkleber.
Collez avec de la colle cyanoacrylate.
Aplique pegamento cianoacrilato.
Assemble left and right sides the same way.
Beide Seiten auf die gleiche Weise bauen.
Assemblez les deux c™t s de la m me fa on.
Realice en montaje de igual forma para ambos lados.
19
Cabin
Deck
Pont
Cabina
20
Hull
Rumpf
Coque
Casco
21
Hull
Rumpf
Coque
Casco
10
25242322212019181716151413121110
9876543210
cm
2mm
Drill holes with the specified diameter.
Lšcher bohren im angegebenen ¯.
Percez des trous dans le ¯ indiqu .
Perfore agujeros con el di‡metro se–alado.
2mm

22
Cabin
Deck
Pont
Cabina
23
24
11
Cabin
Deck
Pont
Cabina
15cm x 4
Rigging cord
Takelgarn
Fil de gr ement
Cabo
21
A-10
A-9
A-10
A-9
3 x 8mm
3 x 8mm TP
TP Screw
LK Treibschraube
Vis autotaraudeuse
Tornillo 3 x 8mm TP
3
18
22
Cabin
Deck
Pont
Cabina
Rubber band
Gummiband
Elastic
Goma el‡stica
18
Rubber band
Gummiband
Elastic
Goma el‡stica
Pay close attention here!
Vorsicht! Wichtiger Hinweis!
Attention! Avis important!
Preste atenci—n.
Make a knot.
Machen Sie einen Knoten.
Faites un nÏud.
Realizar un nudo.
Assemble left and right sides the same way.
Beide Seiten auf die gleiche Weise bauen.
Assemblez les deux c™t s de la m me fa on.
Realice en montaje de igual forma para ambos lados.

25
Hull
Rumpf
Coque
Casco
26
Hull
Rumpf
Coque
Casco
27
Hull
Rumpf
Coque
Casco
12
3 x 25mm
Screw
LK Schraube
Vis
Tornillo 3 x 25mm
2
3mm
Nut
Mutter
Ecrou
Tuerca 3mm
2
4mm
23
A-11
Mark
Markierung
Marque
Marca
Mark
Markierung
Marque
Marca
3 x 25mm
3mm
1
1
2
2
2
5
5
3
4
3
1
1mm
4
1mm
24
25
26
2 x 8mm
2 x 8mm
2 x 8mm
2 x 8mm
A-12
A-12
A-12
2 x 8mm TP
TP Screw
RK Treibschraube
Vis autotaraudeuse
Tornillo 2 x 8mm TP
32
70cm x 4
Rubber Rope
Gummischnur
Corde lastique
Cuerda el‡stica
27
5cm x 8
5cm
Rigging cord
Takelgarn
Fil de gr ement
Cabo
21
21
27
Assemble in the specified order.
Bauen Sie die Stufen in der angegebenen Reihenfolge.
Assemblez dans lÕordre indiqu .
Realice el montaje en el orden se–alado.
2mm
Drill holes with the specified diameter.
Lšcher bohren im angegebenen ¯.
Percez des trous dans le ¯ indiqu .
Perfore agujeros con el di‡metro se–alado.
2mm
Apply instant glue (CA glue, super glue).
Verwenden Sie Sekundenkleber.
Collez avec de la colle cyanoacrylate.
Aplique pegamento cianoacrilato.

31
Sails
Segel
Voiles
Velas
Sails
Segel
Voiles
Velas
Sails
Segel
Voiles
Velas
32
33
14
80cm x 2
135cm x 2
150cm x 1
160cm x 1
Rigging cord
Takelgarn
Fil de gr ement
Cabo
21
13
Snap Ring
Schnappring
Manille rapide
Clip
5
13
36
135cm
150cm
80cm
160cm
x5
10cm x 1
160cm x 1
Rigging cord
Takelgarn
Fil de gr ement
Cabo
Rigging cord
Takelgarn
Fil de gr ement
Cabo
21
40cm x 1
50cm x 1
40cm x 1
Rigging cord
Takelgarn
Fil de gr ement
Cabo
21
21
37
37
10cm
50cm
50mm50mm
21
21
38
21
21
21
160cm
21
21
36
36
Pay close attention here!
Vorsicht! Wichtiger Hinweis!
Attention! Avis important!
Preste atenci—n.
Assemble as many times as indicated (here: twice).
Arbeitsschritt sooft wie angegeben wiederholen (hier: zweimal).
Assemblez autant de fois quÕindiqu (ici: deux fois).
Repita el proceso las veces indicadas.
Make a knot.
Machen Sie einen Knoten.
Faites un nÏud.
Realizar un nudo.
x2
Apply instant glue (CA glue, super glue).
Verwenden Sie Sekundenkleber.
Collez avec de la colle cyanoacrylate.
Aplique pegamento cianoacrilato.

34
35
36
15
Sails
Segel
Voiles
Velas
55mm
85mm
60mm
70mm
160mm
60mm 55mm 70mm 85mm 85mm
39
36
Adjust the tension with
36
.
Stellen Sie die Spannung
mit
36
ein.
Ajustez la tension avec
36
.
Ajuste la tensi—n con
36
.
21
37
Pull at
21
37
and make a knot.
Ziehen Sie an
21
37
und machen
Sie einen Knoten.
Tirez sur
21
37
et faites un nÏud.
Tire de
21
37
y haga un nudo.
21
21
37
37
Sails
Segel
Voiles
Velas
Sails
Segel
Voiles
Velas
39
39
39
39
for operation
zur Bedienung
pour op ration
cuando navegue
for display
zum Ausstellen
pour d coration
como modelo decorativo
31
31
32
160mm
2137
32
36
Pay close attention here!
Vorsicht! Wichtiger Hinweis!
Attention! Avis important!
Preste atenci—n.

40
Decals
Aufkleber
Autocollants
Adhesivos
41
Hull
Rumpf
Coque
Casco
17
3 x 8mm TP
TP Screw
LK Treibschraube
Vis autotaraudeuse
Tornillo 3 x 8mm TP
2
( 2 )1 ( 4 )3 ( 6 )5
WATER-PROOF
HATCH
7
22
< >
< When the sails are closed. >
< Die Segel sind dichtgeholt. >
< Les voiles sont ferm s. >
< Velas cerradas. >
< >
< When the sails are open. >
< Die Segel sind gešffnet. >
< Les voiles sont ouverts. >
< Velas abiertas. >
Operate the control sticks (transmitter)
when adjusting.
Bedienen Sie die RC-Anlage beim
Einstellen.
Manipulez les contr™les lors de
lÕajustement.
Mueva los mandos de la emisora
mientras realiza los ajustes.
Sail Control Stick
Hebel des Segelverstellservos
Manche du servo treuil
Stick de velas
Sail Control Stick
Hebel des Segelverstellservos
Manche du servo treuil
Stick de velas
Sail Control Servo
Segelverstellservo
Servo treuil
Servo de velas
15¡
Sail Control Servo
Segelverstellservo
Servo treuil
Servo de velas
Sails
Segel
Voiles
Velas
3 x 8mm
3 x 8mm
B-9
B-8
24
Pay close attention here!
Vorsicht! Wichtiger Hinweis!
Attention! Avis important!
Preste atenci—n.
9
11
16
(
17
)
KYOSHO RADIO CONTROLLED
SAILING YACHT SERIES
LENGTH: 900mm
BEAM: 225mm
WEIGHT: 3600-4200g
SAFETY PRECAUTIONS
First-time builders should seek advice from
people having building experience in order
to assemble the model correctly and to
produce its performance to full extent.
This radio control model is not a toy.
CAUTION
KYOSHO RADIO CONTROLLED
SAILING YACHT SERIES
LENGTH: 900mm
BEAM: 225mm
WEIGHT: 3600-4200g
SAFETY PRECAUTIONS
First-time builders
should seek advice
This radio control model is not a toy.
CAUTION
10
8
2112
13
15
14
201918

Modify your transmitter so the sail control stick will remain in any position you moved it to, even when releasing it. For this,
remove the little spring which makes the sail control stick recoil into neutral position. This modification will make sailing much
easier. For more details, refer to the trans-mitter instruction manual.
The property of a straight sailing yacht to point its bow into the wind- is called Òweather
helmÓ. The property to point its bow away from the wind, is called Òlee helmÓ. Both
properties can be adjusted by tilting the mast back or forth using the rigging cords.
Adjust so the yacht de-monstrates slight Òweather helmÓ properties.
Wind
Weather Helm
Lee Helm
Weather Helm
Lee Helm
B
C
A
Wind
A
Rudder ...... Proceed into wind (toward A)
by tacking (zigzagging).
Sails .......... Keep sails without making
them shiver.
Rudder ..... When bow heads for B, return
rudder to neutral position.
Sails ......... Set sails perpendicular to wind.
Rudder ..... Slowly move rudder to left.
Sails
.......
Maintain sails as they are.
A
Rudder ..... Proceed into wind (toward A)
by tacking (zigzagging).
Sails
.......
Maintain sails without making
them shiver.
Rudder ..... Return rudder to neutral position.
Sails
.......
Slowly open sails without making
them shiver.
Rudder ..... Steer hard to left.
Sails
.......
At the same time, close sails.
Rudder ...... When bow is on course towards C,
return rudder to neutral position.
Sails
........
Maintain sails as they are.
How to control rudder and sail movement
for skillful sailing.
45
The closest possible heading into the wind is a little
over 45¡ to either side of the wind. Any closer and
the sails will shiver (flap uselessly).
18
Transmitter Modification
MAST ADJUSTMENT
FUNDAMENTALS OF SAILING
With R/C boats, discover a new
world of pleasure. Whether you
sail your yacht on ponds, lakes,
rivers or elsewhere, take precau-
tionary measures to avoid acci-
dents.
Warning!
Avoid windy and stormy weather since it is impossible
to sail your yacht.

OFF
OFF ON
OFF
ON
OPERATING YOUR MODEL SAFELY
Before Running
Kyosho R/C models can move at
high speed and therefore cause
serious injury to people or damage
to property. It is your responsibility
to operate your model safely.
For handling the radio properly,
refer to its instruction manual.
Ensure all rigging cords are taut
and adjusted as per instruction
manual.
If the yacht begins to move by it-
self, somebody else is on your
frequency. Do not operate it under
such conditions for it may go out of
control.
Fully extend
the transmitter
antenna.
Switch on the transmitter.
Switch on the receiver.
While Running
Ensure the yacht turns as per
transmitter input. (rudder control
stick)
Ensure the sails open and close
as per your transmitter inputs.
(sail control stick)
After Running
OFF
Switch off the receiver.
OFF
Switch off the transmitter.
Cautions for Safety
ON
ON
OFF
Never sail your yacht near people
or in places with strong currents!
Never sail your yacht in unsafe
places!
Should water come inside the
yacht, wipe it up and let dry
the inside.
With light winds or your yacht run-
ning at faster speed, close the
sails.
Put the sail boat to water, expos-
ing its sails to the wind blowing
from the side.
Never swim after your yacht to
retrieve it! This is very dangerous
to life!
After sailing, wipe the hull dry and
regrease all moving and rotating
parts.
With strong winds or your yacht
running at low speed, open the
sails.
Kinds of sailing
270¡
45¡ 45¡
Wind
It is impossible to sail
directly into the wind.
ABEAM ABEAM
RUNNING
QUARTERQUARTER
CLOSE HAULEDCLOSE HAULED
DANGER
Wind
Starboard Tack: sails are
on the left side.
Port Tack: sails are on
the right side.
19
Wind
Wind
/