
N C
M Y
GB
INTRODUCTION
BEFORE STARTING
1. Remove the cardboard and accessories from inside the oven.
2. Clean t he ho b.
3. The first time you use the oven heat it at the maximum setting for about two hours to eliminate odours and fumes
due to the protective grease.
ROUTINE USE
Hob
1. Turn the knob to the required setting.
2. To switch off, turn the knob to “0”.
Oven
1. Arrange the food in the oven.
2. Select the required cooking function.
3. Select the temperature.
To get the most out of your new appliance, be sure to read the instructions in this booklet.
29
29

N C
M Y
CONTENTSGB
THE APPLIANCE AND ITS COMPONENTS Page 31
CONTROL PANEL Page 31
BEFORE STARTING Page 32
GENERAL PRECAUTIONS AND RECOMMENDATIONS Page 32
USING THE GLASS-CERAMIC HOB Page 33
USING THE OVEN Page 35
USING THE ELECTRONIC PROGRAMMER Page 42
CLEANING AND MAINTENANCE Page 46
TROUBLE-SHOOTING GUIDE Page 48
AFTER-SALES SERVICE Page 48
INSTALLATION Page 49
TABLES Page 51
30
30

N C
M Y
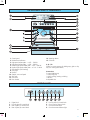
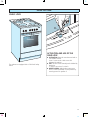
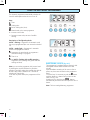
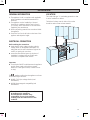
THE APPLIANCE AND ITS COMPONENTS
1. Control panel
2. Residual heat indicators
3. High-speed radiant plate – ø 145 – 1200 W
4. High-speed radiant plate – ø 180 – 1800 W
5. Double High-speed radiant plate – Oval – 1800 W
6. Double High-speed radiant plate – ø 210 – 2100 W
7. Grill elements (self-cleaning)
8. Oven light
9. Fat filter
10. Catalytic oven wall panel
11. Side racks
12. Oven door
13. Door handle
14. Warming drawer
15. Child lock
A, B, C, D:
Guides or runner supports for baking trays, grids or drip
tray (see cooking time tables)
Accessories:
2 enamel baking trays
1 enamel drip tray
1 grid for grilling, roasting or baking
1 fat filter
4 adjustable feet
CONTROL PANEL
1. Digital clock
2. Front lh plate (6) control knob
3. Rear lh plate (5) contro l knob
4. Rear rh plate (4) control knob
5. Front rh plate (3) control knob
6. Oven function selector knob
7. Oven thermostat knob
8. Oven thermostat indicator light
31
31

N C
M Y
BEFORE STARTING
1. Packaging materials (plastic film, expanded
polystyrene, etc.) are potentially dangerous and
must be kept out of the reach of children.
2. The packaging materials can be recycled, as
confirmed by t he symbol
.
3. Make sure the appliance has not been damaged
during transport and that the oven door closes
correctly.
4. Installation and electrical connection of the appliance
must be entrusted to skilled personnel in
accordance with the instructions supplied by the
manufacturer and in compliance with established
safety standards.
5. Remove packaging residues from inside and outside
the appliance. Remove the accessories. Keep
cardboard and plastic protective packages in a safe
place for future use, or dispose of them properly.
6. Glass-ceramic hob
x
Clean thoroughly with a clean damp cloth and a
drop of washing-up liq uid. Rinse with clean water
and dry with a clean cloth.
7. Oven
x
Empty the oven and close the door. Heat the
oven at the maximum temperature setting for
around two hours to eliminate the odour of
grease and f umes fr om the manufacturing
process. Make sure that the kitchen is well
ventilated and do not remain in t he roo m during
this process.
x
Clean the ove n and accessor ies with war m water
and washing-up liquid.
GENERAL PRECAUTIONS AND RECOMMENDATIONS
x
During and after use of the oven, certain parts will
become very hot (e.g. the oven door inspection
window). Do not t ouch hot p arts.
x
Keep children well away from the appliance
while it is in use.
x
Fire risk! Do not store flammable material in the
oven, above the glass ceramic hob and in the
accessory drawer.
x
Make sure that electrical cables connecting other
appliances near the co oker canno t come i nto
contactwiththehoborbetrappedintheoven
door.
x
Do not line the oven walls with aluminium foil. Do
not place baking trays or the drip tray on the floor
of the oven chamber.
x
Do not allow heavy or sharp objects to drop on the
glass ceramic hob. If the hob is cracked or otherwise
damaged by falling objects etc., disconnect the
electrical power cord and call Customer Service.
x
Do not scratch the hob with sharp objects. Do not
use the hob a s a wo rk sur face .
x
The manufacturer declines all liability for injury to
persons or damage to property caused by incorrect
or improper use of the appliance.
x
The various components of the appliance are
recyclable. Dispose of them in accordance with the
regulations in force in your country. If the appliance
is to be scrapped, cut off the power cord.
32
32

N C
M Y
USING THE GLASS-CERAMIC HOB
Radiant plates
All the radiant plates are equipped with automatic
thermostat; the front lh radiant plate has an adjustable
thermostat.
Automatic radiant plates
The knobs do not have fixed positions.
To switch on the radiant plates, turn the knob to position
12. Once the required temperature has been reached,
turn the knob to the required setting for cooking.
Observe the recommendations in the table.
Automatic start radiant plate
This function is on the front lh radiant plate. The
automatic thermostat on this radiant plate is activated
when the knob is se t anywhe re b etwee n 1 and 7. To
avoid the risk of fat fires at higher temperatures the
thermostat function is not active on between positions 8
and 12. The thermostat automatically switches from high
starting temperature to lower holding temperatures as
cooking proceeds so there is no need to turn the knob
from t he starting position to a lower heat position. If you
wish t o use t his functio n, positio n the knob between 1
and 7 and pull it gently outwards. If the knob is
inadvertently pulled outwards or if you have set the
function and want to cancel it, reset the knob to 0. If you
select the wrong setting, just correct it by repositioning
the knob on the required setting. Starting temperature
will be automatically adapted to the new setting.
Double radiant plates
By switching on the second element, the surface area of
the rear and front left radiant plates can be extended.
For this purpose, turn the control knob fully to the right
(position
X
x
).
Normal radiant plate knob
Now return the knob to the require d posit ion. This
knob functions in the same way as described in t he
previous heading “Automatic start radiant plate”
Heat setting table
Setting
Function
X
x
Switching on the second element
(Double radiant plate only)
12
Boiling large quantities of water;
pasta.
11-12 Chips; meat dishes such as stew.
10-11
Croquets; fillet of steak, steaks,
breaded meat.
9-10
Meat: scallops, cutlets etc., omelettes,
meatballs, roasts
8-9
Tender meat, sausages, liver, eggs,
fritters
5-7
Large portions, single course meals,
soups.
4-6 Boiled potato es, minestr one.
3-5 Boiled vegetables, stew.
3-5 Rice pudding
2-4
Rice and milk based foods, small
quantities of potatoes and
vegetables; warming pre-cooked
food.
1-2
Omelettes, scrambled egg, sauces,
hollandaise sauce; for warming ,
melting butter, chocolate and
gelatine.
0 Residual heat only, radiant plate is off.
Double radiant plate knob
33
33

N C
M Y
USING THE GLASS-CERAMIC HOB
RESIDUAL HEAT INDICATOR
The indicator remains active as long as radiant plate
temperature exceeds 60
o
C (also after the radiant plate
has been switched off or after power has been
restored following a mains failure). Do not touch the
radiant plate when the residual heat indicator is
illuminated.
POWER SAVING TIPS
To save power, make use of the residual heat. 5 or 10
minutes before you finish cooking, set the control knob
to “0”.
USING THE IDEAL PANS
x
Use special pans for electric hobs with smooth, flat
and solid bottoms (pans with the test mark for
glass-ceramic hobs are available from specialist
shops).
x
The diameter of the pan should b e the same as the
radiant plate or slightly larger.
x
Do not use pans with damaged or rough bottoms
(cast iron pans). The hob surface could be scratched
or the decoration may be damaged. Do not slide
pots across the hob.
x
To save electricity, use lids whenever possible.
x
Pots with aluminium bottoms may leave silver
streaks or spots on the hob.
x
Pots and pans should be dry. Place pans on the
cooking areas marked on the hob.
x
Donotleavewetordamplidsonthehob.
x
The glass-ceramic surface and pans must be clean.
Carefully eliminate any food remains (especially
containing sugar), dirt etc. with the aid of a
cleansing agent.
x
Never cook the food directly on the glass ceramic
cooktop, but in special pans or containers.
34
34

N C
M Y
USING THE OVEN
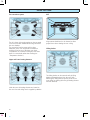
CHILD LOCK
The cookers are equipped with a “Child lock” safety
device.
Child lock
B
R
L
C
1
2
ACTIVATION AND USE OF THE
CHILD LOCK
x
ACTIVATION: Open the oven door and with a
coin slacken screw B.
LeverCmovestotheLafterscrewBis
tightened in position 1.
x
USE: The door closes normally and is blocked by
the device.
To open it move lever C to the R.
x
DEACTIVATION: With the door open move
lever C to the R and block it in this position by
screwing screw B in position 2.
35
35

N C
M Y
USING THE OVEN
Fan convection system
The air is drawn in through openings on the rear panel
of the oven and then heated before being r eturned to
the oven chamber.
The convection function assures uniform heat
distribution in the oven and permits simultaneous
cooking of food on any of the three oven levels.
Temperatures for convection cooking are lower than
those for conventional radiant heat cooking (see
“Temperature selection”).
Upper and lower heating e lements
Inside the oven the heating elements are located on
the oven floor and ceiling. Heat is supplied by radiation.
Grill
Hinge system that allows it to be lowered to allow
proper access when cleaning the oven ceiling.
Sliding shelves
The sliding shelves can be removed easily by lifting
slightly and detaching t hem from t he oven walls.
Removing the sliding shelves improves access to the
oven ceiling for cleaning (after the grill heating element
has been lowered).
36
36

N C
M Y
USING THE OVEN
Side sliding shelves
They facilitate the insertion and removal shelves during
cooking. These shelves support all accessories and the
dishwarmer safe. T he shelves b lock when pulle d to t he
maximum position.
Fat filter
The fat filter protects the fan from dirt that tends to
accumulate during oven and grill cooking.
Use the fat filt er only whe n strictly necessary, i.e. when
roasting and grilling – do not use it when baking cakes,
etc.
37
37

N C
M Y
USING THE OVEN
Switching on and off
To switch on the oven turn the cooking mode selector
and the temperature selector to the required
positions.
The cooking mode selector
can be turned i n either
direction.
The temperature selector knob
must be turned to
the right to switch the oven on and to the left, position
, t o switch it off.
Preheating
Preheating is unne cessary whe n prep aring roasts,
casseroles, and slow-cooking dishes in general. Oven
preheating is recommended, however, for delicate
cooking and dishes that require shorter cooking times
(pastries, etc.). Consult the cooking time tables at the
back of the handbook.
Selecting the temperature for convection cooking
Fan convection cooking temperatures are generally
between 20
o
Cand40
o
C lower than natural convection
temperatures (heat exclusively supplied from above and
below).
Summary table
Cooking functions and temperatures
The following t able shows cooking mo des a nd
temperatures for oven and grill cooking.
Control knob
Temperature Cooking
o
C function
Off 0
Oven light
Lower and upper
heating elements
-Max
Normal grill -200
Turbo grill -200
Fan convection
cooking with upper
-250
heating element
Lower heating element -150
Fan convection cooking
with lower heating
-250
element
Fan convection cooking -250
Energy saving tips
You can utilise residual heat b y setting the control knob
to “0” for approximately 5 or 10 minutes to finish
nearly all types of cooking.
You can also cook side dishes, such as potatoes, rice or
vegetables, t ogether with the meat course.
38
38

N C
M Y
USING THE OVEN
OVEN LAMP
To switch on the oven lamp turn the cooking function
selector knob
to (theknobcanturnineither
direction).
STATIC FUNCTION
Conventional cooking with heating from top and
bottom. In this position the lo wer and upper heating
elements are switched on.
Heating takes place through natural convection and
thermostat temperature can be set between 50
o
Cand
Max. This type of cooking requires oven preheating.
Tip:
This function is particularly suitable for desserts that
must be heated from below, such as fruit pies, b read,
pizzas and roasts, e.g. chicken.
NORMAL GRILL FUNCTION
In this position the infrared heating element is working.
Heat is supplied by radiation. The thermostat must be
settomax.200
o
C. Use with the oven door closed.
Tip:
This function is particularly useful for gratins or
browning, for example onion soup, toast and sausages.
Do not use the grill for more than 30 minutes.
Caution: The oven door becomes very hot during
operation. Keep children well out of reach.
TURBO GRILL FUNCTION
In this position the upper heating element and the grill
element are on simultaneously so that the corner areas
are also heated. Heat is radiated over the entire surface
area of the grill. Set the thermostat to max 200
o
C. Use
with the door closed.
Caution: The oven door becomes very hot during
operation. Keep children well out of reach.
Do not use the turbo grill for more than 30
minutes.
GRILL + FAN FUNCTION
In this position the upper heating element
operates together with the perimeter resistance
and the fan. Heat distribution is by means of air
circulation and temperatures are higher towards
the top of the oven.
The thermostat can be used to set temperatures
between 50
o
and 250
o
C.
Tip:
This mode is particularly suitable for dishes that call for
long cooking at high temperatures. This fan convection
cooking is also recommended for keeping oven-cooked
food such as roasts and grilled dishes warm, or for
delicate reheating of pre-cooked dishes.
BOTTOM HEATING FUNCTION
In this position only the lower element is switched on.
Heat is distributed by natural convection. The
thermostat can be set between 50 and 150
o
C; higher
temperatures are not available.
39
39

N C
M Y
USING THE OVEN
FAN + BOTTOM HEATING
FUNCTION
This mode combines the lower heating element, the
perimeter heating element and the fan. The food is
cooked by forced air circulation with additional heat
from the bottom of the oven. The thermostat can be
set between 50
o
and 250
o
C.
Tip:
This cooking mode is ideal for large joints of meat and
large quantities of food that call for uniform cooking
insideandout,e.g.roasts,turkey,chicken,cakes,etc.
FAN FUNCTION
In this position the perimeter resistance and the fan are
on. Heat is distributed by air circulation. Thermostat
temperature can be adjusted between 50
o
and 250
o
C.
Preheating is not required.
Tip:
This function is particularly useful when using more
than one oven level to prepare cakes, pastry, etc. or
roasts such as beef, pork or lamb.
SUGGESTIONS FOR SPECIAL DISHES
Preserves
To preserve food in hermetic containers:
a. Set the cooking mode selector to
.
b. Set the temperature to 185
o
C and preheat the oven.
c. Fill the drip tray with very hot water.
d. Place the hermetic containers on the drip tray at a
suitable distance from each other. Wet the container
lids and then close the oven door and decrease the
temperature setting to 135
o
C.
If small air bubbles st art to form in the containers, the
preserving process has started. At the end of the
process switch off the oven and allow the co ntainers to
cool before removing.
Fan cooking and browning
The
functions are used for perfect spit
skewer type cooking without using a spit, because the
forced air circulation ensures even cooking o n all sides.
Preheat the oven, setting the thermostat on 250
o
C. Put
in the meat or other food to be grilled, close the oven
door and set the temperature between 50
o
and 200
o
C.
Just before cooking is complete, spread butter on the
food so that a thin crust forms, similar to a u gratin
preparation.
Roasts
For traditional roasts allow the meat to cook evenly.
Make sure the temperature is between 180
o
and
200
o
C and set cooking time in relation to the quantity
andtypeofmeatyouarepreparing.
Simultaneous cooking of different food
Set the mode selector knob to
to cook different
kinds of food at the same time. For example, you can
grill fish or meat at the top of the oven while baking a
cake at the bottom, without any risk of contamination
of flavour o r aroma.
For this type of cooking observe the following basic
rules:
- Cooking temperature for each food type must be
roughly the same (d iffe rence within 2 0
o
-25
o
C).
- Cooking times may differ. This oven function allows
considerable energy savings.
40
40

N C
M Y
USING THE OVEN
Sterilisation
Do not use normal commercially available hermetic jars
when sterilising in the oven. Bottles, enamelled metal
containers and other hermetic containers must be first
sterilised in a steriliser. Meat, sausages and fruit or
vegetable conserves such as stewed apple or tomato
puree must be sterilised in a steriliser.
Proceed as follows:
x
Carefully prep are the hermetic containers and
rubber seals.
x
Thecontainersmustbeallthesamesizeandthey
must be filled to the same height. Do not use
excessively tall containers because the lid may not
hold.
x
Fruit preserves can be filled to 2 cm from the top of
the container. Vegetable preserves should be filled
no higher than 5 cm f rom t he top .
x
Moisten the rubber seals and place them on the
containers.
x
Place the lids on and then tighten them forcefully.
x
Set the cooking mode selector knob to and set
a temperature of 170-180
o
C. Preheat the oven.
x
Put the drip tray on the lowest guides in the oven.
x
Place the containers, suit ably sp aced, o n the drip
tray.
x
Pour 1 litre of water into the drip tray.
x
Lower the temperature setting to 150-160
o
C.
x
After between 50 and 70 minutes, air bubbles will
begin to rise insid e the co ntainers. I f you are
preparing fruit preserves, you can now switch off
the oven. If you are preparing vegetable preserves,
lower the temperature to 125-150
o
Cforan
additional 60 or 90 minutes.
x
Sterilisation times:
Strawberries, raspberries, etc.
10-15 minutes residual heat
Peaches, apricots, plums, etc.
10-20 minutes residual heat
Apples, pears
30 minutes residual heat
Vegetables
30 minutes residual heat
x
Remove the lid after 24 hours.
41
41

N C
M Y
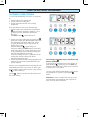
USING THE ELECTRONIC PROGRAMMER
The electronic programmer automatically switches the
front left radiant plate and/or the oven on or off.
Keys:
Timer
Cooking time
Endofcookingtime(hour)
Manual mode, quit cur rent programme
+
Increase current value
−
Decrease current value; set tone of audible
warning.
Description of the lighted symbols:
AUTO – flashing – Programmer in a utomatic mode
butnotyetprogrammed(theovencannotbeswitched
on)
AUTO – steady light – Programmer in automatic
position with programme entered.
Programmer in manual mode or programmer –
controlled cooking is in progress
Timer is on
and AUTO -flashing with audible warning -
Programmer error (cooking time g reater than the
cooking end time).
Note: you can set the programme with just one hand
by selecting the required functi ons key and then
releasing it, and then setting the required time with the
+
and
–
keys within a maximum of 5 seconds of
releasing the function key.
In the case of power failures, the programmer will be
reset.
(10.1)
(10.2)
ELECTRONIC CLOCK
(fig. 10.2)
The programmer is equipped with an electronic clock
with lighted numbers which ind icates hour s and
minutes.
Upon immediate connection of the oven or after a
power cut, three zeros will flash on the programmer
panel.
To set the hour it is necessary to push the
button
and then the
+
or
–
button until you have set the
exact hour (fig. 10.2).
Another way is to push the two
buttons
simultaneously and at the same time push the
+
or
–
button.
Note: The hour setting delete any programme.
42
42

N C
M Y
USING THE ELECTRONIC PROGRAMMER
NORMAL COOKING WITHOUT THE
USE OF THE PROGRAMMER
To use the oven manually, that is, without the aid of
the programmer, it is necessary to cancel the flashing
AUTO by pushing the button
(AUTO will be
switched off and the symbol
will light up –
Fig. 10.3).
Attention: If the AUTO is lighted up steadily (which
means a cooking programme has already been
entered), push the button
to cancel the programme
and switch to manual.
If the oven is switched on, switch it off manually.
ELECTRONIC TIMER
(fig. 10.4)
The timer programme consists only of a buzzer which
may be set for a maximum period of 23 hours and 59
minutes.
If the AUTO is flashing push the
button.
To set the time, push the
button and the
+
or
–
until you obtain the desired time in the panel (fig. 10.4).
Having finished the setting, the clock hour will appear
on the panel and the
lights up.
The symbol will light up. The countdown will start
immediately and may be seen at any moment on the
panel by simply pressing the button
.
At the end of the time, the
symbol will switch off
and an intermittent buzzer will sound; this can be
stopped by pressing any of the buttons.
(0.3)
(0.4)
SETTING THE FREQUENCY OF THE
AUDIBLE SIGNAL
Choose from 3 different sounds by pressing the
–
button.
43
43

N C
M Y
USING THE ELECTRONIC PROGRAMMER
SEMI – AUTOMATIC COOKING
This is used to switch the oven off automatically after
the desired cooking time has elapsed. There are two
ways of obtaining semi-automatic cooking:
1. Set the length o f the c ooking time by pushing t he
button and the
+
button to advance, or
–
to
go backwards if you have passed the desired time
(Fig. 10.5).
or
2. Set the end o f the cooking time by pushing the
button and the
+
button to advance, or
–
to go
backwards if you have passed the desired time
(Fig. 10.6).
AUTO and the
symbol will be on.
Then set the temperature and the cooking
programme using the oven switch and thermostat
knobs (see specific chapters). The oven is switched
on and it will switch off automatically at the end of
the desired time. During cooking, the
symbol
remains on and by pressing the button
you can
see the time that remains till the end of cooking.
The cooking programme can be cancelled at
any time by pushing the
button.
At the end of cooking, the oven and the
symbol
will turn off, the AUTO will flash and a buzzer will
sound; it can be stopped by pushing any o f the
buttons.
Turn the switch and thermostat knobs to zero and
put the programmer to “manual” by pressing the
button.
(0.5)
(0.6)
44
44

N C
M Y
USING THE ELECTRONIC PROGRAMMER
AUTOMATIC OVEN COOKING
To cook food automatically in the oven, it is necessary
to:
1. Set the length of the cooking time
2. Settheendofthecookingtime
3. Set the te mperatur e and the oven cooking
programme.
These operations are done in the following way:
1. Set the leng th of the cooking time by pushing the
button and the
+
button to advance, or
–
to
go back if you have passed the desired time
(fig. 10.7).
The AUTO and the
symbol will be on.
2. Settheendofthecookingtimebypressingthe
button (the cooking time already added to the clock
time will appear), and the
+
button (fig. 10.8); if
you pass t he desired time you may go back by
pushing the
–
button.
After this setting, the
symbol will go off.
If after this setting, the AUTO flashe s on t he pa nel
and a buzzer gives off, it means there was an error
in t he prog ramming, that is that the cooking cycle
has been superimposed on the clock.
In this case, modify the end of cooking time or the
cooking time itself by following the above-
mentioned instruct ions again.
3. Set the temperature and the cooking programme by
using the oven switch and thermostat knobs (see
specific chapters).
Now the oven is pro grammed and everything will work
automatically, that is the oven will turn on at the r ight
time to end the cooking at the hour set. Dur ing co oking ,
the
symbol remains on.
Push the
button to see t he time t hat remains unt il
the end of cooking.
The cooking programme may be cancelled at any
time by pushing
.
At the end of the cooking time the oven will turn off
automatically, the
symbol will turn off, AUTO will
flash and a buzzer will sound, which can be turned off
by pushing any of the buttons.
Turn the switch and thermostat knobs to zero and put
the programmer to “manual” by pressing the
button.
Attention: A power cut makes the clock go to zero
and cancels the set programmes. After a power cut,
three zeros will flash on the panel.
(0.7)
(0.8)
45
45

N C
M Y
CLEANING AND MAINTENANCE
CLEANING THE GLASS-CERAMIC HOB
x
Clean the glass-ceramic hob only when it is
completely cold. Individual cooking areas must be
clean before they are used. Clean with a cloth or
sponge.
x
Use a scraper to remove stubborn stains (observe
the attached instructions).
x
Do not use scouring powder. Use only specific
commercially available cleaning agents for glass-
ceramic hobs.
x
If the hob is damaged or broken, switch off the
electricity and consult the Technical After-Sales
Service.
CLEANING THE OVEN AND THE
ACCESSORY
x
Following each oven cooking session, allow t he
oven to cool and the n clean it. This precaut ion
eliminates the risk of burning food residues the next
time the o ven is used.
x
Do not use scouring powder. To remove
accumulated dirt, use a specific commercially
available cleaning agent and follow the
manufacturer’s instructions.
x
Clean outer sur faces o f the ap pliance with a d amp
cloth and hot water. Do not use scouring powder or
abrasive cleaners und er any cir cumstances.
x
Clean the oven door window and t he light cover
with a cleaning agent.
x
Theaccessoriescanbewashedbyhandorina
dishwasher, using a spe cific de terg ent f or ove ns.
x
After prolo nged use of the oven, i t may be
necessary to dr y the wat er t hat tends to condense
inside the door and around the gasket [seal].
Do not use steam jet cleaners because the
humidity could infiltrate into the appliance
making it dangerous.
Before any cleaning ano maintenance operation
make sure that the appliance is switched off.
GRILL HEATING ELEMENT
x
The heating element is self-cleaning and does not
require maintenance.
FAT FILTER
x
After each use, clean the filter in warm water and
washing-up liquid. Alternatively, wash the filter in
the dishwasher.
INNER GLASS OF OVEN DOOR
x
To clean the oven door thoroughly, remove the
inner pane by unscrewing the fixing screws.
CHANGING THE OVEN LIGHT
1. Disconnect the electrical power supply (for example,
by switching off the main power switch).
2. Unscrew t he light cover
3. Fit a new bulb.
4. Refit the cove r.
Note:
Use only bulbs designed to resist up to 300
o
Cwiththe
following characteristics: 15 W, 230 V, type E-14.
Spare bulbs can be ordered from Customer Service.
46
46

N C
M Y
CLEANING AND MAINTENANCE
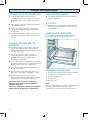
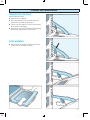
DISMANTLING THE DOOR
Please operate as follows:
x
Open the door completely.
x
The swivel retainers o f the rh and lh hinges are
jooked onto the metal bar above them.
x
Lift the oven door slightly. The noch on the bottom
of the hinge will disengage.
x
Now pull the oven door fonwards off the appliance.
Release both hinge sections from the slots.
DOOR ASSEMBLY
x
Grip the door (as indicated in figure) and refit it in
reverse order of removing procedure.
47
47

N C
M Y
TROUBLE-SHOOTING GUIDE
1. Hotplate not working
Check:
x
that the corresponding knob is on the required
temperature setting.
x
that the appliance is receiving electrical power.
2. Oven not working
Check:
x
that the function selector knob is on the required
position
x
that the temperature knob is on the required
position.
x
that the appliance is receiving electrical power.
3. Oven light not working
Check:
x
that the appliance is receiving electrical power.
x
that the light is not burnt out (if it is, f it a new light).
AFTER-SALES SERVICE
Before you contact the After-Sales Service:
x
Establish whether you can solve the problem
without requesting help (see “ Troubleshooting”).
x
Re-connect the app liance to the mains to see if the
problem has been solved.
x
If the p roblem persists, call in the After-Sales Service.
Please supply the following informatio n when you
call After-Sales Service:
x
brief description of the problem
x
exact numberofyourappliance
x
full address
x
phone number and code
x
preferred calling times.
When you open the oven door the service number is at
the bottom on the left.
48
48
Page is loading ...
Page is loading ...
Page is loading ...
Page is loading ...
Page is loading ...
Page is loading ...
-
 1
1
-
 2
2
-
 3
3
-
 4
4
-
 5
5
-
 6
6
-
 7
7
-
 8
8
-
 9
9
-
 10
10
-
 11
11
-
 12
12
-
 13
13
-
 14
14
-
 15
15
-
 16
16
-
 17
17
-
 18
18
-
 19
19
-
 20
20
-
 21
21
-
 22
22
-
 23
23
-
 24
24
-
 25
25
-
 26
26


Ask a question and I''ll find the answer in the document
Finding information in a document is now easier with AI
Related papers
-
Bauknecht CHR 3462 IN User guide
-
-
Bauknecht ELZD 6263 IN Program Chart
-
Bauknecht ELZD 6265/IN Program Chart
-
Bauknecht ELZD 6264/IN Program Chart
-
-
Bauknecht EMZD 5265 BR Program Chart
-
Whirlpool S 4505/1 WS User guide
-
Whirlpool EMEP 3483 WS User guide
